Product Spotlight: Holiday Color Diffusing Shapes
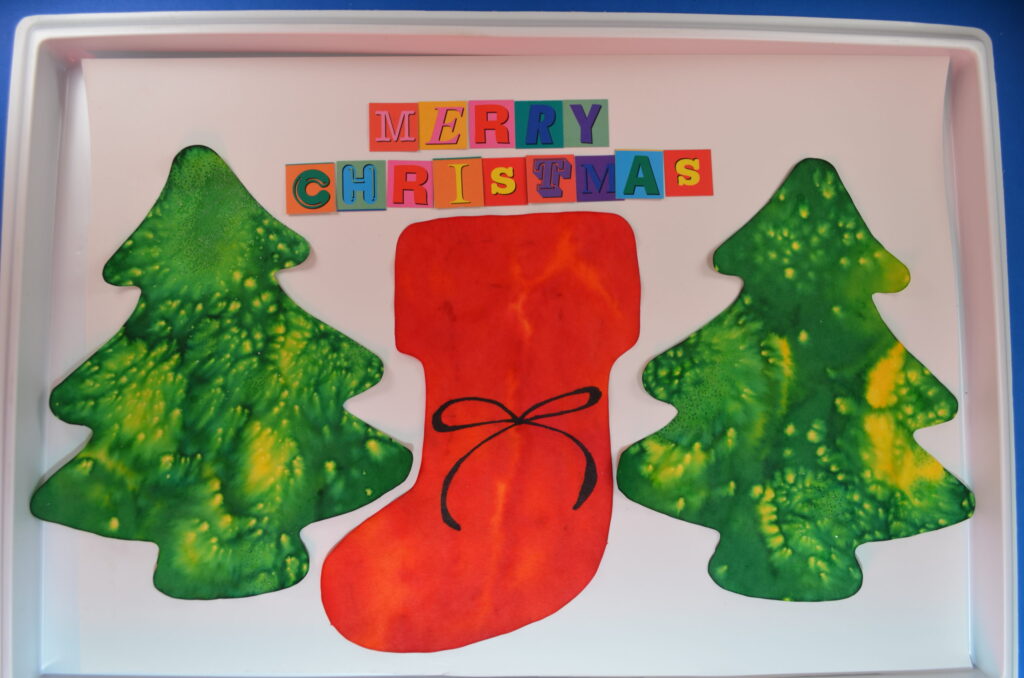
This month, we’re featuring two of our NEW products:

These color diffusing shapes help us get in the holiday spirit while simultaneously developing a deeper understanding of color. There are 3 easy ways to transform these shapes from A to B:

A. Plain Color Diffusing shapes–functional but still waiting for the magic to happen
B. Color Diffusing magic transformed the shapes into these beautiful works of art!

Method 1: Washable Marker & Water

This is the easiest method and the mess-free method. Simply use any washable marker to color the shape, and don’t worry about filling in all the white spaces! When you’re done, spray water on the shape and watch the colors diffuse and create secondary or even tertiary colors.

If you need a spray bottle for the water, we recommend Junior Paint Spritzers–they are perfect for small hands.

Method 2: Watercolor

Break out your trusty watercolor set and go to town! Because of the water used with the watercolor paint, the colors will diffuse throughout the paper as you paint. You can always add some extra water at the end and watch the colors diffuse even more. This is especially helpful if you’d like to make light or pastel designs.

Method 3: Liquid Watercolor & Water

This method creates the most impressive designs, IMHO. You can find liquid watercolors online or at your local craft store. Be careful because these paints can be POTENT! It takes quite a few washes to remove the paint from hands, but that is also what makes the designs so beautiful on Color Diffusing paper.

Simply use a spray bottle with the liquid watercolor to add splashes of color to your Color Diffusing shapes. Once you’re happy, spray the shapes with water and watch the colors blend!

If you need a spray bottle for the color or water, we recommend Junior Paint Spritzers–they are perfect for small hands.

Pro tip: Stick to primary colors! It’s easy to get carried away with color, but once they start diffusing, they have a tendency to blend into one, amorphous brown color if you get too complicated!


Try all 3 and let us know your favorite method!

If you like this, you’ll like Blots of Ornaments too! These ornaments have the added benefits of being cut out of extra thick, high-quality color diffusing paper so that they can be used as real ornaments on a tree or windowsill!

The “Helping Hands” Good Deeds Display

Image of Roylco Color Diffusing Hands artwork display on school hallway

Image of Roylco Color Diffusing Hands artwork display on school hallway

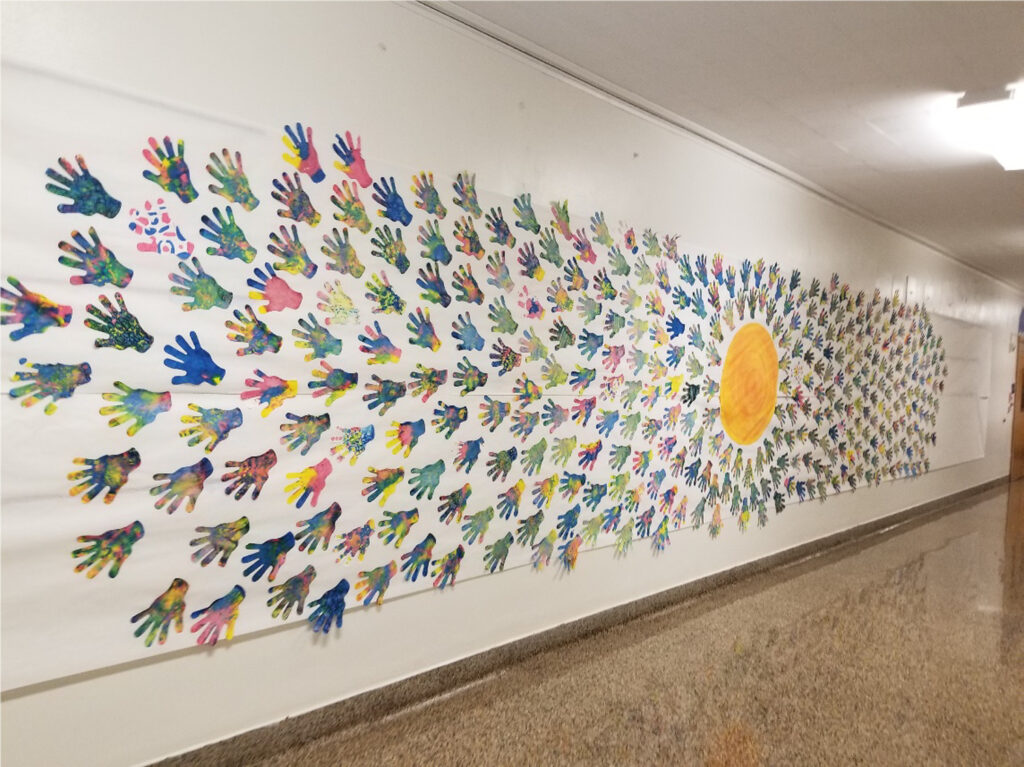
Special Post Contribution: By Amy Klossner

Here are the photos of the project our school completed using Color Diffusing Hands.  They were just perfect.  We read the book Ordinary Mary’s Extraordinary Deed, before painting the hands with liquid watercolors.  It’s a story about a little girl who does one good deed and that person does 5 good deeds then those people do five more good deeds each and so on. Like I said, the hands were perfect for displaying to the students how one good deed (represented by the hand) grows into five more, (represented by the fingers) which grows into 5 more, etc. The “helping hands” displayed that kindness is contagious.

As a spin off, students can write good deeds they are preforming in our school and community on each one of the hands, heart shapes or other inspirational design.


Close up boy decorating color diffusing hand


Close-up of a decorated hand


Children decorating Color Diffusing Hands with liquid water color

How to Decorate Color Diffusing Hands:

Liquid Water Color:  To get the most beautiful color blends, I recommend using liquid watercolor paint in a mister bottle. Spray the colors you like onto the Color Diffusing Hand.  Then use another mister bottle to spray clean water over your colors. Set aside to dry. Be careful where you put them, they can make a mess. To speed up the drying time, I like to hang them up for good air circulation. They should be dry enough to use in about 30 mins.


Washable Markers:  Color the Color Diffusing Hands with washable markers. Do not cover the whole area. Make sure to leave white space. Use a mister bottle to spray clean water over your colors. This will allow the colors to “mingle” and spread.


Image of sketch drawing of Kid 1

Let’s Make a Mother’s Day Bouquet!

Roylco Mothers Day Bouquet 

Age: 6+

Duration: 1 hour, plus drying time.

Learning Outcomes:

We’re learning how to complete a project made of several different components, and how each of those unique parts is needed to create the final craft.

Here’s what you need:

Color Diffusing Paper 9”x12” (R15213)

Fancy Stringing Rings (R2183)

Botanical Cuts (R15333)

Chenille Stems

Straws

Glue

Water

Paints (liquid watercolors & acrylics recommended)

Fine Mist Spray Bottles

Brush (foam or bristle)

Cotton Balls

Small Rock (optional)

Mother’s Day is just around the corner, so now is a good time to get crafty. We’re going to make a bouquet of flowers to show Mom that we appreciate all that she does for us everyday. A garden bouquet looks best when you mix a few different things together, so we’ll do that one step at a time, following the instructions below.


Roylco Mothers Day Bouquet Craft Parts Display

   Roylco Sketch Art of Flower

Here’s how you do it:

Step 1:

Prepare your work surface. If you don’t want to mess up your table, cover with some newsprint or butcher paper.


Step 2:

To begin, we need to paint our 9”x12” Color Diffusing Paper (R15213). This is what we’ll use to cut our flower shapes from. You’ll need 2–4 sheets. To get the most beautiful color blends, I recommend using liquid watercolor paint in a mister bottle. Spray the colors you like onto the sheet of diffusion paper. Then use another mister bottle to spray clean water over your colors.


Set aside to dry. Be careful where you put them, they can make a mess. To speed up the drying time, I like to hang them up for good air circulation. They should be dry enough to use in about 30 mins.


Step 3:

Okay, let’s find a cardboard tube. A toilet paper roll works great. Yeah, that’s right — we use those things! If you don’t have one handy (might want to take care of that), try a paper towel roll. For our bouquet, it will need to be about 3.75” long.


Now, we want to paint the tube. What’s your Mom’s favorite color?


Sounds like a good color to me. Go ahead and paint the tube. Acrylic paint is probably going to work best and dry fastest. Set the tube aside to dry.

 Roylco Mothers Day Bouquet Painting Tube


Consider this:

I thought it would be cool to paint the inside of the tube. I used a different color than the outside. You can use the same color, or not paint the inside. It’s up to you.


You’ll only need to paint one side. The bottom of the tube will be covered.


Step 4:

We’re going to need 3 straws to make our flower stems. I cut mine to lengths of 6.5”, 7” and 8”.


Paint the straws. The bottoms of our stems will not be visible from inside the tube, so you can hold one side and paint the other.


I painted mine green, but if you like red or purple flower stems, go for it. Set the straws aside to dry.

 Roylco Mother's Day Bouquet Painting Straws

Step 5:

I’m using some really neat Botanical Cuts (R15333) to add some garden flair to my bouquet. There are plenty of patterns to choose from in the pack. I chose 3 of them. If you’d like to add these in, now is a good time to decide on your patterns.


Step 6:

Now, let’s go back to our color diffusing paper. What we want to do is cut 4” round flower shapes from our beautifully painted paper. I like to look for the best patterns within the color and use them for outlining my flower shapes.

We’ll need to cut 4 shapes.

I’ve included a PDF template in case you would like to use it. Otherwise, create any flower shape you can imagine. Just remember, it will need to be about 4” round to work with all our other bouquet components.

 Mothers Day Bouquet-Flower Petal Template


Step 7:

We’re going to use one of our flower shapes for covering the bottom of the tube. Add some glue to one side in each of the petals. Then, place the tube in the center of the flower shape and fold the petals up. They should attach to the sides of the tube, closing up the bottom. I added 3 cotton balls to the bottom of my tube to keep the straws from poking through the bottom.


Step 8:

Speaking of the straws, let’s go ahead and add those in. Just add some glue to one side and place them in the tube. Press the straw against the tube to help the glue hold. Attach all 3 straws in this way.


Step 9:

Let’s make our 3 flowers next. Using a sharpened pencil, poke a hole through the center of your flower petals. Don’t make the hole too big. The pencil point should be enough.


Next, we need to use our 3 chenille stems. I cut mine to the same length — about 6”. On one side of the chenille stem, starting about an inch from the end, bend a right angle. Then make a “U” shape in the center of that bend (see the image).

Put one of the flower shapes onto a stem, moving it down to the bottom of the “U” shape.


To give my bouquet a jewel-like quality, I added a Fancy Stringing Ring (R2183) in front of the flower. Place it into the “U” shape as well, and then curl the end of the chenille stem around the ring to hold it in place.


Finish all 3 flowers.


Consider this:

These little flowers are so simple and beautiful, they kind of work on their own. If you want to do a quick craft, try just making the flowers, with the beads and the chenille stems. Tie them together with some ribbon, or a Fabric Strip (15655), and you’ll have a simple and sweet bouquet for Mom.


Step 10:

If you decided to go with the botanical cuts, this is where you’ll attach them. Use your creativity here. I chose 3 patterns and attached them with glue to the outside of the tube, from the bottom up. Pay attention to where your flower stems are. I think it’s neat to curl them botanical cuts around the straws a little.


Step 11:

Simply place the chenille flower stems inside each straw. Push them all the way down to the bend.


That’s it. You did it!

Your garden bouquet is ready to make your Mother’s day complete!

Consider this:

If your bouquet is a little wobbly, drop a rock in it. You may even want to fill the tube with colorful beads or small stones.

 Roylco Sketch Art of Kid 1

Celebrate The Lantern Festival with Stained Glass Lanterns

Create luminous lanterns to string up in your classroom or send home as great gifts! The 3D lanterns are cleverly designed to make assembly easy for little hands. Lanterns are a wonderful example of a cultural and historical artifact that you can discuss
in your next social studies class.

Our stained glass lanterns look a lot like the Andon and Crystal Magic lanterns used in Japan and China, respectively. Your students can be creative and can color in the lanterns any way they like. Adding stained glass to a lantern is a recent trend of turning a practical or useful lamp into a pretty and decorative piece of art.

Age: 4+

Duration: 10 -13 minutes

Learning Outcomes: • Develop fine motor skills • Explore creativity
• Discover lantern and stained glass history   • Use basic design techniques to develop ideas • Learn about Chinese and Japanese lanterns • Combine social studies with arts and crafts  • Use multiple media to create a multi-use craft

You’ll Need:

  1. Each of the lanterns features 4 sky-themed designs. Each design is made to look like a stained glass window. The illustrations include a sun, moon, butterfly and bee. Cut out sections of colored tissue paper or R15275 Stained Glass Paper to glue under the designs.
  2. You can use different colors for parts of one illustration. For instance, paste white tissue paper pieces over the bee’s wings. Alternate and paste yellow and black tissue paper pieces across the separate sections of the bee’s body.
  3. Fold in the lantern along the pre-scored creases to make the lantern three dimensional.
  4. You’ll notice that its side edges are slightly smaller than the rest of the tab. These side tabs will help hook the tab in place when you insert it into the slot. Gently open the slot to loosen it up. Insert the tab into the slot by edging in first one side of the tab then the other.
  5. Finally, fold in all four tabs on the sides of the triangular roof flaps.
  6. Pass a length of fishing line, yarn or string through the holes of all four
    roof tabs and tie a knot at the top to secure.

Now you can hang your lantern along a length of string with other lanterns in sequence or you can hang the lantern directly from the ceiling.

Celebrate Chinese New Year or the start of spring by stringing up the lanterns. You can also send the beautiful lanterns home as Mother’s Day gifts or for any other special event.

Please visit https://roylco.com/shop/r52093-stained-glass-lantern/ for more information.

Bundle Savings

Get all the Roylco items used
in this project and save 15%!

$16.64 USD
bundled price
Add Bundle
to Cart

Flashback Friday: Color Diffusing Crafts!

Feature-Image-colordiffpapercollage

We have had tons of requests for crafts using our lovely Color Diffusing Paper products! Check out an amazing selection of our fabric-like paper in a variety of different projects. The Color Diffusing Paper is perfect for exploring concepts like diffusion and color mixing! We have assembled 7 of our favorite blog posts and linked them here for you!

Color Diffusing Animal Shapes

Color Diffusing Paper Fan with Straws and Connectors

Color Diffusing Paper Jellyfish

Color Diffusing Paper Snowflakes

Color Diffusing 3D Wall Art

Lace Circles Bunting Garland

Wax-Resist Color Diffusing Art

We have also added a whole new craft: Solar Painting!

Solar painting is a wonderful, no-fail activity. All you need is water, color diffusing paper, water color paint and a bright, sunny day. We have tried this activity in both the summer and the winter and they work equally well as long as the winter day is dry.

Age: 4+

Duration: 10 minutes (plus drying time)

Learning Outcomes: Explore scientific concepts including evaporation and osmosis. Introduce students to the scientific process. Create beautiful take-home art.

You’ll Need:

Line-19

Coat a sheet of paper with water and drain off the excess. Place the wet paper into a tray
or on a cookie sheet. Next, drip liquid watercolor paint over top of the wet surface. I like to use primary colors, but experiment with color pallets. Place different objects on top of
the wet paint. Beads, buttons, small shells, acorns, or anything small and non-porous work well. Set the tray complete with the wet, painted sheet of paper with objects on top outside in the direct sunlight to dry. Note: To avoid spills, do the whole project outside.

The results are unexpected and beautiful and it’s a great way to celebrate a sunny day. There are three other important aspects to Sun Painting: First, it’s relatively cheap; you can create variations on this theme and really stretch your art budget by changing up the color palette or using different theme objects like our letter beads to make words, or objects from nature. Second, it’s a great way to introduce science to younger children. There are two important scientific processes going on when you create this art: evaporation and osmosis. Third, the students are creating beautiful, colorful art through a thoughtful design process. In other words, it’s a no-fail art activity because it focuses on process rather than the finished result—even though the finished result is spectacular.

Put the sheet into an art tray. Flood the surface with tap water and pour off any excess water.

step 1.jpg

Use paint pipettes like our R54460 Squiggle Pipettes or R54470 Junior Heart Paint Pipettes to sprinkle small amounts of liquid water color paint over the surface of the wet paper. You need to cover the entire surface with the paint and the pipettes do a great job.

step 2.jpg

Next, lay objects on top of the wet paint and put the whole tray outside in the bright sunlight. We like using our R2131 Bright Buttons and both R2184 Manuscript Letter Beads and R2186 Lower Case Letter Beads to add a literacy component to an art activity.
While you are waiting for the paper to dry in the sunlight, ask your students what they think is going to happen. Most kids will say that the paint will dry on the paper, but stay wet under the objects. They may also say that the paint under the objects will look darker than the paint on the rest of the paper. To be honest, this is exactly what we expected would happen the first time we tried this technique!

step 3.jpg

Instead, the paint on the paper dries, but when you remove the plastic objects, you see a
white “shadow” under them instead of a dark paint color. If it is a particularly hot summer day and the paper dries quickly, you’ll even get shadows around the taller objects like the letter beads. It’s almost photographic!

step 4

Here is what’s happening: The science behind this activity is all about the nature of water. Water wants to distribute itself evenly wherever it is. That’s why water flows across a sheet of paper. It doesn’t want to be higher in one area and lower in another. It wants to remain level, so it travels across a surface until it covers it evenly.

When the sun shines on the paper, the water in the paint starts to evaporate everywhere
except under the plastic/non-porous objects. The wetness under the objects wants to “level” out, so it migrates from under the objects and it pulls the pigment with it. Some younger children think this process is magic, but it’s not: It is science!

step 5.jpg

To take this process to the next level, try limiting yourself to one or two colors, and
experimenting with additives and how you set the piece to dry. For example, try sprinkling table salt, sand, glitter, or other tiny particles over the Color Diffusing Paper. See what the result is. Challenge students to tilt the sheet, so it drains as well as evaporates. This is a no-fail activity, so no matter what students try, they will walk away with a unique piece of art. With that safety net and reward system in place, challenge students to be creative about the materials they choose to experiment with. Display the beautiful results of student’s creative experimentation in the classroom!

Line-18

Like us on FacebookShare this post with your friends, or Subscribe to this blog today to receive original craft project updates every week!

Thanksgiving Pumpkin Pie Craft

finished craft.jpg

This craft perfectly combines early geometry with Thanksgiving cheer!

In order for creativity to flourish, students need a solid understanding of the fundamentals. What underpins the fundamentals is vocabulary. A student has to be able to describe their world and what they see before they can change it and create new things. This activity is a great way to connect the visual aspect of shapes to the vocabulary that students will use for their entire academic careers. Fold a single circle first into 2D then 3D shapes, while getting as detailed as your students are ready for. In the classroom, it might be useful to copy the circle onto an overhead transparency or a sheet of clear Mylar so you can demonstrate for the whole class as you take them through this lesson.

What’s great about this activity is that is can be used for a wide range of ages and developmental levels. Very young students practice their fine motor skills while they fold, and build their vocabularies by identifying the basic shapes they are making. For older and more experienced students, this activity is a great way to practice geometric
vocabulary while learning technical aspects of shapes like faces, vertices and angles. Even better, at every level this is a no-fail activity, so while students are practicing vocabulary, they are succeeding at the basic folds. The small success bolsters confidence, and motivates students to take risks.

Age: 4+

Duration: 15 minutes

Learning Outcomes: Practice and reinforce geometry and vocabulary. Create a cute Thanksgiving craft. Exercise folding skills and following directions.

You’ll Need:

Line-22

The first step for this adorable holiday craft is to decorate your base. Place a color diffusing circle on an art tray or cookie sheet for each student, and have the pipette liquid watercolors onto the circle. Be sure to cover the entire surface! Students can use a pre-mixed orange, or they can experiment with pipetting yellow and red separately. Leave the circles to dry.


Once the circles are dry, it’s time to fold them up! We have created a special video to demonstrate the process:

Use this opportunity to talk to your students about circles. Circles are a regular shape, with a single face. Challenge students to think of where circles are in the world. They might suggest bicycle or car tires, pizzas or the moon and sun. Older students can talk about the mathematical properties of the circle, like the diameter (the distance between two opposite points), radius (the distance from the center to any single point on the curve) and the circumference (the distance around the outside of the circle). Challenge your students to find the area of their circle, using the formula A = r2. A stands for area. Area is the amount of flat space a shape takes up.

This activity is great for a few different reasons. First, it’s easy to do; as a no-fail activity it’s entertaining to students of all ages and it boosts confidence. Second, it’s an easy-to-scale activity. You can fold a circle with four year olds or fourteen year olds, and the conversations can reinforce basic shape names or basic geometry. Some of the shapes we fold are uncommon, so reinforcing them in this activity is important.

Once students have achieved their 3D Icosahedron, tape the bottom so the shape holds. Now you have the base shape for your slice of pumpkin pie!

step 4

To decorate your slice of pie, start by adding a crust! Cut out a triangle of brown construction paper that is approximately 4 1/2″ high (from center base to point) and 5″ wide at the base. Glue the triangle to the base and one edge of your color diffusing icosahedron. Use scissors with wavy blades to trim the base of the triangle so it looks like the crimped edge of a pie crust!


To top off your slice of pie, fluff up a cotton ball and glue it to the top. No pumpkin pie is complete without the whipped cream!

step 7.jpg

Line-17

Like us on FacebookShare this post with your friends, or Subscribe to this blog today to receive original craft project updates every week!


Tube Craft Turkey with Color Diffusing Feathers

Image of Turkey made from Tube Crafts

finished craft.jpg

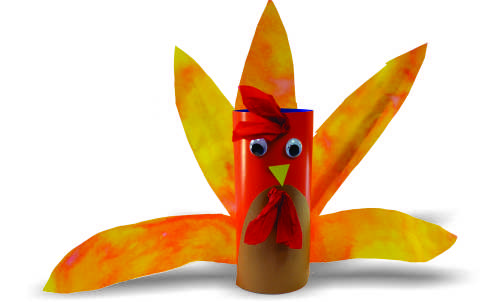
These adorable feathered friends make great centerpieces for any family dinner, and terrific classroom decorations!

Age: 4+

Duration: 15 minutes (plus drying time)

Learning Outcomes:

You’ll Need:

Line-01

We have found that the best way to structure this craft is to start by preparing the color diffusing sheet that will be your turkey’s feathers, and then having students create their turkey’s bodies while the liquid watercolor paint dries. So begin with a sheet of color diffusing paper on a tray and use paint pipettes to cover the whole sheet in liquid watercolor paint.

Set the sheets aside to dry while students create the bodies for their turkeys. Start with one of our card tube crafts flat on the table. Using construction paper, carefully cut out and glue down a belly for your turkey.

Now it’s time to give your turkey a face and some personality! Use a small triangle of yellow construction paper to make the beak. Glue googly eyes above the beak. Next, carefully crumple up a tissue circle to create your turkey’s wattle. Glue it underneath the beak. You can also crumple up a second tissue circle and give your turkey a jaunty set of red forehead feathers!

Once students are happy with the faces of their turkeys, carefully roll them up and insert the tabs into the slots. This will create a tube and allow your turkey to stand on its own!

By now your color diffusing sheets should be dry enough to work with. Carefully cut feather shapes out of the sheet.

Use 5-6 feathers per turkey to give each one a beautiful tail fan of feathers! Carefully glue them to the back of your turkey.

feathers 3.jpg

Line-17

Like us on Facebook, Share this post with your friends, or Subscribe to this blog today to receive original craft project updates every week!

Spotlight on… Squiggle Pipettes

squiggle pipette painting watercolors

We recently revamped our pipette line with a few new designs! One of the new designs is our fabulous Squiggle Pipettes. Learn more below!

squiggle pipette painting watercolors

Squiggle Pipettes feature an interesting squiggle design that helps to distribute paint evenly onto paper. Learn more about this product here! Pipettes are not only a great tool to use for painting, but can be incorporated into fine motor exercises–the motion of squeezing the bulb helps to get kids working out their pincer grip! If you are planning to paint with the pipettes, use watercolor paints.

To use your pipettes, first squeeze the bulb to press out all the air. Dip the nozzle into a container of watercolor and release the bulb to suction the paint into the pipette. Squeeze the bulb again to release the paint over your sheet of paper.

[youtube https://www.youtube.com/watch?v=QmCBhIL4COc]

You can use the Squiggle Pipettes to color your art! Here are some ideas you can try for yourself! Click on the links to be taken to the full tutorials.

 • Make your own giant weaving mat using only Color Diffusing Paper, paint and Squiggle Pipettes! Cut the dried colored paper into strips and weave them in and out of each other to make a beautiful woven mat.

Learn our secret for color-resist painting! We use Squiggle Pipettes to add color to the flag designs.

Color your own clothes! A paper vest, that is. Find more about how to design your own vest at the link.

• Form your art into beautiful images of animals using basic shapes! Squiggle Pipettes are used to make the painted images.

Line-16

Like us on FacebookShare this post with your friends, or Subscribe to this blog today to receive original craft project updates every Monday, Wednesday and Thursday!

Lace Circles Bunting Garland

2015-03-04-FeatureImage

Make a simple, but effective bunting flag banner using R24910 Color Diffusing Lace Circles! PLUS spot our NEW 2015 Junior Heart Paint Pipettes in this craft post!

Age: 3+

Duration: 5 minutes for painting and assembling, half an hour to dry

Learning Objectives: Use fine motor skills to squeeze paint from pipettes onto paper. Learn about the process of diffusion with beautiful Color Diffusing™ technology.

P1016475

You’ll Need:

R24910 Color Diffusing Lace Circles

• R54470 Junior Heart Paint Pipettes

• Watercolor paint

• Paint tray

• String

• Stapler

• Cup of water

Line-12

P1016481

Fill your pipette with watercolor paint and drop the concentrated paint onto various areas of the Color Diffusing Lace Circle. In this image, I have two lace circles overlapping together. Overlapping them works well with the diffusion technology as it ensures an even spread of paint throughout the entire Lace Circle.

P1016486

When you have fully painted your Lace Circles, pipette some water onto the spots of concentrated colors. This will spread the paint further throughout the Lace Circle, mixing the colors together. The process of diffusion occurs as the water pushes aside the molecules of the concentrated colors. The Color Diffusing material actually allows this to happen because the fibers are spaced further apart.

P1016488

Here’s what the diffused color looks like!

P1016490

Leave the Lace Circles to dry overnight.

P1016493

Fold each Lace Circle in half.

P1016496

Cut a length of string that will span the distance for your bunting garland.

P1016498

Thread the string through the folded Lace Circles so that it rests on the inside of the fold. Secure the fold with a staple through the center of the Lace Circle.

P1016503

This is what the bunting garland looks like hung up! Make enough to span the length of your classroom and string up across the room. You can adjust the colors to reflect any upcoming holiday… make green Lace Circles for Saint Patrick’s Day or red and pink ones for Valentine’s Day!

Line-12

Like us on FacebookShare this post with your friends, or Subscribe to this blog today to receive original craft project updates every Monday, Wednesday and Thursday!