Product Spotlight: Holiday Color Diffusing Shapes
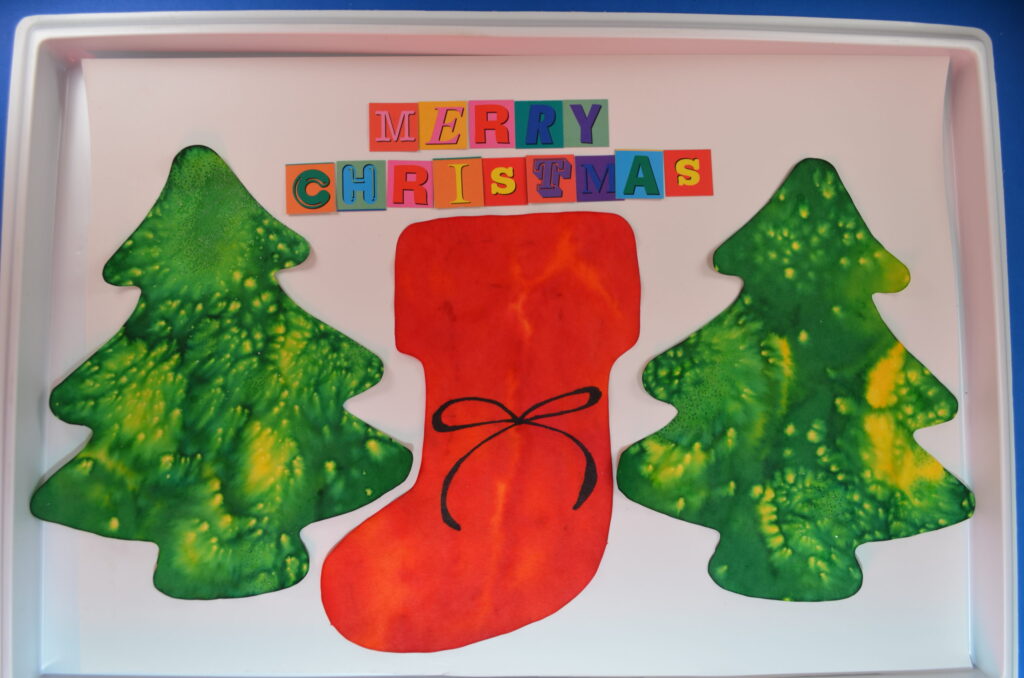
This month, we’re featuring two of our NEW products:

These color diffusing shapes help us get in the holiday spirit while simultaneously developing a deeper understanding of color. There are 3 easy ways to transform these shapes from A to B:

A. Plain Color Diffusing shapes–functional but still waiting for the magic to happen
B. Color Diffusing magic transformed the shapes into these beautiful works of art!

Method 1: Washable Marker & Water

This is the easiest method and the mess-free method. Simply use any washable marker to color the shape, and don’t worry about filling in all the white spaces! When you’re done, spray water on the shape and watch the colors diffuse and create secondary or even tertiary colors.

If you need a spray bottle for the water, we recommend Junior Paint Spritzers–they are perfect for small hands.

Method 2: Watercolor

Break out your trusty watercolor set and go to town! Because of the water used with the watercolor paint, the colors will diffuse throughout the paper as you paint. You can always add some extra water at the end and watch the colors diffuse even more. This is especially helpful if you’d like to make light or pastel designs.

Method 3: Liquid Watercolor & Water

This method creates the most impressive designs, IMHO. You can find liquid watercolors online or at your local craft store. Be careful because these paints can be POTENT! It takes quite a few washes to remove the paint from hands, but that is also what makes the designs so beautiful on Color Diffusing paper.

Simply use a spray bottle with the liquid watercolor to add splashes of color to your Color Diffusing shapes. Once you’re happy, spray the shapes with water and watch the colors blend!

If you need a spray bottle for the color or water, we recommend Junior Paint Spritzers–they are perfect for small hands.

Pro tip: Stick to primary colors! It’s easy to get carried away with color, but once they start diffusing, they have a tendency to blend into one, amorphous brown color if you get too complicated!


Try all 3 and let us know your favorite method!

If you like this, you’ll like Blots of Ornaments too! These ornaments have the added benefits of being cut out of extra thick, high-quality color diffusing paper so that they can be used as real ornaments on a tree or windowsill!

Sponge Paint Christmas Tree

Roylco Sponge Paint Christmas Tree

finished craft.jpg

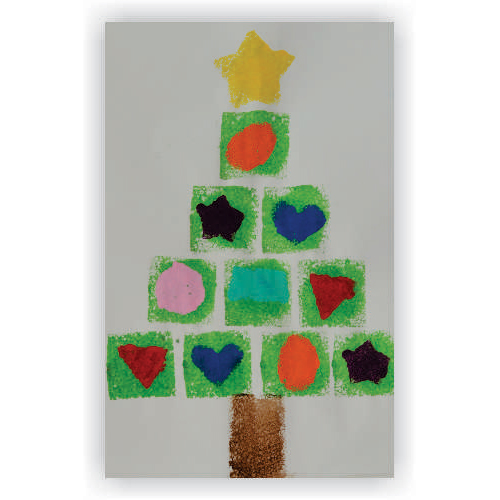
Integrate early geometry and holiday spirit with this adorable craft!

Sponge painting is a tactile and fun activity! By combining our R55009 Shape Sponges with tempera paint and some old-fashioned Christmas Spirit, we have come up with a great way to integrate early geometry and holiday art!

Age: 3+

Duration: 15-20 minutes (plus drying time)

Learning Outcomes:

You’ll Need:

Line-01

The sponges are cut from a thick blue sponge with bubbles in the material to add texture to your prints. Dip the sponge into a bowl of thick tempera paint or fingerpaint! Make sure you keep the sponge flat down against the paint so that it completely covers the bottom surface of the sponge. Bristol paper, poster board or fingerpaint paper are great mediums for stamping the various shapes as they will absorb the paint without warping too much. Encourage your students to stamp repeatedly on the same sheet of paper.

55009 Shape Sponges web.jpg

For this activity, make sure you take the time to talk about shapes with your students. Ask them to name each shape, and describe its attributes. For example, a square has four sides, one face and four angles, while a triangle only has three sides and three angles! We used the square and rectangle sponges to paint the tree itself, and then let the paint dry for a few minutes before adding the shape ornaments!

Let kids experiment with some of these ideas and their own creativity:

  • Squares work to make the shape of your tree, but what other shapes can you use? Try the circle, oval, or even the triangle sponge to craft the body of your tree
  • Add backgrounds to your picture! Make the tree a small part of a bigger mural by painting a scene on a large sheet of butcher paper. Make the activity a whole-class art project.
  • Add presents below the tree! Use sponges to stamp the images of presents underneath the tree, and consider gluing real yarn or narrow ribbon to the presents after the paint has dried.

Line-12

Like us on FacebookShare this post with your friends, or Subscribe to this blog today to receive original craft project updates every week!