The “Helping Hands” Good Deeds Display

Image of Roylco Color Diffusing Hands artwork display on school hallway

Image of Roylco Color Diffusing Hands artwork display on school hallway

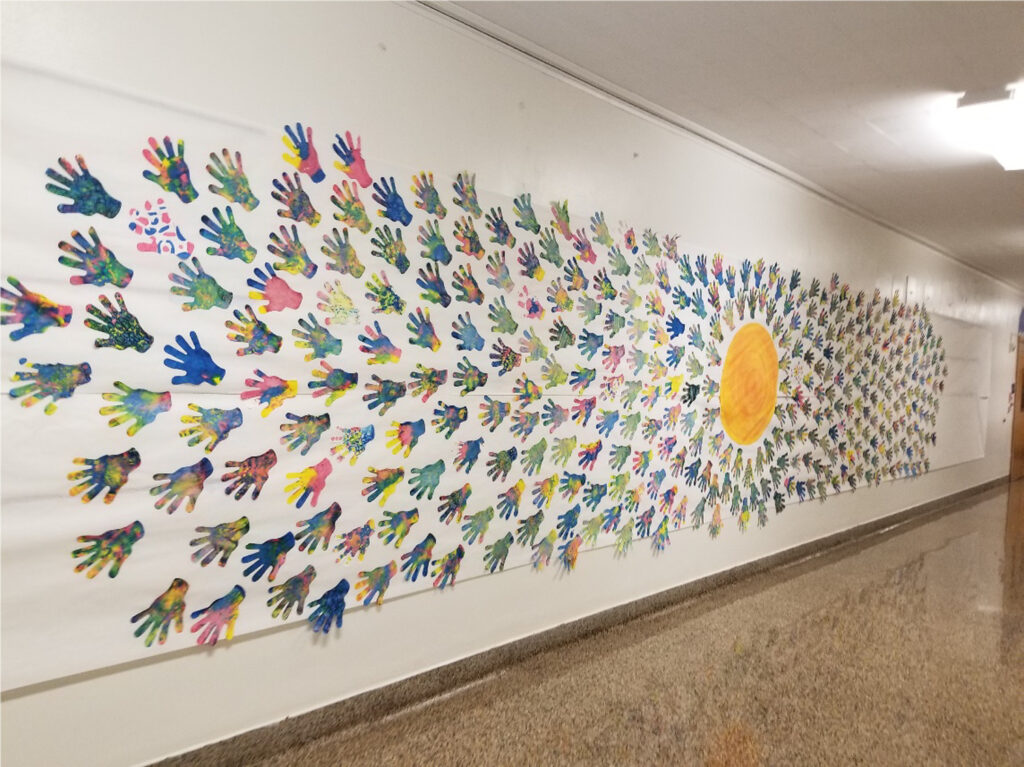
Special Post Contribution: By Amy Klossner

Here are the photos of the project our school completed using Color Diffusing Hands.  They were just perfect.  We read the book Ordinary Mary’s Extraordinary Deed, before painting the hands with liquid watercolors.  It’s a story about a little girl who does one good deed and that person does 5 good deeds then those people do five more good deeds each and so on. Like I said, the hands were perfect for displaying to the students how one good deed (represented by the hand) grows into five more, (represented by the fingers) which grows into 5 more, etc. The “helping hands” displayed that kindness is contagious.

As a spin off, students can write good deeds they are preforming in our school and community on each one of the hands, heart shapes or other inspirational design.


Close up boy decorating color diffusing hand


Close-up of a decorated hand


Children decorating Color Diffusing Hands with liquid water color

How to Decorate Color Diffusing Hands:

Liquid Water Color:  To get the most beautiful color blends, I recommend using liquid watercolor paint in a mister bottle. Spray the colors you like onto the Color Diffusing Hand.  Then use another mister bottle to spray clean water over your colors. Set aside to dry. Be careful where you put them, they can make a mess. To speed up the drying time, I like to hang them up for good air circulation. They should be dry enough to use in about 30 mins.


Washable Markers:  Color the Color Diffusing Hands with washable markers. Do not cover the whole area. Make sure to leave white space. Use a mister bottle to spray clean water over your colors. This will allow the colors to “mingle” and spread.


Image of sketch drawing of Kid 1

Leaf Rubbing Plate Name Badges

final craft

These beautifully detailed leaves make a great backdrop for name badges! This craft is perfect for “Getting to Know You” activities in the classroom. 

Age: 4+

Duration: 5 minutes

Learning Outcomes: Practice writing your name. Exercise fine motor skills.

You’ll Need:

Line-07

This quick craft is perfect for the first week of school when everyone is getting to know each other. I started with three leaf rubbing plates and a sheet of tree paper (with the grain side up, the bark side doesn’t show the rubbings very well!).

step 1

Start by placing the rubbing plate underneath the tree paper. Three or four leaf rubbing plates fit on one sheet of tree paper, so this activity is great for small groups! Carefully hold both the rubbing plate and the sheet of paper in place, and rub the long edge of a crayon back and forth on the paper above the rubbing plate. The leaf pattern will be revealed!

step 3a

Once the rubbings are complete, have each child cut out their leaf, leaving a small border of tree paper around the crayon marks.

step 3b

Finally, ask each child to write their name on their leaf!

step 4

Once every student has a leaf name badge, they can be used in a variety of different ways:

  • Use a loop of tape on the back of each leaf to give each child a wearable name badge! These are a great tool during Meet and Greet activities.
  • Using two strips of packing tape, secure each leaf to each child’s desk (or place at their table). This creates a fun name placard!
  • Create a classroom display! Using brown butcher paper, create the outline of a tree and post the tree on the wall, classroom door or bulletin board. Have students tape their leaves to the tree to create a leafy “Who’s Who” for your classroom!

Line-14

Like us on FacebookShare this post with your friends, or Subscribe to this blog today to receive original craft project updates every week!


Personalized Portfolios

finished craft.jpg

Get kids excited for an artful school year with this useful back-to-school craft!

Every child needs a portfolio to keep their exceptional art and school work in. Get to know your students by having them personalize their portfolio!

Age: 4+

Duration: 5-10 Minutes

Learning Outcomes: Practice names, exercise fine motor skills, and encourage adding art to everyday objects.

You’ll Need:

Line-10

Provide each child with a folder. If the children are sitting in groups, give each group a paper doll pad and a handful of alphabet pasting pieces. To keep things neat, try using a finger paint tray or bowl to hold all the alphabet pieces. Ask each child to choose a paper doll from the pad. The variety of skin tones in the pad will reflect the diversity in your classroom!

step 1

Using a glue stick, glue the paper doll onto the front of the folder.

step 2

Decorate the paper doll! Children can be encouraged to do self-portraits for this activity, or they can decorate the doll as their favorite character from a book or movie.

step 3

Knowing whose folder is whose is important! The final step in this project is for children to find the pasting pieces with the letters of their names on them, and paste their names to their folder.

step 4

These folders will keep a student’s artwork safe throughout the school year! During the last week of school, bring out the portfolios so students can really see their artistic progress from the first week of school to the last week.

Line-03

Like us on FacebookShare this post with your friends, or Subscribe to this blog today to receive original craft project updates every week!

Mosaic Name Tags

finished crafts

Give students an artistic way to label their desks or spots at their table!

This activity is great for the first week of school! Practice literacy and create artistic name plates for each student’s seat.

Age: 5+

Duration: 10 Minutes

Learning Outcomes: Practice spelling names, and exercise fine motor skills.

You’ll Need:

Line-11

Start with a sheet of construction paper. For this project, we used 4 1/4 x 5 1/2″ sheets (a sheet of letter or A4 cut in half). Challenge the students to write their names in pencil on the sheets, taking up the whole sheet. The pencil lines will guide their placement of the mosaic pieces, and it gives students and teachers a chance to double check uneasy spellers!step 2

Using goo spreaders and white glue, challenge students to glue mosaic pieces over the pencil lines. The goo spreaders help prevent wasted glue and sticky messes! They also exercise fine motor skills, which is crucial in a world that is increasingly becoming technological.

Students can choose their favorite colors, use a wild arrangement, organize colors by letter, or however they want to. When they are finished, they will have a beautiful, unique name plate!

step 8

Use clear packing tape to secure each name plate to students’ desks. This example used double color mosaics, but other ideas include:

  • Use alphabet pasting pieces to mosaic a name plate! Each letter of the student’s name is made up of multiple pasting pieces of that letter. For example, the letter A would be made up of several mosaic pasting pieces showing the letter A.
  • Create a name rainbow! Using pictures of rainbows as reference, challenge students to make the first letter of their names with red mosaic pieces, the second with orange, and so on.
  • Don’t be bound by geometry! Most of our pasting pieces are square, but don’t let that limit kid’s imaginations. Encourage them to rotate, layer, and offset their mosaic pieces to create interesting shapes and textures.

Line-13

Like us on FacebookShare this post with your friends, or Subscribe to this blog today to receive original craft project updates every week!


Name Bracelets

finished craft.jpg

This beautiful and tactile craft is a fun spin on traditional bracelets made of strung beads!

Age: 5+

Duration: 5 Minutes

Learning Outcomes: Exercise fine motor skills and practice spelling your name.

You’ll Need:

Line-01

Usually friendship bracelets are knotted or woven out of yarn, but we loved the added tactile dimension of stringing our uppercase letter beads on tubular crinoline! Ours is approximately 1/2″ in diameter. For a child’s bracelet, each child will need approximately 7″ of UN-STRETCHED tubular crinoline and the letters that spell out their names.

step 1.jpg

The tubular crinoline is the perfect stringing medium! Simply pull the end so the crinoline gets thin enough to pull through the holes in the beads. The material is stiff enough to thread easily.

pinch me.jpg

Thread the letters of your name onto the tubular crinoline.


Once your beads are all strung, knot the two loose ends to create a wearable piece of art!

step 4.jpg

Line-08

Like us on FacebookShare this post with your friends, or Subscribe to this blog today to receive original craft project updates every week!


Animal Face Pencil Toppers

finished craft.jpg

Need a five-minute craft that stops fights over pencils? These adorable button pencil toppers are perfect!

Age: 5+

Duration: 5 minutes

Learning Outcomes: Practice fine motor skills, animal names, and clearly mark pencils so students don’t lose them or argue over whose pencil is whose!

You’ll Need:

Line-11

This craft is quick, easy and fun!

Start with a chenille stem. Fold the stem in half, and slide both ends through the button holes. Then give the loose ends a twist to secure the button. Next, carefully wrap the chenille stem around the eraser end of the pencil. It’s that simple! Now students have an animal friend to work on assignments with.

Line-18

Like us on FacebookShare this post with your friends, or Subscribe to this blog today to receive original craft project updates every week!

Rolly Scrolly Mix Up Art Game

Feature-Image-rollyscrollygame

This is a great icebreaker activity for your new classroom. Start out your day with giggles and fun! Draw a mixed-up character on sections of our R15406 Rolly Scrolly Paper, then unfold the entire thing to reveal a hilarious creation.

Age: 5+

Duration: 15 minutes

You’ll Need:

• R15406 Rolly Scrolly Paper

• Crayons

• Imagination!

Line-06

This is a super easy activity for kids of all ages to try out! First, divide your class into groups of four. Students should each get one Rolly Scrolly to work on. Show your students how to fold the Rolly Scrolly into four equal sections. To do this, first fold the entire Rolly Scrolly in half. Fold the Rolly Scrolly once more in half.

You will need to rotate the Rolly Scrolly so that the fold line is at the bottom.

The Rolly Scrolly has four sections. Each of these sections will make up parts of a character. Draw your character’s face on the first section. Draw a pirate, a princess, a firefighter… anything!

When you are done drawing your character’s face, unfold the first section to the next blank section. Tuck the first section behind the second section. This part is MOST important: Pass your mystery Rolly Scrolly artwork to the person on your left. The person on your right should give you their hidden Rolly Scrolly artwork at the same time. Draw a fun shirt for the mystery character!

Repeat the previous step once you have finished drawing the shirt section. Fold this section of the Rolly Scrolly Paper underneath the previous section, then pass onto your left neighbor.

For the third section, draw pants, shorts, skirt, or a Superhero’s underwear!

For the fourth and final section, draw legs and feet. Give your character sneakers, high heels or rain boots. Have fun experimenting!

Final-Drawing

By this time, your Mix Up Rolly Scrolly character should make its way back again to you. When you receive it, unfold the sheet completely to reveal your hilarious character! P.S. Give your character a name once you’re finished drawing him/her!

Check out the video below for more details.

Line-06

Try out this activity and show us what hilarious characters you and your students come up with! Send your photos to subscriber@roylco.ca!!

VOTE FOR US @ Martha Stewart’s American Made Contest!

Hey there, blogger friends! Roylco has signed up for Martha Stewart’s American Made Contest! We need your help to reach the top of the nominees list!! Vote for us at the link! We’re so excited to be a part of … Continue reading