Flag Windsocks

Windsock Artwork made from Color Diffusing Paper

2014-05-25-FeatureImage Make brilliant designs on Color Diffusing Paper using clear glue! Incorporate windsocks into a national holiday craft or use to cheer on your favorite team.

Age: 5+

Duration: 20 minutes

Learning Objectives: Create product art with an emphasis on using fine motor skills. Trace designs onto paper or draw freehand using references. Encourage scissor skills development. Incorporate windsock designs with themes learnt through social studies subjects or in observation of upcoming national events. Talk about significance of wind patterns and weather changes.

You’ll Need:

R15212 Color Diffusing Paper 12 x 18″

• Watercolor paint

• Plastic paint trays

R54460 Squiggle Pipettes OR paintbrushes

• Scissors

• Hole punch

• Yarn

• Tape

• Clear glue (preferrably with applicator tip)

Line-03 This activity is perfect for making a take-home craft that kids will love. You can decide to have kids draw their flag designs freehand, or print out a large flag design in black and white line-art that kids can use as a template beneath their Color Diffusing Paper sheet. In this activity, I’ve used both techniques.

Click on any of the links below to skip to a portion of this tutorial:

1. Designing your windsock

2. Making streamers

3. Assembling your windsock

P6179636 
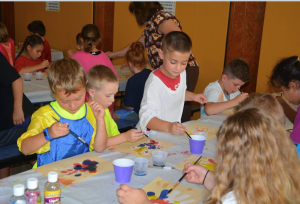
Here, you can see all the materials I’ve assembled. Using bowls to contain the watercolor paint makes it easy for kids to keep their work-spaces clean. Pipettes are a great way to get children with developing finger muscles to experiment with different squeezing techniques.

Alternatively, use paintbrushes to apply the watercolor to the Color Diffusing sheets.

P6179640 First, decide on your design. If you decide to get students to freehand the design, it’s a good idea to print out a reference for students to look at. They can lightly pencil in their design if they’d prefer, then go over top of the design with the clear glue.

It’s ideal if the clear glue dispenser has a pointed applicator that kids can use like the point of a marker or pencil. Gently press the glue down onto the Color Diffusing Paper on top of your penciled design.

P6179642The photo above won’t clearly show the image, but I’ve “drawn” 50 stars with the clear glue in a stacked sequence. Can you guess the flag I’m making?

P6179644Wait until the glue is completely dry! This usually doesn’t take too long, but if you are worried about time, be sure to do the glue “drawing” on a day before your painting class. You can speed up by the process by leaving the drying artwork under an oscillating fan. Once you are ready to paint, place the Color Diffusing Paper into a plastic paint tray.

For this particular project, I’ve grabbed blue watercolor. Notice how nicely the Squiggle Pipette fits into the colorful paint bowl. You can place the bowl in the center of a group of students and have them all grab their paint from that one location.

P6179664This is my favorite part!! As I release the blue watercolor paint from the Squiggle Pipette, the paint carefully avoids any place where I’ve “drawn” in the glue. This is because the glue has seeped completely through the paper and acts as a barrier to the oncoming ink.

P6179668It will take a few squirts from the Squiggle Pipettes to fill the entire canvas, but it’s well worth it for the colorful effect and design popping through!

P6179671For a project like the Union Jack flag, I placed a line-art print of the flag design beneath the Color Diffusing Paper and traced out all the lines with the clear glue. Once the glue was dry, I used a paintbrush to apply the paint. This helped maintain an even layer of paint throughout the design.

P6179714 Take your main windsock design and prepare it for lift-off!

P6179717First, roll the windsock into a tight tube. This will help it retain a cylinder shape once you string it up.

P6179719 Unwind the tube until the ends are overlapping by 2″ on both sides. Tape the edges together.

P6179724 Next, make four holes at equal intervals along the top edge of your flag windsock.

P6179726Grab a large run of yarn, about 2 yards (1.8 m) in length.

P6179729 Loop one end through a hole and hold. Make a second loop with the other end of the yarn and hold that along with the first strand. Use the remaining yarn to pass through a second hole.

P6179731Loop back up and hold the loop in your hand along with the rest of the previous loops. Pass the end of the yarn through a third hole.

P6179732Loop back up through the hole and hold the loop in your hand with the rest. Thread the final stretch of yarn through the fourth hole.

P6179734Then loop back up and hold this loop in your hand with the remaining loops. There should be some leftover length of yarn to use as the string from which you’ll hang the windsock. Twist all the loops together, as one, into a tight knot.

P6179737You can trim some of the excess loops above the knot part. Just make sure not to snip the long piece of string! The first part of the windsock should look something like this.  

P6179681 Now it’s time to make the streaming ends for the windsocks. Place the Color Diffusing paper lengthwise, then spread the paint any which way you’d like. Make lines, spots, color entire strips of paper or intertwine the colors together.

P6179712When this particular sheet of paper has dried, cut it into strips lengthwise.

P6179747 Now grab some glue! We’re ready to attach the final portion of the windsock.

P6179748Put a bit of glue on the inside of the windsock’s bottom edge.

P6179749Press a streamer down onto the glued portion. Space out your streamers into equal intervals and continue all the way around the bottom of the windsock.

P6179752
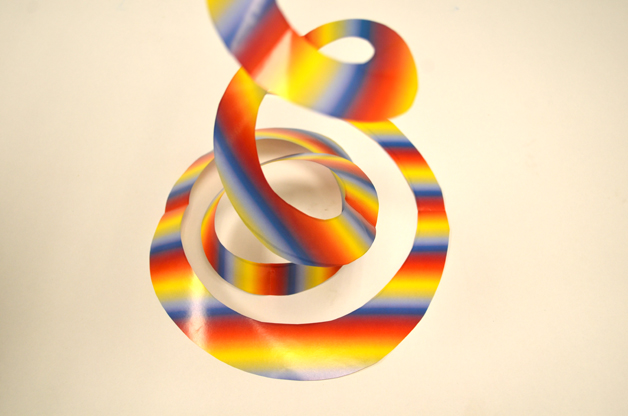
Here’s a look at our windsock! Isn’t it a beaut!

P6179757 
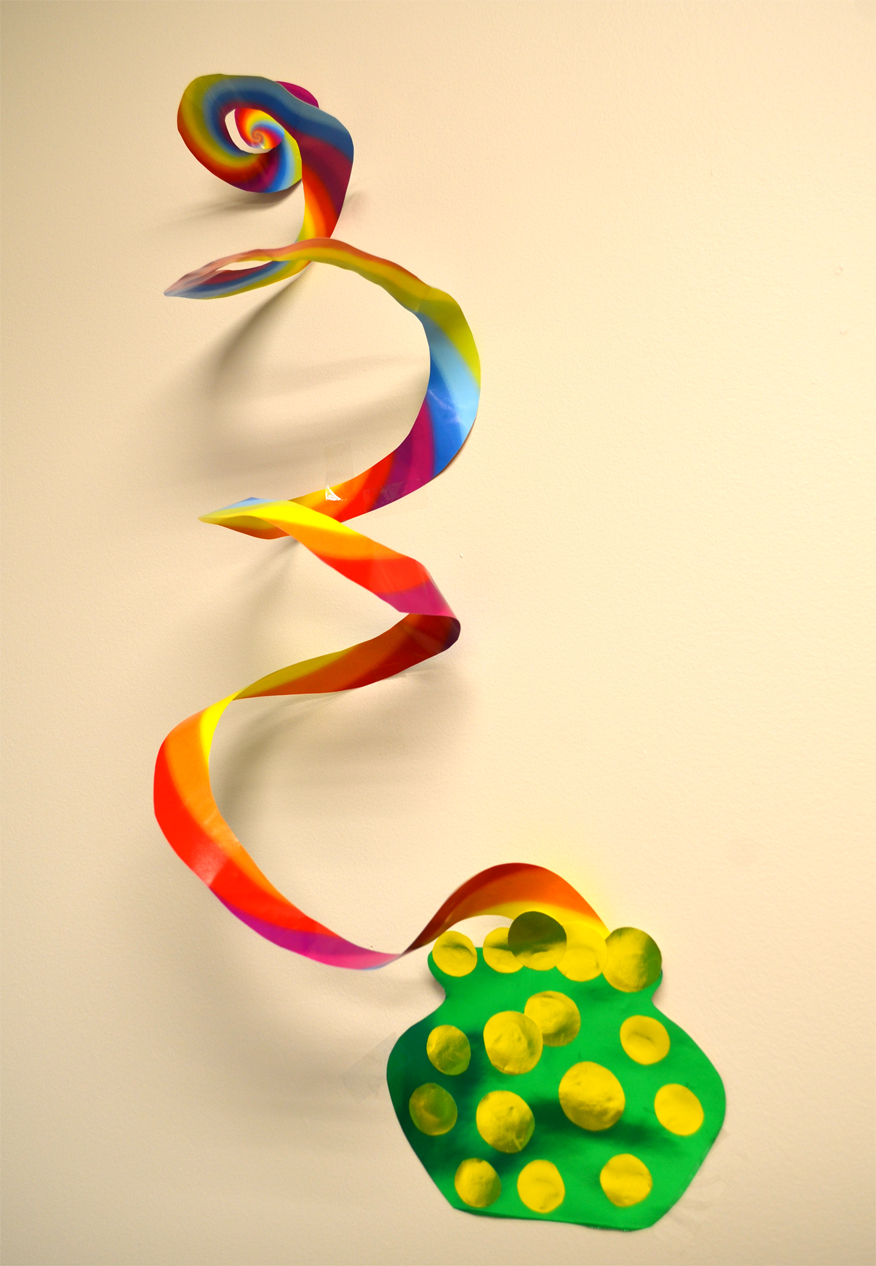
You can see further completed designs here, including the American flag, Canadian flag, and the Union Jack!

OLYMPUS DIGITAL CAMERA 
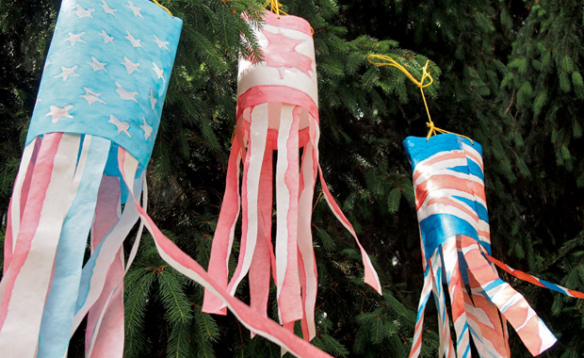
Here’s a shot of our windsocks fluttering outside from our local pine trees!

P6209823 Another gorgeous look at our lovely flag designs! Watch how they flutter animatedly in the breeze! Line-03 Thanks for checking out this post! Like us on FacebookShare this post with your friends, or Subscribe to this blog today to receive original craft project updates every Monday, Wednesday and Friday!

The “Helping Hands” Good Deeds Display

Image of Roylco Color Diffusing Hands artwork display on school hallway

Image of Roylco Color Diffusing Hands artwork display on school hallway

Special Post Contribution: By Amy Klossner

Here are the photos of the project our school completed using Color Diffusing Hands.  They were just perfect.  We read the book Ordinary Mary’s Extraordinary Deed, before painting the hands with liquid watercolors.  It’s a story about a little girl who does one good deed and that person does 5 good deeds then those people do five more good deeds each and so on. Like I said, the hands were perfect for displaying to the students how one good deed (represented by the hand) grows into five more, (represented by the fingers) which grows into 5 more, etc. The “helping hands” displayed that kindness is contagious.

As a spin off, students can write good deeds they are preforming in our school and community on each one of the hands, heart shapes or other inspirational design.


Close up boy decorating color diffusing hand


Close-up of a decorated hand


Children decorating Color Diffusing Hands with liquid water color

How to Decorate Color Diffusing Hands:

Liquid Water Color:  To get the most beautiful color blends, I recommend using liquid watercolor paint in a mister bottle. Spray the colors you like onto the Color Diffusing Hand.  Then use another mister bottle to spray clean water over your colors. Set aside to dry. Be careful where you put them, they can make a mess. To speed up the drying time, I like to hang them up for good air circulation. They should be dry enough to use in about 30 mins.


Washable Markers:  Color the Color Diffusing Hands with washable markers. Do not cover the whole area. Make sure to leave white space. Use a mister bottle to spray clean water over your colors. This will allow the colors to “mingle” and spread.


Image of sketch drawing of Kid 1

Let’s make a Rangoli decorated entryway!

Rangoli Mega Stencils

Roylco Rangoli Artwork Complete

Age: 4+

Duration: 10 minutes

Learning Outcomes:

We want to start a conversation about Indian culture, Hindu traditions and Rangoli art to help us broaden our understanding of the people we share the world with.

Here’s what you need:

Rangoli Mega Stencils (R5621)

Sidewalk Chalk

If you’re looking for a fun, and very simple, summertime activity, this is just for you! All you need is our Rangoli Mega Stencils (R5621) and some sidewalk chalk.

Authentic Rangoli art is spiritually motivated and originates from India. It’s used for decoration and good luck, and it usually coincides with Hindu rituals. Traditionally, women would be the ones to create the Rangoli art. The bright, beautiful patterns are made from a variety of materials, including dried rice, flower petals and sand. 

One of the many uses for Rangoli art is to place the pattern on the ground near the entryway of your home. This is believed to bring good luck and prosperity to all who reside within. Lucky AND beautiful… sounds good to me. Let’s do this!

To create our beautiful patterns, we’re going to be using sidewalk chalk. This is a good medium for decorating your entryway because it’s super simple to clean up, and it will work on pavement, wood and brick. If there isn’t enough space to decorate the floor in front of your door, you could always just decorate the door!

And on that note, a quick message to the kids:

Before you start, make sure the adults in your life know what you’re up to. We already know these stencils are going to look awesome! We just want to make sure they agree with us.

Kid illustration for Little Fingers Big Art Blog

Here’s how you do it:

Step 1: Choose your pattern

The first thing to do is decide which stencil you want to decorate with. The product guide will help you understand how to arrange your shapes. 

Rangoli Entryway Step 1

Step 2: Fill in the shapes

Using your sidewalk chalk, fill in the patterns of your stencil. You can use as many or as few colors as you like. Whatever you think looks best.

Rangoli Entryway Step 2 A

Rangoli Entryway Step 2 B

Rangoli Entryway Step 2 C

Step 3: Admire your work

Come on, admit it… you’re awesome!

Rangoli Entryway Step 3

Consider This:

Do you know anyone who practices Hindu Spirituality?

How are Hindu beliefs different from yours? How are they the same?

What kind of art do the people from your culture create?

If you could share something fun from your culture with the rest of the world, what would it be?


Sensory Collage Easter Egg Art Project

Are you looking for Easter egg ideas? The sensory collage Easter egg art project is great for your classroom activities. It introduces children to the important senses of the human body with Roylco’s Sensory Collage Kit. It’s also great for working on fine motor skills.

Age: 5+

Duration: 15 minutes

Learning Outcomes: Exercise fine motor skills. Practice sorting materials by color and texture. Learn about collage art. Develop sensory awareness.

You’ll Need: 

Pull out a wavy sheet from the R15413 Sensory Paper package, choose your favorite pastel color, and draw an outline of an egg. Encourage kids to slowly move their palms and fingertips over the paper to feel the small raised patterns. Some kids may want to follow the patterns on the paper to create their designs, while others may want to create their own designs. You can color the wavy lines on the paper and it will divide the egg into different sections. You can make these lines as bold as you like.

Next, plan and place the sensory art materials you like on your egg. The Sensory Collage Kit contains 20 different sensory art packs to use in creating unique illustrations.

Before gluing the sensory art materials onto the artwork, you can play with the colors and the different textures. Think about which sensory art materials would best represent your Easter egg artwork.

Encourage children to talk about the color and the texture they use on the artwork and discuss what they feel. Is the color a warm color or a cool color? Is the material rough, hard, scratchy, smooth or bubbly? After exploring the materials, children can start to glue the sensory materials onto the artwork.

The artwork is almost finished. Have the children cut out the egg and glue it on to the  cardstock. Here is our sensory collage Easter egg artwork. Write your name on the artwork and take it home for your Easter celebration!

For more information please visit https://roylcostore.com/products/sensory-collage-kit 


Bundle Savings

Get all the Roylco items used
in this project and save 15%!

$47.58 USD
bundled price
Add Bundle
to Cart


Make your own Origami Rabbit

Are you looking for more Easter ideas this week? Making origami rabbit is fun and easy. Today we are going to show you how to make these cute origami rabbits.

Age: 4+

Duration: 6 Minutes

Learning Outcomes: Practice following step-by-step instructions while exercising fine motor and spatial skills.

You’ll Need: 

Step-by-step Instructions ( Please see the graphic above ):

  1. Fold your paper in half to make a triangle.
  2. Fold the creased side of the triangle up about 3/4″.
  3. Fold one side toward the center, line up the points and crease.
  4. Fold another side toward the center. Line up the points and crease.
  5. Fold the bottom up.
  6. Flip it over. Fold the top point inside to create the top of the rabbit’s head. You can see the rabbit’s head is ready now.
  7. Let’s work on the rabbit’s body. Take another piece of paper. Please check the graphic, fold one side of the paper to make a triangle. Then line up the points and fold another side into a triangle.
  8. Flip it over. Align with the point at the bottom, fold the paper to make a triangle. Then line up the points and fold another side into a triangle.
  9. Align with the points in the middle, then fold the shape into half to create a rabbit’s body. Put the rabbit’s head on the top of the body. The basic shape of rabbit is ready.

Ideas:

  • Roylco’s R15219 Elemetary Origami Animals pack provides different patterns and bright colors of origami paper. Contrasting colors are printed on the reverse side. Use the fun bright paper to create your own designs.
  • You can draw different cute facial features on the rabbit. Or you can use other craft paper to cut out the features and glue them on the rabbit.
  • Check out our blog post on “How to make origami carrots” and make a couple of carrots for your rabbits.
  • Display the rabbits somewhere festive, hide them around the house, or around the neighborhood where friends might find them.
  • Punch a hole at the back of the rabbit. Thread a piece of yarn with all the rabbits you make. Hang the rabbits from the ceiling or use them to decorate bulletin boards, doors and hallways!

Please visit https://roylcostore.com/products/elementary-origami-animals for more information.

Color Diffusing Easter Egg Artwork

Make beautiful color diffusing Easter Egg Artwork by using Roylco’s R15213 Color Diffusing Paper™!

Age: 3+

Duration: 5 minutes for painting and assembling, couple of hour for drying.

Learning Objectives: Use fine motor skills to squeeze paint from pipettes onto paper. Learn about the process of diffusion with beautiful Color Diffusing™ technology.

You’ll Need:

• R15213 Color Diffusing Paper™

• R54470 Junior Heart Paint Pipettes

• Watercolor paint

• Paint tray

• A Cup of water

• Cardstock

Use white chalk to draw an outline of an egg on to Roylco’s R15213 Color Diffusing Paper™ . Then create some patterns to design your egg. I also wrote ” Happy Easter” in the middle of the egg. Encourage children to use their imagination to create their own designs.  

Next, place the paper in the paint tray. Wet the R15213 Color Diffusing Paper™, and use Roylco’s R54470 Junior Heart Paint Pipettes to drip liquid watercolor paint over top of the wet surface. Encourage children to experiment with different color palettes. It’s lots of fun for children to play with different colors and watch the colors flow and blend to create spectacular patterns and effects.. This is a great time for children to learn about color mixing, ask the children to discuss the effects of color mixing.

Let the artwork dry in the paint tray for couple of hours.  You can also use a blow dryer to dry the artwork. You can see the result is unexpected and beautiful.

The color diffusing Easter egg artwork is almost ready. Once the paint is dry, you can cut the egg out and glue it on to the cardstock.

For more information please visit https://roylcostore.com/products/color-diffusing-paper-9×12

Bundle Savings

Get all the Roylco items used
in this project and save 15%!

$15.62 USD
bundled price
Add Bundle
to Cart

A Pot Of Gold for St. Patrick’s Day

Are you looking for craft ideas for St. Patrick’s Day? Create some decorations to make the house and classroom more festive. Lets make a spiral rainbow and pot of gold.

Age: 4+

Duration: 5 minutes

Learning Outcomes: Exercise fine motor skills. holiday activities. Makes a perfect take-home craft.

You’ll Need:

Choose your favorite pattern from Roylco’s R15295 Rainbow Paper Pack.

Draw a spiral at the back of the paper.

You can also glue two pieces of rainbow paper together to create a double-sided sprital.


Use scissors to cut from the end of the outline toward the center to make a spiral.


Take two pieces of metallic paper from Roylco’s R15409 Economy Metallic Paper Pack.

I choose dark green paper to make the pot, and the gold colored paper for the golden coins. Draw the shape of a pot at the back of the green paper, and cut it out. Make the coins by cutting out some circle shapes from the gold paper. Then glue the golden coins on to the green pot.

After you finish making a pot of gold, you can glue it to the end of the rainbow.  Once complete, hang from ceilings, on bulletin boards or anywhere that could use some extra color.


You are the pot of gold at the end of my rainbow!

Bundle Savings

Get all the Roylco items used
in this project and save 15%!

$19.19 USD
bundled price
Add Bundle
to Cart

Make Cross Weaving Mats for this Easter !

Let’s make cross weaving mats for this Easter! With this simple project, the art of weaving colorful strips of paper through a bright Cross Weaving Mat promotes hand-eye coordination!

Age: 4+

Duration: 8-10 minutes

Learning Outcomes: Explore cultural traditions and symbols. Practice folding and taping. Exercise Fine motor skills. Create a take-home craft.

You’ll Need:

Weave a colorful Cross!
• Begin by gently separating the weaving strips from the panel and loosening the die-cut slats of the cross. Allow four strips per cross.

• Start by weaving the vertical area of the cross. Insert a strip through the slats of the
mat and weave in and out. When you have finished the first strip, start the second but
alternate the “in and out” pattern each time. A wavy, checkerboard pattern will appear.

• Trim off the excess weaving strip lengths and use to complete the cross bar of the cross.Carefully glue or tape the ends down on the backside of the weaving mat. Notice the different color combination you have created on the reverse side.

Tape your finished cross to a window for inspirational window art or decorate a Bible
classroom doorway. Use several Cross Weaving Mats to decorate a bulletin board for Easter!

Celebrate The Lantern Festival with Stained Glass Lanterns

Create luminous lanterns to string up in your classroom or send home as great gifts! The 3D lanterns are cleverly designed to make assembly easy for little hands. Lanterns are a wonderful example of a cultural and historical artifact that you can discuss
in your next social studies class.

Our stained glass lanterns look a lot like the Andon and Crystal Magic lanterns used in Japan and China, respectively. Your students can be creative and can color in the lanterns any way they like. Adding stained glass to a lantern is a recent trend of turning a practical or useful lamp into a pretty and decorative piece of art.

Age: 4+

Duration: 10 -13 minutes

Learning Outcomes: • Develop fine motor skills • Explore creativity
• Discover lantern and stained glass history   • Use basic design techniques to develop ideas • Learn about Chinese and Japanese lanterns • Combine social studies with arts and crafts  • Use multiple media to create a multi-use craft

You’ll Need:

  1. Each of the lanterns features 4 sky-themed designs. Each design is made to look like a stained glass window. The illustrations include a sun, moon, butterfly and bee. Cut out sections of colored tissue paper or R15275 Stained Glass Paper to glue under the designs.
  2. You can use different colors for parts of one illustration. For instance, paste white tissue paper pieces over the bee’s wings. Alternate and paste yellow and black tissue paper pieces across the separate sections of the bee’s body.
  3. Fold in the lantern along the pre-scored creases to make the lantern three dimensional.
  4. You’ll notice that its side edges are slightly smaller than the rest of the tab. These side tabs will help hook the tab in place when you insert it into the slot. Gently open the slot to loosen it up. Insert the tab into the slot by edging in first one side of the tab then the other.
  5. Finally, fold in all four tabs on the sides of the triangular roof flaps.
  6. Pass a length of fishing line, yarn or string through the holes of all four
    roof tabs and tie a knot at the top to secure.

Now you can hang your lantern along a length of string with other lanterns in sequence or you can hang the lantern directly from the ceiling.

Celebrate Chinese New Year or the start of spring by stringing up the lanterns. You can also send the beautiful lanterns home as Mother’s Day gifts or for any other special event.

Please visit https://roylco.com/shop/r52093-stained-glass-lantern/ for more information.

Bundle Savings

Get all the Roylco items used
in this project and save 15%!

$16.64 USD
bundled price
Add Bundle
to Cart