5 Reasons Why Arts & Crafts Are Crucial For Early Development

Dinosaurs and unicorns are alive. Superheroes and insects work together to fight evil. Yep, you heard that right! Welcome to the world of arts and crafts – a magical world where children can put on their capes of creativity and curiosity, unlocking the secrets of their own potential. Arts and Crafts are the forefront of development and growth in young children. From open-ended creative expression to cognitive enhancement, arts and crafts truly impact young minds more than we might expect. Let’s explore five benefits that arts and crafts unlock.

Fine Motor Skill Development

Painting, drawing, cutting, and pasting may seem like simple, mundane activities, but they play a crucial role in developing fine motor skills. These activities require precise movements and coordination, which help children refine their hand-eye coordination and dexterity. As they work with various art mediums, they strengthen their muscles in their hands and fingers, laying the groundwork for future tasks like writing. Take a look at one of our new products that aids fine motor skill development in a big way:

Imagination and Creativity

One of the most significant benefits of arts and crafts learning is gaining the ability to ignite and nurture imagination from a creative point of view. Whether it’s molding clay into mythical creatures or using craft sticks to tell stories of ancient kings and queens, crafts encourage children to think out of the box and explore their creative abilities. This freedom sets children on a trajectory for future success in creative roles and professions. Here is our recommendation for products that enhance imagination and creativity:

Cognitive Development

Engaging in arts and crafts activities stimulates various cognitive functions in children. As children explore possibilities through color, they engage in a wide range of cognitive processes from selecting hues to blending shades to recalling memories evoked by colors. These cognitive processes are not limited to the realm of colors alone; they extend to activities like building structures with blocks or piecing together puzzles, where children combine spatial reasoning and critical thinking together to bring their ideas to life. Through these immersive experiences, children not only develop their artistic abilities but also strengthen essential cognitive functions, laying a solid foundation for lifelong learning and growth.

 Expression and Communication

Not only do arts and crafts provide children with freedom of creative expression, but they also provide a non-verbal outlet through self-expression. By exploring colors, shapes, and textures, they can convert their feelings, thoughts, and experiences into expressions. This form of artistic expression is especially beneficial for those who may find it hard to communicate their feelings verbally. By engaging in creative activities, children learn to express themselves in alternative ways, fostering emotional intelligence and communication skills. Art can also serve as a calming and therapeutic activity, helping children manage stress and anxiety. The process of creating art allows them to channel their feelings constructively and develop resilience when facing challenging situations.

Social Skills and Collaboration

Learning how to work with others is a crucial developmental skill that will be used throughout a lifetime. In fact, more that 50% of people say their jobs require collaboration with one another and 75% of employees rate team work as being crucial in the workplace. Arts and crafts often involve collaboration and social interaction, whether it’s contributing to a group project or sharing ideas and materials with peers. These interactions teach children key social skills like sharing, voicing your opinion, taking turns, and cooperating towards a common goal. They learn to respect diverse perspectives, communicate effectively, and work as part of a team, which are essential skills for navigating social relationships in the future.

Incorporating arts and crafts at an early age is more than just a recreational activity – it’s a powerful tool for holistic development. From honing in on fine motor skills and cognitive development to gaining emotional intelligence and social competence, the benefits are far-reaching and long-lasting. By providing opportunities for creative expression and exploration, we empower children to unlock their full potential and become confident and independent individuals. Let’s nurture their creativity, one masterpiece at a time!

Let’s make a Rangoli decorated entryway!

Rangoli Mega Stencils

Roylco Rangoli Artwork Complete

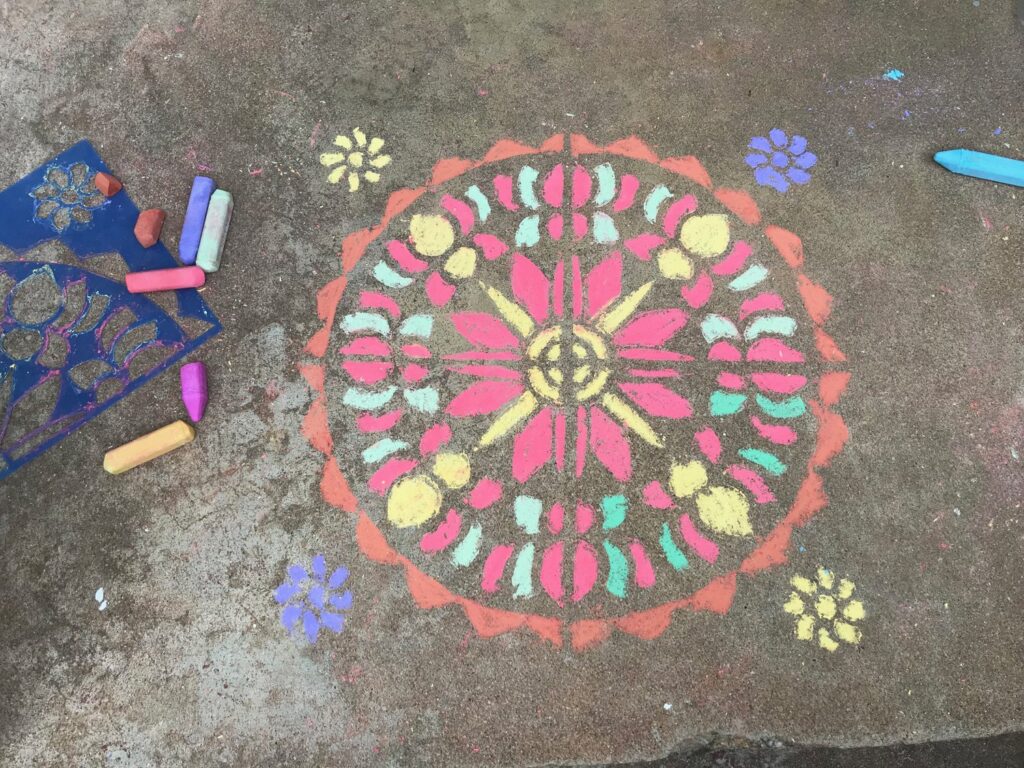
Age: 4+

Duration: 10 minutes

Learning Outcomes:

We want to start a conversation about Indian culture, Hindu traditions and Rangoli art to help us broaden our understanding of the people we share the world with.

Here’s what you need:

Rangoli Mega Stencils (R5621)

Sidewalk Chalk

If you’re looking for a fun, and very simple, summertime activity, this is just for you! All you need is our Rangoli Mega Stencils (R5621) and some sidewalk chalk.

Authentic Rangoli art is spiritually motivated and originates from India. It’s used for decoration and good luck, and it usually coincides with Hindu rituals. Traditionally, women would be the ones to create the Rangoli art. The bright, beautiful patterns are made from a variety of materials, including dried rice, flower petals and sand. 

One of the many uses for Rangoli art is to place the pattern on the ground near the entryway of your home. This is believed to bring good luck and prosperity to all who reside within. Lucky AND beautiful… sounds good to me. Let’s do this!

To create our beautiful patterns, we’re going to be using sidewalk chalk. This is a good medium for decorating your entryway because it’s super simple to clean up, and it will work on pavement, wood and brick. If there isn’t enough space to decorate the floor in front of your door, you could always just decorate the door!

And on that note, a quick message to the kids:

Before you start, make sure the adults in your life know what you’re up to. We already know these stencils are going to look awesome! We just want to make sure they agree with us.

Kid illustration for Little Fingers Big Art Blog

Here’s how you do it:

Step 1: Choose your pattern

The first thing to do is decide which stencil you want to decorate with. The product guide will help you understand how to arrange your shapes. 

Rangoli Entryway Step 1

Step 2: Fill in the shapes

Using your sidewalk chalk, fill in the patterns of your stencil. You can use as many or as few colors as you like. Whatever you think looks best.

Rangoli Entryway Step 2 A

Rangoli Entryway Step 2 B

Rangoli Entryway Step 2 C

Step 3: Admire your work

Come on, admit it… you’re awesome!

Rangoli Entryway Step 3

Consider This:

Do you know anyone who practices Hindu Spirituality?

How are Hindu beliefs different from yours? How are they the same?

What kind of art do the people from your culture create?

If you could share something fun from your culture with the rest of the world, what would it be?


Let’s Make A Window Cling!

BP- Window Cling Rubbing Plates 4 Large

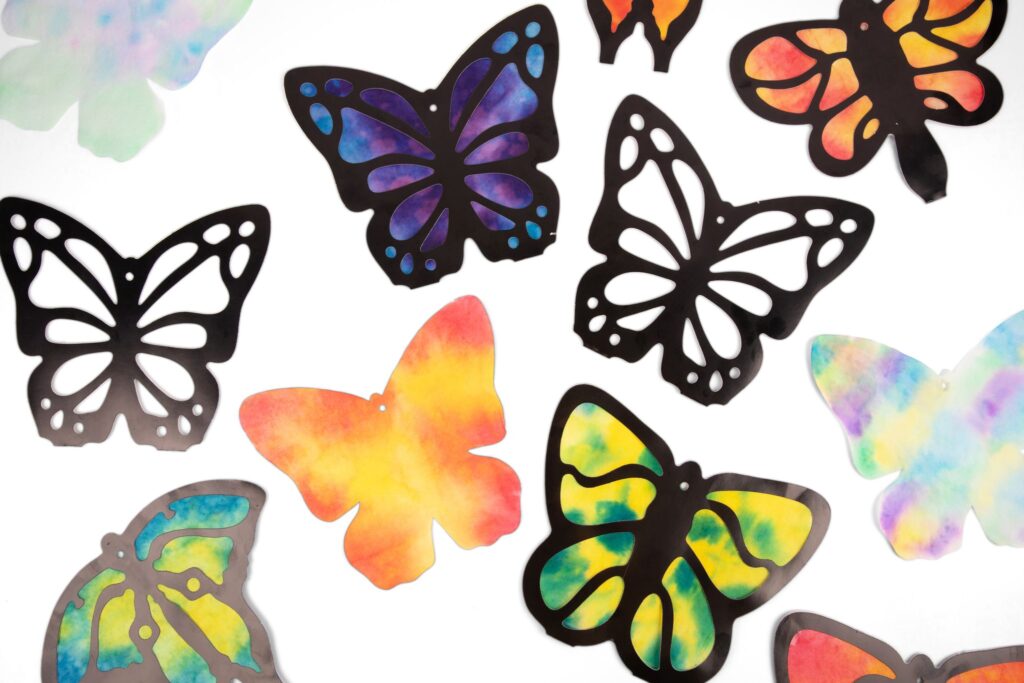
Age: 4+

Duration: 30 minutes (or more, depending on your design preferences), plus drying time.

Learning Outcomes:

We’re going to be mixing ingredients, painting and decorating with our creations.  We can learn about the subjects related to our rubbing plates, nature, science, etc. And, we can even have a discussion about sunlight and color as we enjoy our window clings.

Here’s what you need:

Any of our Rubbing Plates will work perfectly for this project.

Non-Toxic White Glue

Dish Soap

Food Coloring (liquid or gel)

Glitter (optional)

Brush (foam or bristle)

Sandwich Bag (optional – for detailed application of color)

If you’ve worked with our rubbing plates before, you’re going to love this project. It’s easy — and fun to mix, make, and use! I’m using the Insect Rubbing Plates (R5803), but our entire line of Rubbing Plates can be used in this way.

We’re going to create a very cool window cling using non-toxic white glue, some dish soap, and food coloring (you can use liquid or gel food coloring — both work great).

Kids as young as 4 will enjoy this project, with some help and guidance. Kids 4+ will need minimal help but will probably have an excellent time.

Here’s how you do it:

Step 1:

Anytime you’re working with glue things can get a little messy. You’ll be doing yourself a favor if you put some wax or parchment paper down on your work surface. This will also help to keep your rubbing plates from sticking to stuff.

Step 2:

Time to mix some colors! All these materials are safe, so it’s okay to use a cup or a bowl from the kitchen to mix your ingredients.

Start with about 2 tablespoons of white glue. Add a couple of drops of dish soap. It’s okay if your measurements are not super precise.

Next, add the food coloring. A little is plenty. For darker colors, add more. If you don’t have the color you need, try mixing the colors you have. You could also leave the color out to create a translucent appearance (perfect for bug wings).

Consider this:

If you want to use more than one color, you’re awesome! It might be a good idea to prepare all your colors during this step.

Also, glitter doesn’t work great everywhere — but it works great here! Add some glitter to your color during this step, and it will really add a nice, sparkly effect to your window cling. It will be so pretty when the sun is shining through!


Step 3:

Before you begin, make sure to use the side of the rubbing plate on which the pattern is sunk (not raised). It’ll help to keep the color in place.

A foam, or bristle brush, will work great for covering the bug with your mixture. For more precision, try using a pastry bag. Just pour the mixture into a sandwich bag, pushing it down to the corner, then snip a tiny hole in the point.

Really precise images will take some practice. You learn the best amount of glue as you go. But, keep in mind, the thinner the coverage, the more fragile your window cling will be.

Step 4:

We need to let it dry. Depending on how much glue you used, it could take up to 12 hours to dry.

Step 5:

Removal. You know how when you get some glue on your finger, and after it dries you peel it off, and somehow that makes you really happy? This step is like that — times 10.

Watch the edges. The glue can get under the plate, so make sure to peel any away from the back.

AHHhhh… that was fun.

Now you have a window cling!

Consider this:

Trim the edges for a more elegant design.

Step 6:

The time has come to display your creation! Find a good spot in the window and give it a quick wipe with a damp paper towel. Be sure to dry it. Now, use your wet paper towel to dampen the flat side of your window cling. Press it firmly onto the window.

You did it!

Roylco Window Cling Tie Dye Look

Roylco Window Cling Blue and Green Bug

Roylco Window Cling Green Cut Out Bug

This is a great way to add a fun, science and nature theme to any environment —classroom, bedroom, kitchen, office — anywhere you want to hang up some inspiration.

Use your rubbing plates as many times as you like to create more window clings. Experiment with colors, color placement, backgrounds, trimming… get creative and make it your own!

Roylco Sketch Art of Kid on Tricyle

Make your own Origami Rabbit

Are you looking for more Easter ideas this week? Making origami rabbit is fun and easy. Today we are going to show you how to make these cute origami rabbits.

Age: 4+

Duration: 6 Minutes

Learning Outcomes: Practice following step-by-step instructions while exercising fine motor and spatial skills.

You’ll Need: 

Step-by-step Instructions ( Please see the graphic above ):

  1. Fold your paper in half to make a triangle.
  2. Fold the creased side of the triangle up about 3/4″.
  3. Fold one side toward the center, line up the points and crease.
  4. Fold another side toward the center. Line up the points and crease.
  5. Fold the bottom up.
  6. Flip it over. Fold the top point inside to create the top of the rabbit’s head. You can see the rabbit’s head is ready now.
  7. Let’s work on the rabbit’s body. Take another piece of paper. Please check the graphic, fold one side of the paper to make a triangle. Then line up the points and fold another side into a triangle.
  8. Flip it over. Align with the point at the bottom, fold the paper to make a triangle. Then line up the points and fold another side into a triangle.
  9. Align with the points in the middle, then fold the shape into half to create a rabbit’s body. Put the rabbit’s head on the top of the body. The basic shape of rabbit is ready.

Ideas:

  • Roylco’s R15219 Elemetary Origami Animals pack provides different patterns and bright colors of origami paper. Contrasting colors are printed on the reverse side. Use the fun bright paper to create your own designs.
  • You can draw different cute facial features on the rabbit. Or you can use other craft paper to cut out the features and glue them on the rabbit.
  • Check out our blog post on “How to make origami carrots” and make a couple of carrots for your rabbits.
  • Display the rabbits somewhere festive, hide them around the house, or around the neighborhood where friends might find them.
  • Punch a hole at the back of the rabbit. Thread a piece of yarn with all the rabbits you make. Hang the rabbits from the ceiling or use them to decorate bulletin boards, doors and hallways!

Please visit https://roylcostore.com/products/elementary-origami-animals for more information.

A Pot Of Gold for St. Patrick’s Day

Are you looking for craft ideas for St. Patrick’s Day? Create some decorations to make the house and classroom more festive. Lets make a spiral rainbow and pot of gold.

Age: 4+

Duration: 5 minutes

Learning Outcomes: Exercise fine motor skills. holiday activities. Makes a perfect take-home craft.

You’ll Need:

Choose your favorite pattern from Roylco’s R15295 Rainbow Paper Pack.

Draw a spiral at the back of the paper.

You can also glue two pieces of rainbow paper together to create a double-sided sprital.


Use scissors to cut from the end of the outline toward the center to make a spiral.


Take two pieces of metallic paper from Roylco’s R15409 Economy Metallic Paper Pack.

I choose dark green paper to make the pot, and the gold colored paper for the golden coins. Draw the shape of a pot at the back of the green paper, and cut it out. Make the coins by cutting out some circle shapes from the gold paper. Then glue the golden coins on to the green pot.

After you finish making a pot of gold, you can glue it to the end of the rainbow.  Once complete, hang from ceilings, on bulletin boards or anywhere that could use some extra color.


You are the pot of gold at the end of my rainbow!

Bundle Savings

Get all the Roylco items used
in this project and save 15%!

$19.19 USD
bundled price
Add Bundle
to Cart

Make Cross Weaving Mats for this Easter !

Let’s make cross weaving mats for this Easter! With this simple project, the art of weaving colorful strips of paper through a bright Cross Weaving Mat promotes hand-eye coordination!

Age: 4+

Duration: 8-10 minutes

Learning Outcomes: Explore cultural traditions and symbols. Practice folding and taping. Exercise Fine motor skills. Create a take-home craft.

You’ll Need:

Weave a colorful Cross!
• Begin by gently separating the weaving strips from the panel and loosening the die-cut slats of the cross. Allow four strips per cross.

• Start by weaving the vertical area of the cross. Insert a strip through the slats of the
mat and weave in and out. When you have finished the first strip, start the second but
alternate the “in and out” pattern each time. A wavy, checkerboard pattern will appear.

• Trim off the excess weaving strip lengths and use to complete the cross bar of the cross.Carefully glue or tape the ends down on the backside of the weaving mat. Notice the different color combination you have created on the reverse side.

Tape your finished cross to a window for inspirational window art or decorate a Bible
classroom doorway. Use several Cross Weaving Mats to decorate a bulletin board for Easter!

Celebrate The Lantern Festival with Stained Glass Lanterns

Create luminous lanterns to string up in your classroom or send home as great gifts! The 3D lanterns are cleverly designed to make assembly easy for little hands. Lanterns are a wonderful example of a cultural and historical artifact that you can discuss
in your next social studies class.

Our stained glass lanterns look a lot like the Andon and Crystal Magic lanterns used in Japan and China, respectively. Your students can be creative and can color in the lanterns any way they like. Adding stained glass to a lantern is a recent trend of turning a practical or useful lamp into a pretty and decorative piece of art.

Age: 4+

Duration: 10 -13 minutes

Learning Outcomes: • Develop fine motor skills • Explore creativity
• Discover lantern and stained glass history   • Use basic design techniques to develop ideas • Learn about Chinese and Japanese lanterns • Combine social studies with arts and crafts  • Use multiple media to create a multi-use craft

You’ll Need:

  1. Each of the lanterns features 4 sky-themed designs. Each design is made to look like a stained glass window. The illustrations include a sun, moon, butterfly and bee. Cut out sections of colored tissue paper or R15275 Stained Glass Paper to glue under the designs.
  2. You can use different colors for parts of one illustration. For instance, paste white tissue paper pieces over the bee’s wings. Alternate and paste yellow and black tissue paper pieces across the separate sections of the bee’s body.
  3. Fold in the lantern along the pre-scored creases to make the lantern three dimensional.
  4. You’ll notice that its side edges are slightly smaller than the rest of the tab. These side tabs will help hook the tab in place when you insert it into the slot. Gently open the slot to loosen it up. Insert the tab into the slot by edging in first one side of the tab then the other.
  5. Finally, fold in all four tabs on the sides of the triangular roof flaps.
  6. Pass a length of fishing line, yarn or string through the holes of all four
    roof tabs and tie a knot at the top to secure.

Now you can hang your lantern along a length of string with other lanterns in sequence or you can hang the lantern directly from the ceiling.

Celebrate Chinese New Year or the start of spring by stringing up the lanterns. You can also send the beautiful lanterns home as Mother’s Day gifts or for any other special event.

Please visit https://roylco.com/shop/r52093-stained-glass-lantern/ for more information.

Bundle Savings

Get all the Roylco items used
in this project and save 15%!

$16.64 USD
bundled price
Add Bundle
to Cart

Junior Heart Paint Pipettes

R54470-A

Use our Junior Heart Paint Pipettes and love your art! The pipettes have heart-shaped bulbs at the top that will encourage children to practice flexing and squeezing their fingers.

Mix a few drops of concentrated watercolor paint or food coloring with about 2 cups of warm water. Squeeze the bulb to expel all the air from the inside and then dip the nozzle into a bowl of watercolor paint. Release the bulb. The inner chamber will fill with paint.

Squeeze the bulb to press out the paint.

R54470-B

Here are some ideas on how to use the Paint Pipettes!

  • Make interesting splatter art.
  • Mix up watercolor paint with a dash of glitter. Pipette the mixture onto a sheet of Color Diffusing Paper. Let dry overnight, then in the morning, get a look at your fantastic glitter painting!
  • Make a gel heart! Mix up ¼ cup cold water to 1 packet of Knox® Gelatine. Add ¼ cup boiling water and stir until dissolved. Use the pipette to draw in some of the mixture. Let set at room temperature or place in the fridge for faster setting times. Once the gel is set, use a pair of scissors to cut the pipette open. Peel away the sides to reveal your gel heart! Tip: Add in a bit of food coloring to the mixture before you let it set.

Looking for more ideas? Check out our YouTube page for more Roylco videos!

Line-09

Like us on FacebookShare this post with your friends, or Subscribe to this blog today to receive original craft project updates every week!

Sockles

22004 Sockles Sock Pile web

Specially designed socks are bundles of fun and the perfect size for easy yet wonderful craft projects. Learn how to make a sock puppet puppy, a cuddly octopus, a cool snowman, a plush bunny, a caterpillar, animal track slippers, a warming bean bag and colorful fish in our future blog posts on Sockles! Use the guide to help students pick a favorite activity and create their own unique sock project.

Sock projects are perfect for engaging students’ creativity and inspiring new project ideas! Hand out a variety of collage materials that you have available in your craft closet. Provide the materials in plastic bowls to make it easier for students to gather and apply the materials to their sock projects.

22004 Sockles Craft Group web

Before you decorate your Sockles with collage materials, decide if you want to paint them. Make your Sockles colorful! Tip: Paint your Sockles with thicker paint such as tempera. Note: Watercolor paint does not color as well as thick paint. To paint the Sockles evenly, clip one end of the Sockles tight to cardboard and paint the rest of the Sockles with a paint brush or foam brush. Turn the Sockles over and paint the second side. Wait one day for the Sockles to dry. Once the paint is dry, use glitter glue to draw swirls, dots, lines and other decorative elements onto the Sockles.

Alternatively, use markers to make details on the Sockles. Draw faces or patterned details onto the Sockle plush toys! Fill the inside with rice, beans or sand about halfway to three-quarters inside the Sockles. Tie off the open end of the Sockles with an elastic band or sew the opening shut with a safe sewing needle and thread.

22004 Sockles girl web

Follow the detailed instructional guide to make puppets, animals, hand covers, plush toys and more! The project ideas can be adapted with whatever collage materials you have in your craft closet.

Combine project ideas together with innovative materials to make creative craft projects! Stay tuned for a series of projects coming up that use our Sockles…

Line-09

Like us on FacebookShare this post with your friends, or Subscribe to this blog today to receive original craft project updates every week!