Hatch a Baby Dinosaur This Spring

Roylco baby dinosaur lesson plan

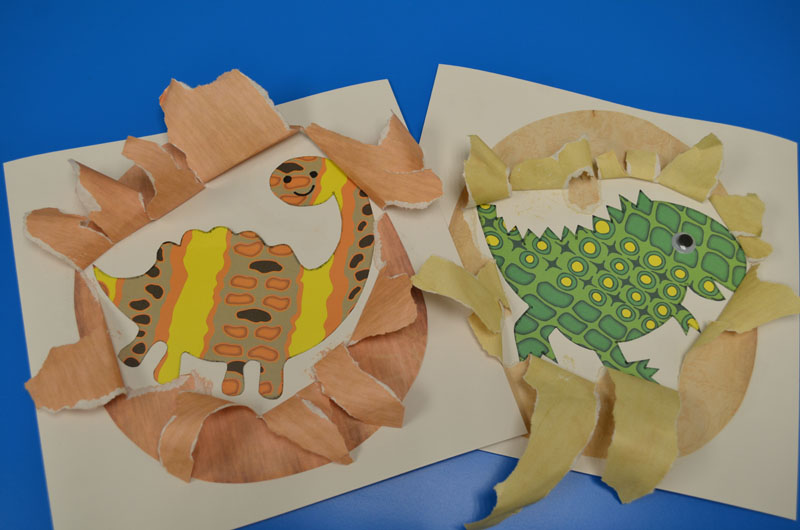
Most young children are fascinated by dinosaurs. They are curious about these mighty creatures that lived millions of years ago. Where did the dinosaur come from? Today we are going to introduce a hatching baby dinosaurs craft activity that children will love. This is a great class activity when you are teaching about dinosaurs.  You can also introduce it at the end of the dinosaur discovery tour at the museum.  Use this activity to talk about how a baby dinosaur grows inside the egg. Children will love to help the baby dinosaur hatch from the egg.

Age: 5+

Duration: 10 – 15 minutes

Learning Outcomes:  Learning evolutionary concepts. Practice drawing skills. Exercise Fine motor skills. Growing children’s interest in science.

You’ll Need:

Let the children choose one piece of paper with their favorite colors and patterns (R15311 Dinosaur Print Papers).

Encourage children to use a pencil to draw the baby dinosaurs at the back of the dinosaur print paper. After they draw the baby dinosaur, they can use the black marker to trace it.

Then cut out the baby dinosaur.

Glue the dinosaur on the white craft paper. You can glue the eye or draw the eye on the dinosaur.

Choose a piece of antique paper ( R15286 Antique Paperthat you like and lay it on top of the baby dinosaur. Use a pencil to draw an egg outline and cut it out.

Add glue to the outline of the brown egg and place it on the white craft paper over top of the baby dinosaur. Make a small cut in the middle the egg.

Ask the children to write their names on the white craft paper and exchange their crafts.

Here comes the exciting moment of this activity.

Invite children to help the dinosaur hatch from the egg by tearing open the paper (where you have made the small hole) to reveal the baby dinosaur inside the egg!

It’s a lot of fun for children to discover the different types of baby dinosaurs.

Please visit https://roylco.com/shop/r15311-dinosaur-print-papers/ for more information.

Bundle Savings

Get all the Roylco items used
in this project and save 15%!

$14.52 USD
bundled price
Add Bundle
to Cart

Let’s Make a Mother’s Day Bouquet!

Roylco Mothers Day Bouquet 

Age: 6+

Duration: 1 hour, plus drying time.

Learning Outcomes:

We’re learning how to complete a project made of several different components, and how each of those unique parts is needed to create the final craft.

Here’s what you need:

Color Diffusing Paper 9”x12” (R15213)

Fancy Stringing Rings (R2183)

Botanical Cuts (R15333)

Chenille Stems

Straws

Glue

Water

Paints (liquid watercolors & acrylics recommended)

Fine Mist Spray Bottles

Brush (foam or bristle)

Cotton Balls

Small Rock (optional)

Mother’s Day is just around the corner, so now is a good time to get crafty. We’re going to make a bouquet of flowers to show Mom that we appreciate all that she does for us everyday. A garden bouquet looks best when you mix a few different things together, so we’ll do that one step at a time, following the instructions below.


Roylco Mothers Day Bouquet Craft Parts Display

   Roylco Sketch Art of Flower

Here’s how you do it:

Step 1:

Prepare your work surface. If you don’t want to mess up your table, cover with some newsprint or butcher paper.


Step 2:

To begin, we need to paint our 9”x12” Color Diffusing Paper (R15213). This is what we’ll use to cut our flower shapes from. You’ll need 2–4 sheets. To get the most beautiful color blends, I recommend using liquid watercolor paint in a mister bottle. Spray the colors you like onto the sheet of diffusion paper. Then use another mister bottle to spray clean water over your colors.


Set aside to dry. Be careful where you put them, they can make a mess. To speed up the drying time, I like to hang them up for good air circulation. They should be dry enough to use in about 30 mins.


Step 3:

Okay, let’s find a cardboard tube. A toilet paper roll works great. Yeah, that’s right — we use those things! If you don’t have one handy (might want to take care of that), try a paper towel roll. For our bouquet, it will need to be about 3.75” long.


Now, we want to paint the tube. What’s your Mom’s favorite color?


Sounds like a good color to me. Go ahead and paint the tube. Acrylic paint is probably going to work best and dry fastest. Set the tube aside to dry.

 Roylco Mothers Day Bouquet Painting Tube


Consider this:

I thought it would be cool to paint the inside of the tube. I used a different color than the outside. You can use the same color, or not paint the inside. It’s up to you.


You’ll only need to paint one side. The bottom of the tube will be covered.


Step 4:

We’re going to need 3 straws to make our flower stems. I cut mine to lengths of 6.5”, 7” and 8”.


Paint the straws. The bottoms of our stems will not be visible from inside the tube, so you can hold one side and paint the other.


I painted mine green, but if you like red or purple flower stems, go for it. Set the straws aside to dry.

 Roylco Mother's Day Bouquet Painting Straws

Step 5:

I’m using some really neat Botanical Cuts (R15333) to add some garden flair to my bouquet. There are plenty of patterns to choose from in the pack. I chose 3 of them. If you’d like to add these in, now is a good time to decide on your patterns.


Step 6:

Now, let’s go back to our color diffusing paper. What we want to do is cut 4” round flower shapes from our beautifully painted paper. I like to look for the best patterns within the color and use them for outlining my flower shapes.

We’ll need to cut 4 shapes.

I’ve included a PDF template in case you would like to use it. Otherwise, create any flower shape you can imagine. Just remember, it will need to be about 4” round to work with all our other bouquet components.

 Mothers Day Bouquet-Flower Petal Template


Step 7:

We’re going to use one of our flower shapes for covering the bottom of the tube. Add some glue to one side in each of the petals. Then, place the tube in the center of the flower shape and fold the petals up. They should attach to the sides of the tube, closing up the bottom. I added 3 cotton balls to the bottom of my tube to keep the straws from poking through the bottom.


Step 8:

Speaking of the straws, let’s go ahead and add those in. Just add some glue to one side and place them in the tube. Press the straw against the tube to help the glue hold. Attach all 3 straws in this way.


Step 9:

Let’s make our 3 flowers next. Using a sharpened pencil, poke a hole through the center of your flower petals. Don’t make the hole too big. The pencil point should be enough.


Next, we need to use our 3 chenille stems. I cut mine to the same length — about 6”. On one side of the chenille stem, starting about an inch from the end, bend a right angle. Then make a “U” shape in the center of that bend (see the image).

Put one of the flower shapes onto a stem, moving it down to the bottom of the “U” shape.


To give my bouquet a jewel-like quality, I added a Fancy Stringing Ring (R2183) in front of the flower. Place it into the “U” shape as well, and then curl the end of the chenille stem around the ring to hold it in place.


Finish all 3 flowers.


Consider this:

These little flowers are so simple and beautiful, they kind of work on their own. If you want to do a quick craft, try just making the flowers, with the beads and the chenille stems. Tie them together with some ribbon, or a Fabric Strip (15655), and you’ll have a simple and sweet bouquet for Mom.


Step 10:

If you decided to go with the botanical cuts, this is where you’ll attach them. Use your creativity here. I chose 3 patterns and attached them with glue to the outside of the tube, from the bottom up. Pay attention to where your flower stems are. I think it’s neat to curl them botanical cuts around the straws a little.


Step 11:

Simply place the chenille flower stems inside each straw. Push them all the way down to the bend.


That’s it. You did it!

Your garden bouquet is ready to make your Mother’s day complete!

Consider this:

If your bouquet is a little wobbly, drop a rock in it. You may even want to fill the tube with colorful beads or small stones.

 Roylco Sketch Art of Kid 1

Create a Craft Circle Giraffe!

craft circle giraffe.jpg

This adorable critter is simple and fun to make!

Age: 5+

Duration: 10 Minutes

Learning Outcomes: Exercise fine motor skills. Practice composing figures out of geometric shapes. Create adorable animal crafts.

You’ll Need:

Line-01

  1. Decide what kind of animal you want to make. We chose to make a giraffe!
  2. Using the double color card sheets. draw an outline of the giraffe’s head and neck. Cut out the outline. Use washable markers to add eyes, a mouth and spots!
  3. Choose a craft circle to be the body of your giraffe. Fold the craft circle in half.
  4. Glue the head and neck to the back of your folded craft circle.
  5. To make the legs of your giraffe, cut four equal lengths of brown yarn.
  6. Tape one end of each piece of yarn to the INSIDE of the folded craft circle.
  7. Cut four squares out of brown card. These will be your giraffe’s hooves. Tape each square to the loose end of the yarn legs.
  8. Use a smaller length of yarn as the tail. Tape the tail to the inside of your half circle, near the crease.
  9. Using your glue stick, glue your half circle closed. This will make the giraffe look neat, and prevent flapping in the breeze if you decide to transform your giraffe into a puppet.

Ideas

  • Use Popsicle sticks to turn your animal into a puppet! Use a Popsicle stick for the body, and additional ones on any legs you want to be able to move.

Bundle Savings

Get all the Roylco items used
in this project and save 15%!

$24.63 USD
bundled price
Add Bundle
to Cart

Line-05

Like us on FacebookShare this post with your friends, or Subscribe to this blog today to receive original craft project updates every week!


Natural Materials Cuff Bracelet

bracelet blog image.jpg

This wearable art is a terrific fashion statement!

Age: 5+

Duration: 10 minutes (excluding drying time)

Learning Outcomes: Learn about the textures and properties of natural materials through manipulation of paper and card board. Exercise fine motor skills.

You’ll Need:

Line-20

Before metalwork became commonplace, jewelry was made with natural materials like wood, bone, leather and porcupine quills. Bone and wood beads could be strung on leather strips, but porcupine quills have to be softened before they can be used. Additionally, rawhide can be wet down, molded and once dry will keep it’s shape. Finally, wood can be steamed to the point where you can bend it! Our version of this craft doesn’t use real rawhide, but students can experiment with paper-based versions of rawhide wet-molding and wood bending.

First cut a 2″ strip of the leather design craft paper and set it aside. You will need it later.

To start, mix a solution of 1/2 a cup of white school glue and 1/2  a cup of tap water. Warm water makes mixing easier, but cool or cold water works too. Just make sure you mix the glue in completely, so there are no gluey lumps in the solution. Once your solution is thoroughly mixed, submerge your craft stick in the mixture for up to 90 seconds. To make this process easier, we used the lid of one of Roylco’s beautiful bins!

Once the craft stick is soaked, pull it out of the solution and start to gently bend it into a circular shape. Just like traditional bending wood, your craft stick can still break if it dries out or if you bend it too quickly. Carefully place the bent craft stick inside an empty Play-doh® container so the bracelet will keep its shape. Allow to dry for at least two hours.

Once the craft stick is dry, remove it from the Play-Doh® container. Lay the 2″ strip of paper in your glue and water solution for a second or two and then gently roll the sheet over the outside of your craft stick. Fold the edges inside so the paper is smooth over top of the craft stick. This technique is similar to wet-molding, and because there is glue in your solution, the paper will be firmly glued to your craft stick once everything dries. Place the paper-covered craft stick back in the Play-Doh® container.

Once the bracelet is dry, decorate it with pencil crayon, marker, crayon or paint. Or try cutting out collage shapes from other sheets of craft paper and glue them on to your bracelet.

Bundle Savings

Get all the Roylco items used
in this project and save 15%!

$18.44 USD
bundled price
Add Bundle
to Cart

Line-13

Like us on FacebookShare this post with your friends, or Subscribe to this blog today to receive original craft project updates every week!

Marble Paper Art Tiles

15401 Marble paper - Yellow LeavesBring color and beauty to the classroom with these simple but beautiful tiles!15401 Marple Paper - Purple Leaves

The middle of winter can feel long and dreary, so lighten up the atmosphere by creating art tiles! These tiles can be used to create a beautiful bulletin board, classroom door or hallway display. Alternatively, they make a simple but beautiful piece of take-home art.

Age: 4+

Duration: 5 minutes

Learning Outcomes: Explore colors and textures. Mosaic abstract shapes together. Practice fine motor skills.

You’ll Need:

Line-07

Start this activity with a sheet of Marble Sculpture Paper. If this is a take-home activity, kids can cut their tiles to whatever size and shape they want. If you plan to use this for a classroom art piece however, it’s easier if all the tiles are the same size. Scraps of the paper can be effectively used as corner frames (like in the yellow tile) if desired.

We suggest using a paint tray in the center of a group table to keep the crafty leaves from flying everywhere. Older students can pop out the die cut leaves on their own. For young students, you may want to pop the pieces out beforehand and let the kids choose and glue them.

Using a glue stick, glue the leaves onto the tiles. Kids can choose to make abstract patterns with their leaves like we did, or they might want to create animals. You can choose a theme for everyone to adhere to, or let the artistic moment dictate decisions.

Once students have completed their tiles, they can either take their artwork home, or it can be used to create a spectacular hallway or bulletin board mosaic!

Bundle Savings

Get all the Roylco items used
in this project and save 15%!

$16.14 USD
bundled price
Add Bundle
to Cart

Line-12

Like us on FacebookShare this post with your friends, or Subscribe to this blog today to receive original craft project updates every week!


Stretched “Hide” Craft

The ultimate fine motor skills craft, kids will cut, lace and tie to create this old-style hide rack!

Age: 6+

Duration: 15 minutes

Learning Outcomes: Learn about ancient techniques for drying and stretching animal hides and creating leather. Exercise fine motor skills as students cut, lace and tie this challenging craft.

You’ll Need:

Line-14

Start by choosing two sheets of craft paper. I chose to use the deer hide and the leather sheets, to show the two possible outcomes of drying animal hides. Use a small loop of tape in the center of the white sides of the sheets to hold them together. This way, both of your hides will be exactly the same shape when you cut them out.

Students can be as creative or literal as they want to when they cut the shape of their hides out. Remember that every animal is a slightly different size, so every hide is unique! I kept my shape vaguely rectangular, but you can choose a wild shape if you want to.

Once you have your hide shape cut out, use your hole punch to make regularly spaced holes. These will allow you to anchor your hide to the frame.

Now it’s time to create your frame. I used four 10″ (25.5 cm) long dowels from the craft store. You can use chopsticks if you want, or students can use small, straight twigs from the playground. Cut four 6″ (15 cm) pieces of yarn. Cross the ends of two of your dowels so that make a right angle. Use a piece of yarn to tie the two together. For a more secure tie, I wrapped my yarn twice in each diagonal, and twice above and below. Trim off any excess yarn.

Continue tying the ends of the dowels together until you have a square frame.

Once your frame is all put together, it’s time to hang your hide on it. Cut a piece of yarn approximately 30″ (76 cm) long, and thread one end through one of our plastic lacing needles. The flexible eye makes threading a breeze! Tie the other end of the yarn to the center of one of your four dowels. Loosely “sew” your hide to your frame. Remember that your hide is supposed to be suspended in the middle of the frame, so don’t pull your yarn too tight. When you come back to the place you started, tie the free end of the yarn to your frame. Trim off any excess yarn.

Now that your hide is stretched, it’s time to decorate! I used washable markers to create a design on the leather side of my hide, and left the deer hide half as it was. Students can use washable markers, crayons or colored pencils to decorate their hides.

This is a great take-home craft, but it also is a great addition to a report or presentation. A dynamic and tactile visual aid can help students absorb information and stay focused!

Bundle Savings

Get all the Roylco items used
in this project and save 15%!

$10.78 USD
bundled price
Add Bundle
to Cart

Line-13

Like us on FacebookShare this post with your friends, or Subscribe to this blog today to receive original craft project updates every week!

Sensory Collage Easter Egg Art Project

Are you looking for Easter egg ideas? The sensory collage Easter egg art project is great for your classroom activities. It introduces children to the important senses of the human body with Roylco’s Sensory Collage Kit. It’s also great for working on fine motor skills.

Age: 5+

Duration: 15 minutes

Learning Outcomes: Exercise fine motor skills. Practice sorting materials by color and texture. Learn about collage art. Develop sensory awareness.

You’ll Need: 

Pull out a wavy sheet from the R15413 Sensory Paper package, choose your favorite pastel color, and draw an outline of an egg. Encourage kids to slowly move their palms and fingertips over the paper to feel the small raised patterns. Some kids may want to follow the patterns on the paper to create their designs, while others may want to create their own designs. You can color the wavy lines on the paper and it will divide the egg into different sections. You can make these lines as bold as you like.

Next, plan and place the sensory art materials you like on your egg. The Sensory Collage Kit contains 20 different sensory art packs to use in creating unique illustrations.

Before gluing the sensory art materials onto the artwork, you can play with the colors and the different textures. Think about which sensory art materials would best represent your Easter egg artwork.

Encourage children to talk about the color and the texture they use on the artwork and discuss what they feel. Is the color a warm color or a cool color? Is the material rough, hard, scratchy, smooth or bubbly? After exploring the materials, children can start to glue the sensory materials onto the artwork.

The artwork is almost finished. Have the children cut out the egg and glue it on to the  cardstock. Here is our sensory collage Easter egg artwork. Write your name on the artwork and take it home for your Easter celebration!

For more information please visit https://roylcostore.com/products/sensory-collage-kit 


Bundle Savings

Get all the Roylco items used
in this project and save 15%!

$47.58 USD
bundled price
Add Bundle
to Cart


Color Diffusing Easter Egg Artwork

Make beautiful color diffusing Easter Egg Artwork by using Roylco’s R15213 Color Diffusing Paper™!

Age: 3+

Duration: 5 minutes for painting and assembling, couple of hour for drying.

Learning Objectives: Use fine motor skills to squeeze paint from pipettes onto paper. Learn about the process of diffusion with beautiful Color Diffusing™ technology.

You’ll Need:

• R15213 Color Diffusing Paper™

• R54470 Junior Heart Paint Pipettes

• Watercolor paint

• Paint tray

• A Cup of water

• Cardstock

Use white chalk to draw an outline of an egg on to Roylco’s R15213 Color Diffusing Paper™ . Then create some patterns to design your egg. I also wrote ” Happy Easter” in the middle of the egg. Encourage children to use their imagination to create their own designs.  

Next, place the paper in the paint tray. Wet the R15213 Color Diffusing Paper™, and use Roylco’s R54470 Junior Heart Paint Pipettes to drip liquid watercolor paint over top of the wet surface. Encourage children to experiment with different color palettes. It’s lots of fun for children to play with different colors and watch the colors flow and blend to create spectacular patterns and effects.. This is a great time for children to learn about color mixing, ask the children to discuss the effects of color mixing.

Let the artwork dry in the paint tray for couple of hours.  You can also use a blow dryer to dry the artwork. You can see the result is unexpected and beautiful.

The color diffusing Easter egg artwork is almost ready. Once the paint is dry, you can cut the egg out and glue it on to the cardstock.

For more information please visit https://roylcostore.com/products/color-diffusing-paper-9×12

Bundle Savings

Get all the Roylco items used
in this project and save 15%!

$15.62 USD
bundled price
Add Bundle
to Cart

Fun Ways to Dye Easter Eggs

Today we are going to show you some fun ways to dye your Easter Eggs.

Age: 4+

Duration: 10 minutes ( Not including drying time )

Learning Outcomes: • Develop fine motor skills • Explore creativity

You’ll Need:

You can use Roylco’s R22054 Lace Design Paper or R15214 Super Value Color Diffusing Paper™ to dye your eggs.

Please see the graphic below. We used both papers. The different texture and design of the paper will create different dying results on the Easter eggs.

  1. Use either the R22054 Lace Design Paper or R15214 Super Value Color Diffusing Paper™ to wrap the egg. Tie the ends tightly with an elastic.
  2. Use Roylco’s R54470 Junior Heart Paint Pipettes to squeeze a few drops of food coloring on to the paper. Then use another Junior Heart Paint Pipette to squeeze a couple of drops of water on the egg. As the egg becomes wet the colors will flow and blend together. Please do not drop too much water on the egg. The more water you add, the more diluted the color of the egg will be.

3. Use the same technique to dye the eggs with different colors.

4. Place the eggs in the paint tray. Let them dry. It will take around 6 hours for them to dry. To speed up the drying, you can use a blow dryer.

All the eggs are dry now! Let’s open them!

You can see the spectacular patterns and colors on the eggs. You can use your eggs as decorations or have an Easter Egg hunt. Enjoy them!

Bundle Savings

Get all the Roylco items used
in this project and save 15%!

$41.19 USD
bundled price
Add Bundle
to Cart