New Product Highlight: Dinosaur Unruly Rulers

Get ready for an art adventure! This set of 6 stencils is fun and useful. Use these Dinosaur Rulers to create your own Dinosaur. Trace around the stencil and add colors when finished.

Age: 3+

Duration: 15-20 minutes

Learning Objectives: Mix and match dinosaur elements to create unique prehistoric animals. Use colored pencils, markers and crayons to decorate your dinos. The simple designs are easy by a wide range of ages.

You’ll need:

  • Crayons, Pencil crayons or markers to design and decorate the dinos
  • Scissor
  • Glue Stick
line-08.png (585×76)

Take a stencil and place it onto a paper. Start tracing the interior edges to draw a perfect dinosaur.

Trace all the body parts starting from head to toe. Mix & match all the elements to give it a proper shape.

Finish the dinosaur shape off with a tail. Here you can see how well the patterns transfers onto the sheet.

Now, it’s time to give colors to this dinosaur. Start filling the shape with your preferred color of crayons and decorate it with your favorite color combination.

To make it more unique, cut out the dinosaur. Choose any picture or a piece of craft paper and glue it on it.

It’s a lot of fun for children to discover the different types of dinosaurs. Try all Dinosaur Rulers and make your own Dinosaur.

Please watch the full video here: https://youtu.be/VM-YXhzKXcw
Visit our website https://roylco.com/shop/dinosaur-unruly-rulers/ for more information.

New Product Highlight: Color Wheel Stencils

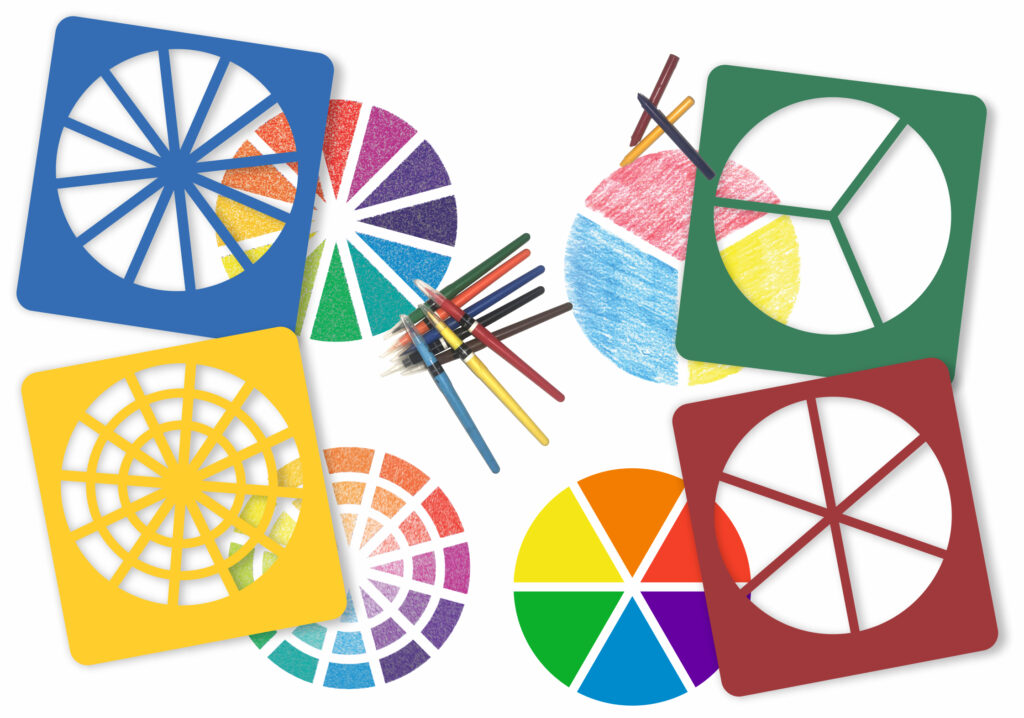
Create fun by encouraging students to create personal color wheels! We like this activity because it can be simple or complex, with a good balance between structure that guides students and open-ended fun that fosters creativity.

Age: 4+
Duration: 15-30 minutes

Here are few ideas on how to use them:

Idea 1: Get familiar with colors by keeping it simple.

What you’ll need:

LET”S GET STARTED

Take a wheel Stencil of your Choice. Put it onto a paper. Start filing up the inner edges with your choice of Color. To get an attractive look, try different colors. You can use Crayons, Markers or Pencil Colors. Once you are done, take off the stencil and see how beautifully the patterns get transfer to the sheet!

Idea 2: Take your color wheels up a notch by adding texture.

What you’ll need:

Take a Wheel Stencil and place it onto a white paper. Place one of our R48250 Rubbing Plate underneath the white paper. The twist starts from here. Fill the first wheel pattern with color of your choice. Once you are done, take that rubbing plate out and switch it with another rubbing plate. Fill up all the patterns by using as many rubbing plates you want and you’ll see the difference.

Idea 3: Take your color diffusing projects in a more structured direction by incorporating the color wheel.

You’ll need:

Take a R15212 Color diffusing Paper and place a wheel stencil over it. Outline the wheel patterns with a chalk or with a white crayon. Now, place the diffusing paper on a no mess tray. Take Our R54466 Junior Paint Spritzers, fill the bottle with liquid water color paint and spritz out a fine mist of color. Use different colors to create different effects.

Let us know how you choose to use your Color Wheel Stencils! Have fun and get creative!
Visit our website https://roylco.com/shop/color-wheel-stencils/ for more information.

Line-08

Thanks for checking out this post! Like us on FacebookShare this post with your friends, or Subscribe to this blog today to receive more project ideas!

Product Spotlight: Holiday Color Diffusing Shapes
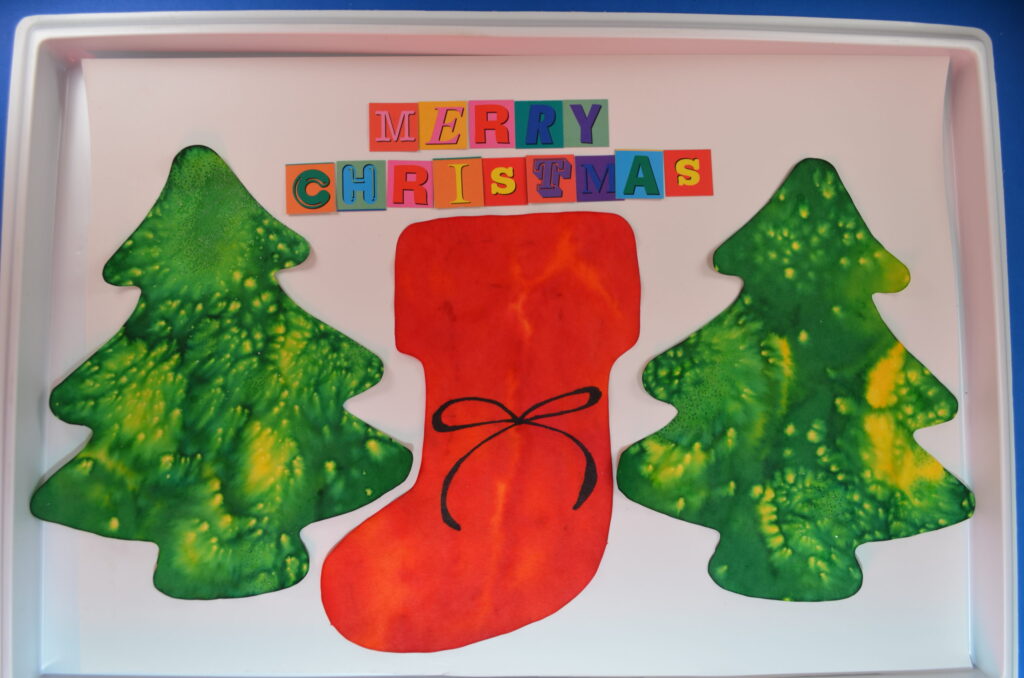
This month, we’re featuring two of our NEW products:

These color diffusing shapes help us get in the holiday spirit while simultaneously developing a deeper understanding of color. There are 3 easy ways to transform these shapes from A to B:

A. Plain Color Diffusing shapes–functional but still waiting for the magic to happen
B. Color Diffusing magic transformed the shapes into these beautiful works of art!

Method 1: Washable Marker & Water

This is the easiest method and the mess-free method. Simply use any washable marker to color the shape, and don’t worry about filling in all the white spaces! When you’re done, spray water on the shape and watch the colors diffuse and create secondary or even tertiary colors.

If you need a spray bottle for the water, we recommend Junior Paint Spritzers–they are perfect for small hands.

Method 2: Watercolor

Break out your trusty watercolor set and go to town! Because of the water used with the watercolor paint, the colors will diffuse throughout the paper as you paint. You can always add some extra water at the end and watch the colors diffuse even more. This is especially helpful if you’d like to make light or pastel designs.

Method 3: Liquid Watercolor & Water

This method creates the most impressive designs, IMHO. You can find liquid watercolors online or at your local craft store. Be careful because these paints can be POTENT! It takes quite a few washes to remove the paint from hands, but that is also what makes the designs so beautiful on Color Diffusing paper.

Simply use a spray bottle with the liquid watercolor to add splashes of color to your Color Diffusing shapes. Once you’re happy, spray the shapes with water and watch the colors blend!

If you need a spray bottle for the color or water, we recommend Junior Paint Spritzers–they are perfect for small hands.

Pro tip: Stick to primary colors! It’s easy to get carried away with color, but once they start diffusing, they have a tendency to blend into one, amorphous brown color if you get too complicated!


Try all 3 and let us know your favorite method!

If you like this, you’ll like Blots of Ornaments too! These ornaments have the added benefits of being cut out of extra thick, high-quality color diffusing paper so that they can be used as real ornaments on a tree or windowsill!

Sensory Collage Easter Egg Art Project

Are you looking for Easter egg ideas? The sensory collage Easter egg art project is great for your classroom activities. It introduces children to the important senses of the human body with Roylco’s Sensory Collage Kit. It’s also great for working on fine motor skills.

Age: 5+

Duration: 15 minutes

Learning Outcomes: Exercise fine motor skills. Practice sorting materials by color and texture. Learn about collage art. Develop sensory awareness.

You’ll Need: 

Pull out a wavy sheet from the R15413 Sensory Paper package, choose your favorite pastel color, and draw an outline of an egg. Encourage kids to slowly move their palms and fingertips over the paper to feel the small raised patterns. Some kids may want to follow the patterns on the paper to create their designs, while others may want to create their own designs. You can color the wavy lines on the paper and it will divide the egg into different sections. You can make these lines as bold as you like.

Next, plan and place the sensory art materials you like on your egg. The Sensory Collage Kit contains 20 different sensory art packs to use in creating unique illustrations.

Before gluing the sensory art materials onto the artwork, you can play with the colors and the different textures. Think about which sensory art materials would best represent your Easter egg artwork.

Encourage children to talk about the color and the texture they use on the artwork and discuss what they feel. Is the color a warm color or a cool color? Is the material rough, hard, scratchy, smooth or bubbly? After exploring the materials, children can start to glue the sensory materials onto the artwork.

The artwork is almost finished. Have the children cut out the egg and glue it on to the  cardstock. Here is our sensory collage Easter egg artwork. Write your name on the artwork and take it home for your Easter celebration!

For more information please visit https://roylcostore.com/products/sensory-collage-kit 


Bundle Savings

Get all the Roylco items used
in this project and save 15%!

$47.58 USD
bundled price
Add Bundle
to Cart


Make your own Origami Rabbit

Are you looking for more Easter ideas this week? Making origami rabbit is fun and easy. Today we are going to show you how to make these cute origami rabbits.

Age: 4+

Duration: 6 Minutes

Learning Outcomes: Practice following step-by-step instructions while exercising fine motor and spatial skills.

You’ll Need: 

Step-by-step Instructions ( Please see the graphic above ):

  1. Fold your paper in half to make a triangle.
  2. Fold the creased side of the triangle up about 3/4″.
  3. Fold one side toward the center, line up the points and crease.
  4. Fold another side toward the center. Line up the points and crease.
  5. Fold the bottom up.
  6. Flip it over. Fold the top point inside to create the top of the rabbit’s head. You can see the rabbit’s head is ready now.
  7. Let’s work on the rabbit’s body. Take another piece of paper. Please check the graphic, fold one side of the paper to make a triangle. Then line up the points and fold another side into a triangle.
  8. Flip it over. Align with the point at the bottom, fold the paper to make a triangle. Then line up the points and fold another side into a triangle.
  9. Align with the points in the middle, then fold the shape into half to create a rabbit’s body. Put the rabbit’s head on the top of the body. The basic shape of rabbit is ready.

Ideas:

  • Roylco’s R15219 Elemetary Origami Animals pack provides different patterns and bright colors of origami paper. Contrasting colors are printed on the reverse side. Use the fun bright paper to create your own designs.
  • You can draw different cute facial features on the rabbit. Or you can use other craft paper to cut out the features and glue them on the rabbit.
  • Check out our blog post on “How to make origami carrots” and make a couple of carrots for your rabbits.
  • Display the rabbits somewhere festive, hide them around the house, or around the neighborhood where friends might find them.
  • Punch a hole at the back of the rabbit. Thread a piece of yarn with all the rabbits you make. Hang the rabbits from the ceiling or use them to decorate bulletin boards, doors and hallways!

Please visit https://roylcostore.com/products/elementary-origami-animals for more information.

Color Diffusing Easter Egg Artwork

Make beautiful color diffusing Easter Egg Artwork by using Roylco’s R15213 Color Diffusing Paper™!

Age: 3+

Duration: 5 minutes for painting and assembling, couple of hour for drying.

Learning Objectives: Use fine motor skills to squeeze paint from pipettes onto paper. Learn about the process of diffusion with beautiful Color Diffusing™ technology.

You’ll Need:

• R15213 Color Diffusing Paper™

• R54470 Junior Heart Paint Pipettes

• Watercolor paint

• Paint tray

• A Cup of water

• Cardstock

Use white chalk to draw an outline of an egg on to Roylco’s R15213 Color Diffusing Paper™ . Then create some patterns to design your egg. I also wrote ” Happy Easter” in the middle of the egg. Encourage children to use their imagination to create their own designs.  

Next, place the paper in the paint tray. Wet the R15213 Color Diffusing Paper™, and use Roylco’s R54470 Junior Heart Paint Pipettes to drip liquid watercolor paint over top of the wet surface. Encourage children to experiment with different color palettes. It’s lots of fun for children to play with different colors and watch the colors flow and blend to create spectacular patterns and effects.. This is a great time for children to learn about color mixing, ask the children to discuss the effects of color mixing.

Let the artwork dry in the paint tray for couple of hours.  You can also use a blow dryer to dry the artwork. You can see the result is unexpected and beautiful.

The color diffusing Easter egg artwork is almost ready. Once the paint is dry, you can cut the egg out and glue it on to the cardstock.

For more information please visit https://roylcostore.com/products/color-diffusing-paper-9×12

Bundle Savings

Get all the Roylco items used
in this project and save 15%!

$15.62 USD
bundled price
Add Bundle
to Cart

Fun Ways to Dye Easter Eggs

Today we are going to show you some fun ways to dye your Easter Eggs.

Age: 4+

Duration: 10 minutes ( Not including drying time )

Learning Outcomes: • Develop fine motor skills • Explore creativity

You’ll Need:

You can use Roylco’s R22054 Lace Design Paper or R15214 Super Value Color Diffusing Paper™ to dye your eggs.

Please see the graphic below. We used both papers. The different texture and design of the paper will create different dying results on the Easter eggs.

  1. Use either the R22054 Lace Design Paper or R15214 Super Value Color Diffusing Paper™ to wrap the egg. Tie the ends tightly with an elastic.
  2. Use Roylco’s R54470 Junior Heart Paint Pipettes to squeeze a few drops of food coloring on to the paper. Then use another Junior Heart Paint Pipette to squeeze a couple of drops of water on the egg. As the egg becomes wet the colors will flow and blend together. Please do not drop too much water on the egg. The more water you add, the more diluted the color of the egg will be.

3. Use the same technique to dye the eggs with different colors.

4. Place the eggs in the paint tray. Let them dry. It will take around 6 hours for them to dry. To speed up the drying, you can use a blow dryer.

All the eggs are dry now! Let’s open them!

You can see the spectacular patterns and colors on the eggs. You can use your eggs as decorations or have an Easter Egg hunt. Enjoy them!

Bundle Savings

Get all the Roylco items used
in this project and save 15%!

$41.19 USD
bundled price
Add Bundle
to Cart

Metallic Robot Mask

finished craft.jpg

This mask is the perfect finishing touch for a classic DIY robot costume this Halloween!

Age: 5+

Duration: 10 Minutes (plus drying time)

Learning Outcomes: Exercise fine motor skills. Practice precision scissor skills. Create beautiful take-home art!

You’ll Need: 

  • R52076 Folding Fun Masks
  • Aluminum Foil (available at most grocery stores)
  • White glue
  • Tempera Paint
  • Paintbrushes
  • Goo Spreader

Line-22

Start with a flat mask, and use the goo spreader to put a thin layer of glue over the whole mask.

step 1.jpg

Lay a large piece of aluminum foil on top of the mask, gently smoothing the foil so there are not air bubbles trapped between the mask and the foil. Allow the glue to dry for a few minutes.

step 2.jpg

Once the glue has dried, carefully cut the excess foil away. Make sure to carefully cut out the Vs that serve as pleats, and the eyes, mouth and nose. If you can’t get to the eyes easily, try using a pencil to make a small hole before trying to use your scissors.

step 3.jpg

Once the excess foil has been trimmed, it’s time to decorate your mask! Sharpies work well on foil, but they aren’t good for a classroom setting. We used tempera paint to decorate our robot mask!

step 4.jpg

Once the paint is dry, fold in both sides of the pleats and tape to give the mask dimension. Push out the nose along the pre-cut scores. Then use chenille stems and the pre-punched holes to secure the mask to your head!

To complete your robot costume for Halloween, try covering a cardboard box in aluminum foil. Then a parent or teacher can cut holes for your head and arms to go through, and students can decorate the robot bodies! This classic Halloween costume is fun and easy to make.

Line-02

Like us on FacebookShare this post with your friends, or Subscribe to this blog today to receive original craft project updates every week!

Action Shapes

2015-08-31-FeatureImage

These poseable, personalized action figures are great for setting up easy puppet theatre-style plays or making a stop motion animation movie! Learn more below!

IMG_0252

Each Action Shape comes in separate parts laid onto sheets. Before popping out all the pieces, ask students to identify the different parts of the body and label them if possible. That way you can keep track of where each piece attaches. The Action Shapes are great for teaching students about proportions, poses or turning projects into All About Me activities!

IMG_0296

Help students orient their Action Shape person according to proper proportions.

IMG_0304

As they are putting their figures together, they can start coloring in details. Use markers, crayons or pencil crayons.

IMG_8638

Make sure to completely cover the Action Shapes body with color!

IMG_0317

The pieces attach together with small fins and slots to keep the fins in place.

IMG_0318

Simply pinch the fins together, and slide them through the slots.

IMG_0320

Fan out the fins to keep the attachments in place.

IMG_0335

This Action Shape was completely colored in before assembly, so the attachments appear seamless!

IMG_0352

Now strike a pose!

IMG_0360

We even had some of the campers pose in our makeshift puppet theatre!

IMG_0371

Everyone else got in on the fun too! To make a stop-motion animation, first think about the kind of action you want your character to perform. This is a great chance for you to discuss the different types of action words or verbs with your students. You can have your students pick one action verb to illustrate through their stop motion video.

IMG_0378

Stop motion animation is made up of multiple single frames or “shots.” These shots are strung together to make up a video. The best way to achieve this is to set up any standard camera you own to take a shot every time your students adjust the poses of their Action Shapes people. Once the action is complete, upload your pictures to your computer. Use software that can easily convert your pictures into a GIF animation or equivalent.

Here’s a look at what we made with stop-motion animation!

Animation

She kicks, she scores!

Your students will have lots of fun preparing their own stop-motion animations. For the background, use a large sheet of Bristol board or have your students create their own backgrounds with sheets of paper and markers or crayons!

Line-12

Like us on FacebookShare this post with your friends, or Subscribe to this blog today to receive original craft project updates every Monday, Wednesday and Thursday!