New Product Highlight: Color Wheel Stencils

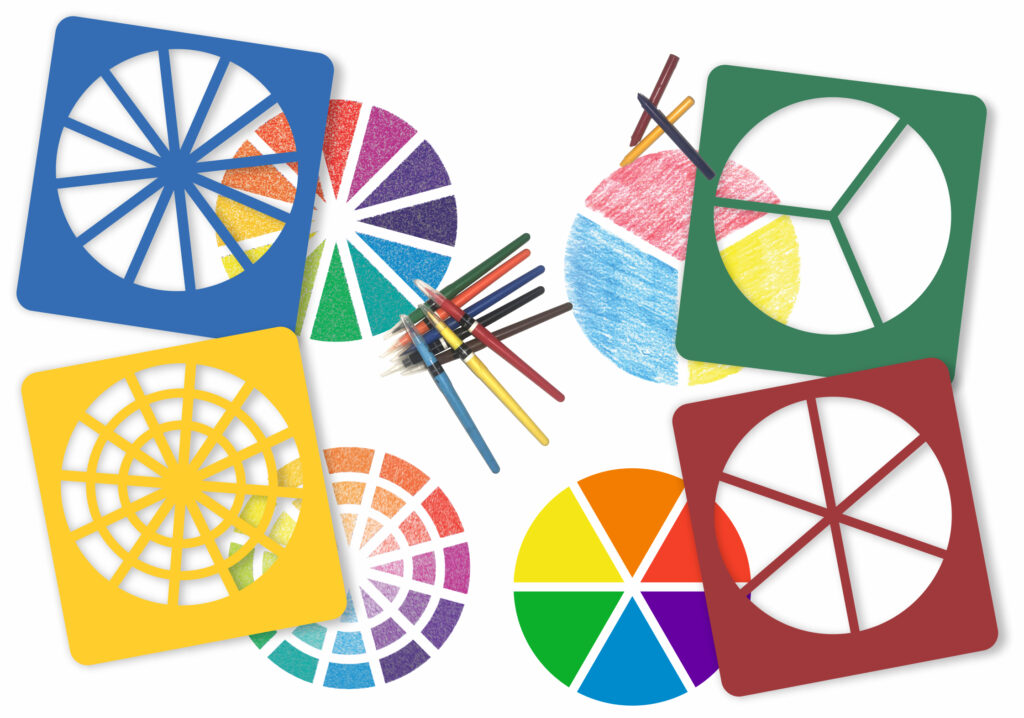
Create fun by encouraging students to create personal color wheels! We like this activity because it can be simple or complex, with a good balance between structure that guides students and open-ended fun that fosters creativity.

Age: 4+
Duration: 15-30 minutes

Here are few ideas on how to use them:

Idea 1: Get familiar with colors by keeping it simple.

What you’ll need:

LET”S GET STARTED

Take a wheel Stencil of your Choice. Put it onto a paper. Start filing up the inner edges with your choice of Color. To get an attractive look, try different colors. You can use Crayons, Markers or Pencil Colors. Once you are done, take off the stencil and see how beautifully the patterns get transfer to the sheet!

Idea 2: Take your color wheels up a notch by adding texture.

What you’ll need:

Take a Wheel Stencil and place it onto a white paper. Place one of our R48250 Rubbing Plate underneath the white paper. The twist starts from here. Fill the first wheel pattern with color of your choice. Once you are done, take that rubbing plate out and switch it with another rubbing plate. Fill up all the patterns by using as many rubbing plates you want and you’ll see the difference.

Idea 3: Take your color diffusing projects in a more structured direction by incorporating the color wheel.

You’ll need:

Take a R15212 Color diffusing Paper and place a wheel stencil over it. Outline the wheel patterns with a chalk or with a white crayon. Now, place the diffusing paper on a no mess tray. Take Our R54466 Junior Paint Spritzers, fill the bottle with liquid water color paint and spritz out a fine mist of color. Use different colors to create different effects.

Let us know how you choose to use your Color Wheel Stencils! Have fun and get creative!
Visit our website https://roylco.com/shop/color-wheel-stencils/ for more information.

Line-08

Thanks for checking out this post! Like us on FacebookShare this post with your friends, or Subscribe to this blog today to receive more project ideas!

Product Spotlight: Holiday Color Diffusing Shapes
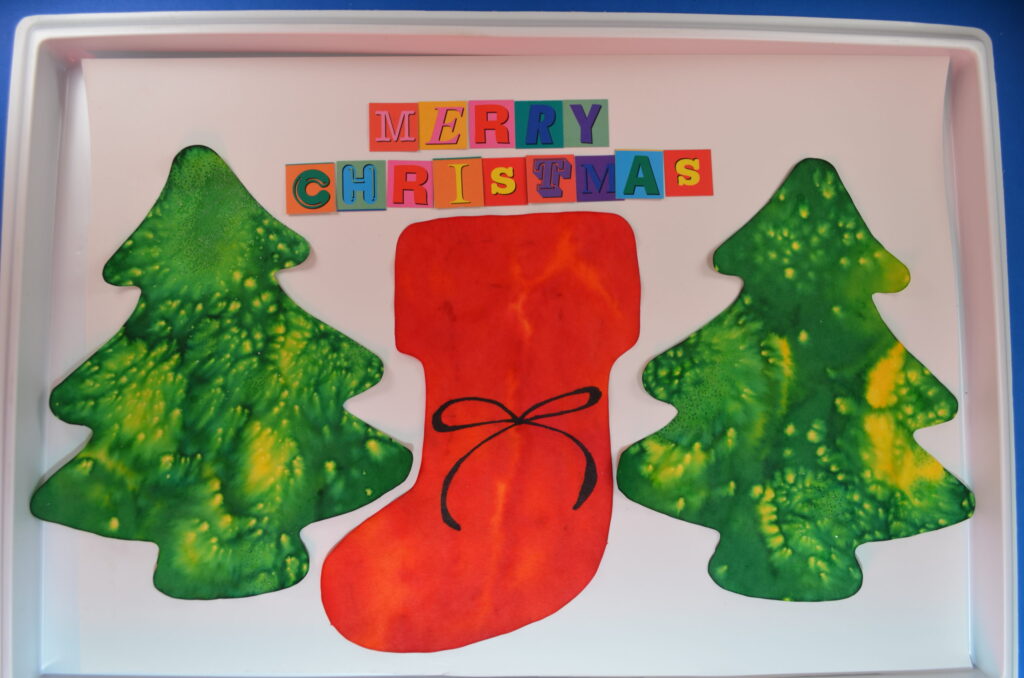
This month, we’re featuring two of our NEW products:

These color diffusing shapes help us get in the holiday spirit while simultaneously developing a deeper understanding of color. There are 3 easy ways to transform these shapes from A to B:

A. Plain Color Diffusing shapes–functional but still waiting for the magic to happen
B. Color Diffusing magic transformed the shapes into these beautiful works of art!

Method 1: Washable Marker & Water

This is the easiest method and the mess-free method. Simply use any washable marker to color the shape, and don’t worry about filling in all the white spaces! When you’re done, spray water on the shape and watch the colors diffuse and create secondary or even tertiary colors.

If you need a spray bottle for the water, we recommend Junior Paint Spritzers–they are perfect for small hands.

Method 2: Watercolor

Break out your trusty watercolor set and go to town! Because of the water used with the watercolor paint, the colors will diffuse throughout the paper as you paint. You can always add some extra water at the end and watch the colors diffuse even more. This is especially helpful if you’d like to make light or pastel designs.

Method 3: Liquid Watercolor & Water

This method creates the most impressive designs, IMHO. You can find liquid watercolors online or at your local craft store. Be careful because these paints can be POTENT! It takes quite a few washes to remove the paint from hands, but that is also what makes the designs so beautiful on Color Diffusing paper.

Simply use a spray bottle with the liquid watercolor to add splashes of color to your Color Diffusing shapes. Once you’re happy, spray the shapes with water and watch the colors blend!

If you need a spray bottle for the color or water, we recommend Junior Paint Spritzers–they are perfect for small hands.

Pro tip: Stick to primary colors! It’s easy to get carried away with color, but once they start diffusing, they have a tendency to blend into one, amorphous brown color if you get too complicated!


Try all 3 and let us know your favorite method!

If you like this, you’ll like Blots of Ornaments too! These ornaments have the added benefits of being cut out of extra thick, high-quality color diffusing paper so that they can be used as real ornaments on a tree or windowsill!

Light Cube: Glowing Art by Twins At Play!

IMG_5045

Kristen from Twins at Play is featured in another great post about the Educational Light Cube. In this edition, she gets her twins to play with neon tempera paints and black lights on the Light Cube!

To see the full post, please view HERE!
Kristen says:
“My twins had such a blast with this activity!
We used:
 
neon tempera paint, 
and printer paper
IMG_5046
 
With the Educational Light Cube remote control, we turned the light cube to on one of it’s blue hues.  We switched around between blues and purples. We also turned on a few black lights. I put one of the Educational Light Cube trays from the accessory pack on to the light cube, then squirted some neon tempera paint right on to the tray. After that, I gave my twin boys paint scrapers and let them make designs, then they pressed printer paper on to the paint, gently pushed down and gently lifted the paper. They ended up with very pretty Art prints!
IMG_5058
We did this before bed, there was very little clean up.
This can be done in daylight with regular colored tempera paint too!”
Thanks to Kristen @ Twins at Play for putting together this awesome post!
Images and Text © Kristen from Twins at Play blog

To see more about our R59601 Educational Light Cube, visit here!

Line-16

Like us on FacebookShare this post with your friends, or Subscribe to this blog today to receive original craft project updates every Monday, Wednesday and Friday!

Cassie Stephens uses our Japanese Carp Wind Sock Kit!

This art teacher helps infuse so much inspiration and creativity into her students’ work… it’s zany!! We LOVE the Japanese Carp Wind Socks Mrs. Stephens’ class made and we’d want you to have a look and share in the wonder!

The basic wind sock shape was used as the base for students to draw their designs on with markers.

Once students had finished their designs, they were instructed to put up their hand to get Mrs. Stephens attention. Mrs. Stephens would then spritz their designs with water to get the colors to mix around, much like the effects produced with our Color Diffusing Paper!

The windsocks were then wrapped and secured together with tape. The students hung them from the top edge of a window overlooking a beautiful courtyard. The image is astounding, but you’ll have to click the link to Cassie’s blog to see it!! Hint: It’s the perfect backdrop for this craft!

Thanks to Cassie for putting together this amazing project! See the full blog post here.

Line-13

Like us on FacebookShare this post with your friends, or Subscribe to this blog today to receive original craft project updates every Monday, Wednesday and Friday!

Educational Light Cube: Dimensional Art by Twins at Play!

The awesome sensory and light play blog Twins at Play delivers a new post about our Educational Light Cube! Check out this great combination of our Light Cube Building set and Constructa Clips on a beautiful illuminated surface and the coolest sculpture you’ve seen yet! 

© Kristen from Caution! Twins at Play! blog

This is what Kristen from Twins at Play had to say about her twins’ experiences with these products:

My twins and I have been enjoying making awesome shapes, sculptures, and art on the light cube with the Constructa Clips light table building kit! The kit comes with 48 red clips and 32 mylar shapes. The shapes are nice and sturdy but do bend a little for awesome building fun! The shapes are also great for color lessons! I love this kit, it is perfect for the light cube, light table, or even natural light play! They cast great color in sunlight!!

In the photos below, we used the clear plastic trays for the light cube to hang the clips from. Then we were able to build outward and downward with the constructa clips and shapes!  This was a really fun and unique building experience. This was also a very unique light cube/light table play experience.
We also used a plastic straw to create art sculptures. We used the 4 clip constructa clips to attach shapes and then we just put the straw through the whole in the center of the constructa clips. What a fun way to create art and building at the same time on the light cube!!

Thanks to Kristen @ Twins at Play for putting together this awesome post!

To see more about our R59601 Educational Light Cube, visit here!

R60165 Constructa Clips Light Table Building Kit can be viewed in-depth here.

Line-07

Like us on FacebookShare this post with your friends, or Subscribe to this blog today to receive original craft project updates every Monday, Wednesday and Friday!

Welcome to the Light Cube!

2014-10-09-FeatureImage

We at Roylco are excited to launch our new series of posts about our brilliant Educational Light Cube! Check us out every Thursday for a brand new look at our sensory-engaging light box… and all the amazing things you can do with it. Let’s get introduced!

IMG_0123The R59601 Educational Light Cube is a sensory base that can be used for a variety of activities! Place different materials onto the Light Cube and turn the unit on. You will notice a bright, beautiful glow emitting from the Light Cube and illuminating the objects on the cube. This is a great way to engage children who would not normally respond to these materials in normal light conditions.

IMG_0247The cube has a water-resistant surface that can easily be cleaned with warm water and soap. This makes it a great base for water-based sensory activities and painting activities.

IMG_0385The Light Cube is portable, durable and a great addition to your classroom! Use it as furniture or to illuminate a low-light area, such as a reading fort.

IMG_0409Cycle through multiple light colors using the accompanying remote. There are 16 colors in total. You can make the colors strobe, flash, fade and smoothly transition between each one.

IMG_0463You can use the Light Cube to engage students in virtually any lesson plan using simple materials already in your classroom. Set up environments like this one, with animal figurines and gravel! Kids will love playing with the different sets.

IMG_0595Use the Light Cube to arrange math manipulatives on the surface. Students focus best when their attention is directed on one thing at a time, and the Light Cube does just that with its soft glow.

IMG_0632It engages students to experiment with different materials and view the effects of color-changing light!

IMG_0730

Practice writing skills!

IMG_8785Observe new concepts on the Light Cube, such as human or animal anatomy using our range of x-ray products!

IMG_9303Test out new sensory materials such as gel-stickers! These materials feel great on little fingers, and illuminate well on the Light Cube.

IMG_9355Stack ‘em up and knock ‘em down! Try out a range of building materials, such as clear plastic dollar store cups, to build your tallest colorful towers!

IMG_9484Keep your students engaged in light exploration with soft-glow lighting. Make a small fort for reading, playtime, math activities and more to amplify the effect of the Light Cube.

IMG_9508Explore what’s inside unique animal specimens!

IMG_9549Older students can join in the fun, too! Set up the Light Cube in a darkened area, and give your students tracing paper and pencils to work with. While using the Light Cube as a tracing light box, students can easily check their work and develop their own creative ideas.

IMG_9615Match up transparent sheets that are printed with various images. Here, we’ve showcased our shell x-rays.

IMG_9745Students will love watching colors leap right off the Light Cube. They can use the materials to build fantastic structures or simply observe the effects of light on color.

IMG_9813Turn on the strobing lights to get amazing responses like this one!

IMG_9915And this one! The Light Cube does it all… delight, entertain, educate and stimulate with its sleek design, bright, colorful lights and durable learning surface.

IMG_9931We’re sure you will delight in your very own Light Cube as well! Visit our Roylco Store for more details or contact your local toy/educator retail store to get your Light Cube today!

Line-20

Like us on FacebookShare this post with your friends, or Subscribe to this blog today to receive original craft project updates every Monday, Wednesday and Friday!

Color Diffusing Animal Shapes

color diffusing animal shapesUse the magic of Color Diffusing Paper to make lovely animal designs from basic shapes! View our tutorial and see how our art campers adapted their designs. 

Age: 4+

Duration: Drying time + 10 minutes

Learning Objectives: Use fine motor skills to squeeze paint out of pipettes onto paper. Develop beautiful arrangements of colors and observe how colors blend together to create new colors. Exercise scissor skills through cutting basic shapes. Learn geometric shape concepts and arrange shapes together to make animal designs. Encourage critical thinking and puzzle solving through shape layering. Combine math, science and art into one unified project.

You’ll Need:

R15212 Color Diffusing Paper (12 x 18″)

R54460 Squiggle Pipettes

R7512 Fingerpaint “No Mess” Trays

• Watercolor paint

• Scissors

• Glue

• Card paper sheet

Line-19

It is important for students to not only exercise their fine motor development, but to understand the processes behind color mixing, diffusion and artistic composition. This is a great exercise in learning composition as students get to use the shapes they have on hand to create interesting designs!

coloring animalsLay sheets of Color Diffusing Paper onto paint trays. Draw basic shapes on the sheets of paper using permanent markers, rulers and other measurement tools. In the photos above, we’ve drawn basic shapes such as squares, triangles circles, half moon shapes and more!

Next, our careful art campers took pipettes and dropped various paint colors onto the diffusion sheets.

painting diffusing paperThey loved seeing how the colors spread throughout the paper! This is the process of diffusion, where paint molecules spread through the paper molecules to fill in the spaces where there are no paint molecules.

paintingHere, one of the campers has mixed multiple colors together.

pipettesThis camper was careful to paint directly over the shape illustrations, but as the paint molecules diffused through the paper, the paint spread throughout the entire sheet!

watercolor paintHere’s another look!

squiggle pipettes paintIt’s a great process that children can see unfolding right before their eyes!

spraying water onto paintTo give the paint a hand, we sprayed the paper with some water to help push the paint molecules around. Notice how the permanent marker ink doesn’t blend with the rest of the paint, however!

sharpie on color diffusing paperAnother art camper was busy working away at her own diffusing paint canvas.

sharpie paintYou can see the paint already starting to spread across.

paint and sharpieHow cool is that?!

scissor skills

We left the paint to dry in the sun, which made the process happen a lot quicker!

cut and paste activityThe campers then cut up the various pieces following the outlines on the paper.

geometry shapes artThey are careful to follow the lines and reaffirm their knowledge of each shape. For instance, it’s easy to tell that this particular shape the art camper is cutting is a square. But how would you describe the candy-cane like shape?

cutting shapesWhile students are cutting, it’s a good idea to ask them what the various shapes can be used to make. Help them visualize their final designs as they are cutting the shapes out.

cutting paper shapesAsk students to use descriptive words when talking about their shapes.

pasting paper

Now let’s piece it all together! Here, one of the art campers has started to create the body and the head of an animal.

paper shapesUsing white glue and goo spreaders (read more about these awesome glue tools here!), the art campers pasted their pieces onto a large sheet of card paper.

glue paperCan you guess what kind of animal this art camper is making?

paper animalA cute piggy!

color diffusing animalHere’s another variation of our adorable piglets! This art camper even drew a smiley face!

paste colorful shapesHow about this work of art?

paste colorful shapesThe art camper here is adding on the legs…

underwater animal craftTo make an adorable crab picture! Isn’t that artwork so neat? Thanks for hanging out with us today. It’s been a blast!

Line-19

Like us on FacebookShare this post with your friends, or Subscribe to this blog today to receive original craft project updates every Monday, Wednesday and Friday!