Frog Mask

finished frog mask.jpg

This adorable mask is a perfect addition to your costume closet! Wear it Trick-or-Treating too!

Age: 4+

Duration: 15 minutes (plus drying time)

Learning Outcomes: Augment student presentations with this adorable costume piece. Exercise fine motor skills. Create wearable art.

You’ll Need:

Line-07

Today we will explore a fun way to add texture and color to a mask using paper! We have chosen a frog mask, but this crafty technique can be used across a wide variety of art activities.

step 1

Start with a flat mask. We used a green marker to add a base color to the entire mask.

step 2

Next, tape the tabs and pleats of the mask together. This will give your mask a 3 dimensional shape! Remember, it is easier to color a mask while it is flat, but if you will be applying details with glue, it is easier to fold up and tape the mask together BEFORE applying glue. If you glue things to a flat mask, the dry glue may crack and cause pieces to fall off when you fold the mask.

step 3

To add color and texture to your mask, try using circle popz! Spread a thin, even layer of glue around the frog mask’s eyes. We used small circles to line the eyes, alternating between a solid circle and a patterned circle.

step 4

For the rest of the face of the mask, we used larger circles cut in half. Spread a thin, even layer of glue on the mask, and start from the bottom of the face. Work your way upwards in slightly overlapping rows,

step 5

This twist on a typical collage technique is a simple, fun and effective way to add bright colors and patterns to a mask.

Use masks in your classroom for imaginative play, to add some life to a presentation, and as beautiful wall art! Don’t forget to take the time to talk about the history and uses of masks in different cultures.

Bundle Savings

Get all the Roylco items used
in this project and save 15%!

$22.51 USD
bundled price
Add Bundle
to Cart

 Line-20

Like us on FacebookShare this post with your friends, or Subscribe to this blog today to receive original craft project updates every week


Metallic Robot Mask

finished craft.jpg

This mask is the perfect finishing touch for a classic DIY robot costume this Halloween!

Age: 5+

Duration: 10 Minutes (plus drying time)

Learning Outcomes: Exercise fine motor skills. Practice precision scissor skills. Create beautiful take-home art!

You’ll Need: 

  • R52076 Folding Fun Masks
  • Aluminum Foil (available at most grocery stores)
  • White glue
  • Tempera Paint
  • Paintbrushes
  • Goo Spreader

Line-22

Start with a flat mask, and use the goo spreader to put a thin layer of glue over the whole mask.

step 1.jpg

Lay a large piece of aluminum foil on top of the mask, gently smoothing the foil so there are not air bubbles trapped between the mask and the foil. Allow the glue to dry for a few minutes.

step 2.jpg

Once the glue has dried, carefully cut the excess foil away. Make sure to carefully cut out the Vs that serve as pleats, and the eyes, mouth and nose. If you can’t get to the eyes easily, try using a pencil to make a small hole before trying to use your scissors.

step 3.jpg

Once the excess foil has been trimmed, it’s time to decorate your mask! Sharpies work well on foil, but they aren’t good for a classroom setting. We used tempera paint to decorate our robot mask!

step 4.jpg

Once the paint is dry, fold in both sides of the pleats and tape to give the mask dimension. Push out the nose along the pre-cut scores. Then use chenille stems and the pre-punched holes to secure the mask to your head!

To complete your robot costume for Halloween, try covering a cardboard box in aluminum foil. Then a parent or teacher can cut holes for your head and arms to go through, and students can decorate the robot bodies! This classic Halloween costume is fun and easy to make.

Line-02

Like us on FacebookShare this post with your friends, or Subscribe to this blog today to receive original craft project updates every week!

3D Features Mask

finished craft.jpg

This cheerful mask incorporates paper sculpting to create vivid 3D facial features! Use as part of a costume or as colorful wall art!

Age: 5+

Duration: 30 minutes (plus drying time)

Learning Outcomes: Practice sculpting with paper. Explore new art techniques. Exercise fine motor skills. Talk about what masks represent for various world cultures.

You’ll Need:

  • R52010 African masks
  • R2172 Tissue Circles
  • Sculpting paper (we used white printer paper, but you can experiment with newsprint or construction paper)
  • White glue (mixed with equal parts water)
  • Tape
  • Paintbrush

Line-20

  1. To start this project, mix equal parts white glue and water in a small dish.
  2. Tape the V’s at the top and bottom of the mask together. This will make a convex mask, and prevent the tissue “skin” from tearing. If you use this technique on a flat mask, the glue and tissue will crack when you transform the mask to 3 dimensions.
  3. Challenge kids to crumple, bend and twist paper in order to sculpt their mask’s facial features. Tape each facial feature securely in place.
  4. Using your paint brush, spread your glue and water mix over your mask. Carefully lay tissues circles on the mask, and laminate them in place with more of your glue and water mixture. The tissue will absorb the moisture and mold itself to the contours of the facial features. If necessary, tear the tissue circles into different shapes to cover smaller areas.
  5. Allow the glue to dry thoroughly!
  6. Trim off any excess tissue paper.
  7. Use chenille stems to secure your mask to your head, or to hang it on the wall!

Bundle Savings

Get all the Roylco items used
in this project and save 15%!

$17.41 USD
bundled price
Add Bundle
to Cart

Line-07

Like us on FacebookShare this post with your friends, or Subscribe to this blog today to receive original craft project updates every week!

Paper Sculpted Lion Mask

finished craft.jpg

These easy paper sculpting techniques create a beautiful 3D effect on any basic mask! 

Age: 5+

Duration: 20 Minutes

Learning Outcomes: Practice precision scissor skills! Explore the tensile strength and elasticity of paper. Learn how different textures create different looks!

You’ll Need:

Line-12

  1. Select your mask. We chose a lion mask for this project. Then we colored in the mane and snout with crayons while the mask was flat.
  2. Fold, crease, overlap and tape your mask so it is 3D! It is much easier to fold your mask up BEFORE you add the paper elements than trying to fold it up after.
  3. Cut strips out of your construction paper to form the lion’s mane. Strips that are approximately 4″ long worked best for the mane.
  4. Once all your strips are cut, gently roll each strip up, then let it relax.
  5. Tape your mane curls to the mask. We taped them in three rows, starting with the outermost row and working inward.
  6. Next, cut strips for the facial fur. We started with long strips and measured each strip against the section of mask we wanted to cover. Once each strip was the correct length, we cut the strip into a fringe and taped it down. Start from the lowest point that you want the fur fringe to cover and work upwards in layers.
  7. Use chenille stems and the pre-punched holes to secure the mask to your head! These masks are perfect finishing touches for Halloween costumes!

Line-06

Like us on FacebookShare this post with your friends, or Subscribe to this blog today to receive original craft project updates every week!


Spooky Halloween Masks

Image of Roylco Halloween Mask

Feature-Image-halloweenmask

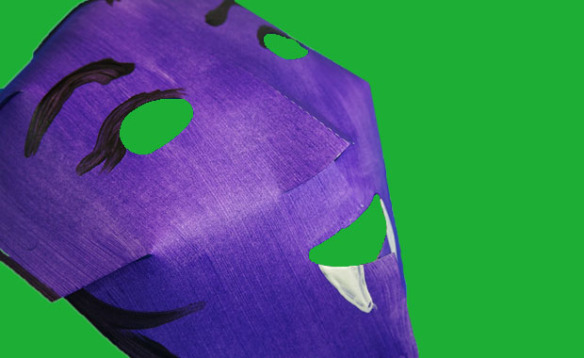
Don’t stress about what to wear this Halloween… make spooky faces with our R52076 Folding Fun Masks! A bit of paint and our step by step instructions go a long way with these spooktacular masks!

Age: 6+

Duration: 20-30 minutes

You’ll Need:

• R52076 Folding Fun Masks

• Paint

• Paintbrush

• Paint tray (try our R7512 “No Mess” Fingerpaint Tray™!)

• Tape

• Imagination!

Line-10

In this tutorial I’m going to show you how to paint a basic scary face. You can add more details to the basic face illustration or change the color for different dramatic effects. The photo at the end of this post shows some example ideas that you can do with minor changes to the look.

OLYMPUS DIGITAL CAMERA

Choose “Halloween” colors for your mask. For this project, I chose deep purple, white and black paint colors.

OLYMPUS DIGITAL CAMERA

Lay out the R52076 Folding Fun Mask onto the paint tray and cover it in an even layer of paint.

OLYMPUS DIGITAL CAMERA

Switch to black paint. First drag your paint brush along the outside edge of the mask to make a black border. Stop right before the bottom edge of the mask. At the middle of the hairline, paint the point of a triangle facing downwards. Finally, add a slight curl to either side of the mask.

OLYMPUS DIGITAL CAMERA

Add an eyebrow line above each eye. Trace out the top edge of each eye with black paint. Drag the point of the brush from the outside corner of each eye to add lashes.

OLYMPUS DIGITAL CAMERA

Use white paint to illustrate fangs.

OLYMPUS DIGITAL CAMERA

Once the paint on the mask is dry, tape the mask slits together. The edges of each slit overlap to make the mask appear 3D!

OLYMPUS DIGITAL CAMERA

Secure the overlapped edges with tape on the underside of the mask.

OLYMPUS DIGITAL CAMERA

Ready for spook-tastic fun! Tip: Punch a hole through each side of the mask. Thread through some string or pipe cleaners to help secure the mask while wearing.

OLYMPUS DIGITAL CAMERA

Change the base color of the mask to form an entirely new mask! Choose a pale green for another vampire-inspired Halloween mask. You can paint the mask deep green and add straight lines with stitch-like notches for a creepy monster mask. Use a thick brush and a deep brown to create the mummy mask. Just drag the paintbrush across the entire mask at different angles. This will create the effect of woven paper strips. Splotch the brush with deep brown around the eyes.

Scare the socks off your friends with these crazy designs!

CRAFT CHALLENGE:

Paint a witch-like mask! Show us your techniques and step-by-step instructions on how to make the perfect witch mask.

Add 3D details! Stitch yarn to the edges of the mask to make hair, or attach thumbtacks to various parts of the mask to make ugly warts. Paint over the thumbtacks with the base color of the face to blend it in.

Line-10

Send us photos of your work to subscriber@roylco.ca. We would love to feature your project on our next upcoming post!