Valentine’s Day: Pop Up Pivot Cards

Make your Valentine feel Special. Create your own Super Cute Valentine Card by using our New R51460 Pop Up Pivot Cards. Send a love note to all your friends and family members with this sweet Valentine’s Day card. The clever design is easy to assemble and fun to decorate. The three-dimensional message card unfolds and pivots as the card opens.

Age: 5+

Duration: 15-30 minutes

Learning Objectives: Makes a perfect take-home craft. Encourage creativity. Integrate art, literacy, and holiday activities. Exercise fine motor skills.

You’ll need:

This Craft Lesson is divided into three Parts:

  • The front card
  • The Pivot Mechanism
  • The Pop-Up Message Card

Let’s get started

There are three pieces to each card: the card, the pop-up message card and the pivot mechanism. Take all three and fold the card in half.

Now, start decorating the card. Take craft papers of different bright colors. Make some heart shapes (small and big) and cut those out. Once you get your heart shapes, glue the smaller hearts onto the bigger ones.

Glue all the heart shapes onto the front of Card. To make the cad looks attractive, glue the bigger shapes first and then the smaller ones. You will get a beautiful front.

Take the Pivot Mechanism. Fold it in half horizontally along the score line. Fold down and inside both the left and right wings.

Take the pop-up message card. Fold it in a zigzag fashion along the score line.

Now, apply glue to both the left lower and upper right flaps of the pivot mechanism. Unfold the message card and align both ends to the glued area of pivot mechanism.

Let’s decorate the message card, take a colored craft paper of your choice. Fold it in half and draw three heart shapes(just draw one sided hearts).

Cut out the heart shapes. Make two kissing emojis and one heart eyes emoji using black marker and small heart shapes. Glue the heart eyes emoji at the center of message card and kissing emojis on the left and right flaps.

Once you are done, apply glue within the indicator lines on the inside of the card and then apply glue to the top of the pivot mechanism. Fold the card shut.

It’s time to decorate the inside of card. Take a craft paper, fold it from center and draw one sided heart. Cut the heart shape out.

Then, take any couple’s picture. Start cutting the picture. Choose your spot from where to start and follow along the lines. Cut nicely around the couple and once you are done, glue it on the heart shape.

Glue the decorated heart on the upper side of card and draw any teddy or cartoon on the other side and fill it with some nice crayons or pencil colors. Your Valentines Card is ready.

Happy valentine’s Day!

Use these cards for Birthdays, Get Well Soon, Mother’s or Father’s Day.

line-13.png (585×76)

Thanks for checking out this post! Like us on FacebookShare this post with your friends, or Subscribe to this blog today to receive more project ideas!

Product Spotlight: Holiday Color Diffusing Shapes
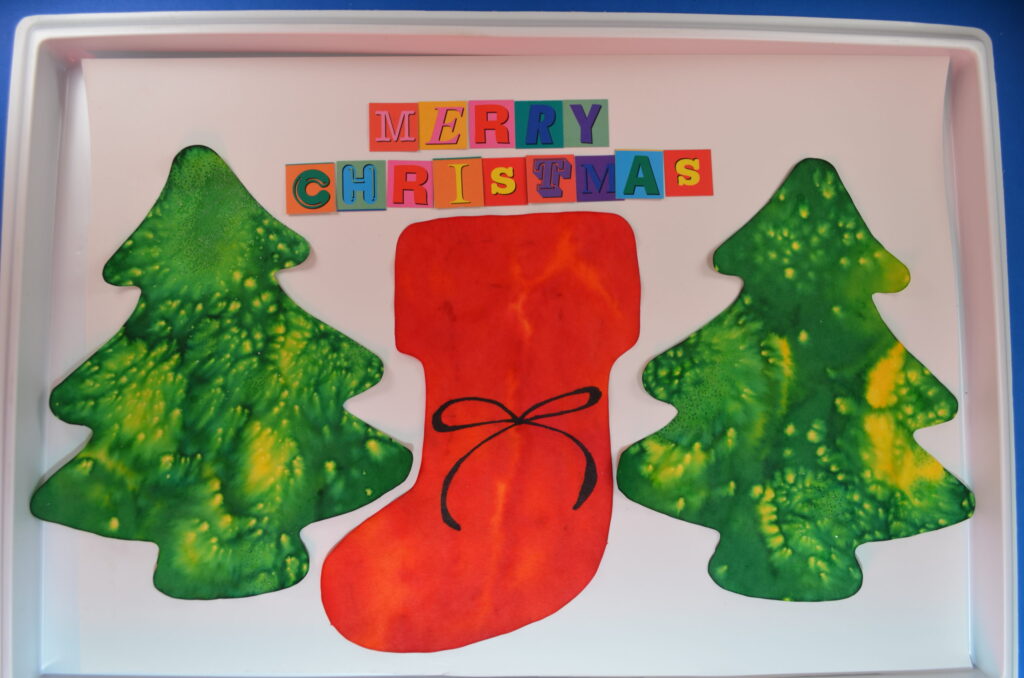
This month, we’re featuring two of our NEW products:

These color diffusing shapes help us get in the holiday spirit while simultaneously developing a deeper understanding of color. There are 3 easy ways to transform these shapes from A to B:

A. Plain Color Diffusing shapes–functional but still waiting for the magic to happen
B. Color Diffusing magic transformed the shapes into these beautiful works of art!

Method 1: Washable Marker & Water

This is the easiest method and the mess-free method. Simply use any washable marker to color the shape, and don’t worry about filling in all the white spaces! When you’re done, spray water on the shape and watch the colors diffuse and create secondary or even tertiary colors.

If you need a spray bottle for the water, we recommend Junior Paint Spritzers–they are perfect for small hands.

Method 2: Watercolor

Break out your trusty watercolor set and go to town! Because of the water used with the watercolor paint, the colors will diffuse throughout the paper as you paint. You can always add some extra water at the end and watch the colors diffuse even more. This is especially helpful if you’d like to make light or pastel designs.

Method 3: Liquid Watercolor & Water

This method creates the most impressive designs, IMHO. You can find liquid watercolors online or at your local craft store. Be careful because these paints can be POTENT! It takes quite a few washes to remove the paint from hands, but that is also what makes the designs so beautiful on Color Diffusing paper.

Simply use a spray bottle with the liquid watercolor to add splashes of color to your Color Diffusing shapes. Once you’re happy, spray the shapes with water and watch the colors blend!

If you need a spray bottle for the color or water, we recommend Junior Paint Spritzers–they are perfect for small hands.

Pro tip: Stick to primary colors! It’s easy to get carried away with color, but once they start diffusing, they have a tendency to blend into one, amorphous brown color if you get too complicated!


Try all 3 and let us know your favorite method!

If you like this, you’ll like Blots of Ornaments too! These ornaments have the added benefits of being cut out of extra thick, high-quality color diffusing paper so that they can be used as real ornaments on a tree or windowsill!

Giant Easter Egg Decorating

Make larger-than-life decorated eggs for Easter holiday

2015-03-11-FeatureImage

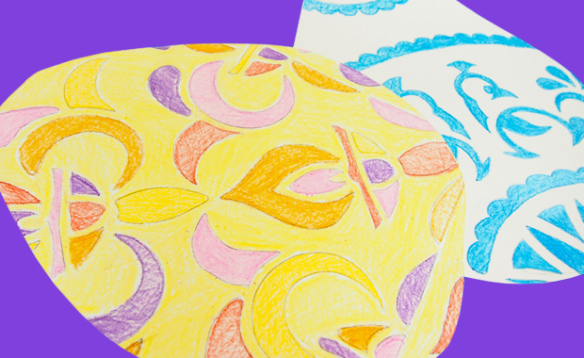
Make larger-than-life decorated eggs for Easter holiday! 

Age: 5+

Duration: 10-15 minutes

Learning Objectives: Use stencils to trace beautiful mandala patterns onto egg shapes. Choose coordinating colors and color in specific parts of the egg design. Learn about the history of Easter and the origin of Rangoli designs through research.

P1016511

You’ll Need: 

R5621 Rangoli Mega Stencils

• Large sheet of card paper

• Pencil

• Crayons or pencil crayons

• Scissors

Line-08

P1016515

Start with a sheet of card paper that is about legal size 11 x 17″ (28 x 43 cm) or more. Draw a small curve at the top of the sheet, and a very large curve at the bottom of the sheet. Join the two curves together to make a full egg shape.

P1016517

Cut the resulting shape out. You don’t have to make the egg shape look absolutely perfect, but the general idea is to keep the bottom wider than the top.

P1016519

Before you begin, make sure to pop out the die cut pieces on the inside of the Rangoli stencil. Place the stencil onto the card cutout. Use a pencil to trace the interior edges of each pattern piece.

P1016523

Here you can see how well the tracing transfers onto the sheet. Don’t press the lines too harshly, as you will want to let the color shine through rather than the outlines.

P1016526

Start filling in each of the outlined shapes with a preferred color of crayon.

P1016528

How do you like me now!? What a pretty design… the color combination looks a lot like the famous blue and white porcelain designs from Asia and Europe.

P1016529

Here’s another egg design to show the variation in color and pattern you can do–much like designing your own Easter egg! Pin up on a display wall for this spring!

Line-08

Like us on FacebookShare this post with your friends, or Subscribe to this blog today to receive original craft project updates every Monday, Wednesday and Thursday!

Accordion Critters Puppet Theatre

OLYMPUS DIGITAL CAMERA

Using the Accordion Critters as puppets can be great fun! Students will already be tempted to take their critters around the classroom to let the accordion-folded legs fly through the air. Take these spontaneous creative activities to center stage with a puppet theatre play.

Age: 6+

Duration: 20-30 minutes (plus drying times)

Learning Objectives: Use fine motor skills while assembling your Accordion Critters. Learn to fold paper. Create puppet theater performances with constructed puppet theatre. Use puppets in literacy projects.

OLYMPUS DIGITAL CAMERA

You’ll Need:

Line-09

OLYMPUS DIGITAL CAMERA

Children can exercise some of their roleplaying skills while exploring literacy. Start with the separate pile of paper strips. The paper strip colors coordinate with the color of the critters’ body. Accordion fold the strips or combine with other colors to make interesting
braid patterns.

OLYMPUS DIGITAL CAMERA

Fold the strips forward then backward and continue all the way the length of the strip.

OLYMPUS DIGITAL CAMERA

When you are all done, you’re ready to attach the legs onto the Accordion Critter body!

OLYMPUS DIGITAL CAMERA

Roll the Accordion Critter into a tube shape and secure with tape. Tape the legs onto the leg indicators around the body shape.

OLYMPUS DIGITAL CAMERA

Hang your Accordion Critter by popping out the little holes on either side of its body and attaching some string.

OLYMPUS DIGITAL CAMERA

To make your own fun puppet theater, save an extra-large cardboard box from a recent purchase.

OLYMPUS DIGITAL CAMERA

Cut vertically across the small flaps to separate the box into one rectangle strip of
cardboard.

OLYMPUS DIGITAL CAMERA

Fold each large flap inside the box so that they meet at the back. These will form the side supports to hold up the puppet theater. Next, draw a simple double curtain shape in the center of the puppet theater.

OLYMPUS DIGITAL CAMERA

You will need to cut out the inside of it to allow your performers to stand behind the puppet theater. Alternatively, you can black out the center to appear like the back of the stage.

OLYMPUS DIGITAL CAMERA

Paint the curtains red or blue and add a gold line to represent the curtain tie and tassels.

OLYMPUS DIGITAL CAMERA

Add a few black vertical lines to show the folds in the curtain appearance. Instead of drawing on the gold ribbon and tassels, I attached small lengths of gold ribbon to each side of the curtain line.

OLYMPUS DIGITAL CAMERA

Leave the paint to dry overnight. You can set the makeshift puppet theater onto a desk and secure the sides with tape or place on top of an ironing board to make it easily adjustable for different heights. Students can stand behind the puppet theater and drape their accordion puppets in front or use the puppet theater simply as a backdrop. Get students to focus on the action of making their Accordion Critters move about, with the accordion legs bouncing up and off the ground. Add some fun, lively music and watch your students’ imaginations come to life!

Line-10

Like us on FacebookShare this post with your friends, or Subscribe to this blog today to receive original craft project updates every week!

Action Shapes Animation

OLYMPUS DIGITAL CAMERA

Now’s the time to bring your vision to life! In order to shoot your animation, you will either need a camera or a tablet with animation software. In this activity, we will be using the stills from our camera to make an animated flipbook!

Age: 6+

Duration: 20-30 minutes

Learning Objectives: Create an animated flipbook using simple materials. Use fine motor skills in “flipping” the book to create a visual animated clip.

You’ll Need:

Line-07

OLYMPUS DIGITAL CAMERA

Children can decorate and color in a large-size sheet of paper to use as a backdrop for your Action Shapes characters. Use poster or Bristol board for this. Place your backdrop on a flat surface such as a desk or easel.

OLYMPUS DIGITAL CAMERA

As I’ve demonstrated before in our Action Shapes post, there are several pieces that join together to create the swiveling motion of the character.

OLYMPUS DIGITAL CAMERA

Each limb has a pair of fins and a hole for sliding the fins through.

OLYMPUS DIGITAL CAMERA

Here’s what the junction looks like when combined. Flatten out the fins to secure.

OLYMPUS DIGITAL CAMERA

Now you’re ready to assemble your full action shape!

OLYMPUS DIGITAL CAMERA

Color in your Action Shape character with pencil crayons or markers! Create custom props out of scrap card paper that you can use in your animation. for this character, we’ve added a ponytail to the side of the Action Shape’s head and decorated a soccer ball to use as a prop in our film. Check out our process below!

OLYMPUS DIGITAL CAMERA

You will need a tripod to properly hold your camera. These can be easily adjusted for height and angle, so you can set it at one point and simply press the shutter button to take as many photos as needed. This will help keep the frames consistent. Note: Be careful you don’t trip over the tripod legs! If you are using a tablet, place the backdrop on a desk and use modular wire shelves to prop the tablet directly on top of the artwork, like it will be grabbing a bird’s eye view. Modular shelves can be found at your nearest department store in the organization aisle. Adjust so that the viewfinder is able to clearly see through the wire mesh.

Use your storyboard as a reference to set up the Action Shapes character. What is your Action Shape’s first pose? Once you have set up the Action Shapes character, take a shot! Go back to your Action Shapes character and slightly move one or two limbs. Take another shot. As you go back and forth between adjusting your character and taking a photo with your camera, you will need to keep in mind that each shot shows one part of an entire action. You need to make all the shots “flow” together so that the starting point of an action smoothly reaches the end.

There are several free-to-use software (called ‘freeware’) online that can string these images together for you into an animation. Simply upload your photos and select them all to get combined into the animation. Most of these software programs will require that your photos be in JPEG format. The final animation will be converted into a GIF, which is a file type that strings multiple pictures together to make a mini video!

OLYMPUS DIGITAL CAMERA

Alternatively, you can “flip” your animation into a flipbook! Select all the images in your folder and select them to print wallet-size onto regular 8.5 x 11” (21.5 x 28 cm) paper.

OLYMPUS DIGITAL CAMERA

Cut out all the small pictures and stack them in the appropriate order. Staple them all together on the side opposite where you will flip through them.

OLYMPUS DIGITAL CAMERA

When finished, hold the stapled side in one hand while flipping consecutively through the pages. As you flip through the pictures, they will string together like a frames in a movie!

Animation

Happy filming!

Line-07

Like us on FacebookShare this post with your friends, or Subscribe to this blog today to receive original craft project updates every week!

Welcome Back to the New Year!

top ten list feature image

Now that we’ve rung in the New Year, we are excited to share our ideas with you over the next little while. Stay tuned for blog posts in a range of subjects, using tools that you already have in your classroom!

We hope that you’ve enjoyed a year of posts from Little Fingers Big Art. Here’s a recap of 10 of our favorite posts:

1.IMG_0139

Use jelly on the Light Cube for a great sensory activity!

2.2015-02-25-FeatureImage

Make lucky four leaf clovers for St. Patrick’s Day, coming up in March!

3.

P1016562

Combine letters in a Word Mobile to generate literacy creativity in students!

4.

Image-04

Guest post from Rebecca Milling about the wonderful creations made with our Straws and Connectors at St. Jerome’s Children’s Home in Nakuru, Kenya.

5.

P1016903

Check out this neat step-by-step tutorial on how to make 3D wall art!

6.

IMG_0811

Use our Tube Crafts to make a birdfeeder… or critterfeeder!

7.

P1016967

Make beautiful tissue paper birds–a great fine motor skills activity!

8.

Animation

Check out our awesome Action Shapes People! Customizable action figures that your students can use for stop-motion animation projects!

9.

Collage-a-Saurus-FeatureImage

Imagine what dinosaurs really looked like with our Collage-A-Saurus and Dinosaur Paper Sheets!

10.

OLYMPUS DIGITAL CAMERA

Turn old doodle paper into wrapping paper for someone’s birthday or for Christmas time!

These are our top ten for the year! Share your favorite post online with your friends.

Leave us a comment to let us know what kinds of posts you would like to see more of!

Line-09

Like us on FacebookShare this post with your friends, or Subscribe to this blog today to receive original craft project updates every week!

NAEYC 2015 – A Great Turnout!

naeyc 2015

This year, the creative folks at Roylco returned to the Annual NAEYC Conference, which was being held in sunny Orlando, Florida! Check out some of our favorite moments captured on our cameras!

Every year, the National Association for the Education of Young Children hosts a large space for companies who specialize in art education (like us!) to showcase their materials and talk one-on-one with the teachers. We had a prime location nearby the entrance to the hall, and welcomed hundreds of visitors!

naeyc2015

Our booth featured a fantastic array of our products, with 4 tables zig-zagging across the front. This allowed us to demo some of the products to our teacher friends while encouraging a flow of traffic through our booth.

naeyc 2015

We showed off some of our new products too! Look out for some of the following great products coming out next year at your local educational retailers:

R60705 Neon Straws and Connectors

R54490 Chromatography Kit

R48236 Junior Fun Faces Mix and Match Rubbing Plates

R59270 My Body in Action Cards

R49143 All About Me Book

naeyc 2015

We had great fun talking about our published ebooks as well (soon to be available on our website!), including The Art of LearningThe Art of EngineeringThe Human Body: Inside & OutLight Table Magic and Learn Math… Without Knowing It! Each e-book is a gigantic resource for teachers, featuring over 50 ideas for implementing art-based learning through various subjects. The focus is on FUN learning, meaning that we don’t provide any worksheets or practice lessons that students need to learn. Instead, we focus on building quality experiences within the classroom, using those experiences as a strong foundation, and strengthening those experiences with further tie-ins.

naeyc 2015

We love our teachers and strive to make the difference with all our products! Email us at info [at] roylco [dot] com for more information about our 2016 products and e-books!

Line-05

Like us on FacebookShare this post with your friends, or Subscribe to this blog today to receive original craft project updates every week!

Thank You Art Campers!

kids art camp roylco

Thank you to all our wonderful art campers who participated in our 2014 Art Camp! We had a blast!

ThankYouPhoto-02

Although it was unusually cold for the middle of summer, we did lots of activities that kept us up on our feet and moving about. The kids not only took part, they engaged fully with each other and made the best of friends!

ThankYouPhoto-05

We had some silly moments…

ThankYouPhoto-06

…some sneaky moments…

ThankYouPhoto-04

…and some out-of-the-box moments!

ThankYouPhoto-03

All of these moments brought about a willingness to explore with new materials and develop artistic ability using fine and gross motor skills!

We’ve put together a gallery of faces featuring our lovely campers. Thanks again for all the great memories and we hope to see you soon!

ThankYouAllKids

Line-16

Like us on FacebookShare this post with your friends, or Subscribe to this blog today to receive original craft project updates every Monday, Wednesday and Thursday!

Newspaper Builders Pyramid

newspaper builders pyramid

We had the fantastic opportunity to visit THEMUSEUM in Kitchener, Ontario and build a pyramid with our R60550 Newspaper Builders! This worked out well for us since the museum was hosting their exhibit of ancient Egypt!

newspaper builders pyramid

The R60550 Newspaper Builders kit features 36 connectors and 200 rod tubes. The rod tubes are secured inside a sheet of newspaper at either end. Use tape to adhere the tubes to the inside of the roll. Roll up the newspaper, secure with tape, and you are ready to start building! We painted our newspaper sheets before we rolled them up.

newspaper builders pyramid

The connectors fit snugly into the tubes, and feature prongs that point in 30° angles. You can make multiple triangle shapes and combine them into a unique sculpture. These girls put together the top of our proposed structure: a pyramid!

newspaper builders pyramid

We first started with the base. Constructing the base is the most important part because it sets up how the rest of the sculpture will look.

newspaper builders pyramid

We split the campers into separate groups. This not only helped us complete the sculpture faster but also taught kids the experience of working on different parts that are pieced together to make a whole sculpture.

newspaper builders pyramid

We helped the campers connect the various parts together.

newspaper builders pyramid

And then we held it up while the finishing touches were added!

newspaper builders pyramid

It was a great experience for everyone!

newspaper builders pyramid

All standing and secure! The kids loved to crawl inside the structure, as it seemed like a little ‘house’!

Line-22

Like us on FacebookShare this post with your friends, or Subscribe to this blog today to receive original craft project updates every Monday, Wednesday and Thursday!