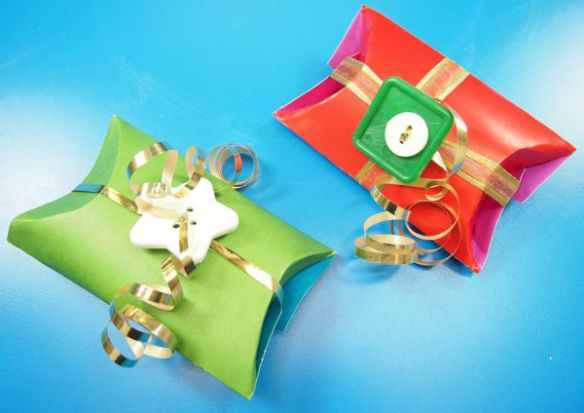
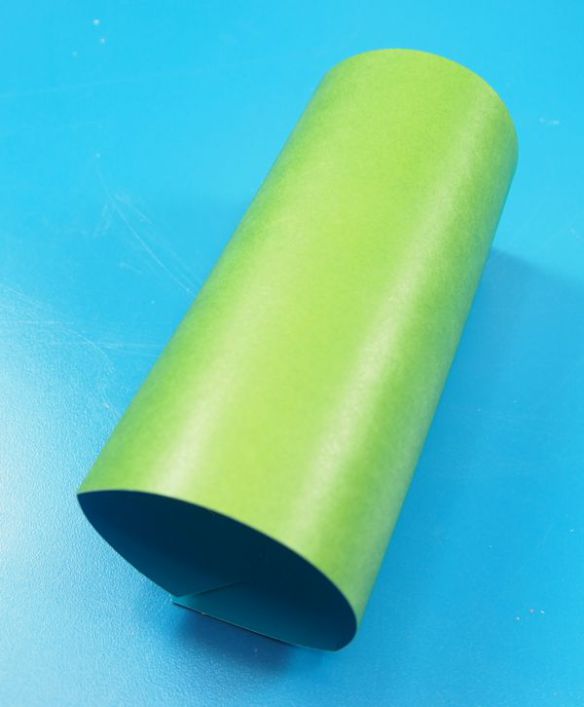
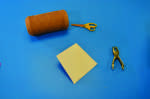
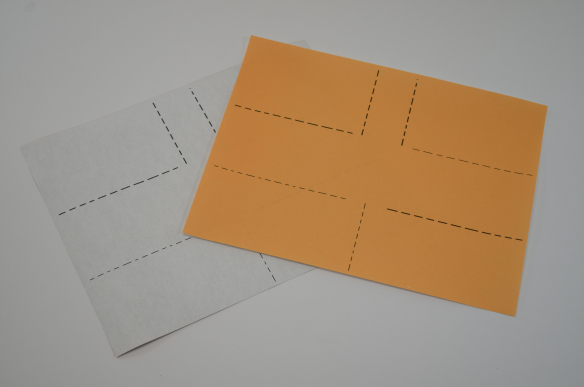
Collect all your materials that you’ll need. You can choose any color of Tube Crafts as they are double-sided.
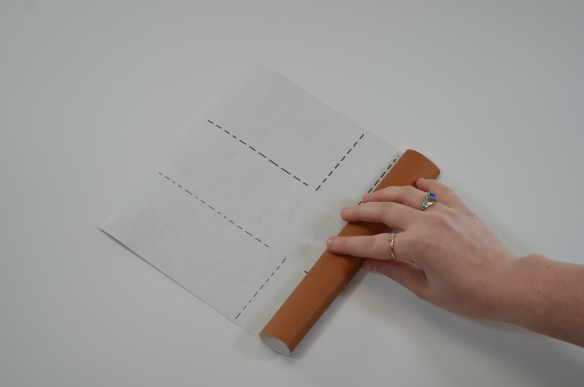
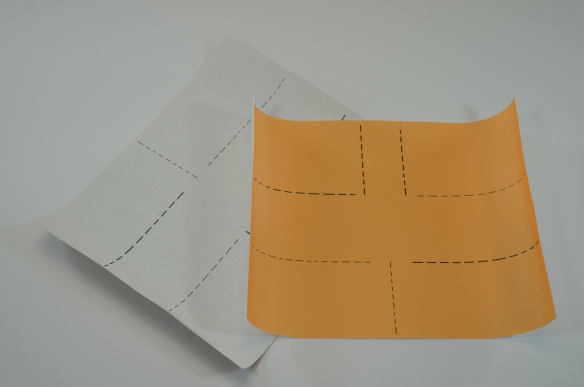
Roll the flattened sheet across the short sides. We’ve designed the Tube Craft sheets on one side with tabs and slots on the other to help secure the tube in place.
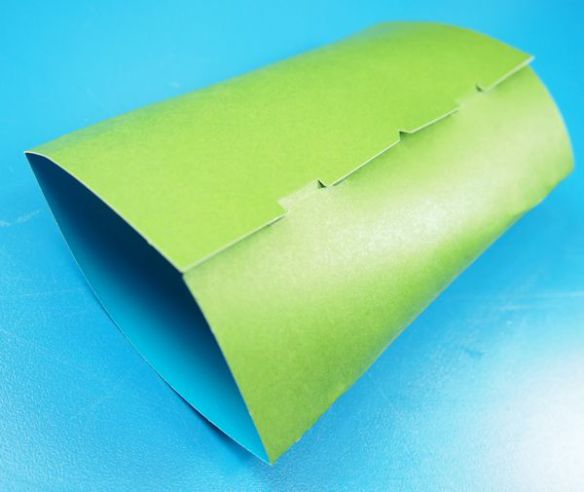
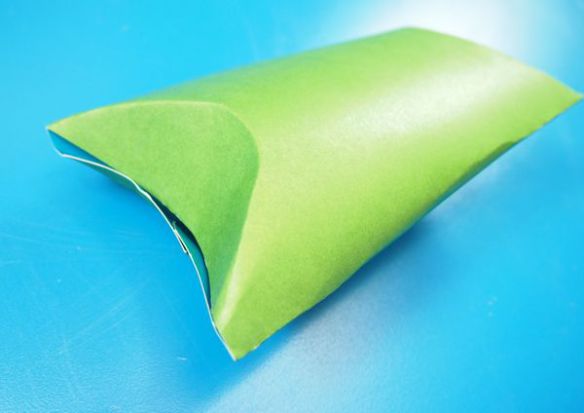
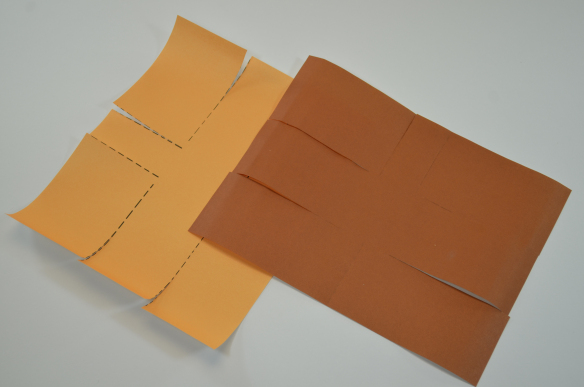
Flatten the tube on both sides.
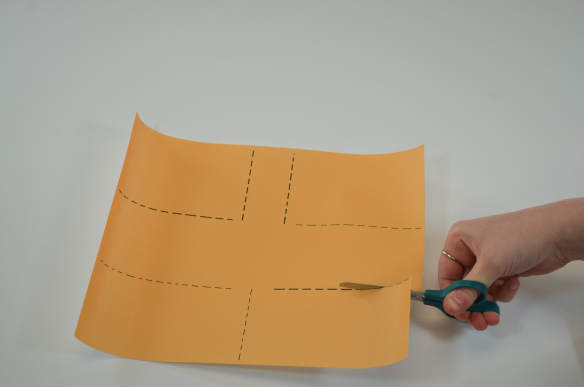
Press in one side of the tube, followed by the other side. Leave the un-flattened end open to allow small gifts or candies to be placed inside.
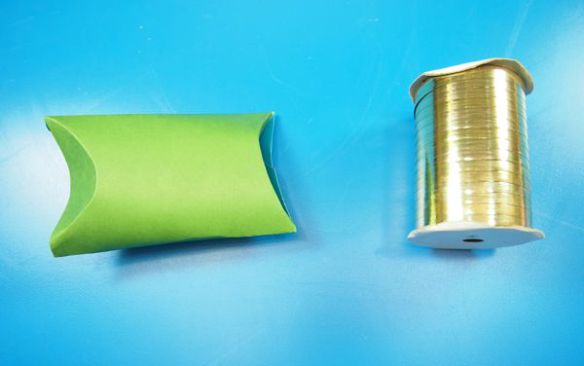
Close up the other side once you have placed your gift inside.
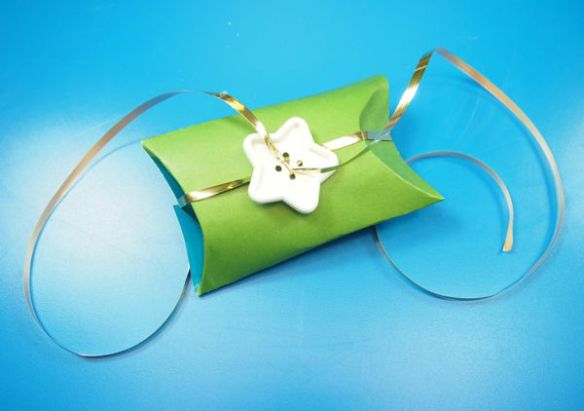
Wrap the gift box with gold ribbon. Secure with a knot then thread the ends through the holes in our Really Big Buttons.
And voila! You have yourself a perfectly-wrapped gift for a special person during the holiday season.
Like us on Facebook, Share this post with your friends, or Subscribe to this blog today to receive original craft project updates every week!
As 2017 comes to a close, we thought we would look back on what a great year we have had, and give you some sneak peeks for the coming year!
We want to start with a look back at our favorite 2017 Blog Posts!
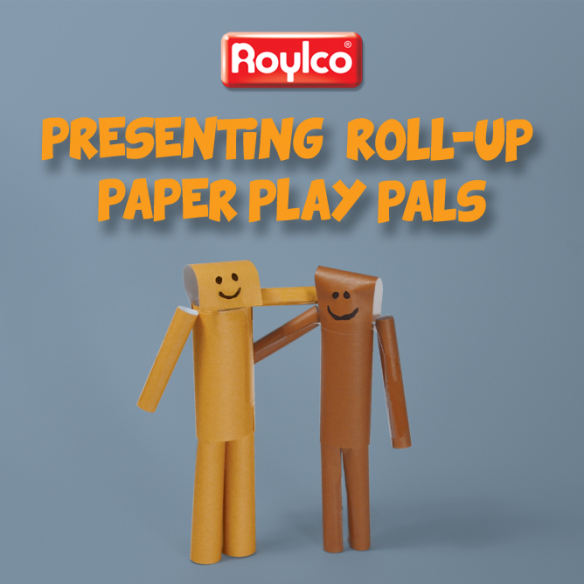
Our Roll-Up Paper Play Pals are a terrific craft for students! Use them in imaginative play, for “All About Me” activities and as a fun paper doll.
Roylco introduced two dolls in 2017, and they could not be any cuter! Encourage kids to explore their bodies and their emotions with these cuddly dolls.
In an October full of masks, this was one of our favorites! This beautiful lion encourages kids to explore paper sculpting and to create wearable art!
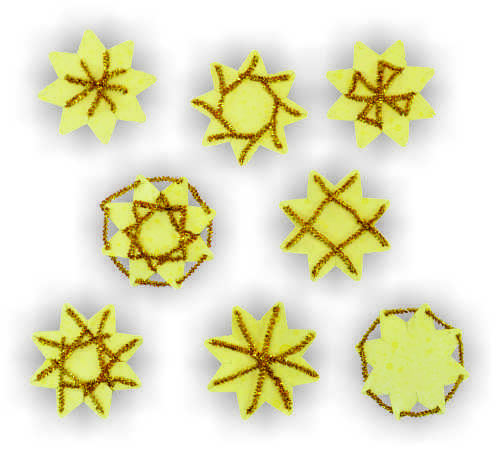
We loved how these vibrant and versatile stars brightened up the room!
Visual, tactile and beautiful, we absolutely love the marbling process used to create this adorable caterpillar!
2017 has been a great year for us, but we are so excited to debut exciting new products and craft ideas to you for 2018! Stay tuned for future blog posts featuring exciting new products including:
Roylco’s new R72020 Live Action Green Screen Kit allows students to create their own special effects and movies! The kit will include 6 green screens and 24 sticks to use to manipulate puppets of their own design. Stay tuned for blog posts featuring tips and tricks for green screen editing, puppet templates and more!
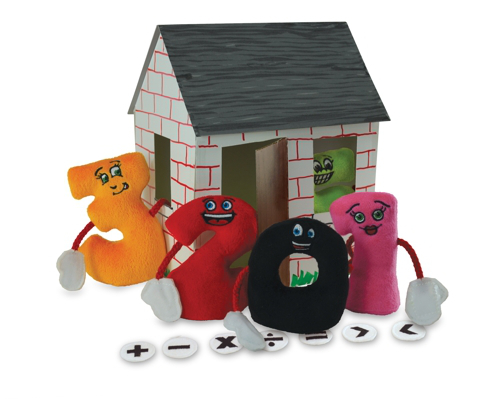
Roylco is expanding our line of dolls with these adorable numbers! The R35076 Number Dolls include 9 colorful dolls from 0-9, and seven hook and loop math signs. Stay tuned for blog posts exploring the mathematical possibilities of these friendly-faced dolls!
Like us on Facebook, Share this post with your friends, or Subscribe to this blog today to receive original craft project updates every week!
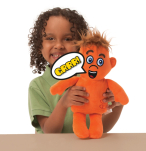
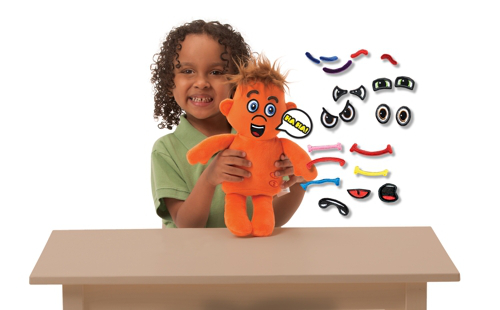
This doll is an emotional super hero! Use it to encourage students to talk about their own moods and emotions. This cuddly doll comes with lots of different Velcro® facial features, allowing you to decide what the doll is feeling. Store other emotions on the doll’s cape. If you pull the cord on the doll’s back, you’ll hear 16 sounds (played randomly) that correspond with emotions. Ask students to match up the sounds with emotions!
Use the doll to encourage students to talk about their own moods and emotions. This cuddly doll comes with lots of different velcro facial features, allowing you to decide what the doll is feeling. Store other emotions on the doll’s cape. If you pull the cord on the doll’s back, you’ll hear 16 sounds (played randomly) that correspond with emotions. Ask students to match up the sounds with emotions! For a student having a difficult time expressing themselves verbally, this doll offers a way to explore emotions in a tactile and visual way. Students can express how they are feeling by superimposing their emotions on the doll and showing on the doll’s face how they feel. Changing the doll’s emotions also exercises fine motors skills.
Classroom Activities
Gather students together in a large group. Pull the cord on the back of the doll, and ask students to connect the sound with an emotion. Ask students why they connect that sound with that emotion, and finally have them create the emotion on the doll’s face. Make an emotions chart! Use either a circle with the basic emotions or a variation on the graph described earlier in the guide.
Divide students into groups. Have one group either pull the cord to make a sound, or create an emotion on the doll’s face. Have the second group place the emotion the first group made on the chart. Do the two groups agree on the emotion? If they do, keep going! If the groups disagree on where an emotion should be placed on the chart, or what the emotion on the doll is, have the groups discuss the reasons behind their decisions.
What are emotions? People have been trying to understand and categorize emotions for as long as there have been civilizations. In ancient China the belief was that excessive emotions damaged the Qi (”air” or “gas”), or essence of a human being. Hippocrates, an ancient Greek physician who lived c. 460-c. 370 BC, made popular Humoral Theory. Humoral Theory was based on Ayurvedic Medicine (a type of medicine practiced in ancient India) and theorized that humans are made up of four essential humors, or bodily fluids. The four humors are: black bile, yellow bile, phlegm, and blood. For a very long time, doctors believed that these four humors influenced health and emotions.
In the late 19th century, Charles Darwin published a book called The Expression of Emotions in Man and Animals. This book, along with an increased understanding of how the human body functions, led to research on emotions and how the brain processes emotions. In the late 1880s, William James (an American psychologist and philosopher) and Carl Lange (a Danish psychologist) independently but at the same time proposed the idea that emotions and feelings are a result of a physiological (having to do with the physical body) experience. This idea, which would become known as the James-Lange Theory, essentially states that emotions come after we feel a change in our bodies. The James-Lange Theory says that we don’t cry because we feel sad, but we cry and therefore we feel sad. The physical action comes before the emotion. Walter Bradford Cannon (a professor of physiology at Harvard Medical School) and Phillip Bard (a doctoral student of Cannon’s) agreed with the James-Lange Theory in that physiological responses play a role in emotions, however they did not agree that emotions come after the physiological response. The Cannon-Bard Theory argues that the body’s reaction and the emotion happen at the same time.
In the 1960s, the Two Factor Theory was put forward by Stanley Schachter and Jerome E. Singer. The Two Factor Theory argued that emotions are based on two factors: physiological arousal (the body’s response to the world around it) and cognitive labels (your brain consciously thinking about how to label what it is thinking). This was the first theory to bring cognition into the discussion about emotions. The Two Factor Theory is also the first theory to bring up the idea of misattributing emotions based on physiological signs. For example, tears can be a sign of happiness, but young children may misattribute the emotion because it is more common for tears to be attributed to sadness. The Two Factor Theory requires cognitive understanding of context and social cues to label the emotions that are connected with what the body is doing. Once the Two Factor Theory had introduced cognition into the discussions about emotions, many cognitive-based theories of emotion sprang up. The most well-known of these theorists is Richard Lazarus, a psychologist.
Lazarus referred to emotions as a “marriage of emotion and thought.” He is best known for his cognitive-meditational theory. Lazarus’s theory of the way emotions work is threefold: first, the individual unconsciously assesses the situation and its potential consequences. Second, the body reacts in response to the unconscious appraisal and starts physical processes like the heart pumping faster. Finally, the person can choose how to react and label the emotion based on both the cognitive and physical input. Once we understand how emotions work in the brain and physical body, we have to understand how emotions are communicated. Things like crying, blushing or sweating are physiological effects, and while they can function as cues for other people to know how you might be feeling, expressing emotions is always conscious behavior. An expressing of an emotion might be as easy as smiling at a friend, or saying “I am angry” to a trusted adult.
Is there a difference between an emotion and a feeling? It depends. Many people use “emotion” and “feeling” interchangeably. However, psychologists and behavioral analysts do distinguish between feelings and emotions. Strictly speaking, an emotion is a combination of a cognitive label and physiological responses to a situation. A feeling, on the other hand, is the subjective experience of an emotion after you have felt the emotion. To put it simply, you feel an emotion but you talk about a feeling. Moods are also discussed. The general definition of a mood is a feeling that is less strong than an emotion, lasts longer, and my not have any contextual cause.
There are many, many different emotions and those emotions can be nuanced in millions of different ways. To make things a little simpler, many psychologists recognizes six basic emotions based on the research of psychologist Paul Ekman: anger, happiness, fear, disgust, sadness and surprise. Other psychologists recognize Robert Plutchik’s eight basic emotions: anger, fear, trust, disgust, joy, sadness, surprise and anticipation. These basic emotions can be combined to create complex emotions. One way of visualizing complex emotions is on a two-dimensional coordinate plane, where the x-axis is labeled with valence (how positive or negative the experience is) and the y-axis is labeled with arousal (how energized the experience feels). A very active and very positive emotion, such as excitement, would be located in the upper left corner of quadrant 1 on such a graph. Despite all the theories and research, discovering how emotions work and learning how to organize them is still an ongoing process. Neuroscientists are studying the ways the brain interacts with emotions, psychologists work with people to help cope with emotions and emotional disorders and sociologists study emotions across cultures.
Like us on Facebook, Share this post with your friends, or Subscribe to this blog today to receive original craft project updates every week
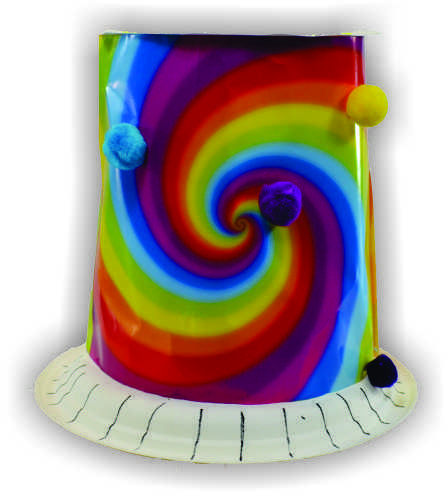
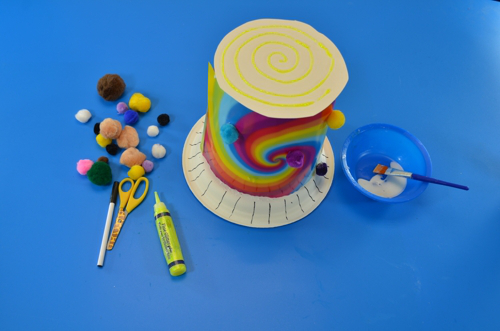
This wild and colorful hat is the last in hour Halloween series this year! Add your top hat to a costume, use for dramatic play, or wear it to read Alice in Wonderland.
Age: 4+
Duration: 15 minutes
Learning Outcomes: Express yourself with color and pattern with a fashionable hat. Exercise fine motor skills. Encourage creativity.
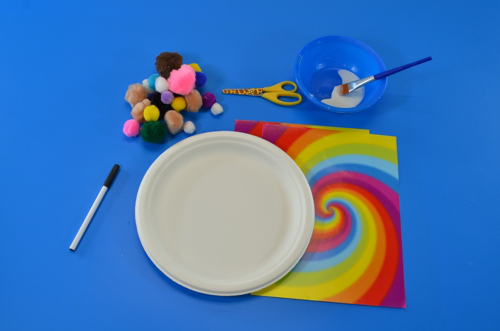
This top hat is a great way to express who you are! It’s also super simple to make and decorate. Start by taping two sheets of rainbow paper together. Tape the 11″ sides together, and form a cylinder. Carefully lay the cylinder on your paper plate and trace around it. Carefully cut out the center of the paper plate. For this project, we are not discarding the center, we’ll use it for the top of our top hat. If students have difficulty cutting into their paper plate, carefully punch a small hole on the pencil line and cut from there.
Now it’s time to construct your hat. Tape your paper cylinder to the paper plate. This will form the brim of your hat. Then tape the cut-out center of the paper plate to the top of the paper cylinder. This will enclose your hat and make sure your head doesn’t get wet in case of rain! (Note: these hats are NOT waterproof.)
It’s time to decorate! We used glitter glue to create a spiral on the top of our hat, and glued pom poms to the cylindrical part. We also used a washable marker to add some stylish lines to the brim.
Once your class has finished their hats, have a Halloween fashion show! Use a sheet of red butcher paper on the floor as your “red carpet” and encourage students to walk down it in character to show off their hats and costumes. Of course pictures are a must for this activity!
Like us on Facebook, Share this post with your friends, or Subscribe to this blog today to receive original craft project updates every week
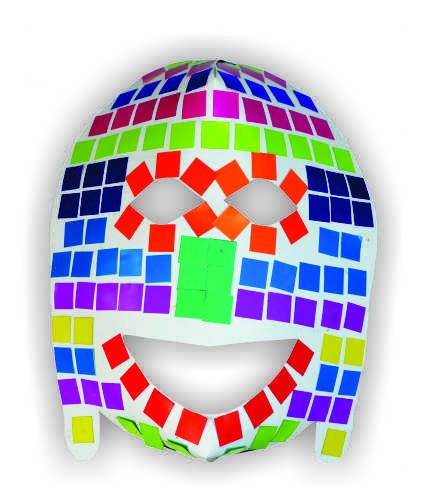
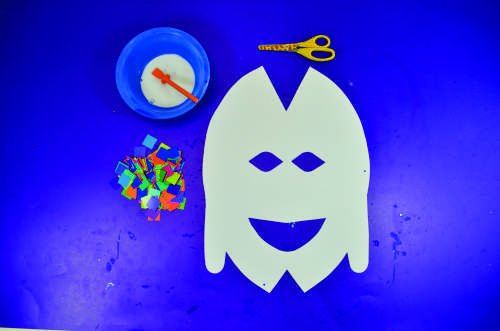
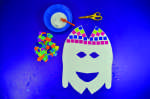
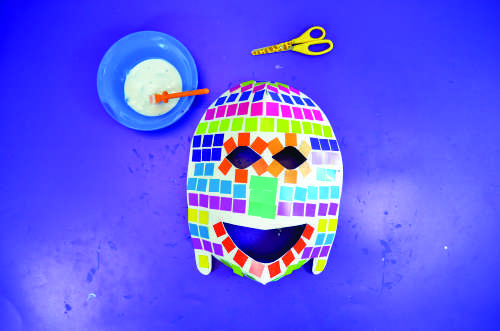
These beautiful, geometric masks are perfect for imaginative play and for unique Halloween costumes!
Age: 4+
Duration: 15 minutes (not including drying time)
Learning Outcomes: Exercise fine motor skills. Practice mosaic technique, which can be used on a variety of other projects. Talk about self-expression. Create a fun costume piece or wall-worthy artwork!
Start with one of our African masks flat on your work surface. In order to keep things neat, try using our Bright Bowls to hold a small amount of white glue and the mosaics! We suggest asking students to plan their designs out before they glue the mosaics down. It is hard to change a design once the glue is down!
Once students have their designs, use a goo spreader to place a thin layer of glue on the top section of the mask. Lay down your mosaics in the glue. Repeat this process until your mosaic is complete. Allow the glue to dry completely.
Finally, once the glue has dried, overlap the edges of the V cut in the top of the mask and tape them together. Do the same for the V cut in the bottom of the mask. This will transform your mask from flat to convex!
Using chenille stems and the pre-punched holes, secure the mask on your face or hang it on the wall!
Like us on Facebook, Share this post with your friends, or Subscribe to this blog today to receive original craft project updates every week!
Add a numeracy dimension to light table play with these glittery, squishy animal shapes!To tessellate means to completely fill a flat space with the same, repeating shape without any gaps or overlap. We have created 5 animal shapes that fit snugly together and form exciting patterns. Elephant, dog, fish, bird, and lizard gel creatures each have their own special glitter shape inside!
The translucent gel and glitter make these critters a perfect addition to a light table or light cube!
The squishy texture provides a quiet, non-distracting outlet for fidgety kids in classrooms. These gel animals are also fridge and freezer safe, so they can soothe incoming teeth, bruises and bumps!
Talk about symmetry! Challenge students to find rotational, reflectional or translational symmetry. Individual animals may not be symmetrical but tessellated shapes might be! Some tessellations might have more than one kind of symmetry. For example, individual lizards have reflectional symmetry, but five or six tessellated lizards have rotational and reflectional symmetry!
Older students will have fun tessellating these squishy animals, but very young children can be encouraged to create other patterns. Challenge them to organize the animals by color or make repeating patterns by type of animal.
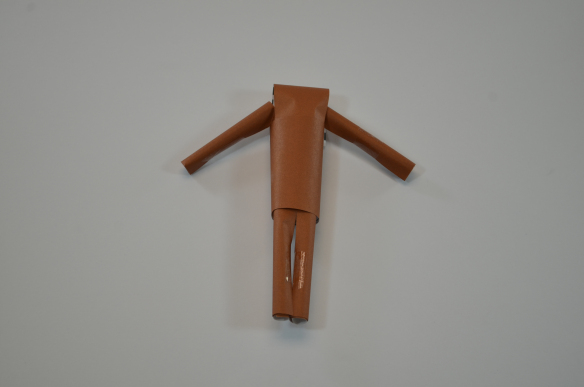
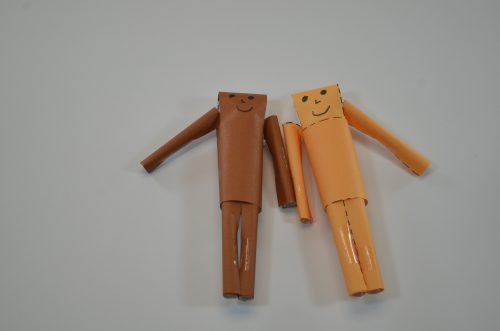
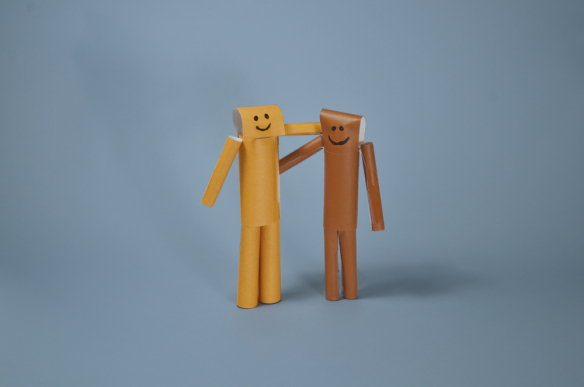
Prepare popular paper play pals! Great for teaching children to follow instructions, practice fine motor skills, and create diverse pals for imaginary play!
Age: 4+
Duration: 10 minutes
Learning Outcomes: Cut and roll paper to practice fine motor sills. Explore diversity in the classroom.
Open the Roll Up Doll Template on your computer. Print out the template onto the Skin Tone Craft paper.
Roll up each sheet of paper, being careful not to crease it. Then allow the paper to unroll naturally.
Once you have rolled and unrolled your sheet of paper, carefully cut along the dotted lines.
Next, carefully roll up the arm and leg sections and tape each cylinder shut. Then, gently roll the body into a cylinder. Tape shut. You may need to trim the arms if they are too long. Finally, fold the top flap down and tape to the opposite side of the body to create the head.
Draw a face on your paper play pal, and enjoy!
Like us on Facebook, Share this post with your friends, or Subscribe to this blog today to receive original craft project updates every week!
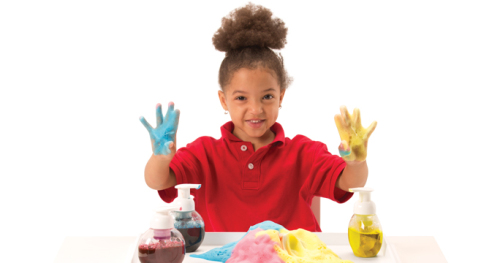
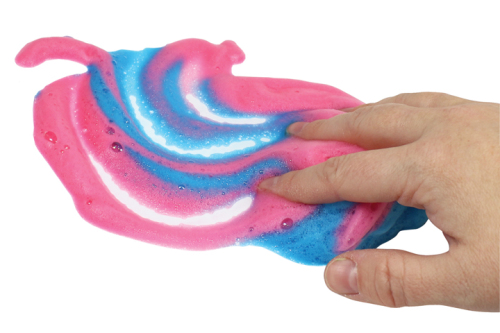
Explore a range of fun sensory experiences with colorful and exciting Foam Paint using our special dispensing bottles! Mix up a simple recipe for foam paint to create beautiful sensory art. Engage your early childhood and special needs students. Foam paint looks beautiful and feels luscious to the touch. In addition, it has a great scent!
To make your own foam paint, mix:
1/4 cup dish soap
cold water
liquid watercolor or
food coloring
Note: Adjust the amount to soften or intensify color.
OPTIONAL: tablespoons glycerin (for a
fluffier foam)
The Foam Paint Bottles have special pump dispensing action to give your students an extra
level of sensory exercise. Pour the foam paint recipe into the base and screw on the pump dispenser. As you press the pump, it will squirt out a dollop of colorful foam.
A little goes a long way. To save leftovers, simply twist the nozzle to lock it, then store in a cool dry location for a month or more.
Like us on Facebook, Share this post with your friends, or Subscribe to this blog today to receive original craft project updates every week!
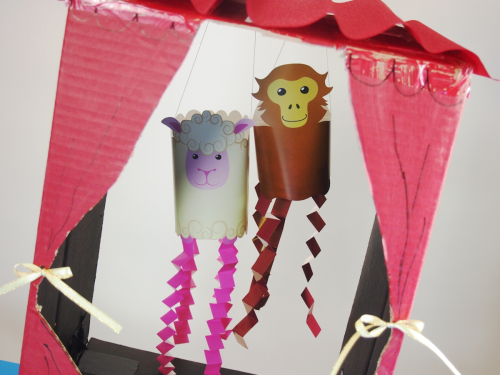
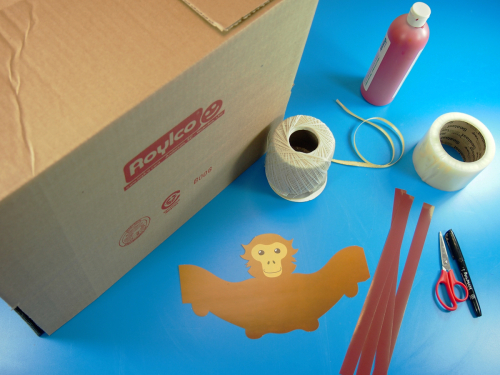
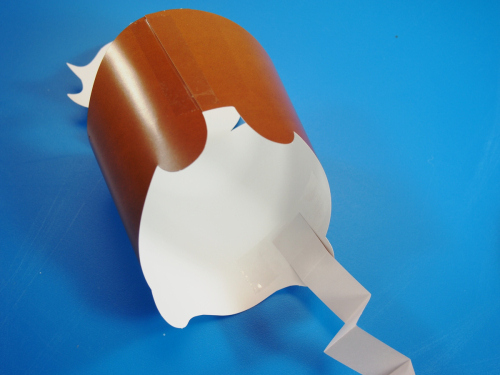
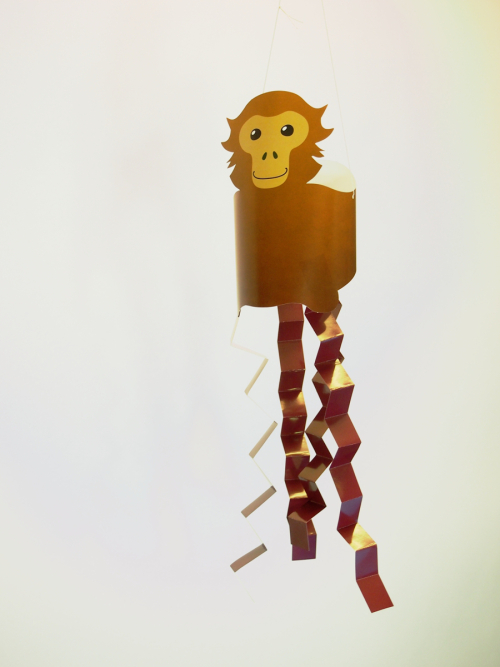
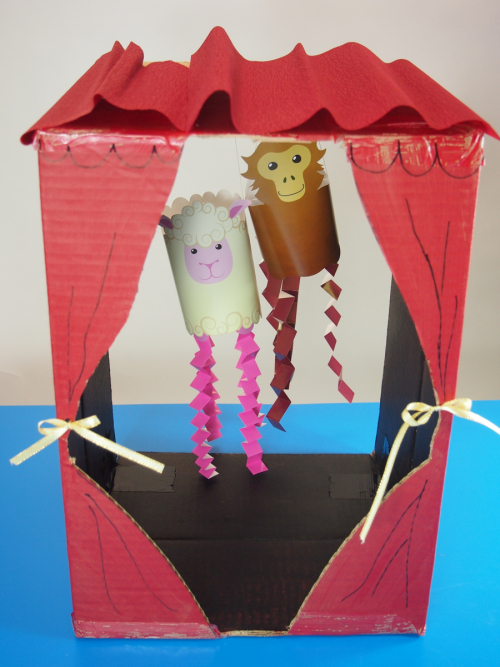
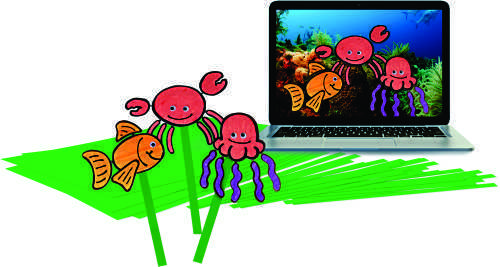
Using the Accordion Critters as puppets can be great fun! Students will already be tempted to take their critters around the classroom to let the accordion-folded legs fly through the air. Take these spontaneous creative activities to center stage with a puppet theatre play.
Age: 6+
Duration: 20-30 minutes (plus drying times)
Learning Objectives: Use fine motor skills while assembling your Accordion Critters. Learn to fold paper. Create puppet theater performances with constructed puppet theatre. Use puppets in literacy projects.
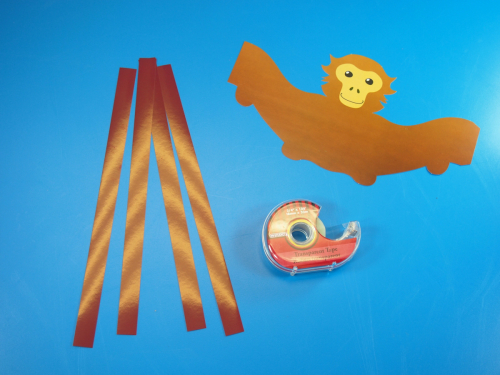
Children can exercise some of their roleplaying skills while exploring literacy. Start with the separate pile of paper strips. The paper strip colors coordinate with the color of the critters’ body. Accordion fold the strips or combine with other colors to make interesting
braid patterns.
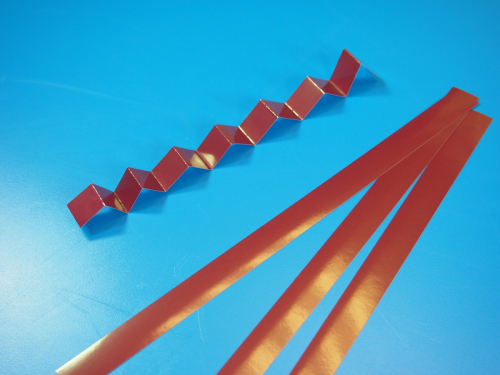
Fold the strips forward then backward and continue all the way the length of the strip.
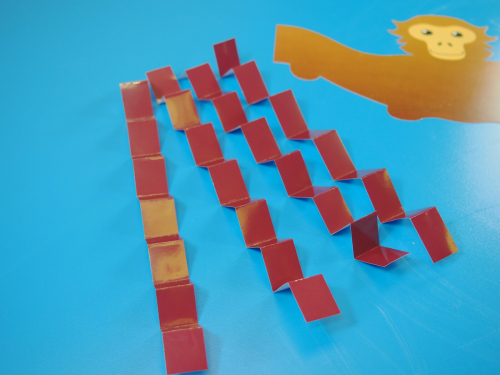
When you are all done, you’re ready to attach the legs onto the Accordion Critter body!
Roll the Accordion Critter into a tube shape and secure with tape. Tape the legs onto the leg indicators around the body shape.
Hang your Accordion Critter by popping out the little holes on either side of its body and attaching some string.
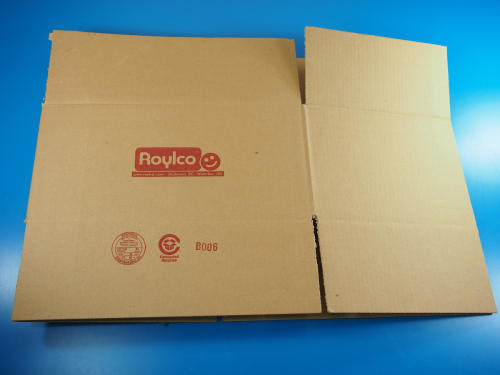
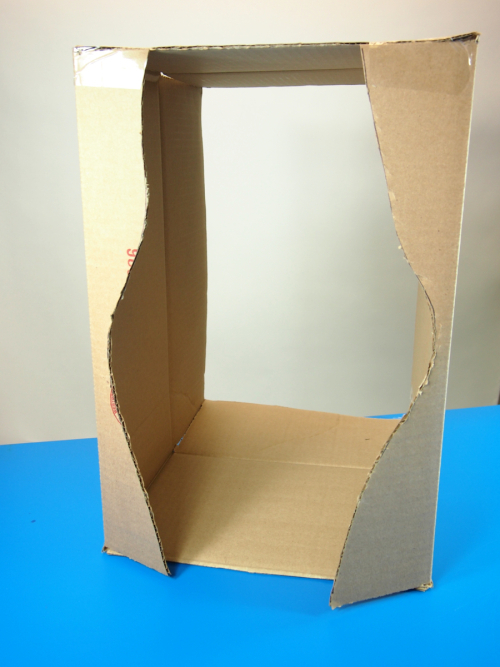
To make your own fun puppet theater, save an extra-large cardboard box from a recent purchase.
Cut vertically across the small flaps to separate the box into one rectangle strip of
cardboard.
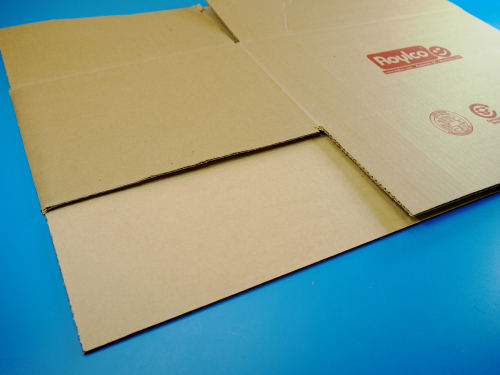
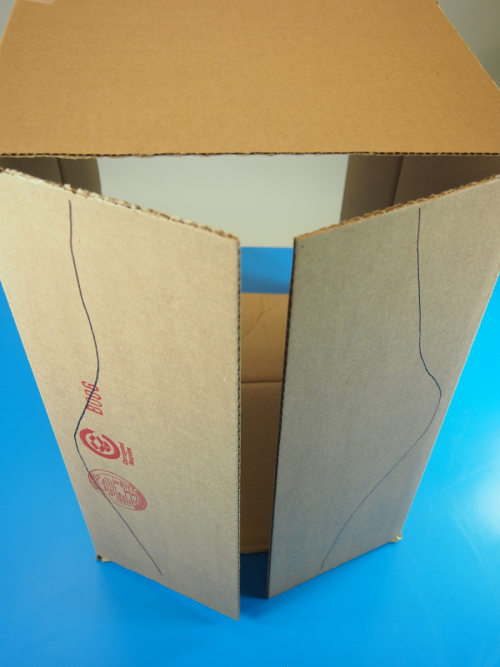
Fold each large flap inside the box so that they meet at the back. These will form the side supports to hold up the puppet theater. Next, draw a simple double curtain shape in the center of the puppet theater.
You will need to cut out the inside of it to allow your performers to stand behind the puppet theater. Alternatively, you can black out the center to appear like the back of the stage.
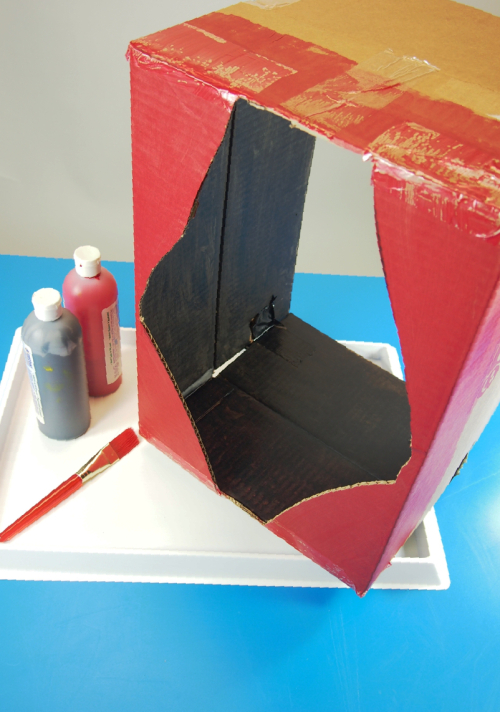
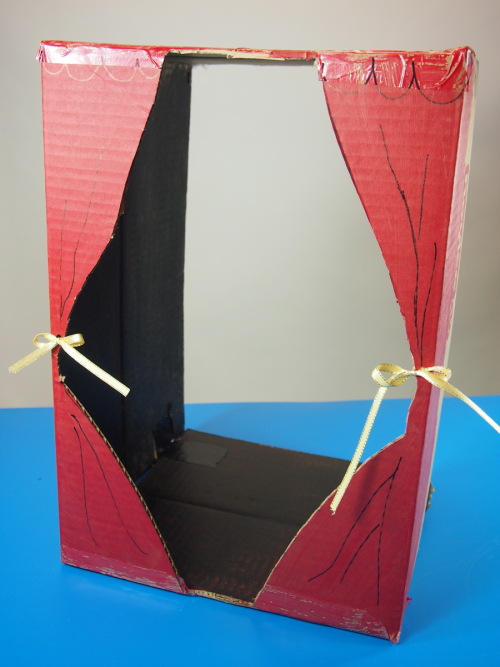
Paint the curtains red or blue and add a gold line to represent the curtain tie and tassels.
Add a few black vertical lines to show the folds in the curtain appearance. Instead of drawing on the gold ribbon and tassels, I attached small lengths of gold ribbon to each side of the curtain line.
Leave the paint to dry overnight. You can set the makeshift puppet theater onto a desk and secure the sides with tape or place on top of an ironing board to make it easily adjustable for different heights. Students can stand behind the puppet theater and drape their accordion puppets in front or use the puppet theater simply as a backdrop. Get students to focus on the action of making their Accordion Critters move about, with the accordion legs bouncing up and off the ground. Add some fun, lively music and watch your students’ imaginations come to life!
Like us on Facebook, Share this post with your friends, or Subscribe to this blog today to receive original craft project updates every week!


 This top hat is a great way to express who you are! It’s also super simple to make and decorate. Start by taping two sheets of rainbow paper together. Tape the 11″ sides together, and form a cylinder. Carefully lay the cylinder on your paper plate and trace around it. Carefully cut out the center of the paper plate. For this project, we are not discarding the center, we’ll use it for the top of our top hat. If students have difficulty cutting into their paper plate, carefully punch a small hole on the pencil line and cut from there.
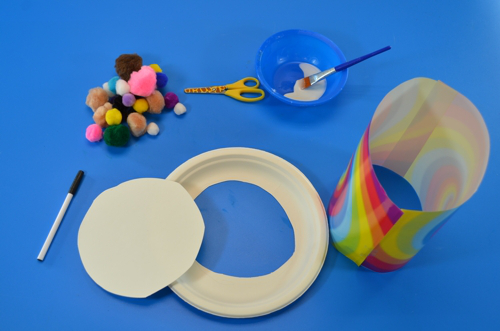


 Finally, fold the top flap down and tape to the opposite side of the body to create the head.