Stained Glass Christmas Ornaments

Stained Glass Christmas Ornaments

31100 Stainglass Ornaments Collection

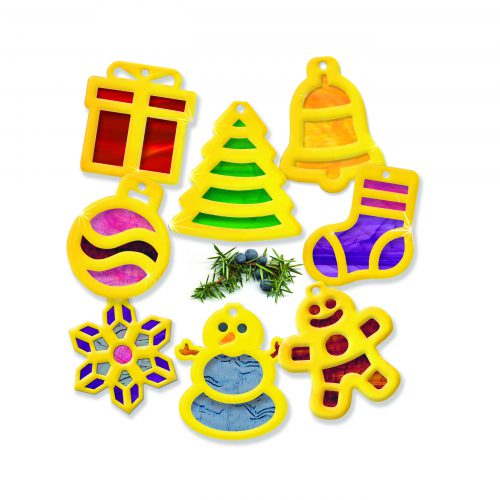
Need a fast and fabulous Christmas craft? These beautiful ornaments are the perfect project to spread holiday cheer!

Age: 4+

Duration: 10 minutes

Learning Outcomes: Explore the symbolism behind common Christmas emblems. Create beautiful take-home art that can be given as a gift. Exercise fine motor skills.

You’ll Need: 

Line-20

These ornaments are quick and simple to put together. Start by simply popping out the die-cut frames. Next, pop out the internal pieces, and set the frames aside.

Lay the internal pop-out on the stained glass paper and use a pencil to draw around the internal pop out. Make sure that you leave at least 1/4″ of space around the internal pop out so you have enough space to tape the stained glass paper into the frame. Cut out your stained glass pieces, and tape them to the inside (the white side) of the frames. Make sure to leave the small round hole at the top open!

Once your stained glass pieces are taped in place, fold the frame over and tape closed.

To finish off your stained glass ornament, cut a 6″ piece of yarn. Thread the yarn through the small round hole at the top of your ornament, and knot the loose ends into a circle. This will allow you to hang your ornament on your Christmas tree!

ornaments on tree.jpg

Have family members who don’t celebrate Christmas? Gift them the snowman or snowflake ornament and suggest they hang it in a window! Sunlight streams through the stained glass paper beautifully, and adds cheer to winter months.

ornaments on window.jpg

Line-21

Like us on FacebookShare this post with your friends, or Subscribe to this blog today to receive original craft project updates every week!

Roll-Up Paper Play Pals

RollUpPeopleFBpost

Prepare popular paper play pals! Great for teaching children to follow instructions, practice fine motor skills, and create diverse pals for imaginary play!

Age: 4+

Duration: 10 minutes

Learning Outcomes: Cut and roll paper to practice fine motor sills. Explore diversity in the classroom.

TogetherFB

You’ll Need:

Line-20

Open the Roll Up Doll Template on your computer. Print out the template onto the Skin Tone Craft paper.

DSC_6454.JPG

Roll up each sheet of paper, being careful not to crease it. Then allow the paper to unroll naturally. DSC_6455

DSC_6457.JPG

Once you have rolled and unrolled your sheet of paper, carefully cut along the dotted lines. DSC_6458

DSC_6459.JPG

Next, carefully roll up the arm and leg sections and tape each cylinder shut. Then, gently roll the body into a cylinder. Tape shut. You may need to trim the arms if they are too long. DSC_6460Finally, fold the top flap down and tape to the opposite side of the body to create the head. DSC_6462

Draw a face on your paper play pal, and enjoy!

DSC_6465.JPGLine-14

Like us on FacebookShare this post with your friends, or Subscribe to this blog today to receive original craft project updates every week!

Terrific Tree Paper Braided Bookmarks

OLYMPUS DIGITAL CAMERA

Make a woven wood Bookmark! Great for teaching children to follow instructions and use fine motor skills in folding.

Age: 5+

Duration: 10 minutes

Learning Objectives: Cut and fold paper to encourage fine motor skill development. Create bookmarks for literacy. Incorporate tree facts into activity; Terrific Tree Paper features an image of tree bark on the front and wood grain on the back. Investigate different types of trees through the provided prints. Create art from nature.

OLYMPUS DIGITAL CAMERA

You’ll Need:

Line-07

OLYMPUS DIGITAL CAMERA

Cut Terrific Tree Paper into ½” x 11” strips.

OLYMPUS DIGITAL CAMERA

Glue two strips together at the corner.

OLYMPUS DIGITAL CAMERA

Glue two more strips on top the first strips but directly underneath.

OLYMPUS DIGITAL CAMERA

Fold each strip, in order from left to right, across the others.

OLYMPUS DIGITAL CAMERA

Keep folding until you near the end of the strips.

OLYMPUS DIGITAL CAMERA
Glue the ends together and trim the excess to form the final angle.

OLYMPUS DIGITAL CAMERA

Extra tip: Alternate the pattern by making the first two strips the grain side of the wood and the second two strips the bark side.

Line-08

Like us on FacebookShare this post with your friends, or Subscribe to this blog today to receive original craft project updates every week!