Christmas Tube Gift Boxes

Photo of Christmas Tube Gift Boxes Artwork

OLYMPUS DIGITAL CAMERA

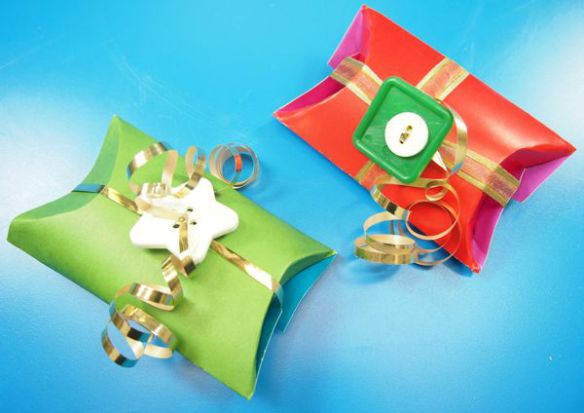
Make beautiful Christmas gift boxes with our R39301 Tube Crafts

Age: 5+

Duration: 10 minutes

Learning Objectives:

You’ll Need:

R39301 Tube Crafts

R2143 Really Big Buttons

• Ribbon

• Tape, if required

Line-15

OLYMPUS DIGITAL CAMERA

Collect all your materials that you’ll need. You can choose any color of Tube Crafts as they are double-sided.

OLYMPUS DIGITAL CAMERA

Roll the flattened sheet across the short sides. We’ve designed the Tube Craft sheets on one side with tabs and slots on the other to help secure the tube in place.

OLYMPUS DIGITAL CAMERA

Flatten the tube on both sides.

OLYMPUS DIGITAL CAMERA

Press in one side of the tube, followed by the other side. Leave the un-flattened end open to allow small gifts or candies to be placed inside.

OLYMPUS DIGITAL CAMERA

Close up the other side once you have placed your gift inside.

OLYMPUS DIGITAL CAMERA

Wrap the gift box with gold ribbon. Secure with a knot then thread the ends through the holes in our Really Big Buttons.

OLYMPUS DIGITAL CAMERA

And voila! You have yourself a perfectly-wrapped gift for a special person during the holiday season.

Line-09

Like us on FacebookShare this post with your friends, or Subscribe to this blog today to receive original craft project updates every week!

Stained Glass Christmas Ornaments

Stained Glass Christmas Ornaments

31100 Stainglass Ornaments Collection

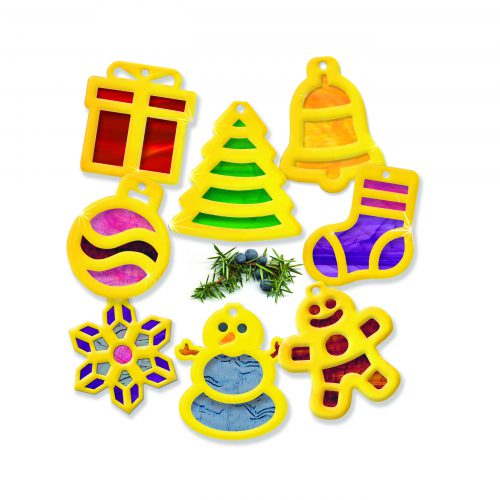
Need a fast and fabulous Christmas craft? These beautiful ornaments are the perfect project to spread holiday cheer!

Age: 4+

Duration: 10 minutes

Learning Outcomes: Explore the symbolism behind common Christmas emblems. Create beautiful take-home art that can be given as a gift. Exercise fine motor skills.

You’ll Need: 

Line-20

These ornaments are quick and simple to put together. Start by simply popping out the die-cut frames. Next, pop out the internal pieces, and set the frames aside.

Lay the internal pop-out on the stained glass paper and use a pencil to draw around the internal pop out. Make sure that you leave at least 1/4″ of space around the internal pop out so you have enough space to tape the stained glass paper into the frame. Cut out your stained glass pieces, and tape them to the inside (the white side) of the frames. Make sure to leave the small round hole at the top open!

Once your stained glass pieces are taped in place, fold the frame over and tape closed.

To finish off your stained glass ornament, cut a 6″ piece of yarn. Thread the yarn through the small round hole at the top of your ornament, and knot the loose ends into a circle. This will allow you to hang your ornament on your Christmas tree!

ornaments on tree.jpg

Have family members who don’t celebrate Christmas? Gift them the snowman or snowflake ornament and suggest they hang it in a window! Sunlight streams through the stained glass paper beautifully, and adds cheer to winter months.

ornaments on window.jpg

Line-21

Like us on FacebookShare this post with your friends, or Subscribe to this blog today to receive original craft project updates every week!

Project Spotlight: 3D Ornaments

2014-12-15-FeatureImage

Decorate with color this season! Fold up beautiful ornaments with our special designs–use paint, crayons or markers to color in the shapes.

Each of the R51081 3D Ornaments are die-cut into 3 folding designs. This means that when folded, the card ornament transforms into a beautiful arrangement that can be hung from the ceiling or as a part of a giant seasonal mobile.

20141127_112219

This photo was taken in Simply Wonderful Toys in Guelph, Ontario. They decorated the ceiling using our 3D Ornaments! The ornaments were given to children to color and collage while they waited for parents to finish shopping.

51081-3D-Ornaments-art_4

Here’s a look at some of the ways you can decorate the ornaments. Use paint or markers to color in alternating sections of the ornament. Splatter paint blobs across the ornament to give your design a retro tie-dye effect. Experiment with different paint techniques to make your ornament stand out!

51081-3D-Ornaments-girl

All finished decorating! Pop out the ornament along the scored lines and fold each layer of the ornament towards opposite sides. Thread some string through the pre-punched hole at the top of the ornament and hang.

Line-08


Like us on FacebookShare this post with your friends, or Subscribe to this blog today to receive original craft project updates every Monday, Wednesday and Friday!

Little Fingers Big Art won’t be posting from now until the week of January 5th, 2015. Enjoy a safe and prosperous holiday! See you in the NEW YEAR! Check back for more incredible arts and crafts projects in your classroom. All the best, from all your friends at Roylco!

New Year’s Masquerade Masks

2014-12-10-FeatureImage

This year’s New Year’s party will be a blast with fancy custom-made masks! Celebrate the past year and what the New Year will bring!

Age: 5+

Duration: 10-20 minutes

Learning Objectives: 

You’ll Need:

R15623 Tie Dye Paper

R22020 Color-In Masks

• Glue

• Scissors

• Pencil

• Rhinestones or sticker jewels

• Feathers

• Hole punch

• Decorative ribbon

Line-15

Encourage your students to think of their New Years masks as a reflection of their creative expression. So go crazy with it! Bring out your stock of decorative materials from the craft closet–look for things like sequins, bright, shiny beads or buttons, rhinestones, tinsel and more!

P1015837

Gather up your plethora of decorations for the masks! You don’t need to use a full sheet of the Tie-Dye Paper to decorate the mask; in fact, it would make sense to cut each sheet in half and divide the halves between two students.

P1015840

Place the Color-In Mask onto the Tie-Dye Paper and trace around the outside edges with pencil. Be sure to mark those eye holes as well as the pre-punched holes on the sides!

P1015841

Cut out the Tie-Dye Paper along the traced lines.

P1015843

Glue the Tie-Dye Paper cutout directly on top of the Color In Mask.

P1015848

Pick out your assortment of decorative items. Start adding details to your mask! Make patterns with the sequins or rhinestones, trace the outlines of the eyeholes or the edges of the mask.

P1015849

At this stage, I’ve decided to add decorative feathers to the mask. This adds a bit of flair! You can use hot glue, but regular white glue works fine as well. Simply press and hold down the feather shaft for 30 seconds. If the feather pops away from the paper, dab a bit of glue onto the feathery strands and press down onto the paper.

P1015850

Finally, punch holes through the Color-In Mask on either side.

P1015854

Attach a strand of ribbon onto each side of the mask. It’s a good idea to make two strands of ribbon for each mask, as it is easier to tie the mask around students’ heads. This is a great take-home project for kids before they head home for the holiday season!

Line-15

Like us on FacebookShare this post with your friends, or Subscribe to this blog today to receive original craft project updates every Monday, Wednesday and Friday!

Project Spotlight: Snowflake Weaving Mats

2014-12-08-FeatureImage

Add beautiful snowflakes to your winter display with artwork your students get to make!

The R16027 Snowflake Weaving Mats kit contains 24 projects for your classroom in four unique snowflake designs. What sets each of your students’ snowflakes apart from each other is the addition of our patterned weaving strips. There are plenty of designs for students to choose. Mix and match different combinations of weaving strips for a beautiful bold look!

Weaving is a great way to encourage fine motor development as it forces fingers to expertly pass the strips over and under the slots in the weaving mat. Remember to alternate the start for each strip as you go!

When you are finished weaving all the way to the bottom of the mat, snip off the ends of the paper strips and tape the finished weave down.

You can see the process for weaving at the link below:

[youtube https://www.youtube.com/watch?v=dZM9688k1z8]

Hang up your finished snowflake designs on a display wall. Alternatively, write the name of each student on his or her snowflake and hang from the ceiling for a lovely mobile decoration.

Line-12

Like us on FacebookShare this post with your friends, or Subscribe to this blog today to receive original craft project updates every Monday, Wednesday and Friday!

Tissue Paper Button Wreath

2014-12-03-FeatureImage

Start the Christmas decorating with a simple take-home ornament! Children younger than 5 years can experience the joy of making their own decorations with standard materials you will find in your classroom.

Age: 3-5 years

Duration: 10 minutes

Learning Objectives:

You’ll Need:

R22052 Double Color Card Sheets

R2131 Bright Buttons

R2172 Tissue Circles

• Gluestick

• Scissors

• Pencil

• Hole punch

Line-21

This wreath is nice and compact to be hung off a doorknob or can be tacked to the center of a child’s room door. Hang up on a tree for a rustic “crafty” look!

P1015821

We are going to make a simple wreath out of tissue paper and card paper, using the buttons as ornaments to decorate it. Use coordinating colors to make your wreath. You don’t have to make the wreath exclusively for the holidays. Instead, you can adapt it based on different colors that are relative to various seasons! Test out different combinations of colors and materials to see which work best.

P1015822

Let’s start with making the wreath.

P1015823

Fold the sheet of Double Color Card sheet in half.

P1015824

Use scissors to cut a small semi-circle out of the center of the folded sheet. Cut off the corners of the folded sheet and round out the edges to form a larger semi-circle.

P1015825

Now, unfold the wreath.

P1015879

Punch a hole into the top of the wreath. Cut a length of decorative ribbon and thread through the hole. Tie a knot at one end.

P1015881

To add texture to your wreath, you will need to use our Tissue Circles, or find scraps of green tissue paper in your scrap paper box.

P1015882

Take a scrap of green tissue paper and scrunch it in the center. Pull out the surrounding paper, much like you would when stuffing tissue paper into a gift bag.

P1015883

Dab a bit of glue onto the wreath and press the scrunched tissue paper on top.

P1015885

Add more tissue paper scraps all the way around the wreath.

P1015889

Glue a Bright Button onto the center of each tissue paper section. Enjoy a beautiful but easy-to-make decoration for this holiday season!

Line-14

Like us on FacebookShare this post with your friends, or Subscribe to this blog today to receive original craft project updates every Monday, Wednesday and Friday!

Project Spotlight: Really Big Origami Paper

2014-12-02-FeatureImage

Fold perfect origami ornaments or use as wrapping paper! The R15208 Really Big Origami Paper designs are beautiful and ornate, doubling as festive paper for this holiday season!

The sheets are perfect squares at 12 x 12″ (30 x 30 cm) making them the perfect cut and size for practicing to fold complex origami designs. Don’t work with standard sized paper that needs to be cut and prepared ahead of time. Start immediately folding gorgeous paper sculptures.

Origami-Butterfly

There are 6 different designs that you can use to make your origami sculptures. To learn more about the different designs, visit our origami page on the blog!

Try some of these project ideas with the R15208 Really Big Origami Paper!

You can view each of the folding techniques step-by-step in our exclusive videos below! Simply click on any of the animal origami links to view more:

Origami Fish  

Origami Frog

Origami Boat

Origami Crane

Origami Bird

Origami Butterfly

Once you are finished folding up your origami designs, punch a hole through the top and string through some ribbon to make a loop. Tie off the loop with a knot. Hang the origami ornaments on a crafty Christmas tree!

In addition, make snowflakes with the Origami Paper! We show you how to make beautiful snowflakes with intriguing designs in the R15314 Super Slick Paper video, which you can view here.

Line-16

Like us on FacebookShare this post with your friends, or Subscribe to this blog today to receive original craft project updates every Monday, Wednesday and Friday!