5 Reasons Why Arts & Crafts Are Crucial For Early Development

Dinosaurs and unicorns are alive. Superheroes and insects work together to fight evil. Yep, you heard that right! Welcome to the world of arts and crafts – a magical world where children can put on their capes of creativity and curiosity, unlocking the secrets of their own potential. Arts and Crafts are the forefront of development and growth in young children. From open-ended creative expression to cognitive enhancement, arts and crafts truly impact young minds more than we might expect. Let’s explore five benefits that arts and crafts unlock.

Fine Motor Skill Development

Painting, drawing, cutting, and pasting may seem like simple, mundane activities, but they play a crucial role in developing fine motor skills. These activities require precise movements and coordination, which help children refine their hand-eye coordination and dexterity. As they work with various art mediums, they strengthen their muscles in their hands and fingers, laying the groundwork for future tasks like writing. Take a look at one of our new products that aids fine motor skill development in a big way:

Imagination and Creativity

One of the most significant benefits of arts and crafts learning is gaining the ability to ignite and nurture imagination from a creative point of view. Whether it’s molding clay into mythical creatures or using craft sticks to tell stories of ancient kings and queens, crafts encourage children to think out of the box and explore their creative abilities. This freedom sets children on a trajectory for future success in creative roles and professions. Here is our recommendation for products that enhance imagination and creativity:

Cognitive Development

Engaging in arts and crafts activities stimulates various cognitive functions in children. As children explore possibilities through color, they engage in a wide range of cognitive processes from selecting hues to blending shades to recalling memories evoked by colors. These cognitive processes are not limited to the realm of colors alone; they extend to activities like building structures with blocks or piecing together puzzles, where children combine spatial reasoning and critical thinking together to bring their ideas to life. Through these immersive experiences, children not only develop their artistic abilities but also strengthen essential cognitive functions, laying a solid foundation for lifelong learning and growth.

 Expression and Communication

Not only do arts and crafts provide children with freedom of creative expression, but they also provide a non-verbal outlet through self-expression. By exploring colors, shapes, and textures, they can convert their feelings, thoughts, and experiences into expressions. This form of artistic expression is especially beneficial for those who may find it hard to communicate their feelings verbally. By engaging in creative activities, children learn to express themselves in alternative ways, fostering emotional intelligence and communication skills. Art can also serve as a calming and therapeutic activity, helping children manage stress and anxiety. The process of creating art allows them to channel their feelings constructively and develop resilience when facing challenging situations.

Social Skills and Collaboration

Learning how to work with others is a crucial developmental skill that will be used throughout a lifetime. In fact, more that 50% of people say their jobs require collaboration with one another and 75% of employees rate team work as being crucial in the workplace. Arts and crafts often involve collaboration and social interaction, whether it’s contributing to a group project or sharing ideas and materials with peers. These interactions teach children key social skills like sharing, voicing your opinion, taking turns, and cooperating towards a common goal. They learn to respect diverse perspectives, communicate effectively, and work as part of a team, which are essential skills for navigating social relationships in the future.

Incorporating arts and crafts at an early age is more than just a recreational activity – it’s a powerful tool for holistic development. From honing in on fine motor skills and cognitive development to gaining emotional intelligence and social competence, the benefits are far-reaching and long-lasting. By providing opportunities for creative expression and exploration, we empower children to unlock their full potential and become confident and independent individuals. Let’s nurture their creativity, one masterpiece at a time!

Dream Catcher

New ideas for Craft! Create your own beautiful modern style Dream Catcher using our R42280, release stress and relieve yourself. Learn how to create these dream catchers and add a wonderful touch to your home.

Age: 4+

Duration: 20 Minutes

Learning Objectives:  Decorate the thick cardboard hoops with markers, paint or crayons before threading the string through the pre-punched holes. Use our stringing suggestions or ask students to invent their own patterns. Don’t forget to decorate the included card feathers.

You’ll Need:

line-03.png (585×76)

Take the cardboard dream catcher and pop out the cardboard hoop and feathers.

On the back side of Cardboard hoop, number the holes on the hoop from 1-12 and decorate the front with paint or color of your choice.

Once you are done, take the plastic needle and twine. Pass the twine through the needle.

Now, start threading the string through the pre-punched holes. Let’s Begin at hole #1. Pass the needle from the back of hoop no. 1 and now, pass it through hoop no. 8 form the front.

Follow this pattern: 1,8,3,10,5,12,7,2,9,4,11. (You can also make your own weaving patterns).

Keep following the pattern and once you reach at hoop no. 11, you’ll see a beautiful pattern. Now, Cut off the extra twine from both ends and tie at the back. Our Net is complete.

It’s time to decorate the feathers. Paint the cardboard feathers with the color of your choice and let it soak for few minutes. After 20-30 minutes, pop the feathers out.

Take the plastic needle again and thread the twine through the hole in the chipboard feather. We’ll use beads this time to get an attractive look. Pass the feather and beads through needle.

Add as many beads as you want in it and tie them to the hole no.#7. Repeat the same procedure and make three hanging strings.

Let’s decorate our dream catcher and give it an eye catching look. Use Our R15703 Hair Paper. It includes number of colors. Choose one of your choice and glue it at the back of Cardboard hoop.

Take a craft paper, pencil and scissor and draw this flower shape. Cut it off and start rolling it inwards. Glue it at the end. You’ll get a beautiful flower.

Follow the same steps and make some flowers of pink and green color and stick those on our dream catcher. Make some butterflies with craft paper and glue the butterflies on the net.
Our Dream Catcher is ready.

line-03.png (585×76)

Thanks for checking out this post! Like us on FacebookShare this post with your friends, or Subscribe to this blog today to receive more project ideas!

Valentine’s Day: Pop Up Pivot Cards

Make your Valentine feel Special. Create your own Super Cute Valentine Card by using our New R51460 Pop Up Pivot Cards. Send a love note to all your friends and family members with this sweet Valentine’s Day card. The clever design is easy to assemble and fun to decorate. The three-dimensional message card unfolds and pivots as the card opens.

Age: 5+

Duration: 15-30 minutes

Learning Objectives: Makes a perfect take-home craft. Encourage creativity. Integrate art, literacy, and holiday activities. Exercise fine motor skills.

You’ll need:

This Craft Lesson is divided into three Parts:

  • The front card
  • The Pivot Mechanism
  • The Pop-Up Message Card

Let’s get started

There are three pieces to each card: the card, the pop-up message card and the pivot mechanism. Take all three and fold the card in half.

Now, start decorating the card. Take craft papers of different bright colors. Make some heart shapes (small and big) and cut those out. Once you get your heart shapes, glue the smaller hearts onto the bigger ones.

Glue all the heart shapes onto the front of Card. To make the cad looks attractive, glue the bigger shapes first and then the smaller ones. You will get a beautiful front.

Take the Pivot Mechanism. Fold it in half horizontally along the score line. Fold down and inside both the left and right wings.

Take the pop-up message card. Fold it in a zigzag fashion along the score line.

Now, apply glue to both the left lower and upper right flaps of the pivot mechanism. Unfold the message card and align both ends to the glued area of pivot mechanism.

Let’s decorate the message card, take a colored craft paper of your choice. Fold it in half and draw three heart shapes(just draw one sided hearts).

Cut out the heart shapes. Make two kissing emojis and one heart eyes emoji using black marker and small heart shapes. Glue the heart eyes emoji at the center of message card and kissing emojis on the left and right flaps.

Once you are done, apply glue within the indicator lines on the inside of the card and then apply glue to the top of the pivot mechanism. Fold the card shut.

It’s time to decorate the inside of card. Take a craft paper, fold it from center and draw one sided heart. Cut the heart shape out.

Then, take any couple’s picture. Start cutting the picture. Choose your spot from where to start and follow along the lines. Cut nicely around the couple and once you are done, glue it on the heart shape.

Glue the decorated heart on the upper side of card and draw any teddy or cartoon on the other side and fill it with some nice crayons or pencil colors. Your Valentines Card is ready.

Happy valentine’s Day!

Use these cards for Birthdays, Get Well Soon, Mother’s or Father’s Day.

line-13.png (585×76)

Thanks for checking out this post! Like us on FacebookShare this post with your friends, or Subscribe to this blog today to receive more project ideas!

New Product Highlight: Dinosaur Unruly Rulers

Get ready for an art adventure! This set of 6 stencils is fun and useful. Use these Dinosaur Rulers to create your own Dinosaur. Trace around the stencil and add colors when finished.

Age: 3+

Duration: 15-20 minutes

Learning Objectives: Mix and match dinosaur elements to create unique prehistoric animals. Use colored pencils, markers and crayons to decorate your dinos. The simple designs are easy by a wide range of ages.

You’ll need:

  • Crayons, Pencil crayons or markers to design and decorate the dinos
  • Scissor
  • Glue Stick
line-08.png (585×76)

Take a stencil and place it onto a paper. Start tracing the interior edges to draw a perfect dinosaur.

Trace all the body parts starting from head to toe. Mix & match all the elements to give it a proper shape.

Finish the dinosaur shape off with a tail. Here you can see how well the patterns transfers onto the sheet.

Now, it’s time to give colors to this dinosaur. Start filling the shape with your preferred color of crayons and decorate it with your favorite color combination.

To make it more unique, cut out the dinosaur. Choose any picture or a piece of craft paper and glue it on it.

It’s a lot of fun for children to discover the different types of dinosaurs. Try all Dinosaur Rulers and make your own Dinosaur.

Please watch the full video here: https://youtu.be/VM-YXhzKXcw
Visit our website https://roylco.com/shop/dinosaur-unruly-rulers/ for more information.

New Product Highlight: Color Wheel Stencils

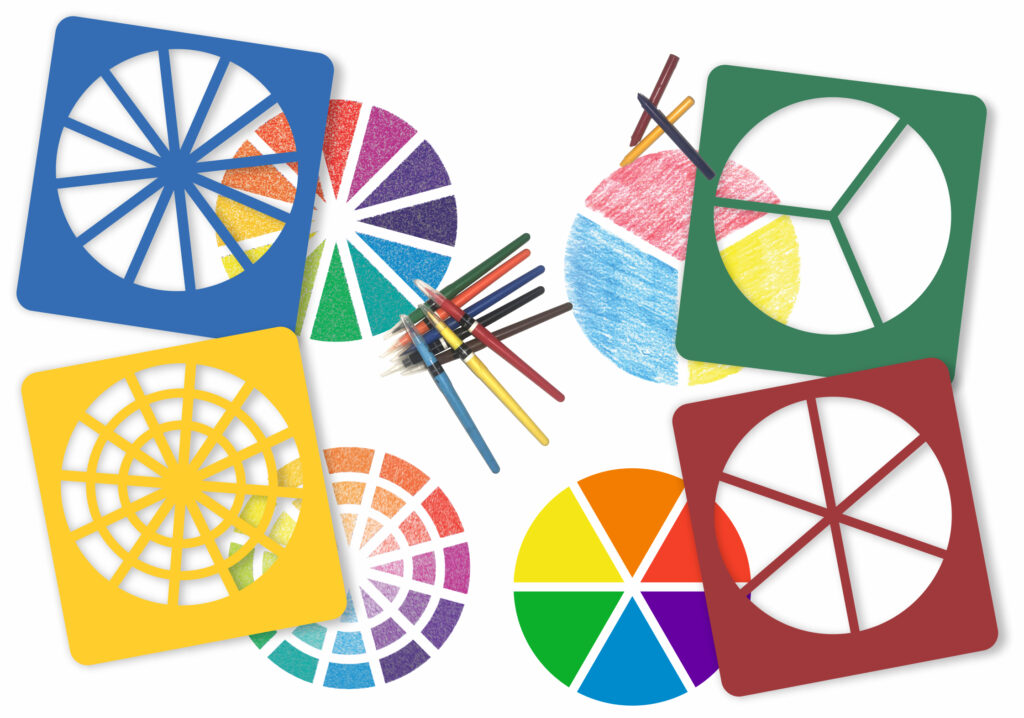
Create fun by encouraging students to create personal color wheels! We like this activity because it can be simple or complex, with a good balance between structure that guides students and open-ended fun that fosters creativity.
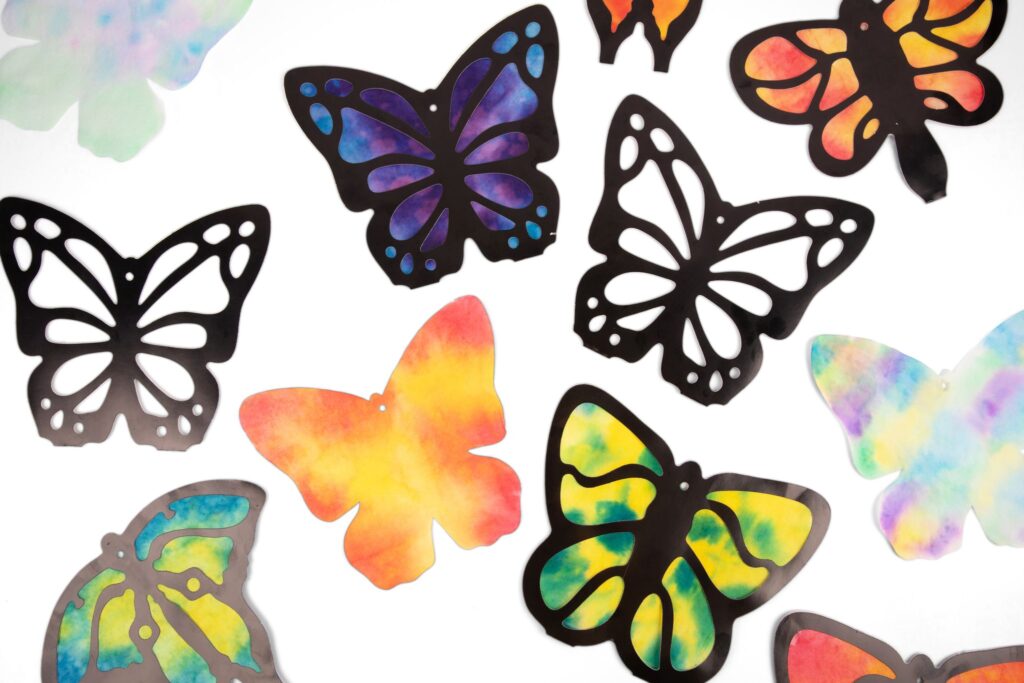
Age: 4+
Duration: 15-30 minutes

Here are few ideas on how to use them:

Idea 1: Get familiar with colors by keeping it simple.

What you’ll need:

LET”S GET STARTED

Take a wheel Stencil of your Choice. Put it onto a paper. Start filing up the inner edges with your choice of Color. To get an attractive look, try different colors. You can use Crayons, Markers or Pencil Colors. Once you are done, take off the stencil and see how beautifully the patterns get transfer to the sheet!

Idea 2: Take your color wheels up a notch by adding texture.

What you’ll need:

Take a Wheel Stencil and place it onto a white paper. Place one of our R48250 Rubbing Plate underneath the white paper. The twist starts from here. Fill the first wheel pattern with color of your choice. Once you are done, take that rubbing plate out and switch it with another rubbing plate. Fill up all the patterns by using as many rubbing plates you want and you’ll see the difference.

Idea 3: Take your color diffusing projects in a more structured direction by incorporating the color wheel.

You’ll need:

Take a R15212 Color diffusing Paper and place a wheel stencil over it. Outline the wheel patterns with a chalk or with a white crayon. Now, place the diffusing paper on a no mess tray. Take Our R54466 Junior Paint Spritzers, fill the bottle with liquid water color paint and spritz out a fine mist of color. Use different colors to create different effects.

Let us know how you choose to use your Color Wheel Stencils! Have fun and get creative!
Visit our website https://roylco.com/shop/color-wheel-stencils/ for more information.

Line-08

Thanks for checking out this post! Like us on FacebookShare this post with your friends, or Subscribe to this blog today to receive more project ideas!

Product Spotlight: Holiday Color Diffusing Shapes
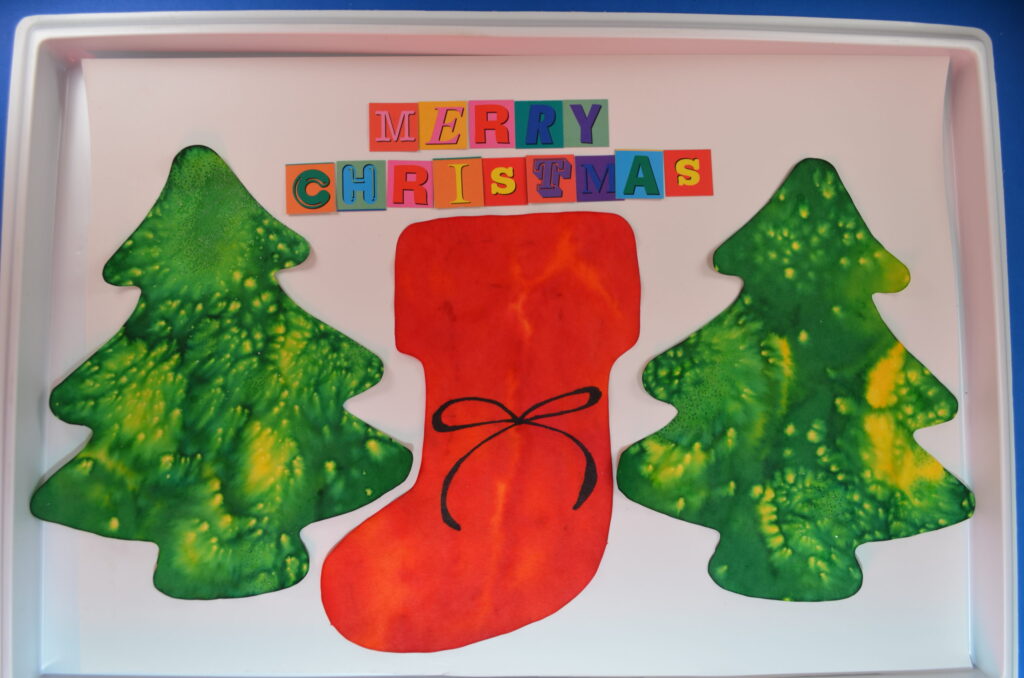
This month, we’re featuring two of our NEW products:

These color diffusing shapes help us get in the holiday spirit while simultaneously developing a deeper understanding of color. There are 3 easy ways to transform these shapes from A to B:

A. Plain Color Diffusing shapes–functional but still waiting for the magic to happen
B. Color Diffusing magic transformed the shapes into these beautiful works of art!

Method 1: Washable Marker & Water

This is the easiest method and the mess-free method. Simply use any washable marker to color the shape, and don’t worry about filling in all the white spaces! When you’re done, spray water on the shape and watch the colors diffuse and create secondary or even tertiary colors.

If you need a spray bottle for the water, we recommend Junior Paint Spritzers–they are perfect for small hands.

Method 2: Watercolor

Break out your trusty watercolor set and go to town! Because of the water used with the watercolor paint, the colors will diffuse throughout the paper as you paint. You can always add some extra water at the end and watch the colors diffuse even more. This is especially helpful if you’d like to make light or pastel designs.

Method 3: Liquid Watercolor & Water

This method creates the most impressive designs, IMHO. You can find liquid watercolors online or at your local craft store. Be careful because these paints can be POTENT! It takes quite a few washes to remove the paint from hands, but that is also what makes the designs so beautiful on Color Diffusing paper.

Simply use a spray bottle with the liquid watercolor to add splashes of color to your Color Diffusing shapes. Once you’re happy, spray the shapes with water and watch the colors blend!

If you need a spray bottle for the color or water, we recommend Junior Paint Spritzers–they are perfect for small hands.

Pro tip: Stick to primary colors! It’s easy to get carried away with color, but once they start diffusing, they have a tendency to blend into one, amorphous brown color if you get too complicated!


Try all 3 and let us know your favorite method!

If you like this, you’ll like Blots of Ornaments too! These ornaments have the added benefits of being cut out of extra thick, high-quality color diffusing paper so that they can be used as real ornaments on a tree or windowsill!

Decorative Tree Ornaments

Feature-Image-DecoTreeSculpture

Add a personal touch to your decorations this holiday season with a beautiful and surprisingly simple craft ornament. It requires nothing more than some decorative paper and a few yards of yarn!

Age: 4+

Duration: 15 minutes

You’ll Need:

R15420 Black and White Paper/ R15200 Patterned Paper ClasspackR15203 Decorative Hues Paper / R15421 Double -Sided Rainbow Paper / R15409 Economy Metallic Paper / R15289 All Kinds of Fabric Paper/ R15256 Amazing Animal Paper / R15263 Tie-Dry Craft Paper/ R15303 Retro Pop Paper

• Yarn

• Scissors

• Tape

• Ruler

• Protractor

Line-03This would be a great opportunity to introduce children on how to use a protractor to make angles. For this activity, children will use protractors to make different sizes of semi-circles for the cone shapes.

IMG_7791Select the different types of paper you would like to use in your Christmas tree ornament. Our trees have 4-5 tiers to them. If you would like to make the trees smaller, simply leave out the two interior tiers.

IMG_7797Lay the ruler horizontally across the length of the paper. For the largest and last tier, place the first point at the middle of the ruler. Draw a semi-circle from one corner of the page to the opposite corner.

IMG_7799The second tier should feature a semi-circle that is about 9″ in width.

IMG_7801The third tier should feature a semi-circle that is 6″ in width.

IMG_7804

The last tier should feature a semi-circle that is about 4½” in width.

IMG_7806Cut out each of the semi-circles.

IMG_7809Roll the semi-circles into cones and secure the edges together with tape. Note: When you roll up the cones, be sure to leave a bit of an opening at the top. You’ll need the opening to thread string through.

DecoTreeAnimation

Tie a knot at the bottom of the yarn. String the rest of the yarn through the opening in the top of the cone. Continue to thread the yarn through the rest of the cones.

IMG_7819Simply make a loop from the yarn and place onto a tree branch or hang in a window.

Line-03

How are you decorating your classroom for the winter holidays? Send us photos of your inventive craft decorations to subscriber@roylco.ca!

3D Ocean Scenes

3D Ocean Scene Hero Shot

2014-06-09-FeatureImage

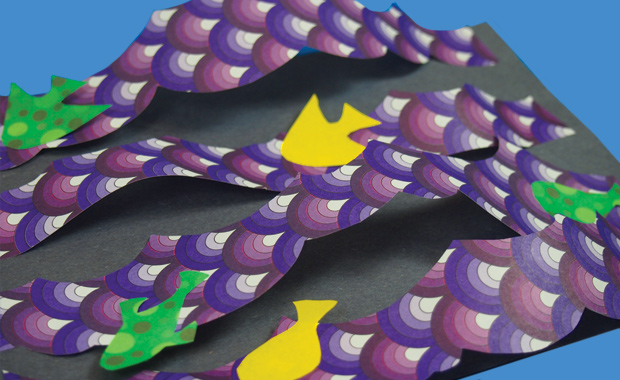
Following our ocean theme for this week, I’ve put together a little craft that incorporates our decorative papers into a fun and vivid cut and paste activity! Find out how to make your own ocean scenes below!

Age: 6+

Duration: 15-20 minutes

Learning Objectives: Exercise fine motor skills through cutting wave shapes. Focus scissor skills while cutting out fine details in various shapes. Turn 2D shapes into 3D images. Combine a flat base color with decorative paper to simulate the appearance of ocean waves. Combine colors together. Learn how to space elements apart to express dimension.

You’ll Need:

R15203 Decorative Hues Paper

• Construction paper, 9 x 12″

• Glue

• Scissors

• Pencil

Line-08

This craft is definitely one of our easier ones. There are less materials to use in this activity, so the final product is simple but effective. Kids will love playing around with the 3D waves to make their fish characters appear as if they are swimming!

P6099446Here’s a selection of the various Decorative Hues Papers you can use, along with some suggested backdrops for your ocean scenes. Blue is definitely a go-to color, but you may not have 30 sheets of blue construction paper easily available.

Other colors to use are: white, black, green, or even (not pictured here) purple! White goes well against light blue or greenish waves. Black can be used to depict a night-time ocean scene. Green works well with blue or white waves. Purple can be used for a deep-sea scene. Grab some references online to see what kinds of color combinations work with different ocean scenes.

P6099449I’m going to show you how a difficult color–such as black–can be incorporated into an ocean scene.

P6099451Most construction paper sheets come in 9 x 12″ configurations. For this activity, you will only need half of the sheet, so two students can use one color and create different waves effects. Fold the sheet of paper in half.

P6099452Use the folded line to cut or tear your sheet in half. You should have a sheet size of 9 x 6″.

P6099456I’ve selected a pretty wave-like pattern from the Decorative Hues paper. Notice I’ve used a sheet that’s predominantly purple. This makes it appear as if the reflection of the water is casting a purplish hue.

P6099458Flip your wave paper over and draw a line with peaks across the length of the sheet. You can get students to practice drawing wave lines on scrap paper before drawing them on the Decorative Hues paper.

P6099460You can fit about 3-4 wave lines on the back of the Decorative Hues sheet. Keep the spacing relatively equal, but you can do thinner lines if you wish.

P6099463

Cut each of the wave lines out from the paper. Discard the part above the first line you drew. Next, select two fun colors for the fish shapes. Fish are relatively small so you can cut the sheets in half and distribute among students.

Fish Drawing Lesson!

Click on any of the following subheadings to learn how to draw:

Basic Fish Shape

Fish Design 2

Fish Design 3

Basic Fish Shape

Draw a basic fish shape with two basic shapes: a triangle for the tail and an oval for the body.

P6099464

Start by drawing a small line.

P6099465From the bottom of the line, draw a large oval shape.

P6099466Complete the oval by crossing over and connecting it to the top of the line.

Fish Design 2

This fish look a little more exotic, but is made up of two triangles: a large triangle for the body and a small triangle for the tail.

P6099468

First draw a large rounded triangle shape. Leave the line open so it can connect to the tail.

P6099469

Finish the fish shape off with a smaller triangle for the tail.

Fish Design 3

This fish design is a little more complex. It is based after the top view of a koi fish, so it requires a little more curve to the basic shapes. There are a lot of ovals and rounded triangles used in this fish shape. Older students can use reference drawings of other fish to make their designs.

P6099470Draw a loose tear-drop shape for the tail.

P6099471Connect the tail to a large oval body.

P6099472

Add small triangles for fins.

P6099474

Cut out all the fish shapes. Thanks to the versatile design, it’s easy to flip the fish to face any direction.

P6099475

Now let’s get ready to assemble the 3D ocean scene!

P6099478

Flip over the first wave pattern you wish to use. Dab a bit of glue on either end of the strip.

P6099479

Slightly curl in the wave strip as you glue it down onto the background. Slide the edges of the wave strip about 1/4″ away from the edge of the background. This will lift up the sheet off the background to create a wave effect. Space each of the wave strips apart as you glue them down.

P6099482

Hang loose and get ready to add in the fish!

P6099484Dab glue onto the back of the fish shape.

P6099485

And glue your fish onto one of the wave strips.

P6099486

Fill up the entire scene with fish figures! Now they all look like they’re surfing the waves!

P6099491

Here’s a look at what else you can do with different combinations of Decorative Hues paper! The scene on the left depicts a series of koi fish on light blue waves. The scene looks like it’s fresh out of a painting!

Line-08Thanks for checking out this post! Like us on FacebookShare this post with your friends, or Subscribe to this blog today to receive original craft project updates every Monday, Wednesday and Friday!

Flag Windsocks

Windsock Artwork made from Color Diffusing Paper

2014-05-25-FeatureImage Make brilliant designs on Color Diffusing Paper using clear glue! Incorporate windsocks into a national holiday craft or use to cheer on your favorite team.

Age: 5+

Duration: 20 minutes

Learning Objectives: Create product art with an emphasis on using fine motor skills. Trace designs onto paper or draw freehand using references. Encourage scissor skills development. Incorporate windsock designs with themes learnt through social studies subjects or in observation of upcoming national events. Talk about significance of wind patterns and weather changes.

You’ll Need:

R15212 Color Diffusing Paper 12 x 18″

• Watercolor paint

• Plastic paint trays

R54460 Squiggle Pipettes OR paintbrushes

• Scissors

• Hole punch

• Yarn

• Tape

• Clear glue (preferrably with applicator tip)

Line-03 This activity is perfect for making a take-home craft that kids will love. You can decide to have kids draw their flag designs freehand, or print out a large flag design in black and white line-art that kids can use as a template beneath their Color Diffusing Paper sheet. In this activity, I’ve used both techniques.

Click on any of the links below to skip to a portion of this tutorial:

1. Designing your windsock

2. Making streamers

3. Assembling your windsock

P6179636 Here, you can see all the materials I’ve assembled. Using bowls to contain the watercolor paint makes it easy for kids to keep their work-spaces clean. Pipettes are a great way to get children with developing finger muscles to experiment with different squeezing techniques.

Alternatively, use paintbrushes to apply the watercolor to the Color Diffusing sheets.

P6179640 First, decide on your design. If you decide to get students to freehand the design, it’s a good idea to print out a reference for students to look at. They can lightly pencil in their design if they’d prefer, then go over top of the design with the clear glue.

It’s ideal if the clear glue dispenser has a pointed applicator that kids can use like the point of a marker or pencil. Gently press the glue down onto the Color Diffusing Paper on top of your penciled design.

P6179642The photo above won’t clearly show the image, but I’ve “drawn” 50 stars with the clear glue in a stacked sequence. Can you guess the flag I’m making?

P6179644Wait until the glue is completely dry! This usually doesn’t take too long, but if you are worried about time, be sure to do the glue “drawing” on a day before your painting class. You can speed up by the process by leaving the drying artwork under an oscillating fan. Once you are ready to paint, place the Color Diffusing Paper into a plastic paint tray.

For this particular project, I’ve grabbed blue watercolor. Notice how nicely the Squiggle Pipette fits into the colorful paint bowl. You can place the bowl in the center of a group of students and have them all grab their paint from that one location.

P6179664This is my favorite part!! As I release the blue watercolor paint from the Squiggle Pipette, the paint carefully avoids any place where I’ve “drawn” in the glue. This is because the glue has seeped completely through the paper and acts as a barrier to the oncoming ink.

P6179668It will take a few squirts from the Squiggle Pipettes to fill the entire canvas, but it’s well worth it for the colorful effect and design popping through!

P6179671For a project like the Union Jack flag, I placed a line-art print of the flag design beneath the Color Diffusing Paper and traced out all the lines with the clear glue. Once the glue was dry, I used a paintbrush to apply the paint. This helped maintain an even layer of paint throughout the design.

P6179714 Take your main windsock design and prepare it for lift-off!

P6179717First, roll the windsock into a tight tube. This will help it retain a cylinder shape once you string it up.

P6179719 Unwind the tube until the ends are overlapping by 2″ on both sides. Tape the edges together.

P6179724 Next, make four holes at equal intervals along the top edge of your flag windsock.

P6179726Grab a large run of yarn, about 2 yards (1.8 m) in length.

P6179729 Loop one end through a hole and hold. Make a second loop with the other end of the yarn and hold that along with the first strand. Use the remaining yarn to pass through a second hole.

P6179731Loop back up and hold the loop in your hand along with the rest of the previous loops. Pass the end of the yarn through a third hole.

P6179732Loop back up through the hole and hold the loop in your hand with the rest. Thread the final stretch of yarn through the fourth hole.

P6179734Then loop back up and hold this loop in your hand with the remaining loops. There should be some leftover length of yarn to use as the string from which you’ll hang the windsock. Twist all the loops together, as one, into a tight knot.

P6179737You can trim some of the excess loops above the knot part. Just make sure not to snip the long piece of string! The first part of the windsock should look something like this.  

P6179681 Now it’s time to make the streaming ends for the windsocks. Place the Color Diffusing paper lengthwise, then spread the paint any which way you’d like. Make lines, spots, color entire strips of paper or intertwine the colors together.

P6179712When this particular sheet of paper has dried, cut it into strips lengthwise.

P6179747 Now grab some glue! We’re ready to attach the final portion of the windsock.

P6179748Put a bit of glue on the inside of the windsock’s bottom edge.

P6179749Press a streamer down onto the glued portion. Space out your streamers into equal intervals and continue all the way around the bottom of the windsock.

P6179752Here’s a look at our windsock! Isn’t it a beaut!

P6179757 You can see further completed designs here, including the American flag, Canadian flag, and the Union Jack!

OLYMPUS DIGITAL CAMERA Here’s a shot of our windsocks fluttering outside from our local pine trees!

P6209823 Another gorgeous look at our lovely flag designs! Watch how they flutter animatedly in the breeze! Line-03 Thanks for checking out this post! Like us on FacebookShare this post with your friends, or Subscribe to this blog today to receive original craft project updates every Monday, Wednesday and Friday!