3D Ocean Scenes

3D Ocean Scene Hero Shot

2014-06-09-FeatureImage

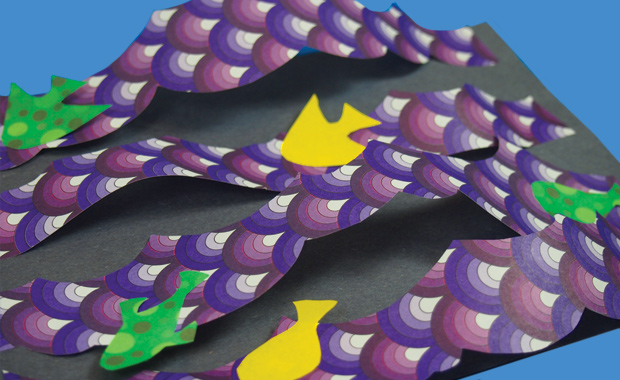
Following our ocean theme for this week, I’ve put together a little craft that incorporates our decorative papers into a fun and vivid cut and paste activity! Find out how to make your own ocean scenes below!

Age: 6+

Duration: 15-20 minutes

Learning Objectives: Exercise fine motor skills through cutting wave shapes. Focus scissor skills while cutting out fine details in various shapes. Turn 2D shapes into 3D images. Combine a flat base color with decorative paper to simulate the appearance of ocean waves. Combine colors together. Learn how to space elements apart to express dimension.

You’ll Need:

R15203 Decorative Hues Paper

• Construction paper, 9 x 12″

• Glue

• Scissors

• Pencil

Line-08

This craft is definitely one of our easier ones. There are less materials to use in this activity, so the final product is simple but effective. Kids will love playing around with the 3D waves to make their fish characters appear as if they are swimming!

P6099446Here’s a selection of the various Decorative Hues Papers you can use, along with some suggested backdrops for your ocean scenes. Blue is definitely a go-to color, but you may not have 30 sheets of blue construction paper easily available.

Other colors to use are: white, black, green, or even (not pictured here) purple! White goes well against light blue or greenish waves. Black can be used to depict a night-time ocean scene. Green works well with blue or white waves. Purple can be used for a deep-sea scene. Grab some references online to see what kinds of color combinations work with different ocean scenes.

P6099449I’m going to show you how a difficult color–such as black–can be incorporated into an ocean scene.

P6099451Most construction paper sheets come in 9 x 12″ configurations. For this activity, you will only need half of the sheet, so two students can use one color and create different waves effects. Fold the sheet of paper in half.

P6099452Use the folded line to cut or tear your sheet in half. You should have a sheet size of 9 x 6″.

P6099456I’ve selected a pretty wave-like pattern from the Decorative Hues paper. Notice I’ve used a sheet that’s predominantly purple. This makes it appear as if the reflection of the water is casting a purplish hue.

P6099458Flip your wave paper over and draw a line with peaks across the length of the sheet. You can get students to practice drawing wave lines on scrap paper before drawing them on the Decorative Hues paper.

P6099460You can fit about 3-4 wave lines on the back of the Decorative Hues sheet. Keep the spacing relatively equal, but you can do thinner lines if you wish.

P6099463

Cut each of the wave lines out from the paper. Discard the part above the first line you drew. Next, select two fun colors for the fish shapes. Fish are relatively small so you can cut the sheets in half and distribute among students.

Fish Drawing Lesson!

Click on any of the following subheadings to learn how to draw:

Basic Fish Shape

Fish Design 2

Fish Design 3

Basic Fish Shape

Draw a basic fish shape with two basic shapes: a triangle for the tail and an oval for the body.

P6099464

Start by drawing a small line.

P6099465From the bottom of the line, draw a large oval shape.

P6099466Complete the oval by crossing over and connecting it to the top of the line.

Fish Design 2

This fish look a little more exotic, but is made up of two triangles: a large triangle for the body and a small triangle for the tail.

P6099468

First draw a large rounded triangle shape. Leave the line open so it can connect to the tail.

P6099469

Finish the fish shape off with a smaller triangle for the tail.

Fish Design 3

This fish design is a little more complex. It is based after the top view of a koi fish, so it requires a little more curve to the basic shapes. There are a lot of ovals and rounded triangles used in this fish shape. Older students can use reference drawings of other fish to make their designs.

P6099470Draw a loose tear-drop shape for the tail.

P6099471Connect the tail to a large oval body.

P6099472

Add small triangles for fins.

P6099474

Cut out all the fish shapes. Thanks to the versatile design, it’s easy to flip the fish to face any direction.

P6099475

Now let’s get ready to assemble the 3D ocean scene!

P6099478

Flip over the first wave pattern you wish to use. Dab a bit of glue on either end of the strip.

P6099479

Slightly curl in the wave strip as you glue it down onto the background. Slide the edges of the wave strip about 1/4″ away from the edge of the background. This will lift up the sheet off the background to create a wave effect. Space each of the wave strips apart as you glue them down.

P6099482

Hang loose and get ready to add in the fish!

P6099484Dab glue onto the back of the fish shape.

P6099485

And glue your fish onto one of the wave strips.

P6099486

Fill up the entire scene with fish figures! Now they all look like they’re surfing the waves!

P6099491

Here’s a look at what else you can do with different combinations of Decorative Hues paper! The scene on the left depicts a series of koi fish on light blue waves. The scene looks like it’s fresh out of a painting!

Line-08Thanks for checking out this post! Like us on FacebookShare this post with your friends, or Subscribe to this blog today to receive original craft project updates every Monday, Wednesday and Friday!

Sensory Collage Easter Egg Art Project

Are you looking for Easter egg ideas? The sensory collage Easter egg art project is great for your classroom activities. It introduces children to the important senses of the human body with Roylco’s Sensory Collage Kit. It’s also great for working on fine motor skills.

Age: 5+

Duration: 15 minutes

Learning Outcomes: Exercise fine motor skills. Practice sorting materials by color and texture. Learn about collage art. Develop sensory awareness.

You’ll Need: 

Pull out a wavy sheet from the R15413 Sensory Paper package, choose your favorite pastel color, and draw an outline of an egg. Encourage kids to slowly move their palms and fingertips over the paper to feel the small raised patterns. Some kids may want to follow the patterns on the paper to create their designs, while others may want to create their own designs. You can color the wavy lines on the paper and it will divide the egg into different sections. You can make these lines as bold as you like.

Next, plan and place the sensory art materials you like on your egg. The Sensory Collage Kit contains 20 different sensory art packs to use in creating unique illustrations.

Before gluing the sensory art materials onto the artwork, you can play with the colors and the different textures. Think about which sensory art materials would best represent your Easter egg artwork.

Encourage children to talk about the color and the texture they use on the artwork and discuss what they feel. Is the color a warm color or a cool color? Is the material rough, hard, scratchy, smooth or bubbly? After exploring the materials, children can start to glue the sensory materials onto the artwork.

The artwork is almost finished. Have the children cut out the egg and glue it on to the  cardstock. Here is our sensory collage Easter egg artwork. Write your name on the artwork and take it home for your Easter celebration!

For more information please visit https://roylcostore.com/products/sensory-collage-kit 


Bundle Savings

Get all the Roylco items used
in this project and save 15%!

$47.58 USD
bundled price
Add Bundle
to Cart


A Pot Of Gold for St. Patrick’s Day

Are you looking for craft ideas for St. Patrick’s Day? Create some decorations to make the house and classroom more festive. Lets make a spiral rainbow and pot of gold.

Age: 4+

Duration: 5 minutes

Learning Outcomes: Exercise fine motor skills. holiday activities. Makes a perfect take-home craft.

You’ll Need:

Choose your favorite pattern from Roylco’s R15295 Rainbow Paper Pack.

Draw a spiral at the back of the paper.

You can also glue two pieces of rainbow paper together to create a double-sided sprital.


Use scissors to cut from the end of the outline toward the center to make a spiral.


Take two pieces of metallic paper from Roylco’s R15409 Economy Metallic Paper Pack.

I choose dark green paper to make the pot, and the gold colored paper for the golden coins. Draw the shape of a pot at the back of the green paper, and cut it out. Make the coins by cutting out some circle shapes from the gold paper. Then glue the golden coins on to the green pot.

After you finish making a pot of gold, you can glue it to the end of the rainbow.  Once complete, hang from ceilings, on bulletin boards or anywhere that could use some extra color.


You are the pot of gold at the end of my rainbow!

Bundle Savings

Get all the Roylco items used
in this project and save 15%!

$19.19 USD
bundled price
Add Bundle
to Cart

Make Chinese Lanterns for Chinese New Year

The Chinese Lantern Festival is a Chinese festival celebrated on the fifteenth day of the first month in the lunisolar Chinese calendar. It marks the final day of the traditional Chinese New Year celebrations, and it falls on March 2nd for 2018.During the Lantern Festival, children carry paper lanterns and go out at night. People also go to temples to solve riddles on the lanterns.

Age: 5+

Duration: 8-10 minutes

Learning Outcomes: Explore cultural assumptions and symbols. Practice folding and taping. Exercise Fine motor skills. Create a cute take-home craft.

You’ll Need:

Ideas:

  • Use your own imagination and add some decorations to the lanterns.

Bundle with Textured Rubbing Plates

Bundle Savings

Get all the Roylco items used
in this project and save 15%!

$25.06 USD
bundled price
Add Bundle
to Cart

Bundle with Optical Illusion Rubbing Plates

Bundle Savings

Get all the Roylco items used
in this project and save 15%!

$25.06 USD
bundled price
Add Bundle
to Cart

Drama Hats

drama paper hats

Make believe you are a pilot, cowboy, Viking, queen and more with lovely blank, printed Drama Hats!

drama paper hats

All the Drama Hats come printed on blank paper and are die-cut into recognizable hat shapes. Choose between a crown, Viking helmet, captain’s hat, medieval warrior helmet, pirate hat, pharaoh headdress, aviator hat and cowboy hat!

drama paper hats

Use markers, crayons or pencil crayons to color in the white parts of the hats.

drama paper hats

Kids love to take their time filling in all the little details.

drama paper hats

Encourage students to add embellishments and other fun craft materials to “fun up” their designs.

drama paper hats

The older students tend to fill in more of the surface area than younger students do. You can encourage younger students to fill in the areas with paint if they are having trouble coloring in all the spaces.

drama paper hats

Attach on a strip of paper to either side of the Drama Hats. You can accordingly tighten or loosen the strips to fit each child’s head. Tape it secure.

drama paper hats

We cut out props such as eye patches and mustaches from craft foam and wore them along with our hats. The campers had a great time role-playing. A chunk of time was spent running around in the garden acting out the different roles and creating on-the-fly stories about adventures in the woods!

Line-07

Like us on FacebookShare this post with your friends, or Subscribe to this blog today to receive original craft project updates every Monday, Wednesday and Thursday!

Project Spotlight: Paper Globes

2014-11-17-FeatureImage

Make beautiful paper globes with colorful paper designs, pre-cut and scored for easy assembly! Hang the globes up on a Christmas tree or decorate one of our mobile bases with the globes.

The Paper Globes feature 8 different color schemes. Each of the color schemes includes 1 solid color and 1 patterned circle. The patterns are all coordinated to work with the solid color circles. Mix and match to make your own combinations! See what works for you.

83459-Globe-2

Each circle is pre-cut with slots. Use the slots to easily slide the circles into each other. You can invert the sides to show through the opposite side of the paper circle you use. The best part about the Paper Globes is that they do not require gluing, so you can turn a craft session into a less-mess experience!

83459-Globes

Each pack of Paper Globes will make 16 globes in total. When you have created your globes, punch a hole through the top and tie a length of string or ribbon. With the holiday season approaching, it’s a good idea to consider decorating your tree with easy-to-make ornaments like these!

Alternatively, run a ribbon through the paper globes to make a decorative garland. Hang up the garland on a wall or decorate a ledge in your classroom!

Line-02

Like us on FacebookShare this post with your friends, or Subscribe to this blog today to receive original craft project updates every Monday, Wednesday and Friday!

Educational Light Cube: Stacking Colorful Cups


2014-10-09-FeatureImage

View the dazzling effects of color-changing light on the cube with dollar store variety cups and plastic drinking glasses! Develop fine motor skills through arrangements of stackable cups… see more of this exercise below!


IMG_9337

To start the activity, we first turned on the Light Cube to the ‘white’ setting. Next, we placed a stack of clear-color plastic cups we found at the dollar store on top of the cube. The white brings out the brightness of the clear colors and allows kids to see what inside of the various cups look like when they’re stacked together.


IMG_9338

We next asked our art camper Stephano to take the structure apart. He wanted to see how the individual pieces looked like. Without the bases, these regular dollar variety martini glasses appear quite unique!


IMG_9340

How about we add some more to the mix? Here’s a good look at what happens when you stack multiple cups of the same color together–the colors become extremely saturated, meaning that they are intensified.


IMG_9343

Now let’s add another level of complication to our structure with the bases for the cups.


IMG_9361

Stephano decided to structure the martini glasses in a way that they could easily be stacked together with the bases intact. He decided to place them standing on top of the inside of each cup.


IMG_9362

Next, we amplified the colors of the glasses by changing the cube’s color to red. This created a stark glow throughout the room and helped Stephano focus directly on stacking rather than the colors of the cups.


IMG_9364

Once we turned the cube’s color back to white, we got to see how Stephano had randomly chosen differently-colored cups to stack together. Reflecting back on the activity, Stephano noticed that he wasn’t so worried about which colors he used while he was stacking. Instead he could focus directly on stacking the cups together, and then afterwards enjoyed the surprise when he got to see what combinations of colors he used!


Line-12

Like us on FacebookShare this post with your friends, or Subscribe to this blog today to receive original craft project updates every Monday, Wednesday and Friday!


Craft Stick Bracelets

2014-06-04B-FeatureImage

Make beautiful bracelets using our R39100 Wild Animal Craft Sticks! An ingenious process creates a curved shape in the craft stick that you can use as a bracelet!

Age: 4+

Duration: 10 minutes. Project dries overnight.

Learning Objectives: Combine craft stick designs with flower pieces to make beautiful combinations. Observe the effects of glue and water on manipulating the shapes of craft sticks. Use simple techniques to create an effective, visually appealing product.

You’ll Need:

R39100 Wild Animal Craft Sticks

R15657 Wild Flower Paper Bits

• Small plastic disposable cups

• White glue

• Glue stick

• Water

• Paint tray

• Container

• Paper towels

Line-09

It’s a good idea to protect your work surface as you will be working with glue and water. Children can share one container of water and glue between each other, but that will inevitably lead to some messes!

P1019186

Set up all of the supplies you’ll need. The craft sticks are patterned in 5 different designs, but you can experiment with different designs using the Wild Flower Paper Bits.

P1019192First, mix 1 part water with 1 1/2 parts glue. You want to have more glue than water, as this will help the bracelet retain its shape. I suggest mixing the glue and water together in a bottle. Cap it off, then shake to get the two ingredients fully mixed.

P1019203Pour the mixture into a container that’s long enough to fit the craft sticks inside.

P1019206Dip one craft stick inside the container. Let it sit inside for about 1-2 minutes.

P1019211Once you remove the craft stick, it becomes bendable! Carefully press the craft stick along its length to loosen it up. Grab the ends and gently bend the craft stick inwards.

P1019213Place the craft stick inside the plastic disposable cup along the topmost rim.

P1019216Let sit overnight until it dries. In the morning, remove the bracelet from the cup to reveal a beautiful shape!

P1019221

Now you can decorate your bracelet! Pop out a few of the Wild Flower Paper Bits. Choose several different shapes and patterns.

P1019222Dab a bit of glue into the center of each flower. Layer the flowers.

P1019226Finally, add a lot of glue to the center of the craft stick bracelet and press your flower design down onto it.

P1019228Ready to wear!

P1019235You can try a number of different combinations with just a few sheets of flower bits and a great craft stick design!

Line-09

Thanks for checking out this post! Like us on FacebookShare this post with your friends, or Subscribe to this blog today to receive original craft project updates every Monday, Wednesday and Friday!

Craft Spotlight: My Very Own Puppet Theatre

2014-06-23-FeatureImage

Play and perform with your personalized puppet theatre! The projects are die-cut to look like theatre curtains and come with two puppet cutouts to decorate and use as characters in your very own play!

R39201 My Very Own Puppet Theatre projects are each hole-punched on either side so they can be threaded with string and worn like a great big necklace.

IMG_7717First pop out the puppet theatre from the backing. Color in the theatre with bright marker colors, like red or purple! Color in the puppet characters as well. The characters are cut with a handle so they are easy for kids to hold.

IMG_7727

One of our art campers came up with an idea to make her own puppet character. She used card to cut out a fish shape, colored it in, then attached it to one of our Goo Spreaders! Your students can experiment with different ideas like this.

R39201

Kids can wear the puppet theatre and perform puppet plays anywhere! Read the Puppet Theatre full web guide here to discover curriculum connections and great activities for the classroom.

Line-05

hanks for checking out this post! Like us on FacebookShare this post with your friends, or Subscribe to this blog today to receive original craft project updates every Monday, Wednesday and Friday!