Growth Mindset Lesson Plan

You might be wondering what a growth mindset is, so let’s start by defining it. A growth mindset is the believe that we can improve our abilities through effort, practice, and learning from mistakes. The opposite of a growth mindset is a fixed mindset which is the believe that our abilities are set in stone.

So why is having a growth mindset important?

Having a growth mindset is vital to development because it allows us to view challenges as a growing opportunity, rather than as an unclimbable mountain. When we approach issues with a growth mindset, we are more likely to achieve goals and try new things that may be difficult or unfamiliar to us. These situations help foster perseverance, problem-solving skills, and a stronger work ethic.

A growth mindset is something that is learned, and therefore, must first be taught. Teaching children this practice from a young age is a great way to help them navigate the coming challenges in their lives, and will also help them to better resolve social issues. Take a look at a few of our products we recommend for exploring growth mindsets.

Roylco Laminated Speech Bubbles:

Our Laminated Speech Bubbles allow children to write how they think someone would respond to a certain situation with a growth mindset vs. with a fixed mindset. This is a great tool to visually show kids how having a fixed mindset often leads to more frustration and limitations, while having a growth mindset leads to greater positivity and success.

Roylco Stand-Up Self Portraits:

Using the Stand-Up Self Portraits, children are able to express what they imagine someone with a fixed mindset looking like (facial expression, what they would say, etc.) and someone with a growth mindset. This allows parents and teachers the opportunity to ask children questions of why they think someone with that specific mindset would think and feel that way, which leads to greater conversation of the benefits of having a growth mindset.

See the Growth Mindset Lesson Plan for greater detail on how to most effectively utilize these tools, Laminated Speech Bubbles and Stand-Up Self Portraits, as a method of teaching young learners the importance of adopting a growth mindset.

We hope you too see the importance of both adults and children putting into practice a growth mindset. It is never too early to learn to effectively overcome challenges and expand your mind to the possibilities in front of you!

New Product Highlight: Dinosaur Unruly Rulers

Get ready for an art adventure! This set of 6 stencils is fun and useful. Use these Dinosaur Rulers to create your own Dinosaur. Trace around the stencil and add colors when finished.

Age: 3+

Duration: 15-20 minutes

Learning Objectives: Mix and match dinosaur elements to create unique prehistoric animals. Use colored pencils, markers and crayons to decorate your dinos. The simple designs are easy by a wide range of ages.

You’ll need:

  • Crayons, Pencil crayons or markers to design and decorate the dinos
  • Scissor
  • Glue Stick
line-08.png (585×76)

Take a stencil and place it onto a paper. Start tracing the interior edges to draw a perfect dinosaur.

Trace all the body parts starting from head to toe. Mix & match all the elements to give it a proper shape.

Finish the dinosaur shape off with a tail. Here you can see how well the patterns transfers onto the sheet.

Now, it’s time to give colors to this dinosaur. Start filling the shape with your preferred color of crayons and decorate it with your favorite color combination.

To make it more unique, cut out the dinosaur. Choose any picture or a piece of craft paper and glue it on it.

It’s a lot of fun for children to discover the different types of dinosaurs. Try all Dinosaur Rulers and make your own Dinosaur.

Please watch the full video here: https://youtu.be/VM-YXhzKXcw
Visit our website https://roylco.com/shop/dinosaur-unruly-rulers/ for more information.

New Product Highlight: Color Wheel Stencils

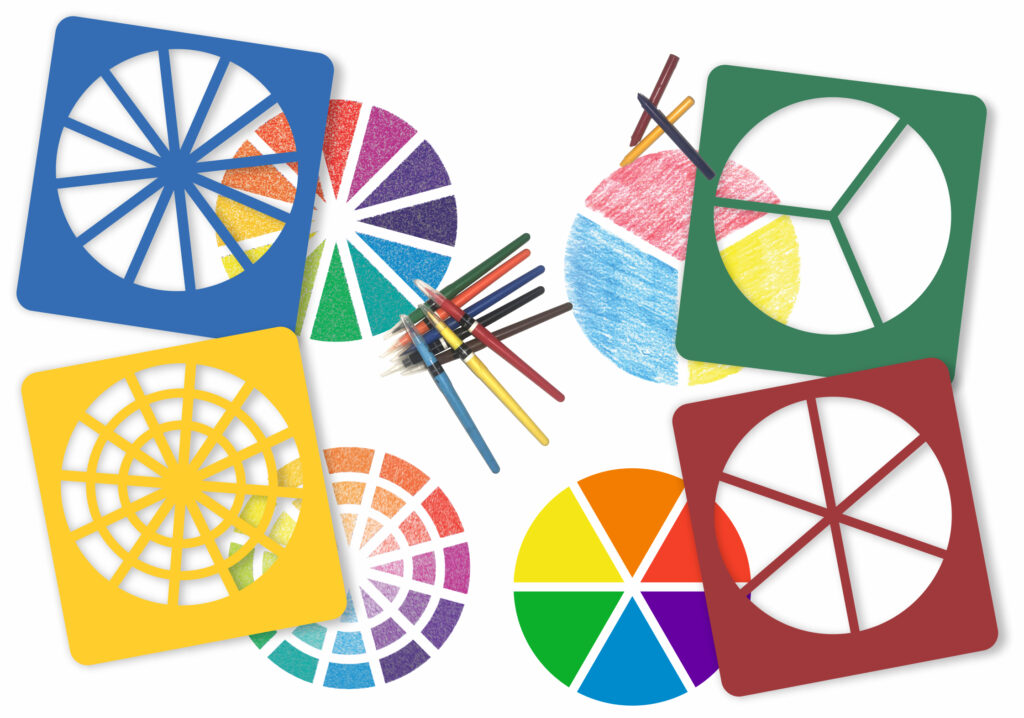
Create fun by encouraging students to create personal color wheels! We like this activity because it can be simple or complex, with a good balance between structure that guides students and open-ended fun that fosters creativity.

Age: 4+
Duration: 15-30 minutes

Here are few ideas on how to use them:

Idea 1: Get familiar with colors by keeping it simple.

What you’ll need:

LET”S GET STARTED

Take a wheel Stencil of your Choice. Put it onto a paper. Start filing up the inner edges with your choice of Color. To get an attractive look, try different colors. You can use Crayons, Markers or Pencil Colors. Once you are done, take off the stencil and see how beautifully the patterns get transfer to the sheet!

Idea 2: Take your color wheels up a notch by adding texture.

What you’ll need:

Take a Wheel Stencil and place it onto a white paper. Place one of our R48250 Rubbing Plate underneath the white paper. The twist starts from here. Fill the first wheel pattern with color of your choice. Once you are done, take that rubbing plate out and switch it with another rubbing plate. Fill up all the patterns by using as many rubbing plates you want and you’ll see the difference.

Idea 3: Take your color diffusing projects in a more structured direction by incorporating the color wheel.

You’ll need:

Take a R15212 Color diffusing Paper and place a wheel stencil over it. Outline the wheel patterns with a chalk or with a white crayon. Now, place the diffusing paper on a no mess tray. Take Our R54466 Junior Paint Spritzers, fill the bottle with liquid water color paint and spritz out a fine mist of color. Use different colors to create different effects.

Let us know how you choose to use your Color Wheel Stencils! Have fun and get creative!
Visit our website https://roylco.com/shop/color-wheel-stencils/ for more information.

Line-08

Thanks for checking out this post! Like us on FacebookShare this post with your friends, or Subscribe to this blog today to receive more project ideas!

Product Spotlight: Holiday Color Diffusing Shapes
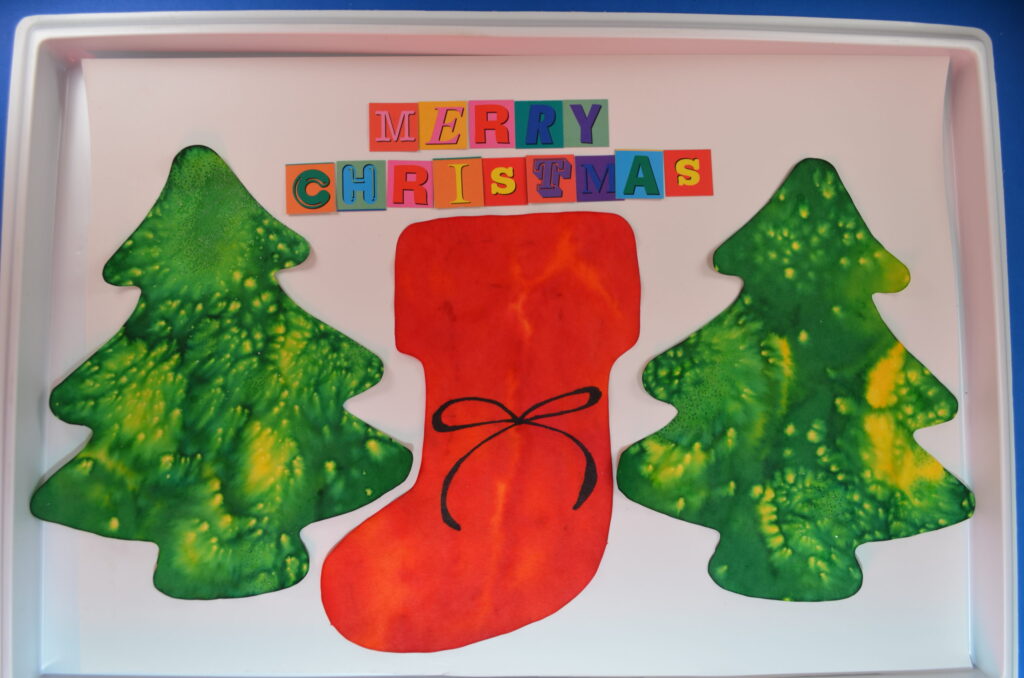
This month, we’re featuring two of our NEW products:

These color diffusing shapes help us get in the holiday spirit while simultaneously developing a deeper understanding of color. There are 3 easy ways to transform these shapes from A to B:

A. Plain Color Diffusing shapes–functional but still waiting for the magic to happen
B. Color Diffusing magic transformed the shapes into these beautiful works of art!

Method 1: Washable Marker & Water

This is the easiest method and the mess-free method. Simply use any washable marker to color the shape, and don’t worry about filling in all the white spaces! When you’re done, spray water on the shape and watch the colors diffuse and create secondary or even tertiary colors.

If you need a spray bottle for the water, we recommend Junior Paint Spritzers–they are perfect for small hands.

Method 2: Watercolor

Break out your trusty watercolor set and go to town! Because of the water used with the watercolor paint, the colors will diffuse throughout the paper as you paint. You can always add some extra water at the end and watch the colors diffuse even more. This is especially helpful if you’d like to make light or pastel designs.

Method 3: Liquid Watercolor & Water

This method creates the most impressive designs, IMHO. You can find liquid watercolors online or at your local craft store. Be careful because these paints can be POTENT! It takes quite a few washes to remove the paint from hands, but that is also what makes the designs so beautiful on Color Diffusing paper.

Simply use a spray bottle with the liquid watercolor to add splashes of color to your Color Diffusing shapes. Once you’re happy, spray the shapes with water and watch the colors blend!

If you need a spray bottle for the color or water, we recommend Junior Paint Spritzers–they are perfect for small hands.

Pro tip: Stick to primary colors! It’s easy to get carried away with color, but once they start diffusing, they have a tendency to blend into one, amorphous brown color if you get too complicated!


Try all 3 and let us know your favorite method!

If you like this, you’ll like Blots of Ornaments too! These ornaments have the added benefits of being cut out of extra thick, high-quality color diffusing paper so that they can be used as real ornaments on a tree or windowsill!

Decorative Tree Ornaments

Feature-Image-DecoTreeSculpture

Add a personal touch to your decorations this holiday season with a beautiful and surprisingly simple craft ornament. It requires nothing more than some decorative paper and a few yards of yarn!

Age: 4+

Duration: 15 minutes

You’ll Need:

R15420 Black and White Paper/ R15200 Patterned Paper ClasspackR15203 Decorative Hues Paper / R15421 Double -Sided Rainbow Paper / R15409 Economy Metallic Paper / R15289 All Kinds of Fabric Paper/ R15256 Amazing Animal Paper / R15263 Tie-Dry Craft Paper/ R15303 Retro Pop Paper

• Yarn

• Scissors

• Tape

• Ruler

• Protractor

Line-03This would be a great opportunity to introduce children on how to use a protractor to make angles. For this activity, children will use protractors to make different sizes of semi-circles for the cone shapes.

IMG_7791Select the different types of paper you would like to use in your Christmas tree ornament. Our trees have 4-5 tiers to them. If you would like to make the trees smaller, simply leave out the two interior tiers.

IMG_7797Lay the ruler horizontally across the length of the paper. For the largest and last tier, place the first point at the middle of the ruler. Draw a semi-circle from one corner of the page to the opposite corner.

IMG_7799The second tier should feature a semi-circle that is about 9″ in width.

IMG_7801The third tier should feature a semi-circle that is 6″ in width.

IMG_7804

The last tier should feature a semi-circle that is about 4½” in width.

IMG_7806Cut out each of the semi-circles.

IMG_7809Roll the semi-circles into cones and secure the edges together with tape. Note: When you roll up the cones, be sure to leave a bit of an opening at the top. You’ll need the opening to thread string through.

DecoTreeAnimation

Tie a knot at the bottom of the yarn. String the rest of the yarn through the opening in the top of the cone. Continue to thread the yarn through the rest of the cones.

IMG_7819Simply make a loop from the yarn and place onto a tree branch or hang in a window.

Line-03

How are you decorating your classroom for the winter holidays? Send us photos of your inventive craft decorations to subscriber@roylco.ca!

Sensory Collage Easter Egg Art Project

Are you looking for Easter egg ideas? The sensory collage Easter egg art project is great for your classroom activities. It introduces children to the important senses of the human body with Roylco’s Sensory Collage Kit. It’s also great for working on fine motor skills.

Age: 5+

Duration: 15 minutes

Learning Outcomes: Exercise fine motor skills. Practice sorting materials by color and texture. Learn about collage art. Develop sensory awareness.

You’ll Need: 

Pull out a wavy sheet from the R15413 Sensory Paper package, choose your favorite pastel color, and draw an outline of an egg. Encourage kids to slowly move their palms and fingertips over the paper to feel the small raised patterns. Some kids may want to follow the patterns on the paper to create their designs, while others may want to create their own designs. You can color the wavy lines on the paper and it will divide the egg into different sections. You can make these lines as bold as you like.

Next, plan and place the sensory art materials you like on your egg. The Sensory Collage Kit contains 20 different sensory art packs to use in creating unique illustrations.

Before gluing the sensory art materials onto the artwork, you can play with the colors and the different textures. Think about which sensory art materials would best represent your Easter egg artwork.

Encourage children to talk about the color and the texture they use on the artwork and discuss what they feel. Is the color a warm color or a cool color? Is the material rough, hard, scratchy, smooth or bubbly? After exploring the materials, children can start to glue the sensory materials onto the artwork.

The artwork is almost finished. Have the children cut out the egg and glue it on to the  cardstock. Here is our sensory collage Easter egg artwork. Write your name on the artwork and take it home for your Easter celebration!

For more information please visit https://roylcostore.com/products/sensory-collage-kit 


Bundle Savings

Get all the Roylco items used
in this project and save 15%!

$47.58 USD
bundled price
Add Bundle
to Cart


A Pot Of Gold for St. Patrick’s Day

Are you looking for craft ideas for St. Patrick’s Day? Create some decorations to make the house and classroom more festive. Lets make a spiral rainbow and pot of gold.

Age: 4+

Duration: 5 minutes

Learning Outcomes: Exercise fine motor skills. holiday activities. Makes a perfect take-home craft.

You’ll Need:

Choose your favorite pattern from Roylco’s R15295 Rainbow Paper Pack.

Draw a spiral at the back of the paper.

You can also glue two pieces of rainbow paper together to create a double-sided sprital.


Use scissors to cut from the end of the outline toward the center to make a spiral.


Take two pieces of metallic paper from Roylco’s R15409 Economy Metallic Paper Pack.

I choose dark green paper to make the pot, and the gold colored paper for the golden coins. Draw the shape of a pot at the back of the green paper, and cut it out. Make the coins by cutting out some circle shapes from the gold paper. Then glue the golden coins on to the green pot.

After you finish making a pot of gold, you can glue it to the end of the rainbow.  Once complete, hang from ceilings, on bulletin boards or anywhere that could use some extra color.


You are the pot of gold at the end of my rainbow!

Bundle Savings

Get all the Roylco items used
in this project and save 15%!

$19.19 USD
bundled price
Add Bundle
to Cart

Ms. Johnston’s class makes our Tessellations!

Today we get to show off more Tessellations fun with art projects from Ms. Johnston’s class! 

This post, titled “Tessellations are so fun!” was published on May 9th, 2012 and was posted on Mrs. Johnston’s Blog: Adventures in Fifth Grade. Click here to visit the link!

Our R5863 Animal Tessellations are a hit in classrooms! These beautiful animal patterns can be combined to create repeated patterned shapes, known as tessellations.

Great for inter-subject learning! Combine math and art together to foster enjoyable learning for your students. Teach your students about mathematical tessellations using the guide provided.

View the complete R5863 Animal Tessellations PDF guide here!

Tracing the Tessellations designs are a great way to encourage critical thinking skills in patterning and symmetry designs. Tessellations are all about repeating patterns. First, trace the outline of your chosen design onto a sheet of paper.

R5863

Remove the design, then find common lines to re-position your template on. Trace a second design right beside the first using these common designs.

Later, once you are finished filling your sheet of paper with Tessellations designs, color the designs in!

5863_Tesselation_Animal

Thanks to Ms. Johnston for sharing her students’ work!

Images and original post © Mrs. Johnston’s Blog: Adventures in Fifth Grade

This post was not sponsored for a review. At LittleFingersBigArt, our mission is to present to our readers and viewers the newest and most creative craft ideas that fans of Roylco have made on their own. Our goal is to allow you and other educators and parents to reuse our products in fun ways so that children always get the best educational experience from them!

We’d love to see more ideas like this one! If you’ve got a brilliant craft idea or have made a version of one of our crafts that you would like to share with us, send an email to subscriber@roylco.ca with photos, descriptions or a link to your work. We will create a feature post and link back to you with full credit. We’d love to hear from you!

Line-21

Drip Drip Splatter Splash uses our Color Diffusing Paper!

Create awesome effects on Color Diffusing Paper! The Drip, Drip, Splatter, Splash blog posted their butterfly artwork which used Color Diffusing Paper, permanent marker and watercolor paints.

The post was published on April 17, 2013 and is entitled, “Butterfly Art.” Click here to visit the page!

Using permanent marker helps to create definite lines that students can use as guidelines for painting. We suggest to first have your design sketched out onto scrap paper. Once you are satisfied with the look, place a sheet of Color Diffusing Paper on top. Trace the outlines with black marker onto the Color Diffusing Paper.

Watercolor paints work best with the Diffusing Paper as it gets absorbed into and throughout the paper. This neat effect is due to the process of diffusion. Diffusion happens when the particles in watercolors meet a material like diffusing paper that has little to no water content. As a result, it is always trying to fill in that area with watercolor particles.

The first part of the post shows a beautiful picture of the various butterfly renditions made with Color Diffusing Paper. Scroll further down the post to see other variations made with different materials!

Thanks to Shelly P for sharing her work!

Images and original post © Drip, Drip, Splatter Splash

This post was not sponsored for a review. At LittleFingersBigArt, our mission is to present to our readers and viewers the newest and most creative craft ideas that fans of Roylco have made on their own. Our goal is to allow you and other educators and parents to reuse our products in fun ways so that children always get the best educational experience from them!

We’d love to see more ideas like this one! If you’ve got a brilliant craft idea or have made a version of one of our crafts that you would like to share with us, send an email to subscriber@roylco.ca with photos, descriptions or a link to your work. We will create a feature post and link back to you with full credit. We’d love to hear from you!

Line-16