Chinese Lanterns

Color-In Chinese Lanterns Craft

2014-02-12-FeatureImage

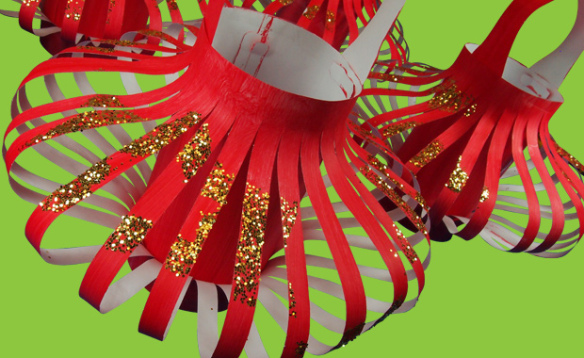
Get ready for Chinese New Year!  Learn how to create lanterns can help students work with form and color to create these awesome, decorative projects. We’ll show you the step by step process using our R22021 Color-In Chinese Lanterns and our R55009 Shape Sponges!

Age: 5+

Duration: 20 minutes

You’ll Need:

• R22021 Color-In Chinese Lanterns

• R55009 Shape Sponges

• Paint

• Glue

• Glitter (if desired)

• Paint tray

• Paint bowl

• Paint brush

• String

• Tape

Line-18

2014-02-12-Step01

It’s a good idea to use newspapers to contain glitter!

Each of the Chinese Lantern projects comes with 3 pieces: a large square with lines cut into it, a medium rectangle and a wavy-looking long piece.

2014-02-12-Step03Set each piece inside your paint tray. Paint all 3 pieces in a flat color. If needed, paint on two or three layers. When you are satisfied with the strength of the paint color, set aside to dry.

2014-02-05-Sponge-AnimationOnce the large square piece is completely dry, get ready to decorate it! Fill a plastic bowl with a bit of white glue. Select a favorite sponge shape and dip one side into the glue. Carefully stamp the sponge shape 4-6 times across the square lantern piece.

2014-02-12-Step05Make sure you do this step quickly, before the glue dries! Place the square piece onto newspaper. Sprinkle gold glitter glue completely on top of the stamped glue areas.

2014-02-12-Step06When the glue and glitter have dried, gently lift up one edge of the square piece and shake off the excess. Only the parts where the glitter met the glue will remain on the square piece. This creates a lovely surprise for students! Tip: Try to separate the die-cut lines if they are stuck together from the paint/glue.

2014-02-12-Step09

Now it’s time to switch back to the medium rectangle piece. There are two tabs at the top and of the rectangle piece. On the bottom are two slots. Flip over the piece and locate the tabs. Grab the sides of the tabs and fold them into the center.

2014-02-12-Step10Roll the rectangle piece into a tube. To secure the tube, slide the folded tabs into the slots.

2014-02-12-Step11Reach inside the tube and unfold the tabs to “lock” in place.

2014-02-12-Step12You can reinforce the tube with a bit of tape!

2014-02-12-Step13Now it’s time to attach the handle. That’s what the long wavy piece is for! Locate the two slots along the top edge of the tube and slide the ends of the handle through.

2014-02-12-Step14

This will create a little basket-like project. Lay your glitter-stamped square piece face down so that the unpainted side is facing up. Align the top edge of the basket tube with the top edge of the square piece.

2014-02-12-Step15Wrap the glitter-stamped piece all around the tube and secure the edges together with tape.

2014-02-12-Step16Now, flip the lantern over. To create the bowl effect, you need to match the bottom edge of the square piece with the bottom edge of the inner tube. This will cause the strips to fan out.

2014-02-12-Step17Tape the bottom edges together.

2014-02-12-Step18If needed, separate and fan out the individual strips.

2014-02-12-Step19A beautiful, glittery take-home gift or, use string to hang the lanterns together from the classroom ceiling.

Line-18

Thanks for stopping by to view this post! If you would like to share some of your or your students’ projects, send photos of your work to subscriber@roylco.ca! Thanks for visiting and check back soon!

New Year’s Masquerade Masks

2014-12-10-FeatureImage

This year’s New Year’s party will be a blast with fancy custom-made masks! Celebrate the past year and what the New Year will bring!

Age: 5+

Duration: 10-20 minutes

Learning Objectives: 

You’ll Need:

R15623 Tie Dye Paper

R22020 Color-In Masks

• Glue

• Scissors

• Pencil

• Rhinestones or sticker jewels

• Feathers

• Hole punch

• Decorative ribbon

Line-15

Encourage your students to think of their New Years masks as a reflection of their creative expression. So go crazy with it! Bring out your stock of decorative materials from the craft closet–look for things like sequins, bright, shiny beads or buttons, rhinestones, tinsel and more!

P1015837

Gather up your plethora of decorations for the masks! You don’t need to use a full sheet of the Tie-Dye Paper to decorate the mask; in fact, it would make sense to cut each sheet in half and divide the halves between two students.

P1015840

Place the Color-In Mask onto the Tie-Dye Paper and trace around the outside edges with pencil. Be sure to mark those eye holes as well as the pre-punched holes on the sides!

P1015841

Cut out the Tie-Dye Paper along the traced lines.

P1015843

Glue the Tie-Dye Paper cutout directly on top of the Color In Mask.

P1015848

Pick out your assortment of decorative items. Start adding details to your mask! Make patterns with the sequins or rhinestones, trace the outlines of the eyeholes or the edges of the mask.

P1015849

At this stage, I’ve decided to add decorative feathers to the mask. This adds a bit of flair! You can use hot glue, but regular white glue works fine as well. Simply press and hold down the feather shaft for 30 seconds. If the feather pops away from the paper, dab a bit of glue onto the feathery strands and press down onto the paper.

P1015850

Finally, punch holes through the Color-In Mask on either side.

P1015854

Attach a strand of ribbon onto each side of the mask. It’s a good idea to make two strands of ribbon for each mask, as it is easier to tie the mask around students’ heads. This is a great take-home project for kids before they head home for the holiday season!

Line-15

Like us on FacebookShare this post with your friends, or Subscribe to this blog today to receive original craft project updates every Monday, Wednesday and Friday!

Project Spotlight: Snowflake Weaving Mats

2014-12-08-FeatureImage

Add beautiful snowflakes to your winter display with artwork your students get to make!

The R16027 Snowflake Weaving Mats kit contains 24 projects for your classroom in four unique snowflake designs. What sets each of your students’ snowflakes apart from each other is the addition of our patterned weaving strips. There are plenty of designs for students to choose. Mix and match different combinations of weaving strips for a beautiful bold look!

Weaving is a great way to encourage fine motor development as it forces fingers to expertly pass the strips over and under the slots in the weaving mat. Remember to alternate the start for each strip as you go!

When you are finished weaving all the way to the bottom of the mat, snip off the ends of the paper strips and tape the finished weave down.

You can see the process for weaving at the link below:

[youtube https://www.youtube.com/watch?v=dZM9688k1z8]

Hang up your finished snowflake designs on a display wall. Alternatively, write the name of each student on his or her snowflake and hang from the ceiling for a lovely mobile decoration.

Line-12

Like us on FacebookShare this post with your friends, or Subscribe to this blog today to receive original craft project updates every Monday, Wednesday and Friday!

Craft Spotlight: Nature Paper

2014-05-05-FeatureImage

Take a good look at the images in our R15290 Nature Paper, and think of how you can combine them to make colorful, crazy critters! The Nature Paper elements can also be hung from mobiles or pasted onto picture frames or posters as decorations.

The R15290 Nature Paper features 32 sheets of brilliant graphics that are die-cut for easy removal. Simply pop out the images from the backings and use! The great part about these images is that they’re printed on both sides so you don’t have to paste two pieces together.

To view more about Nature Paper, click on this link! You can view a video, read the detailed PDF guide or check out some nifty images. The art in the guide can be used to make your own selection of animal friends. Find the first image in your Nature Paper set, and match it in the same position as shown in the guide. Continue to find the remaining images in the set and glue together once the image is complete.

Get a little creative with your own designs! The video below shows you how to make a beautiful dancing ballerina from the elements in the kit. What a great exercise for young students! Learn how to combine these elements together, just like puzzle pieces, to create something new!

Line-17

Thanks for viewing this post! Give us a like and share with your friends! Subscribe to this blog to receive updates every Monday, Wednesday and Friday on new craft projects and products. We’d love to hear from you! Send us your input through the contact form.

Craft Spotlight: Sew Up Vests

2014-04-28-FeatureImage

Wear your art! That’s what we say for our amazing Sew Up Vests! These multi-skill craft projects are made from versatile Color Diffusing material so that the paint design you make on the vest creates a tie-dye like effect when you add a bit of water. Paint, fold, sew and wear your vest for a variety of classroom activities!

Sew Up Vests help encourage fine motor development while giving children the creative freedom to design their own wearable vest. The vests dry fairly quickly in the sun after painting, so you don’t have to be stuck waiting for long!

To see more about our Sew Up Vests, visit this webpage. The accompanying teacher’s guide gives you more project ideas and suggestions to experiment with your Sew Up Vests.

Use the vests for group differentiation, gross motor exercise, math and literacy games, or for drama class!

IMG_2670


At the Art Camp, our little artists went to town with their vest designs! We supplied the campers with markers and spray bottles of water to help distribute the ink throughout the vests. Some of our campers decided to use crayons instead!

IMG_2684Once several spots of marker were applied to the vest, the campers used their spray bottles to spread the ink throughout the material.

IMG_2682

Next, we sewed the various pieces together. There are two pocket pieces, a back vest piece and two side vest pieces. All the pieces have matching holes to help coordinate your students’ sewing. Here, we use our plastic sewing needles, which are included in the kit.

IMG_2698

The guide provides you with further details on how to sew together the vest.

IMG_2691

We tried a few spots with paint first to see how they turned out!

IMG_2699

The best part was getting to wear the vests.

IMG_2701

These art vests are perfect for students to personalize and to feel good about wearing them.

Line-16

Thanks for viewing this post! Subscribe to this blog today to get updates on new craft products and craft ideas every Monday, Wednesday and Friday! Send us any comments, questions or suggestions through the contact form at the top of the page.


The Differentiated Kindergarten blog uses our Manuscript Letter Beads!

Students will love being able to see their numbers and letters up close! These sturdy, colorful beads can be strung on thread or sorted into trays just like the photo above. Use the beads to teach number and letter recognition using visual and tactile approaches. Like blogger Marsha states, the beads aren’t simply beads, because “the bead IS the letter”! 

Blogger Marsha published her post on July 12, 2013. The post is entitled, “Beads Glorious Beads!!!” Check out the full blog post here!

As the post shows, the Manuscript Letter beads come in two formats: Lowercase and Uppercase.

To order our products, visit our website here or click on the following links to locate our products:

• Manuscript Letters (Uppercase)

• Manuscript Letters (Lowercase)

Number Beads

The Manuscript Letters can be used for a variety of projects or in educational lesson plans. Great for introducing letter and number recognition, the Manuscript Letters and Math Beads come in a variety of bright and fun colors that students will love to work with.

String up the letters to make bracelets or necklaces! Tie a knot in between each new threaded letter to keep them from bunching up, or use pony beads to separate the letters when spelling multiple words.

Use the letters for Bingo games! Play a variation of Bingo called Lingo (Letter + Bingo)! Draw a 4 x 4 square grid and write a random selection of letters on it. Distribute the graph cards among students and provide a handful of letters for the students to use. When a random letter is called out, students must search through their letter supply to find the correct letter. The first person to call out Bingo must have a row of 4 letters with corresponding letter beads!

One of Marsha’s activities involved separating a handful of letter beads into consonants and vowels or lowercase from uppercase. To really increase students’ letter comprehension, you can ask them to make words from the jumbled uppercase or lowercase letters!

Marsha even designed a lovely little cubby area to store all the letters inside. You can customize the storage area to hold letters as well as numbers or to differentiate between upper and lowercase letters.

Thanks to Marsha for this insightful post!

Images and original post © This Little Class of Mine

This post was not sponsored for a review. At LittleFingersBigArt, our mission is to present to our readers and viewers the newest and most creative craft ideas that fans of Roylco have made on their own. Our goal is to allow you and other educators and parents to reuse our products in fun ways so that children always get the best educational experience from them!

We’d love to see more ideas like this one! If you’ve got a brilliant craft idea or have made a version of one of our crafts that you would like to share with us, send an email to us with photos, descriptions or a link to your work. We will create a feature post and link back to you with full credit. Contact us through the contact form for more details. We’d love to hear from you!

Line-05

This Little Class of Mine uses our Color Diffusing Paper!

Used to make ocean backgrounds for these adorable squid characters, Color Diffusing Paper was combined with paint and bit of salt to create neat bubbly water effects!

This activity was part of a literacy/art class that studied a fun children’s book, I’m the Best Artist in the Ocean by Kevin Sherry. The squid on the front cover was used as the inspiration for this classroom’s art projects. Students also gained a lesson in biology as they learned a bit about ocean life and habitats of ocean creatures.

Check out some of the amazing art projects at this link!

The post, entitled “Best Artist in the Ocean: Giant Squid Painting” was published on September 27, 2010 at the Little Class of Mine blog. Visit more of this blog here!

Ms. Nellie Mae first showed her students a simple and challenging way to draw squid characters. The students painted their squid characters onto blue-color paper. While they waited for the paint to dry, the students prepared their backgrounds.

The R15212 Color Diffusing Paper was first placed on top of a sheet of white paper. This was a bonus trick that allowed students to make a copy of their artwork! Using liquid watercolors, the students painted their diffusion paper. The students then dropped pinches of salt onto the still-wet paint. This created a bubbly effect on the paint!

Crazy cool!

Thanks to Nellie Mae for sharing this post!

Images and original post © This Little Class of Mine

This post was not sponsored for a review. At LittleFingersBigArt, our mission is to present to our readers and viewers the newest and most creative craft ideas that fans of Roylco have made on their own. Our goal is to allow you and other educators and parents to reuse our products in fun ways so that children always get the best educational experience from them!

We’d love to see more ideas like this one! If you’ve got a brilliant craft idea or have made a version of one of our crafts that you would like to share with us, send an email to subscriber@roylco.ca with photos, descriptions or a link to your work. We will create a feature post and link back to you with full credit. We’d love to hear from you!

Craft Spotlight: Stand Up Letters

DSCF7019Our newest product addition: R49702 Stand Up Letters! Students can color in and decorate the letters, adding their own unique touch with collage materials, stickers, mosaics and more! The Stand Up Letters are perfect for helping students picture exactly how each letter looks like–since they stand out so well!

Stand Up Letters can be used for a variety of literacy projects! Click on the link to visit our full product webpage.

• Younger students can trace the inside of the Stand Up Letters to help build their fine motor skills and get them prepared for learning how to write the letters individually!

• Older students can spell their names with the letters.

• Draw on images that match the letter (i.e. Cat for the letter ‘C’ and so on).

• Use the letters to teach the differences between consonants and vowels!

• Students can also play a spelling game that’s a version of Boggle Letters! Choose 3-5 assorted consonants and vowels and encourage the students to spell out words with the provided letters.

View more ideas here in the PDF guide!

The Stand Up Letters are made from sturdy card to help reinforce the folded letter when it’s placed upright.

R49702

The video below shows how to set up and decorate the Stand Up Letters.

Line-20

Thanks for viewing this post! Subscribe to our blog to get notified about craft updates every Monday, Wednesday and Friday!   

Ms. Johnston’s class makes our Tessellations!

Today we get to show off more Tessellations fun with art projects from Ms. Johnston’s class! 

This post, titled “Tessellations are so fun!” was published on May 9th, 2012 and was posted on Mrs. Johnston’s Blog: Adventures in Fifth Grade. Click here to visit the link!

Our R5863 Animal Tessellations are a hit in classrooms! These beautiful animal patterns can be combined to create repeated patterned shapes, known as tessellations.

Great for inter-subject learning! Combine math and art together to foster enjoyable learning for your students. Teach your students about mathematical tessellations using the guide provided.

View the complete R5863 Animal Tessellations PDF guide here!

Tracing the Tessellations designs are a great way to encourage critical thinking skills in patterning and symmetry designs. Tessellations are all about repeating patterns. First, trace the outline of your chosen design onto a sheet of paper.

R5863

Remove the design, then find common lines to re-position your template on. Trace a second design right beside the first using these common designs.

Later, once you are finished filling your sheet of paper with Tessellations designs, color the designs in!

5863_Tesselation_Animal

Thanks to Ms. Johnston for sharing her students’ work!

Images and original post © Mrs. Johnston’s Blog: Adventures in Fifth Grade

This post was not sponsored for a review. At LittleFingersBigArt, our mission is to present to our readers and viewers the newest and most creative craft ideas that fans of Roylco have made on their own. Our goal is to allow you and other educators and parents to reuse our products in fun ways so that children always get the best educational experience from them!

We’d love to see more ideas like this one! If you’ve got a brilliant craft idea or have made a version of one of our crafts that you would like to share with us, send an email to subscriber@roylco.ca with photos, descriptions or a link to your work. We will create a feature post and link back to you with full credit. We’d love to hear from you!

Line-21