Jack O’ Lantern Weaving Mats

jack o lantern weaving mats

Weave beautiful bright patterned strips through lovely weaving mat pumpkins, pre-cut for a ready-to-use fine motor activity!

Weaving mats are a great way to encourage fine motor development in young children. It’s a skill that’s inherent to finger work as tying the laces on one’s shoe or learning to use a writing tool.

jack o lantern weaving mats

The Jack-O’Lantern Weaving Mat kits come with 24 pumpkin weaving mats, and several different patterned strips.

jack o lantern weaving mats

Weave the strips horizontally across the mat, going over and under each progressive slot. As you start the next row, be sure to begin weaving the opposite way that was done in the row prior. So for instance, if you started the row by first weaving under, start the next row by weaving over.

jack o lantern weaving mats

Here is a close-up of the process as one of our art campers finishes up her pumpkin weaving mat.

jack o lantern weaving mats

You can choose several different patterns of weaving strips that are all thematically printed to accentuate the pumpkin weaving mat.

jack o lantern weaving mats

Each weaving mat is accompanied with glowing Jack-O’-Lantern features in various shapes and designs. Mix and match the features to make a unique Jack-O’-Lantern!

jack o lantern weaving mats

The last step is to decorate the pumpkin faces with two additional leaf graphics. Paste them directly onto the pumpkin face.

jack o lantern weaving mats

Paste the green vines to the tops of the pumpkins. Use the blunt edge of a pair of scissors to curl the vines. You can paste the pumpkin weaving mats onto a length of ribbon to use as a classroom decoration!

Line-13

Like us on FacebookShare this post with your friends, or Subscribe to this blog today to receive original craft project updates every Monday, Wednesday and Thursday!

Light Cube Jelly Play

2015-01-15-FeatureImage

Kids love experimenting with new and weird materials. No wonder, then, that we had the perfect opportunity to play with giant gelatine blocks over the Light Cube–the kids were so intrigued! Using feathers to decorate the gelatine was an added fine motor activity that you can incorporate in your own gelatine block play! We detail more about this process below.

IMG_0102

Gelatine blocks are great because they are transparent, meaning that they are clear enough to be seen through. Some gel blocks can be thicker depending on how you mix up the quantities (we will discuss more about how to make your own gel block below!) This is a great opportunity for teachers to talk about the differences between opaque (not see-through), translucent (somewhat see-through) and transparent (see-through) objects!

IMG_0104

The gel block has great texture and movement too! On the Light Cube, it looks even better because it glows with the light underneath.

IMG_0112

We asked the campers to “decorate” the gel block with fancy additions such as pipe cleaners and feathers. We used shimmering, glittery pipe cleaners to help bounce the light around even more.

IMG_0115

Both campers were really excited to see that the gel block acted like a stand for the feathers and pipe cleaners. It was soft enough to press the materials through but also firm enough to keep the materials in their spots without letting them tip over!

IMG_0118

Since we had the Light Cube set to a white glow, it made the colors of the feathers pop out! Look at the contrast between the yellow and the blue. These are complementary colors, meaning that they are placed directly across one another on the color wheel. Another cool lesson for students: learning about color groups!

IMG_0124

Once we got started, it was hard to stop! Fabian here decided to curl one of the pipe cleaners into a spiral shape and jut it into the gel block for fun.

IMG_0138

To make your gelatine block just like ours you will need the following:

• Knox® Gelatine (find a box of packets at any baking supplies or supermarket near you!)

• Heat-safe bowl or large mold, depending on your preference

• Hot or boiling water

• Cold water

• Measuring cup

• Baby oil

• Whisk

First, measure the cup capacity of the mold you are using. Simply use a measuring cup to keep track of how much water you use to fill the mold. Once you have a definite number, divide it in half. One half of the water cup capacity will need to be boiled while the rest will need to cool in the fridge. You can pour out half of the water into a kettle or sauce pan and heat it up until boiling. For every cup of water used to fill the mold, you will need to use 1 package of the Knox® Gelatine powder. While you are waiting for the water to boil, spread some baby oil onto the mold. This will help loosen the gelatine out of the mold when it is set. Pour the hot/boiled water into the mold and mix in with the gelatine powder using the whisk. When the gelatine is fully mixed into the water and there are no remaining clumps, pour in the remaining half of the water that was cooling in the fridge. Stir the mixture with the whisk. Place the gelatine mold into the fridge to set for 3 hours or leave overnight.

In the morning, pop out the gelatine mold. You can use a long spatula to ease the block out of the mold. Flip the mold over to set it on top of a tray. Place the tray onto the Light Cube and turn on the white glow to get started on your own neat sensory-fine motor play activity!

IMG_0139

We love the campers’ priceless reactions to the activity–they spent more time on it than we’d planned!

Line-07

Like us on FacebookShare this post with your friends, or Subscribe to this blog today to receive original craft project updates every Monday, Wednesday and Thursday!

Project Spotlight: Snowflake Weaving Mats

2014-12-08-FeatureImage

Add beautiful snowflakes to your winter display with artwork your students get to make!

The R16027 Snowflake Weaving Mats kit contains 24 projects for your classroom in four unique snowflake designs. What sets each of your students’ snowflakes apart from each other is the addition of our patterned weaving strips. There are plenty of designs for students to choose. Mix and match different combinations of weaving strips for a beautiful bold look!

Weaving is a great way to encourage fine motor development as it forces fingers to expertly pass the strips over and under the slots in the weaving mat. Remember to alternate the start for each strip as you go!

When you are finished weaving all the way to the bottom of the mat, snip off the ends of the paper strips and tape the finished weave down.

You can see the process for weaving at the link below:

[youtube https://www.youtube.com/watch?v=dZM9688k1z8]

Hang up your finished snowflake designs on a display wall. Alternatively, write the name of each student on his or her snowflake and hang from the ceiling for a lovely mobile decoration.

Line-12

Like us on FacebookShare this post with your friends, or Subscribe to this blog today to receive original craft project updates every Monday, Wednesday and Friday!

Fingerpaint Sensations Alphabet

2014-08-20-FeatureImage
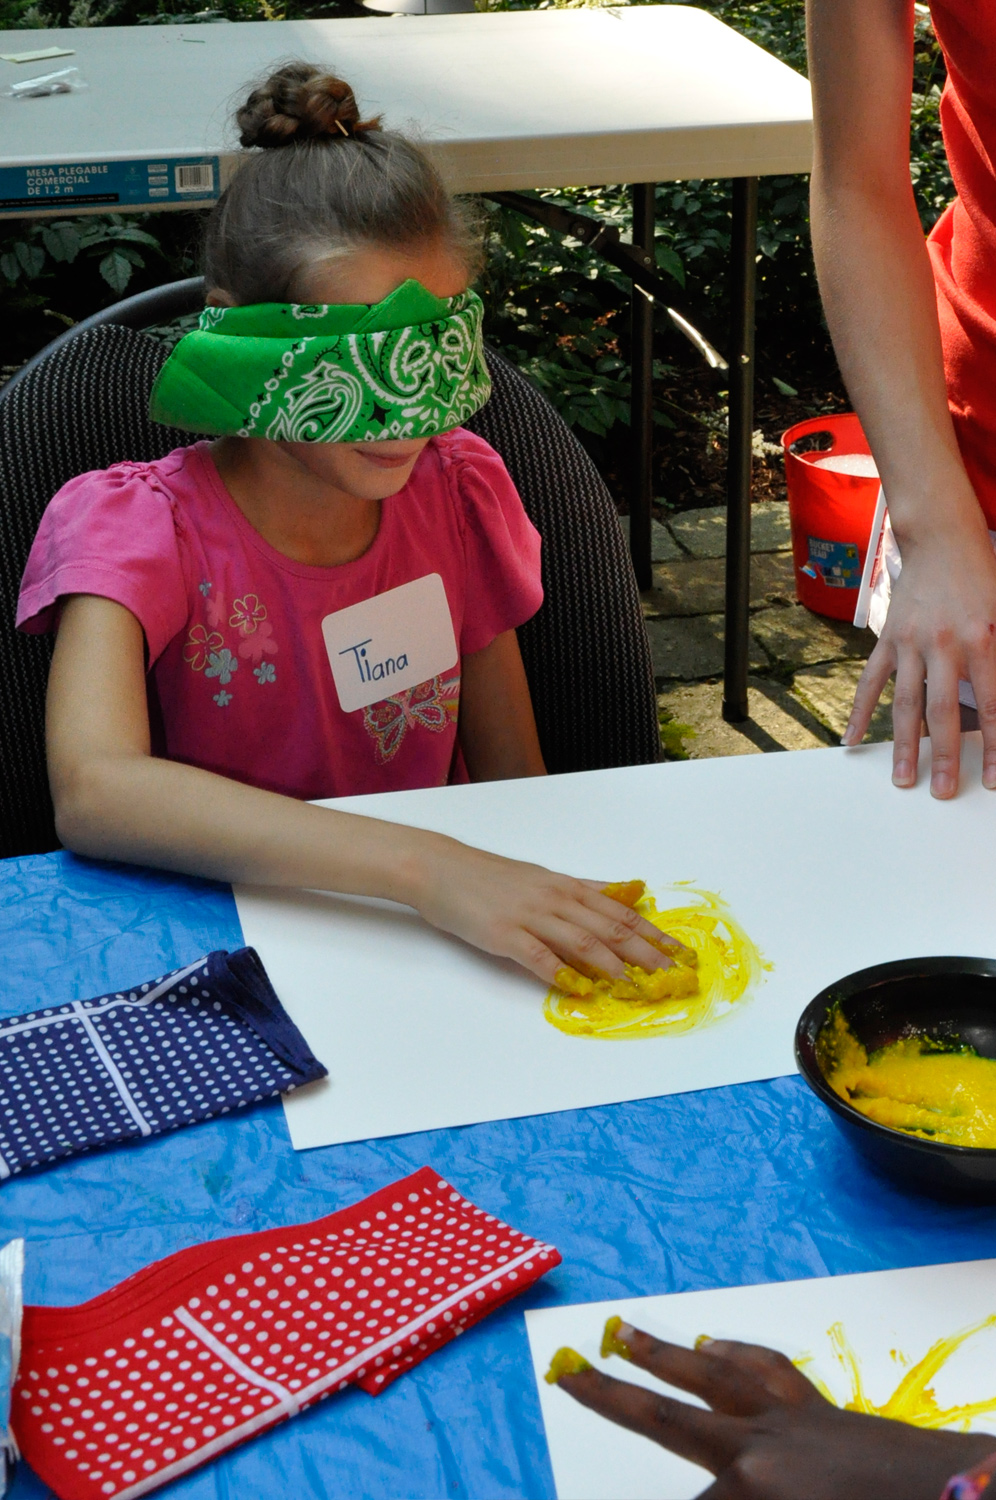
It’s almost time for Back to School! …And that means getting to know new students through their names. In order to spell their names correctly, students will need to begin their literacy lessons. It just so happens that September is filled with various literacy weeks, so this week’s craft is the perfect start to learning some letters through sensory fingerpainting!

Age: 3+

Duration: 15-20 minutes

Learning Objectives: Use fingers to paint. Develop fine motor skills while stimulating tactile senses. Learn letters of the alphabet for Back to School and for literacy lessons.

You’ll Need:

R75415 Finger Paint Sensations Kit

R7512 Fingerpaint “No Mess” Trays

R5519 Paint Bowls

• Paint 

• Mixing spoon

• Card paper

• Pencil

Line-05

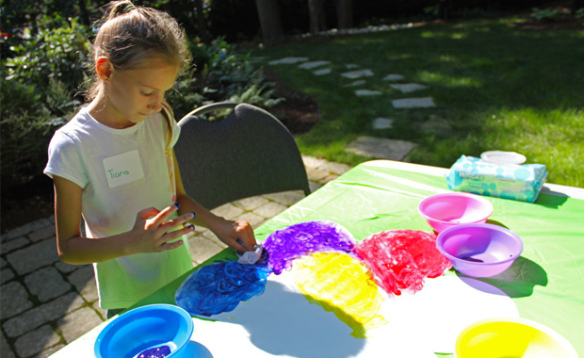
Add a touch of sensory appeal to your students’ literacy lessons with our Fingerpaint Sensations kit! Designed to enhance students’ tactile skills, the fingerpaint kit features 10 safe, special additives that can be combined with paint to turn fingerpainting into a cool experience.

P8190175
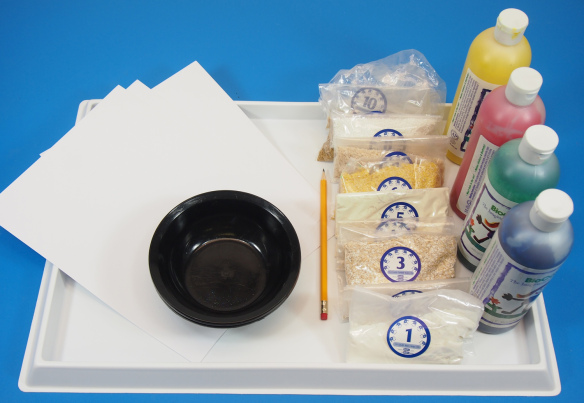
In the photograph, you can see all 10 additives in labeled bags. Select your favorite colors and mix with different additives to engage your students’ fingerpainting experiences.

P8190179

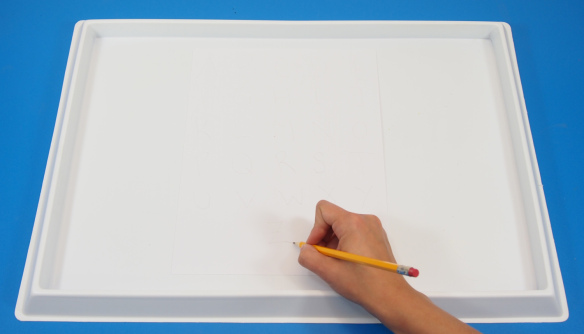
Place your card paper onto the paint tray. Write all the letters of the alphabet onto the card paper. I wrote 5 rows of 5 letters each with the last letter ‘Z’ written at the bottom.

P8190184
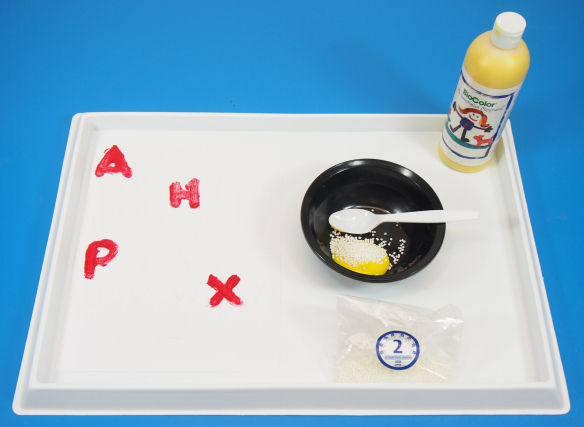
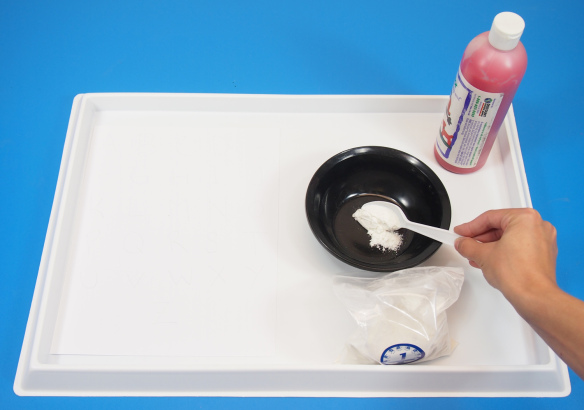
I’ll start with each of the additives. Once again, they are 100% safe for students to use, which is the best part, as kids will love feeling the different textures on their fingers! The 1st additive is called “Fine Grit.” This will make the paint feel gritty to kids’ fingers.

P8190188
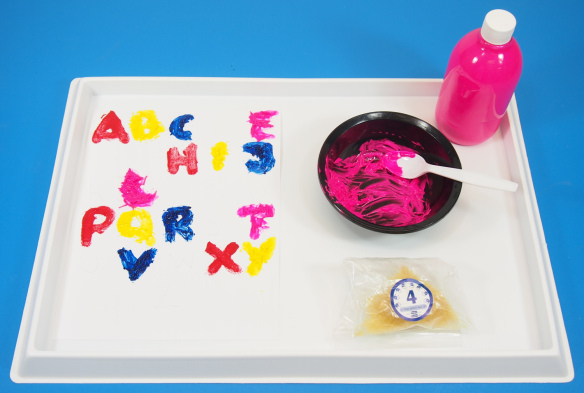
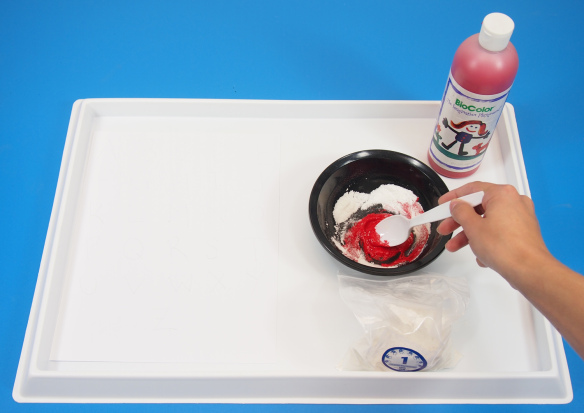
Mix 1 teaspoon of Fine Grit Additive #1 to a few squirts of paint.

P8190191
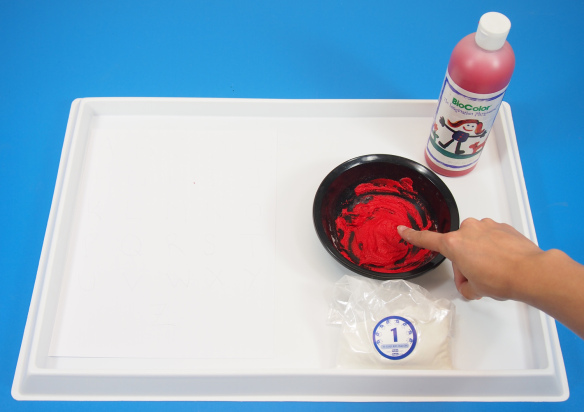
Show children how to dip their “painting” finger into the textured fingerpaint.

P8190194
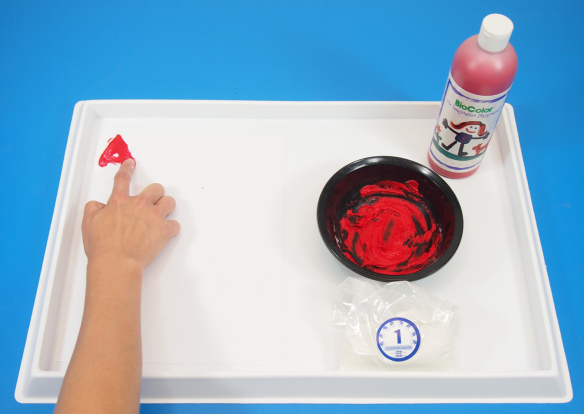
Locate your first letter and trace the pencil marking with your finger. This is a great way to reinforce the shape of the letter while giving your students a different texture to feel!

P8190197
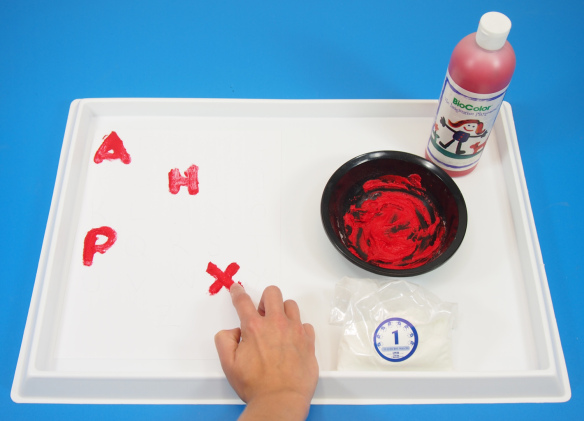
I’ve decided to mix up the colors, so I’m going through them randomly. You can follow one row of letters or make your own combination of colorful, textured letters!

P8190203Additive #2 is known as “Frictionless” which adds small decorative balls to the paint.

P8190209
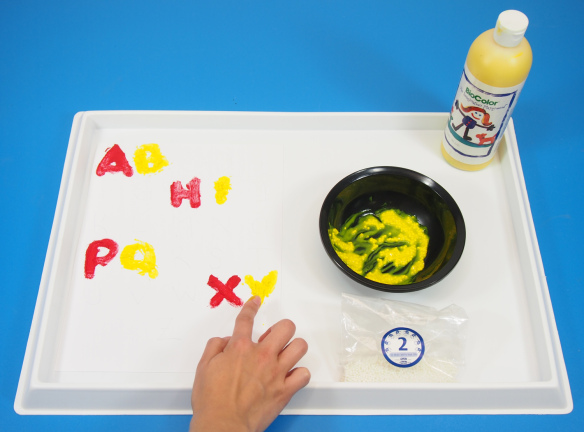
Mix 1 teaspoon of Additive #2 to another color of paint. I’ve added another letter beside each previous letter.

P8190211The next additive is #3. This one is called “Soft.”

P8190215Add more letters to the alphabet poster!

P8190218Additive #4 is called “Slippery.” Remember, you can add more of the additive to the paint to increase the textured effect!

P8190222This one is a little difficult to handle, so choose letters that are simple to fingerpaint.

P8190225
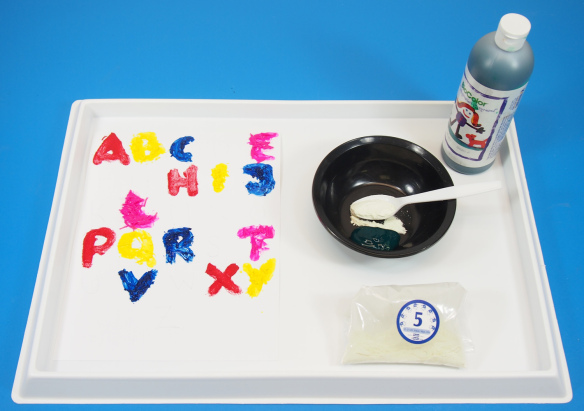
Additive #5 is known as “Gooey.” This additive turns the paint sticky and slimy!

P8190228
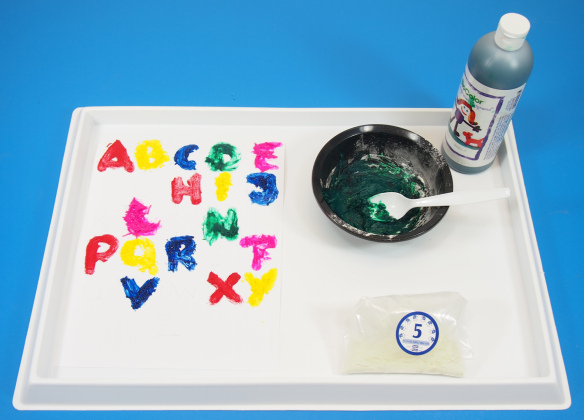
Here I’ve just painted 2 additional letters to make room for the rest!

P8190231
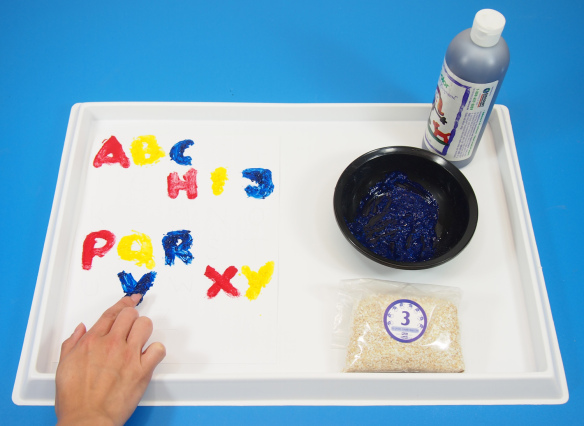
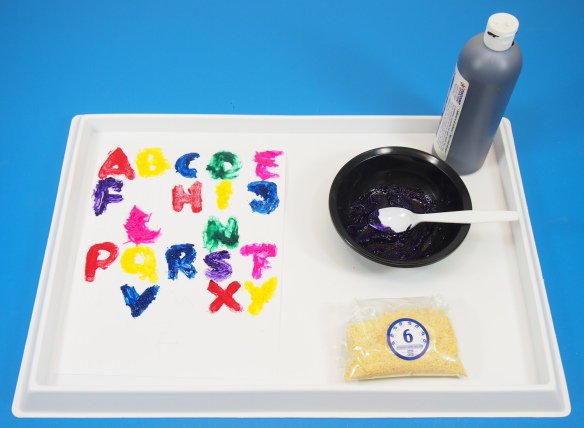
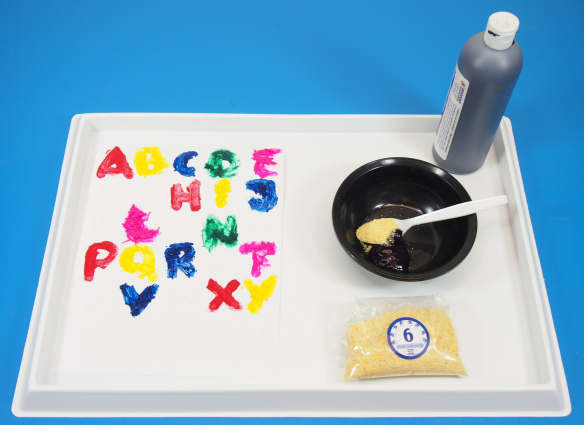
Additive #6 is known as “Coarse Grit.”

P8190235Add in a few more letters. We’re almost done!

P8190238
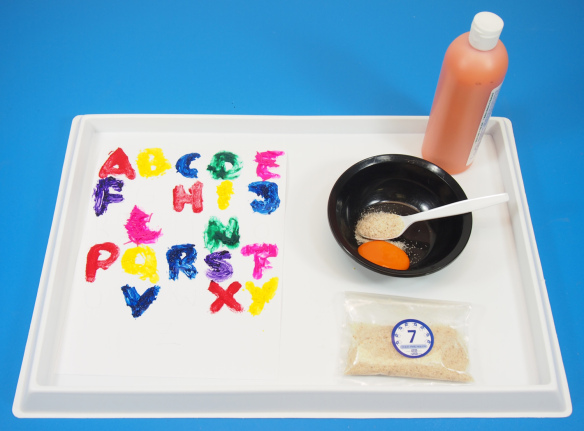
Additive #7 is called “Goopy.” The ingredients clump together to make a goopy substance.

P8190241
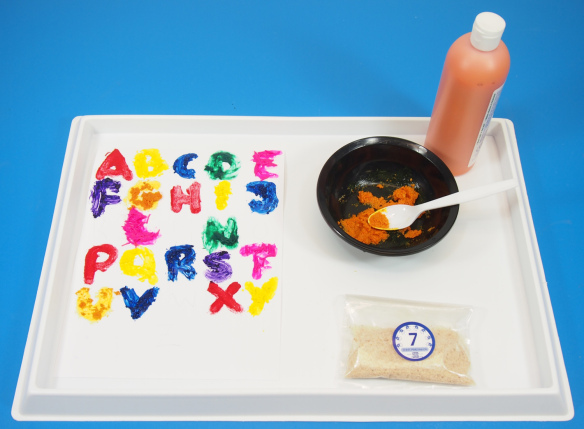
You can see just how goopy it is!

P8190244Additive #8 is known as “Rolly Polly.”

P8190246I’ve added two more letters.

P8190249
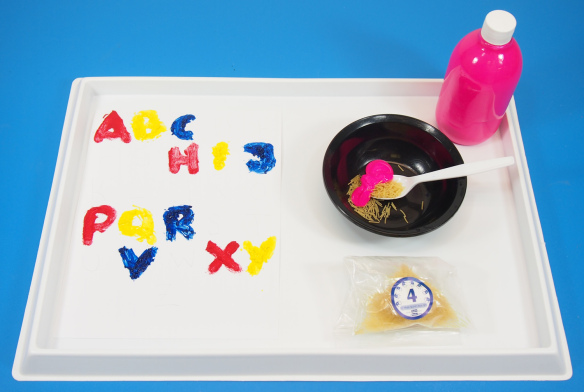
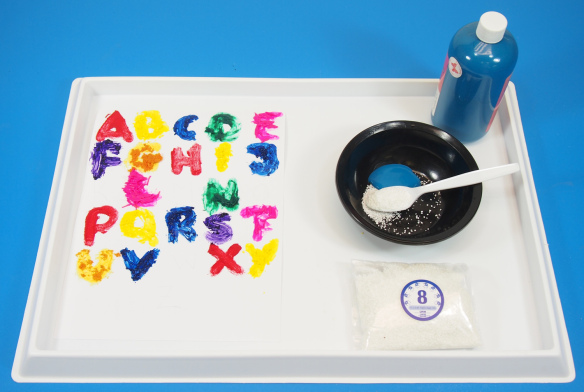
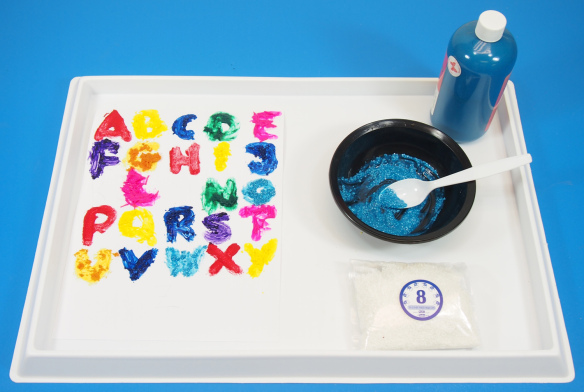
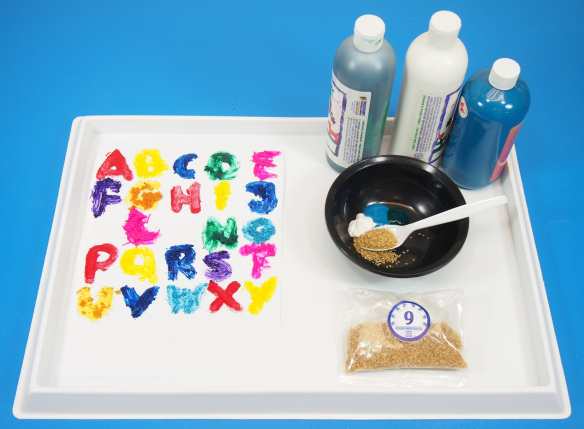
This next additive is called “Super Grit.”

P8190252
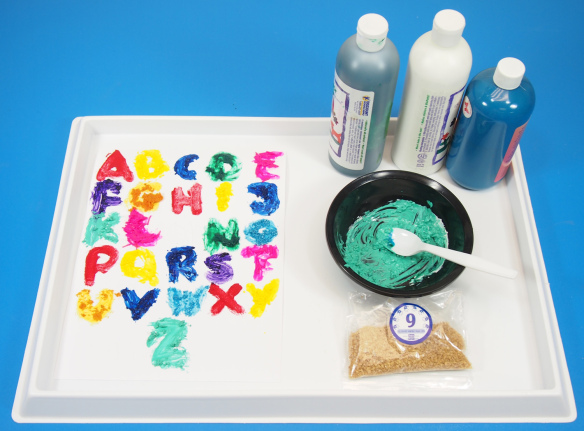
I’ve mixed several colors to add more interest to our alphabet poster.

P8190256
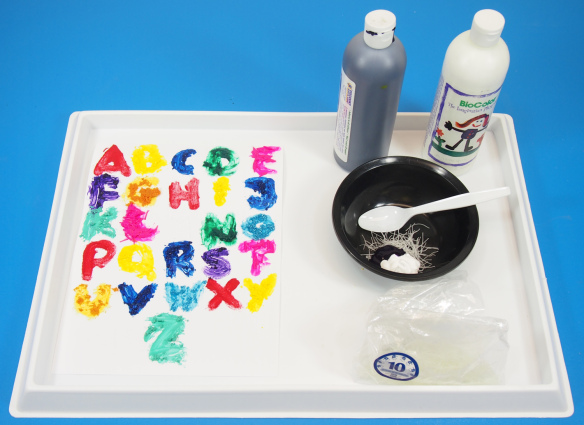
The last additive, #10, is called “Stringy.”

P8190258
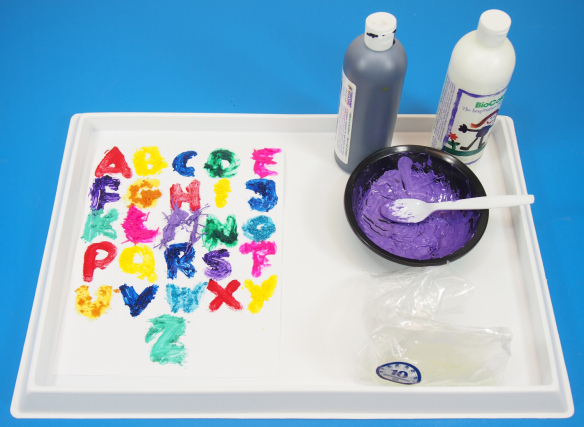
I’ve lightened the purple and positioned the stringy additives to make a textured “M.”

P8190259
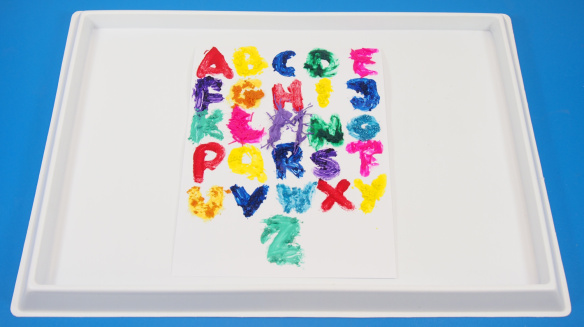
Here’s the final look. Wait for the paint to dry before letting students feel their fingers over the letters. What kinds of textures can they feel on the paper? Let them describe the textures to you while they learn about the letters!

Line-05Like us on FacebookShare this post with your friends, or Subscribe to this blog today to receive original craft project updates every Monday, Wednesday and Friday!

Mosaic Play!

imagejpeg_2

Our R15639 Spectrum Mosaics were featured in a project at a local daycare! Here’s a few photos of the projects these crafters put together!

R15639 Spectrum Mosaics come in a variety of different colors and are double-sided, so kids will get surprised at the color they see on the opposite side.

imagejpeg_12These mosaics were used to decorate the bug cutouts with a bit of glue. The colors are bright enough that kids can separate them or sort them into groups.

R15639

The aim of this project was to paste the mosaics on the bugs in order to decorate them, but you can take it a step further by focusing on covering parts of the cutout with a certain color. This gives it a uniform mosaic look.

The Spectrum Mosaics package comes with beautiful practice artwork on which children can paste the mosaics. This will help them build puzzle-solving skills while exercising fine motor skills!

Thanks to Janice for sending us these photos!

Line-05

BIG IDEA: Sewing Stencils Quilt!

2014-05-14-FeatureImage

Explore different fine motor techniques such as sewing and tracing with this BIG classroom project! Combine everyone’s artwork into one. Trace recognizable basic shapes using our Fine Motor Skills Stencils and learn a basic sewing method safely with our Plastic Lacing Needles. Check out more about the tutorial below!

Age: 4+

Duration: 20-30 minutes

You’ll Need:

R5601 Plastic Lacing Needles

R58620 Fine Motor Skills Silly Stencils

• Felt

• Yarn

• Marker

• Scissors

Line-21

The best part about our Plastic Lacing Needles is that they are rounded at the tip, which means that they are safe and easy to use with a variety of soft fabrics.

P1019025

You don’t need much material for this project. The goal of this activity is to encourage students to develop their fine motor skills while creating artwork that’s a part of a larger art piece: a classroom quilt!

P1019029

Provide your students with a variety of felt colors. Guide them to think about the scenes or shapes they want to trace onto their felt piece. In the photo above, I’ve decided to make a stormy scene using our raindrop, thunderbolt and bean-shaped stencils to make the clouds! Younger students can trace basic shapes in the stencils kit, such as squares and circles, if they wish.

P1019032

You will need to use markers to trace out the shapes. Using pencil will catch onto the felt threads and won’t create an imprint. If you would like students to practice their tracing before transferring their skills onto the felt piece, provide them with scrap paper to trace onto.

The Fine Motor Skills Silly Stencils are designed to help graduate your students from tracing basic shapes and objects to more complex designs. Yellow colored stencils in this set represent easier shapes to trace, such as triangles, squares and circles. Red stencils represent medium difficulty while the blue stencils feature the most complicated designs. You will see that in the following images, I’ve used mostly red and blue stencils. These are best to use when making “scenes” out of the images.

P1019036

Once you have traced out the images, get your Lacing Needle and yarn ready! You will use the traced images as guides for sewing.

P1019038

Widen the eye of the Lacing Needle to thread the yarn through.

P1019041

Make a rough estimate of how much yarn you will need for each traced part. Tie a knot at the very end of the length of yarn. Show your students how this will prevent the yarn from slipping through the felt when making a stitch.

Here’s an image of a basic stitch that I’m using in this project:

43006-Illustration-16

This kind of stitch is called a running stitch. This means that you slide the needle and thread over and under the fabric in one continuous direction.

There are a variety of other stitches you can use to sew up the traced shapes! You can get older students to experiment with these types of stitches.

43006-Illustration-17

BACKSTITCH: The backstitch is made by sliding the needle and thread over and under but instead of continuing the stitch forward, the needle and thread are pulled back into the previous hole before continuing forward. This stitch helps to secure the two pieces of fabric in place, or to repair a bad stitch.

43006-Illustration-18

OVERCAST STITCH: You can use the above stitch to combine students’ felt projects together into one quilt-like wall mural. The overcast stitch is a series of stitched loops. Instead of passing the needle and thread straight to the next hole, the needle and thread are looped around the edge of the fabric and brought through the next hole on the underside of the fabric.

2014-05-14-AniamtionUsing the running stitch, I’ve followed the lines traced out from my chosen stencils. I was also conscious about the color of the yarn I’m using. There are a total of 3 different yarn colors I used to outline the various shapes. You can see in the animation above what it looks like to gradually complete the shape.

Tip: The felt may be a bit stiff in some places, so you’ll need to maneuver the Lacing Needle through. The best technique to do is twist the point of the needle a little bit to the left then to the right to loosen the felt threads.

P1019078

Once your students’ stitched pieces are complete, attach them together into a large-scale quilt or tapestry mural! You can either tape the pieces together with scotch tape or sew them with thread. 

Line-21

Thanks for viewing this post! Like us and subscribe to the blog for crafty updates every Monday, Wednesday and Friday! 

Craft Spotlight: Fingerpaint Flower

2014-04-14-FeatureImage

Big, bold and bright, Fingerpaint Flowers are the perfect art activity to paint out in the spring air! The best part about fingerpainting outside is that it adds another dimension of sensory development: not only are students using fingerpaints to stimulate finger movement, but the warmth of the sunlight will warm up the paint and the fingerpainting paper!

You don’t have to get the students to paint the entire flower. It can serve as a group activity! For younger students, paint sections of the flower petals. Some students may get a bit overwhelmed by the size of the fingerpainting canvas. Focus each student on painting one small space at a time, like one petal out of the whole flower. This will help students to narrow down their fingerpainting.

R75422

The R75422 Big! Huge! Fingerpaint Flowers can be painted then used as classroom decorations. Make a giant fingerpaint flower garden!

Once the paint on the Fingerpaint Flower is dry, paste other materials such as yarn, scrap paper, sequins, glitter glue and more to decorate! Add fun designs or patterns to the flower petals with markers or crayons.

To view more ideas in the instructional guide, click here!

Line-21

Thanks for viewing this post! Subscribe to this blog today to get updates on new craft products and craft ideas every Monday, Wednesday and Friday! Send us any comments, questions or suggestions through the contact form at the top of the page.

Craft Spotlight: Fingerpaint Sensations Kit

Feature-Image-FingerPaintSense

Our safe-to-use additives provide a pop of sensation to your painting projects! A great way to encourage fine motor play in special needs classrooms. Simply pop in one additive to one color of paint and let the fun begin!

Each additive is packaged separately so you can control how much of each you want to use in your painting. Simply insert the additives into your favorite paints and stir around. It’s a good idea to place each color into separate bowls. Let sit for a bit to help the additives soak into the paint.

R75415

The kit includes ten sensational additives: Fine grit, funny fibers, coarse grit, squishy, soft, frictionless, dissolving, roly-poly, stringy and goopy!

The video below demonstrates how these additives work with paint on paper. Try it out for yourself!

Get your students to dip their fingers into the paint and describe the textures they feel. Which textures do they like the best? The video below shows one of our friends Ryan trying out the Fingerpaint Sensations paints for the first time!

Children can paint scenes or pictures of things they like.

_DSC0026To help your students focus on the sensations of the fingerpaint, wrap a bandanna around their eyes so they can’t see their work. Ask them to “feel” their painting. Our Art Campers were talked through their paintings. For instance, we would help them dip their hands into a color of paint and told them to feel the texture and imagine what it could represent in their painting. Once they provided their descriptions, we placed their hands over their painting paper and asked them to draw the the rays of the sun using gritty yellow paint. 

_DSC0019

Once that was complete, the students moved on to paint their gooey blue sky. It was great fun to hear their reactions when they put the different elements of the painting together. Despite not being able to see, many students could clearly visualize how they wanted their painting to appear.

_DSC0021It was a good lesson in getting students to focus on their fine motor movements rather than just relying on their vision to create their art pieces.

If you are going for more results-based artwork, try out a project like the one below!

75415 Fingerpaint Sensations_Image Sample1

Here’s an example of something your students can make. Cover various parts of your hands and fingers with different sensational paint colors. Press your hand onto a piece of paper. Add in details later.

Line-20We hope you’ve enjoyed this post! If you have thoughts to share or would like us to post up photos of your students’ work, send us an email to subscriber@roylco.ca!