Really Big Tangrams

girl tangram.jpg

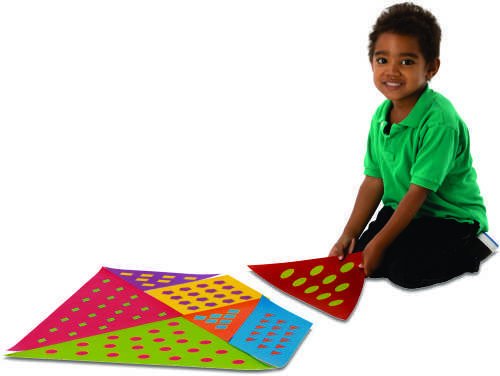
We scaled up these tans to scale up the fun of  solving tangrams!

Get ready to have fun with our Really Big Tangrams! You’ll have to make a lot of room on the floor for this huge version of the classic Chinese dissection puzzle. Learn to use mathematical principles by arranging the 7 pieces, called tans, to make geometric shapes and figures. It won’t take long to realize the puzzles are not as simple as they seem. Printed on durable, weather resistant material, Really Big Tangrams are perfect for group activities in the classroom OR on the playground. Let everyone work together to exercise creative strategies for practical problems. The included guide will get you started with three different levels of difficulty. Use our Really Big Tangrams as a teaching tool for 2D spatial relationships, working together as a team, and for active play!

What is a dissection puzzle? Dissection puzzles are puzzles that are made with tiles of varying sizes. The hallmark of dissection puzzles is that the pieces can be assembled to create two or more distinct geometric shapes. Dissection puzzles are as old as Plato, with the earliest puzzles being described in Ancient Greek texts. Tangrams came to the west in the 19th century (the 1800s) when American sea captain M. Donaldson brought a set back with him on his ship, the Trader, in 1815. These puzzles were less popular in the latter half of the 19th century, but saw a resurgence during the first world war.

boy tangram.jpg


Tangrams can form all different kinds of puzzles! Some common themes are:

  • Animals
  • Plants
  • Buildings
  • Geometric Shapes

You can find some puzzle ideas in the guide included with these tans, but you can also visit your local bookstore for puzzle books. The internet is also a great resource!

Line-05

Like us on FacebookShare this post with your friends, or Subscribe to this blog today to receive original craft project updates every week!

New Year’s Masquerade Masks

2014-12-10-FeatureImage

This year’s New Year’s party will be a blast with fancy custom-made masks! Celebrate the past year and what the New Year will bring!

Age: 5+

Duration: 10-20 minutes

Learning Objectives: 

You’ll Need:

R15623 Tie Dye Paper

R22020 Color-In Masks

• Glue

• Scissors

• Pencil

• Rhinestones or sticker jewels

• Feathers

• Hole punch

• Decorative ribbon

Line-15

Encourage your students to think of their New Years masks as a reflection of their creative expression. So go crazy with it! Bring out your stock of decorative materials from the craft closet–look for things like sequins, bright, shiny beads or buttons, rhinestones, tinsel and more!

P1015837

Gather up your plethora of decorations for the masks! You don’t need to use a full sheet of the Tie-Dye Paper to decorate the mask; in fact, it would make sense to cut each sheet in half and divide the halves between two students.

P1015840

Place the Color-In Mask onto the Tie-Dye Paper and trace around the outside edges with pencil. Be sure to mark those eye holes as well as the pre-punched holes on the sides!

P1015841

Cut out the Tie-Dye Paper along the traced lines.

P1015843

Glue the Tie-Dye Paper cutout directly on top of the Color In Mask.

P1015848

Pick out your assortment of decorative items. Start adding details to your mask! Make patterns with the sequins or rhinestones, trace the outlines of the eyeholes or the edges of the mask.

P1015849

At this stage, I’ve decided to add decorative feathers to the mask. This adds a bit of flair! You can use hot glue, but regular white glue works fine as well. Simply press and hold down the feather shaft for 30 seconds. If the feather pops away from the paper, dab a bit of glue onto the feathery strands and press down onto the paper.

P1015850

Finally, punch holes through the Color-In Mask on either side.

P1015854

Attach a strand of ribbon onto each side of the mask. It’s a good idea to make two strands of ribbon for each mask, as it is easier to tie the mask around students’ heads. This is a great take-home project for kids before they head home for the holiday season!

Line-15

Like us on FacebookShare this post with your friends, or Subscribe to this blog today to receive original craft project updates every Monday, Wednesday and Friday!

Project Spotlight: Snowflake Weaving Mats

2014-12-08-FeatureImage

Add beautiful snowflakes to your winter display with artwork your students get to make!

The R16027 Snowflake Weaving Mats kit contains 24 projects for your classroom in four unique snowflake designs. What sets each of your students’ snowflakes apart from each other is the addition of our patterned weaving strips. There are plenty of designs for students to choose. Mix and match different combinations of weaving strips for a beautiful bold look!

Weaving is a great way to encourage fine motor development as it forces fingers to expertly pass the strips over and under the slots in the weaving mat. Remember to alternate the start for each strip as you go!

When you are finished weaving all the way to the bottom of the mat, snip off the ends of the paper strips and tape the finished weave down.

You can see the process for weaving at the link below:

[youtube https://www.youtube.com/watch?v=dZM9688k1z8]

Hang up your finished snowflake designs on a display wall. Alternatively, write the name of each student on his or her snowflake and hang from the ceiling for a lovely mobile decoration.

Line-12

Like us on FacebookShare this post with your friends, or Subscribe to this blog today to receive original craft project updates every Monday, Wednesday and Friday!

Tissue Paper Button Wreath

2014-12-03-FeatureImage

Start the Christmas decorating with a simple take-home ornament! Children younger than 5 years can experience the joy of making their own decorations with standard materials you will find in your classroom.

Age: 3-5 years

Duration: 10 minutes

Learning Objectives:

You’ll Need:

R22052 Double Color Card Sheets

R2131 Bright Buttons

R2172 Tissue Circles

• Gluestick

• Scissors

• Pencil

• Hole punch

Line-21

This wreath is nice and compact to be hung off a doorknob or can be tacked to the center of a child’s room door. Hang up on a tree for a rustic “crafty” look!

P1015821

We are going to make a simple wreath out of tissue paper and card paper, using the buttons as ornaments to decorate it. Use coordinating colors to make your wreath. You don’t have to make the wreath exclusively for the holidays. Instead, you can adapt it based on different colors that are relative to various seasons! Test out different combinations of colors and materials to see which work best.

P1015822

Let’s start with making the wreath.

P1015823

Fold the sheet of Double Color Card sheet in half.

P1015824

Use scissors to cut a small semi-circle out of the center of the folded sheet. Cut off the corners of the folded sheet and round out the edges to form a larger semi-circle.

P1015825

Now, unfold the wreath.

P1015879

Punch a hole into the top of the wreath. Cut a length of decorative ribbon and thread through the hole. Tie a knot at one end.

P1015881

To add texture to your wreath, you will need to use our Tissue Circles, or find scraps of green tissue paper in your scrap paper box.

P1015882

Take a scrap of green tissue paper and scrunch it in the center. Pull out the surrounding paper, much like you would when stuffing tissue paper into a gift bag.

P1015883

Dab a bit of glue onto the wreath and press the scrunched tissue paper on top.

P1015885

Add more tissue paper scraps all the way around the wreath.

P1015889

Glue a Bright Button onto the center of each tissue paper section. Enjoy a beautiful but easy-to-make decoration for this holiday season!

Line-14

Like us on FacebookShare this post with your friends, or Subscribe to this blog today to receive original craft project updates every Monday, Wednesday and Friday!

Guest Post! The Museum uses our Rolly Scrolly Paper!

THEMUSEUM in Kitchener, Ontario, Canada hosted their amazing “Unwrapping Egypt” exhibit this summer. Museum-goers could visit the exhibit and become immersed in the culture and beautiful history of Ancient Egypt. We at Roylco were lucky enough to participate in some of the children’s programming with our Rolly Scrolly Paper! Check out this special hieroglyphics project with a written commentary from the senior education interpreter!

Brent from THEMUSEUM gives his impressions of the project below! All photos are courtesy of THEMUSEUM unless otherwise noted.

To view the full blog post at the museum’s website, please visit the link here!

Brent says:

“Our current exhibition, Unwrapping Egypt, features a complete reproduction of the artifacts found in the tomb of King Tutankhamun. They’re adorned in marvellous colours and, more importantly, feature hieroglyphics, the pictorial symbols of the written ancient Egyptian language. To connect what campers have seen in our exhibition space, we decided to put their transcribing skills to the test using Roylco’s R15406 Rolly Scrolly Paper…

There are cool things written on scrolls, and they can be rolled and unrolled in such a way that is relatively unique. While children this age may have difficulties reading and writing, they are quite adept at applying intuitive thought processes to emulate what scripts might look like. Roylco’s Rolly Scrolly paper is a perfect medium to allow children of this age to express intuitive thought.

Our campers from 7-9 are able to recognize patterns with symbols more readily, and are intrigued by the discovery of novel patterns connecting what they’ve seen in the exhibit space.

This activity was a tremendous success in achieving our goal to awe, enlighten, and inspire our campers.”

Visit the whole blog post here!

Thank you so much to Brent for providing us with this awesome commentary!

Image and original post © THEMUSEUM

We’d love to see more ideas like this one! If you’ve got a brilliant craft idea or have made a version of one of our crafts that you would like to share with us, send an email to us with photos, descriptions or a link to your work. We will create a feature post and link back to you with full credit. Contact us through the contact form for more details. We’d love to hear from you!

Thank You 2013 Art Camp Kids!

Group ShotToday’s post is a little bit different than our regular series of posts! The folks at Roylco enjoyed a fantastic summer art camp in 2013 thanks to our brilliant art campers. Using our classroom materials, the group completed a variety of amazing projects. We would like to say, “Thank you!” to all of our campers and showcase some of our favorite moments from the camp!

drawing, coloring, all about meGetting to capture smiles like this was definitely one of our favorite moments. Using our “All About Me” products, our art campers were able to express the best of their own creativity with representations of themselves!

color diffusing, straws and connectors, architecture paperThese were some of our favorite moments: getting to see the Art Campers working together and having fun while learning new concepts. The kids learned a variety of skills, everything from building, stacking, painting, gluing, molding, sorting and more!

hanging stained glass, umbrella, masks, animal hop

The best was when we let the campers take their own initiatives with their crafts. Let’s have an animal foot race! Or, let’s find a good place to hang our stained glass frames. It’s an endless lesson in fun and excitement.

art campWe had wonderful hot summer days to enjoy our good company! That, combined with good spirits and creativity turned our summer art camp experience into a dream.

color reveal birds

We all loved to pose for photos with our new friends!

Kids NamesWe have to give a shout-out to our best buds at the 2013 Art Camp! Everyone did an amazing job and had a blast together. Thank you so much, art campers!

Line-12Like us on FacebookShare this post with your friends, or Subscribe to this blog today to receive original craft project updates every Monday, Wednesday and Friday!

Craft Spotlight: Yoga Cards

2014-06-02-FeatureImageGet outside and STRETCH! R62011 Yoga Cards feature printed images of recognizable things, such as a hot air balloon or a tree and an accompanying yoga position. Our Art Campers exercised with a ton of different poses. Check out more below!

Full instructions for Yoga Cards can be found here. Access breathing tips, detailed descriptions about each pose and more! There are 3 challenge levels: Beginner, Intermediate and Difficult. Each are color coded by a border surrounding each card: Green – Easy, Yellow – Intermediate, and Red – Challenging.

IMG_7777

The back of each card shows detailed illustrations on how each pose is performed. For instance, the picture above shows our campers performing the “Wooden Bridge” pose.

This pose requires that you straighten your arms outwards from your body and spread your feet apart. Carefully inhale as you lean on one knee and hold for several seconds. Exhale as you straighten your knee out. Repeat for the opposite leg.

IMG_7766

A bit too easy? Okay! Let’s try something new!

IMG_7783

Now let’s try the “Swaying Sunflower” pose. This one requires you to raise one arm up and over your head to the other side, inhaling as you do so. Stretch your body in the direction that your hand is pointing. Exhale as you lower your arm. Repeat for the other arm.

IMG_7773

Yoga Cards not only visually stimulate your students, but help them connect an action to a recognizable object. This helps generate image association and engages various muscles in the body.

IMG_7782

You can add your own twist to each action by introducing song or rhythm, like a dance session! Otherwise, get students to focus on their breathing and learning new vocabulary words such as inhale (to breathe in) or exhale (to breathe out).

IMG_7780

This one’s pretty challenging! See if you can do it right now. If not, why not get a set of Yoga Cards and start with the Easy Difficulty to loosen up those muscles!

Line-06Thanks for viewing this post! Like us on Facebook and subscribe today to our blog for more updates like this every Monday, Wednesday and Friday!