Thank You Art Campers!

kids art camp roylco

Thank you to all our wonderful art campers who participated in our 2014 Art Camp! We had a blast!

ThankYouPhoto-02

Although it was unusually cold for the middle of summer, we did lots of activities that kept us up on our feet and moving about. The kids not only took part, they engaged fully with each other and made the best of friends!

ThankYouPhoto-05

We had some silly moments…

ThankYouPhoto-06

…some sneaky moments…

ThankYouPhoto-04

…and some out-of-the-box moments!

ThankYouPhoto-03

All of these moments brought about a willingness to explore with new materials and develop artistic ability using fine and gross motor skills!

We’ve put together a gallery of faces featuring our lovely campers. Thanks again for all the great memories and we hope to see you soon!

ThankYouAllKids

Line-16

Like us on FacebookShare this post with your friends, or Subscribe to this blog today to receive original craft project updates every Monday, Wednesday and Thursday!

Spotlight on… Squiggle Pipettes

squiggle pipette painting watercolors

We recently revamped our pipette line with a few new designs! One of the new designs is our fabulous Squiggle Pipettes. Learn more below!

squiggle pipette painting watercolors

Squiggle Pipettes feature an interesting squiggle design that helps to distribute paint evenly onto paper. Learn more about this product here! Pipettes are not only a great tool to use for painting, but can be incorporated into fine motor exercises–the motion of squeezing the bulb helps to get kids working out their pincer grip! If you are planning to paint with the pipettes, use watercolor paints.

To use your pipettes, first squeeze the bulb to press out all the air. Dip the nozzle into a container of watercolor and release the bulb to suction the paint into the pipette. Squeeze the bulb again to release the paint over your sheet of paper.

[youtube https://www.youtube.com/watch?v=QmCBhIL4COc]

You can use the Squiggle Pipettes to color your art! Here are some ideas you can try for yourself! Click on the links to be taken to the full tutorials.

 • Make your own giant weaving mat using only Color Diffusing Paper, paint and Squiggle Pipettes! Cut the dried colored paper into strips and weave them in and out of each other to make a beautiful woven mat.

Learn our secret for color-resist painting! We use Squiggle Pipettes to add color to the flag designs.

Color your own clothes! A paper vest, that is. Find more about how to design your own vest at the link.

• Form your art into beautiful images of animals using basic shapes! Squiggle Pipettes are used to make the painted images.

Line-16

Like us on FacebookShare this post with your friends, or Subscribe to this blog today to receive original craft project updates every Monday, Wednesday and Thursday!

Spotlight on… Pocket Portfolio!

pocket portfolio artist coloring

Need something to do on those long road trips? Or just feeling very artistic? Try our R82051 Pocket Portfolio, ready set with all the materials you need to make a sketchbook of unique illustrations!

The R82051 Pocket Portfolio is a great kit to bring out even for rainy school days when everyone’s stuck inside! The kit features over 100 printed coloring pages with beautiful illustrations, including everything from a person’s portrait to an ice cream sundae, teddy bear, lady bug and more! The range of coloring pages makes the kit a great repeat project to do whenever you need something to fill in the time for your students.

The kit also includes 8 crayons that you can add to your stash of existing crayons! You can keep the entire kit inside of the package as a handy place to stash all your artwork and materials.

We’ve included an assortment of rubbing plate patterns that you can use to decorate the foreground or background of each scene. Simply place the rubbing plate underneath the sheet of paper. Use the blunt side of a crayon and rub back and forth. The imprint of the rubbing plate underneath will show through the paper to appear as if you’ve colored the sheet in an interesting pattern. Use the rubbing plates to make patterned details on leaves, petals, clothes and more!

Here’s an alternative way to have fun with your coloring kit: Paste on materials to decorate the coloring pages such as colorful mosaics or other fun embellishments!

When you have finished coloring in all the pages in the kit, you can further use your rubbing plates to make cool craft projects!

• Rub designs onto clear protective sheets to make suncatchers

• Use the patterned rubbing plates to make textures for fun spring crowns

• Explore planetary surfaces with our fun paper solar system!

Line-20

Like us on FacebookShare this post with your friends, or Subscribe to this blog today to receive original craft project updates every Monday, Wednesday and Thursday!

Nature Mobile Maker

Image of close up of Nature Mobile

nature mobile craft

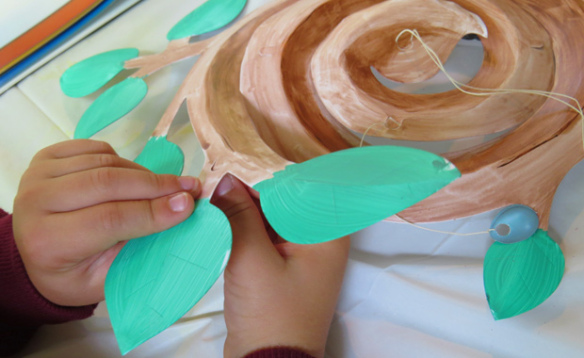
Make a lovely mobile decoration for spring! Our R51302 Nature Mobile Maker is a great base for making your mobile. Add on found objects such as leaves, feathers or flowers!

Age: 3+

Duration: 15-20 minutes plus drying times

Learning Objectives: Explore the natural world through decorating the mobile with natural found objects. Experiment with gravity and weight through kinetic studies. Observe the movements and flow of air and how this affects the balance of weight on the mobile.

nature mobile craft

You’ll Need:

R51302 Nature Mobile Maker

R15290 Nature Paper (or found objects, such as leaves, twigs, feathers, flowers, etc…)

• Scissors

• String

• Markers or paint

• Hole punch

Line-08

nature mobile craft

First pop the blank Nature Mobile Maker out from its paper backing. Separate all the elements and then place the mobile on a protected flat surface. Use paint or markers to color in the branches brown and to color in the leaves green.

nature mobile craft

Be sure to color on both sides of the mobile! This will make sure that from anywhere the mobile is viewed, it looks complete.

nature mobile craft

It was a bit of a rainy day when we made our mobiles, so we weren’t able to go exploring for found objects in nature. As a substitute, we used our R15290 Nature Paper! Pop out several of the elements from the paper backing. You’ll need no more than 6-10 elements per mobile. Mix large objects with smaller ones for a diverse appearance. Hole punch through the tops of each element you’ve chosen, then tie on a bit of string to hang from the mobile.

nature mobile craft

Our mobile is designed with ingenious little flip-up tabs that can be raised and pressed down over the length of string to secure it in place. This makes attachment way more easier than messing around with tape or tying the pieces on with difficulty.

nature mobile craft

Our camper friends took their finished mobiles out to the garden to hang them up among the bushes.

nature mobile craft

Even though the sun cleared up and we were able to resume our nature walk, we still had a great time making all our paper mobiles!

nature mobile craft

The mobiles seemed to blend right in with our amazing forest background!

Line-17

Like us on FacebookShare this post with your friends, or Subscribe to this blog today to receive original craft project updates every Monday, Wednesday and Thursday!

Spotlight on… Postage Stamp!

postage stamp art

Mail something nice to a friend and make your own signature stamp piece! 

These large sized paper sheets are shaped like postage stamps, and cut with a special border to mimic the look and feel of the real thing. They are 9 x 12″ (23 x 30 cm), perfect for bringing out the fine details in your artwork!

Use crayons to draw a rectangle border on the inside of the stamp sheet. Take a moment to think about some kind of signature piece of artwork that you’d like to be drawn on the interior of the stamp. Remember that the stamps you may see at the post office feature an image of something important that relates to the country or signifies something that the people of that country are proud of.

Tell students to each make a list of things that they are proud of in their lives. Things such as “my dog,” “my cottage by the lake” or “my soccer goal” are good suggestions! When your students have made up their lists, ask them to describe why these things are important to them. Once they have come up with solid reasons, you can start to narrow down your choices as to what makes each student most proud in her or his life.

Try to think of ways that you would represent the picture. Will you simply put a picture of a dog on the stamp or will you embellish the illustration somehow to make it look more important and worthy of having its picture on a stamp? Perhaps you can add details that are important to the dog such as its bone, collar, playhouse, play-toy and so on. You can even go further by adding something like a superhero cape to the dog!

Flip the large postage stamp over and write a letter to someone important in your life such as a friend, parent or close relative. Practice writing your letter on a sheet of paper first so that you can revise your work before copying it onto the back of the stamp. Once you are finished, your students are ready to take their stamps home and “send” them to their favorite people!

You can also “send” cards with the stamps. Here are some of our card projects:

• Make a card any dad will love!

• Surprise someone with a pop-up bouquet, straight from a card!

• These underwater scenes are great to send to a friend!

Line-17

Like us on FacebookShare this post with your friends, or Subscribe to this blog today to receive original craft project updates every Monday, Wednesday and Thursday!

Spotlight on… Hidden Difference Puzzle Cards

2015-05-11-FeatureImage

Find all the differences between the colorful character cards in our Hidden Difference Puzzles! The puzzles are great for encouraging critical thinking through comparison and contrast.

The Hidden Difference Puzzle Cards each come in a set of 4, with 12 different character cards. Each of the cards features an image of a young person dressed in some kind of career uniform with an assortment of props related to that specific character. Each card in the set of 4 that is outlined in blue is your starting point. This is the card that you will use to compare to all the other cards! Take the blue card from any of the sets and discuss with your students what is featured in the picture. Observe the clothes that the young person is wearing. What kind of career is she or he representing? What are the elements in the picture that help support your students’ guesses?

new-6

Once you have an understanding of what each card represents, talk about what people in these professions do and how they are important to community building. You can even start to discuss with your students what kinds of interests they have that may be reflected in their career choices one day!

new-8

There are enough cards for pairs of students to work on finding all the differences together. The comparison cards are bordered in green for easy, yellow for intermediate and red for challenging, meaning that there are more differences in the cards as you progress through the more difficult cards.

Learning about comparisons is a great way to encourage critical thinking in students. If you’d like a more introductory approach to learning about different versus same, consider trying this activity! We used found things in a classroom and a salad tray to help students categorize the differences between items through tactile and visual sense. Once students are comfortable with identifying differences in objects, they can progress to using the Hidden Difference cards.

new-7

Get your students to mark down all the differences. They can use dry-erase markers directly on the cards to indicate where the differences are. The surface of the cards is easy to wipe with baby wipes or glass cleaner and paper towel. Once students are confident with their discoveries, they can check their work against all the answers printed at the back of the blue card.

This is a great activity to get students to work together while exercising their brains and having fun!

Line-21

Like us on FacebookShare this post with your friends, or Subscribe to this blog today to receive original craft project updates every Monday, Wednesday and Thursday!

Tube Crafts: Sunny the Snake

tube snake paper roll Sssssssss! Here’s a great project you can adapt for larger groups of students–make an awesome tube snake. This is one of the many projects we’ve got lined up this year for Tube Crafts! Age: 4+

Duration: 15-20 minutes

Learning Objectives: Use fine motor skills to roll up colorful tubes. Great group activity! Multiple groups can contribute to building the snake.

tube snake paper roll

You’ll Need:

R39301 Tube Crafts

• Hole punch

• Permanent marker

• Ribbon

• Scissors

Line-10 tube snake paper roll

A full classpack of Tube Crafts is great for a variety of different projects. The flat sheets are printed with a color on each side. One one edge, the Tube Craft sheet features two tabs that fit into the slots on the other edge.

tube snake paper roll

Roll the flat sheet into a tube and push the tabs into the slots.

tube snake paper roll

You can see how I’ve left the bottom tab out so you can see where it fits into the slot. To make it easier to work with, you can try to press one side of the tab into the slot, then press the opposite side in.

tube snake paper roll

Once you have made a tube, punch two holes across from each other on either end. This will allow you to connect the different tubes together.

tube snake paper roll

Cut two lengths of yarn.

tube snake paper roll

Thread a length of yarn through each of the holes in the tube.

tube snake paper roll

Thread the ends of the yarn to adjoining tubes. Secure the tubes together with a knot at each end.

tube snake paper roll

To make the tail for the snake, make a tube.

tube snake paper roll

At one end of the tube, start out by cutting a V-shape.

tube snake paper roll

Continue cutting out along the side of the tube until you reach the opposite side.

tube snake paper roll

Hole punch the opposite sides of the tube.

tube snake paper roll

Start with another flat sheet from the Tube Crafts kit.

tube snake paper roll

Another great feature of our Tube Crafts is that we’ve added a notch halfway through the edge of the sheet. This allows you to cut the tube in half before assembling. This way you can make smaller tubes! In this next step, we will use the smaller tube to make the snake’s head.

tube snake paper roll

Cut straight across the flat sheet using the notches as a guide.

tube snake paper roll

Roll up and secure the tube with the tab and slot.

tube snake paper roll

Cut the same V-shaped notch out of the small tube, just as you did for the snake’s tail.

tube snake paper roll

Once you are finished making the head, use permanent marker to add details such as the eyes and nostril to the snake’s head. You can’t forget about the tongue! To make the tongue, tape on a length of pink ribbon! Drag the edge of a pair of scissors across the ribbon to curl it into a spiral. Alternatively, use a strip of felt and cut out a V from the bottom to make it a forked tongue.

tube snake paper roll

Here’s a look at what the finished snakes look like. You can give one snake project to each group of students in your classroom or encourage everyone to contribute to one giant snake project!

Line-18

Like us on FacebookShare this post with your friends, or Subscribe to this blog today to receive original craft project updates every Monday, Wednesday and Thursday!

Spotlight on… Dry Erase Blank Playing Cards

2015-04-27-FeatureImage

Play memory games, math games, traditional card games and more with our R49623 Dry Erase Blank Playing Cards

The cards are specially designed to be reusable because of the dry erase surface. Use dry erase markers to write numbers and letters or to draw illustrations. The writings and drawings will easily wipe off with a bit of paper towel or glass cleaner to restart the activity!

There are 60 cards in each pack, giving you enough value and quantity for group gameplay and re-use.

We will list two suggested activities for each type of playing card game based on 2 different subjects: math and literacy. These activities are based on card games that can be played from kindergarten to grade 2. We’ve added alternative suggestions to help challenge older students as well.

MATH

Explore numbers through quantity games and memory matching!

Pre-K to Kindergarten: Get a set of 10 playing cards. On one set of 5 cards, write each number between 1-5 on separate playing cards. On the second set of 5 cards, repeat the same process. You may draw little shapes or illustrations (such as squares or apples) to correspond with the number written on each card. Take the finished cards and shuffle them together, then place them face-down on a flat surface. Ask a student to pick the first card from the top of the deck, flip it over and say the number on the card out loud. Students can use the visual cues on each card to indicate the quantity. Instruct students to take each card they draw and place them face up onto a flat surface. If the next card they draw is different from the first, they must figure out if the card should be placed before or after the previous card. This will help students understand the placement of numbers along the number line. If they draw a card that’s the same as another card they’ve drawn, they must place the cards on top of the previous card to indicate that the numbers match. The game is over when all the cards have been flipped over and placed in their appropriate areas.

Grades 1-2: This game is for 2 players, but can be adapted for one. Create 3 sets of 10 playing cards with the numbers 1-10 written on each separate card. Shuffle the cards together and place face down in a deck. Take three more cards and write the addition (+), subtraction (-) and equal sign (=). Choose either addition or subtraction to be the main operation and place it face up in front of the students. Place the card with the equal sign to the right of the operation card. Ask each student to draw 4 cards from the deck. Whoever goes first must draw a ‘wild card’ from the deck and place it to the right of the equal sign. This number is the result that each player must try to match with an appropriate pair of cards from their hand. They can only choose two cards that must either add together or subtract from one another to match the wild card result. If the player cannot match any of the cards in their hand together, they must draw another card from the deck. The player to put down the first correct combination of numbers to match the result gets a point. Place used cards in a discard pile. Once all the cards have been drawn, or if a player has discarded all cards from his or her hand, the game is over. The player with the most amount of points wins!

LITERACY

Students can exercise their knowledge of letters and word combinations using the playing cards!

Pre-K to Kindergarten: Students in this grade level are just starting to learn about the letters of the alphabet. Write all the uppercase letters of the alphabet on separate playing cards. Write all the lowercase letters of the alphabet on a separate set of playing cards. Combine the set together and separately lay all the cards face down on a flat surface. The objective of the game is to find two matching pairs, the uppercase and lowercase letters. As the students flip over each of the cards, they must call out the name of the letter on the card. This will help students with letter retention. Once they have matched all the upper and lowercase letters together, the game is over!

Grades 1-2: Students in this grade level are able to put together short words to make simple sentences. To expand on this, write single words onto each of the cards. Use familiar words that your students have learned or are in the process of learning about. Include a variety of words such as nouns, verbs, adjectives, pronouns and articles. Mix up the cards and place them all face up on a flat table. Ask students to pick out a word and form their own sentence around it. Challenge older students to form a complete sentence using only the words on the playing cards! What kinds of cool sentences can you come up with?

You can form your own playing cards that are useful for playing games such as Go Fish, Concentration or Memory… and you never have to worry about how to work your lessons around a specific type of resource.

Line-09

Like us on FacebookShare this post with your friends, or Subscribe to this blog today to receive original craft project updates every Monday, Wednesday and Thursday!

Spotlight on… Classroom Tunics

classroom tunics

Keep track of your numbers and letters with Classroom Tunics! Every student can take part in the learning fun when they’ve donned their dry-erase pullover.

classroom tunics

The R49620 Dry Erase Classroom Tunics fit nicely onto students’ shoulders. The tunic is designed to hold in place by the dry erase panels on the front and back. You can use the panels to write numbers, letters or other form of signage!

classroom tunics

The best part is that the dry-erase tunics can be re-used over and over again.

classroom tunics

It’s safe for children to wear and a great way to include students in group activities.

classroom tunics

Our full guide gives you detailed resources for implementing the classroom tunics into 7 important subject ares of the curriculum. Learn how to integrate numbers into everyday learning while engaging students in fun activities such as color matching, sorting and more!

classroom tunics

We wrote a number onto each of the students’ vests and asked them to organize themselves in the correct order. We intentionally left out some numbers to give the campers an extra challenge!

classroom tunics

The students all had to work together to determine who went where in the number line. It was a great exercise.

classroom tunics

The best challenge occurred when we changed some of our campers’ vests to subtraction, addition and equal signs. We then chose two students to stand on either side of the operation and work with their peers to figure out what the answer was!

classroom tunics

There are so many great ways to use the Classroom Tunics. Even simply color-coding your students into groups makes the tunics well worth their while in your classroom!

Line-11

Like us on FacebookShare this post with your friends, or Subscribe to this blog today to receive original craft project updates every Monday, Wednesday and Thursday!