New Year’s Masquerade Masks

2014-12-10-FeatureImage

This year’s New Year’s party will be a blast with fancy custom-made masks! Celebrate the past year and what the New Year will bring!

Age: 5+

Duration: 10-20 minutes

Learning Objectives: 

You’ll Need:

R15623 Tie Dye Paper

R22020 Color-In Masks

• Glue

• Scissors

• Pencil

• Rhinestones or sticker jewels

• Feathers

• Hole punch

• Decorative ribbon

Line-15

Encourage your students to think of their New Years masks as a reflection of their creative expression. So go crazy with it! Bring out your stock of decorative materials from the craft closet–look for things like sequins, bright, shiny beads or buttons, rhinestones, tinsel and more!

P1015837

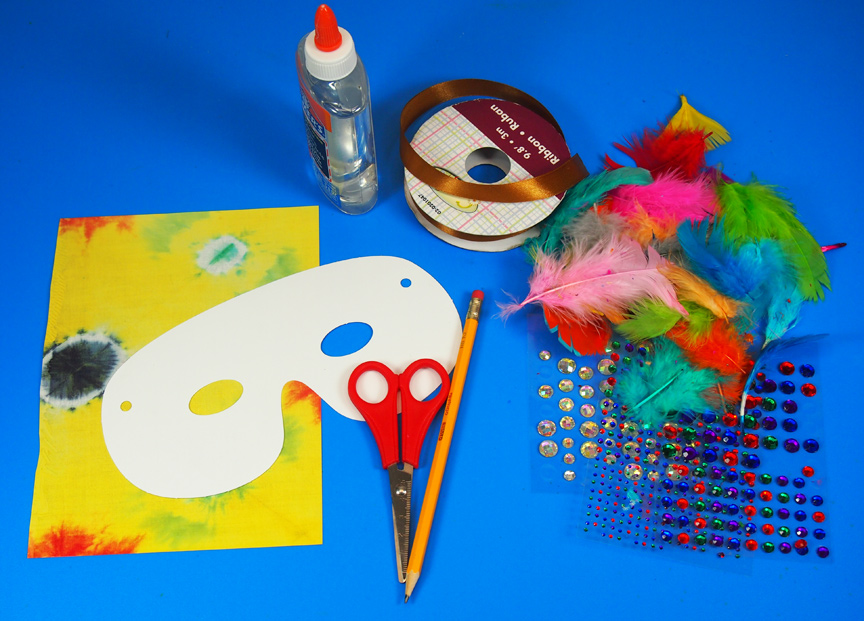
Gather up your plethora of decorations for the masks! You don’t need to use a full sheet of the Tie-Dye Paper to decorate the mask; in fact, it would make sense to cut each sheet in half and divide the halves between two students.

P1015840

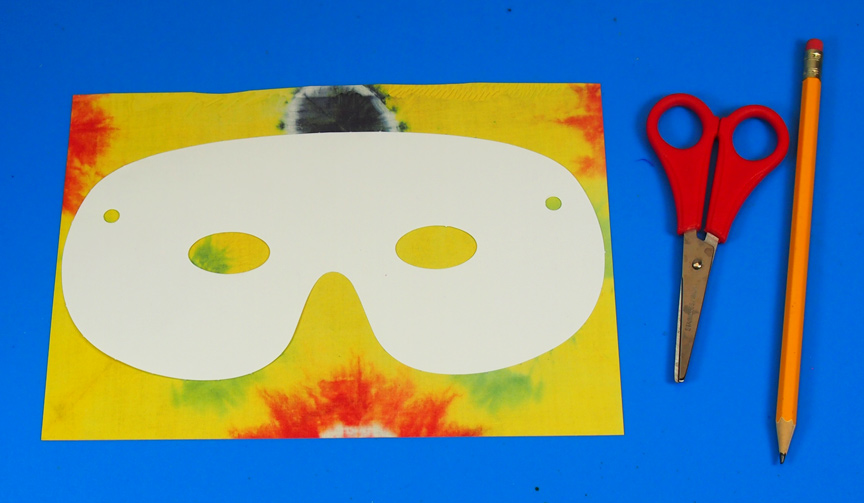
Place the Color-In Mask onto the Tie-Dye Paper and trace around the outside edges with pencil. Be sure to mark those eye holes as well as the pre-punched holes on the sides!

P1015841

Cut out the Tie-Dye Paper along the traced lines.

P1015843

Glue the Tie-Dye Paper cutout directly on top of the Color In Mask.

P1015848

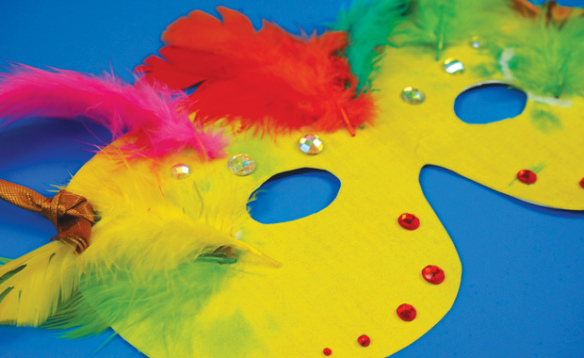
Pick out your assortment of decorative items. Start adding details to your mask! Make patterns with the sequins or rhinestones, trace the outlines of the eyeholes or the edges of the mask.

P1015849

At this stage, I’ve decided to add decorative feathers to the mask. This adds a bit of flair! You can use hot glue, but regular white glue works fine as well. Simply press and hold down the feather shaft for 30 seconds. If the feather pops away from the paper, dab a bit of glue onto the feathery strands and press down onto the paper.

P1015850

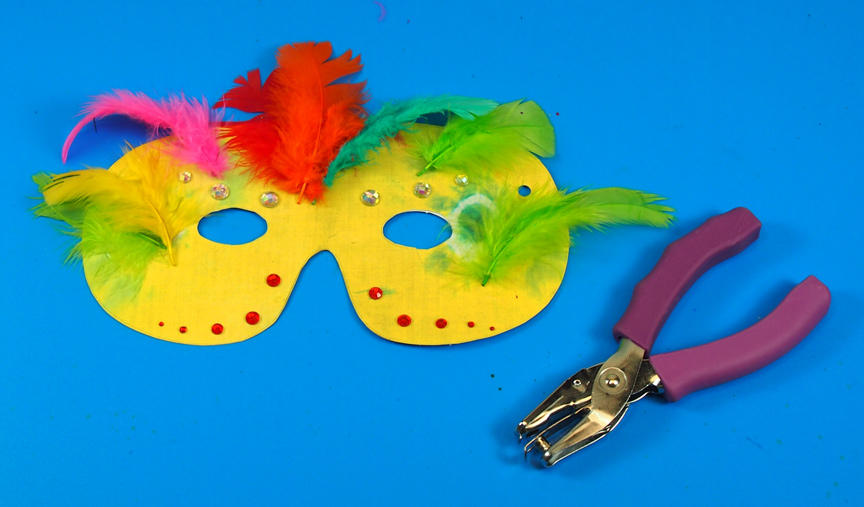
Finally, punch holes through the Color-In Mask on either side.

P1015854

Attach a strand of ribbon onto each side of the mask. It’s a good idea to make two strands of ribbon for each mask, as it is easier to tie the mask around students’ heads. This is a great take-home project for kids before they head home for the holiday season!

Line-15

Like us on FacebookShare this post with your friends, or Subscribe to this blog today to receive original craft project updates every Monday, Wednesday and Friday!

Thank You 2013 Art Camp Kids!

Group ShotToday’s post is a little bit different than our regular series of posts! The folks at Roylco enjoyed a fantastic summer art camp in 2013 thanks to our brilliant art campers. Using our classroom materials, the group completed a variety of amazing projects. We would like to say, “Thank you!” to all of our campers and showcase some of our favorite moments from the camp!

drawing, coloring, all about meGetting to capture smiles like this was definitely one of our favorite moments. Using our “All About Me” products, our art campers were able to express the best of their own creativity with representations of themselves!

color diffusing, straws and connectors, architecture paperThese were some of our favorite moments: getting to see the Art Campers working together and having fun while learning new concepts. The kids learned a variety of skills, everything from building, stacking, painting, gluing, molding, sorting and more!

hanging stained glass, umbrella, masks, animal hop

The best was when we let the campers take their own initiatives with their crafts. Let’s have an animal foot race! Or, let’s find a good place to hang our stained glass frames. It’s an endless lesson in fun and excitement.

art campWe had wonderful hot summer days to enjoy our good company! That, combined with good spirits and creativity turned our summer art camp experience into a dream.

color reveal birds

We all loved to pose for photos with our new friends!

Kids NamesWe have to give a shout-out to our best buds at the 2013 Art Camp! Everyone did an amazing job and had a blast together. Thank you so much, art campers!

Line-12Like us on FacebookShare this post with your friends, or Subscribe to this blog today to receive original craft project updates every Monday, Wednesday and Friday!

Craft Spotlight: Retro Pop Paper

2014-06-09-FeatureImage

Add beautiful effects to your cut and paste projects! R15303 Retro Pop Paper provides you with a variety of bright colors and eye-catching designs. For this project, our Art Campers decorated painted wave paper with fish cutouts using the Retro Pop Paper. See more below!

DSC05525

First, we supplied our campers with a few fish templates that they could apply to the paper, trace out and cut. We showed them how to fold the paper, and then place the templates, folded, onto the fold line of the Retro Pop Paper.

DSC05528

Once the campers had traced the shape onto the paper, they cut it out.

IMG_7679

With the paper unfolded, a fish shape appeared! We tried a variety of different fish shapes. You can see the shapes in the top right.

DSC05529

The backdrop was a sheet of brown craft paper that we had in rolls in our art room. We spread out the sheets and cut them at about 3-4 foot widths, then painted them with blue wavy lines.

DSC05531

Our campers applied a bit of glue to the backs of the fish shapes and pasted them into various positions on the craft paper.

DSC05532

The campers had a lot of space to work with!

DSC05535

All done! Check out all those gorgeous fish designs!

IMG_7694

Here’s what another group did. Great work, campers!

Line-18

hanks for viewing this post! Like us on Facebook and subscribe today to our blog for more updates like this every Monday, Wednesday and Friday!

Craft Spotlight: Nature Paper

2014-05-05-FeatureImage

Take a good look at the images in our R15290 Nature Paper, and think of how you can combine them to make colorful, crazy critters! The Nature Paper elements can also be hung from mobiles or pasted onto picture frames or posters as decorations.

The R15290 Nature Paper features 32 sheets of brilliant graphics that are die-cut for easy removal. Simply pop out the images from the backings and use! The great part about these images is that they’re printed on both sides so you don’t have to paste two pieces together.

To view more about Nature Paper, click on this link! You can view a video, read the detailed PDF guide or check out some nifty images. The art in the guide can be used to make your own selection of animal friends. Find the first image in your Nature Paper set, and match it in the same position as shown in the guide. Continue to find the remaining images in the set and glue together once the image is complete.

Get a little creative with your own designs! The video below shows you how to make a beautiful dancing ballerina from the elements in the kit. What a great exercise for young students! Learn how to combine these elements together, just like puzzle pieces, to create something new!

Line-17

Thanks for viewing this post! Give us a like and share with your friends! Subscribe to this blog to receive updates every Monday, Wednesday and Friday on new craft projects and products. We’d love to hear from you! Send us your input through the contact form.