Why STEAM Toys Matter

We’ve got the secret that all parents are looking for. STEAM toys. No, not toys that produce steam, but the acronym STEAM (science, technology, engineering, arts, and math). Parents are wanting them, and educators are pushing them. In a world now dominated by social media and gruesome video games, the yearn for real hands-on learning toys has become a must-have for parents, and rightfully so. These toys, designed to engage children in the five category disciplines listed above, are gaining major recognition for their profound impact on fine motor skill and cognitive development at every age. Let’s explore the importance of fostering STEAM toys into play.

Numbers, please!:

Yes, we get it. Where’s the truth without numbers? Our good friends over at The Toy Association have put together a fabulous White Page STEAM Toy summary with all the stats parents need to hop on the STEAM train. We’ll just summarize a few of those facts here:

  • 67% of parents believe that STEM/STEAM toys are the best way to push science, technology, engineering, and math skills in their child(ren).
  • 82% of parents acknowledge they look for ways to encourage learning in their child’s play
  • Screen time for children averages 3 ½ hours per day.
  • 9 out of 10 parents believe it’s important for their child(ren) to foster STEM/STEAM skills for further development.

All data gathered from The Toy Association, 2019.

Encourage a Love for Learning:

Out with the old and in with the new – STEAM toys turn learning into a fun and engaging trial-and-error adventure. They also encourage open-ended play – a valuable criterion that teaches every way to play is the right way. By merging play with education, children view learning as enjoyable with a yearn for further exploration.  Children are naturally curious, and STEAM toys harness that curiosity and ignite a passion for knowledge.

Develop Must-Have Critical Thinking Skills:

Critical thinking skills are the core of our everyday activities and successes. STEAM toys challenge children to solve problems, make decisions, and think from a creative point of view (just like every skill requirement listed on a college application or a job listing). Whether constructing a building made from early engineering blocks or testing out different color combinations in an art project, introducing analytical thinking and problem-solving skills at a young age is crucial for future development.

Learning There’s No I in Team:

Teamwork projects are the forefront of every class or work project – we function in teams. Many STEAM toys are designed to encourage collaboration and learning how to understand other points of view, which can be difficult at a young age. Working on a project together also teaches valuable social skills that can be masked by social media usage. Learning teamwork, social, and problem-solving skills?

To wrap it all up, STEAM toys are much more than playthings – they are the catalysts for a love of learning and exploration. By introducing STEAM early on, we empower young children to become revolutionized critical thinkers, collaborators, and innovators. So, what are you waiting for? Hop on the STEAM toy train today! As we say at Roylco, let’s build tomorrow’s generation together.

Chinese Lanterns

Color-In Chinese Lanterns Craft

2014-02-12-FeatureImage

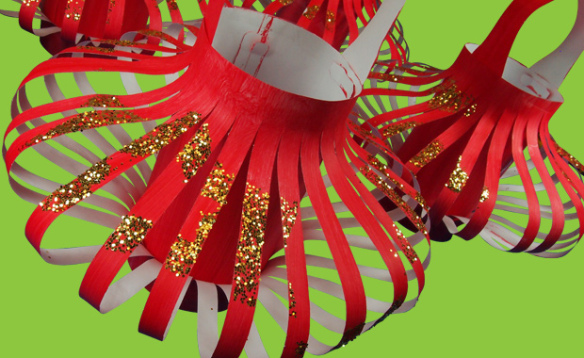
Get ready for Chinese New Year!  Learn how to create lanterns can help students work with form and color to create these awesome, decorative projects. We’ll show you the step by step process using our R22021 Color-In Chinese Lanterns and our R55009 Shape Sponges!

Age: 5+

Duration: 20 minutes

You’ll Need:

• R22021 Color-In Chinese Lanterns

• R55009 Shape Sponges

• Paint

• Glue

• Glitter (if desired)

• Paint tray

• Paint bowl

• Paint brush

• String

• Tape

Line-18

2014-02-12-Step01

It’s a good idea to use newspapers to contain glitter!

Each of the Chinese Lantern projects comes with 3 pieces: a large square with lines cut into it, a medium rectangle and a wavy-looking long piece.

2014-02-12-Step03Set each piece inside your paint tray. Paint all 3 pieces in a flat color. If needed, paint on two or three layers. When you are satisfied with the strength of the paint color, set aside to dry.

2014-02-05-Sponge-AnimationOnce the large square piece is completely dry, get ready to decorate it! Fill a plastic bowl with a bit of white glue. Select a favorite sponge shape and dip one side into the glue. Carefully stamp the sponge shape 4-6 times across the square lantern piece.

2014-02-12-Step05Make sure you do this step quickly, before the glue dries! Place the square piece onto newspaper. Sprinkle gold glitter glue completely on top of the stamped glue areas.

2014-02-12-Step06When the glue and glitter have dried, gently lift up one edge of the square piece and shake off the excess. Only the parts where the glitter met the glue will remain on the square piece. This creates a lovely surprise for students! Tip: Try to separate the die-cut lines if they are stuck together from the paint/glue.

2014-02-12-Step09

Now it’s time to switch back to the medium rectangle piece. There are two tabs at the top and of the rectangle piece. On the bottom are two slots. Flip over the piece and locate the tabs. Grab the sides of the tabs and fold them into the center.

2014-02-12-Step10Roll the rectangle piece into a tube. To secure the tube, slide the folded tabs into the slots.

2014-02-12-Step11Reach inside the tube and unfold the tabs to “lock” in place.

2014-02-12-Step12You can reinforce the tube with a bit of tape!

2014-02-12-Step13Now it’s time to attach the handle. That’s what the long wavy piece is for! Locate the two slots along the top edge of the tube and slide the ends of the handle through.

2014-02-12-Step14

This will create a little basket-like project. Lay your glitter-stamped square piece face down so that the unpainted side is facing up. Align the top edge of the basket tube with the top edge of the square piece.

2014-02-12-Step15Wrap the glitter-stamped piece all around the tube and secure the edges together with tape.

2014-02-12-Step16Now, flip the lantern over. To create the bowl effect, you need to match the bottom edge of the square piece with the bottom edge of the inner tube. This will cause the strips to fan out.

2014-02-12-Step17Tape the bottom edges together.

2014-02-12-Step18If needed, separate and fan out the individual strips.

2014-02-12-Step19A beautiful, glittery take-home gift or, use string to hang the lanterns together from the classroom ceiling.

Line-18

Thanks for stopping by to view this post! If you would like to share some of your or your students’ projects, send photos of your work to subscriber@roylco.ca! Thanks for visiting and check back soon!

A Pot Of Gold for St. Patrick’s Day

Are you looking for craft ideas for St. Patrick’s Day? Create some decorations to make the house and classroom more festive. Lets make a spiral rainbow and pot of gold.

Age: 4+

Duration: 5 minutes

Learning Outcomes: Exercise fine motor skills. holiday activities. Makes a perfect take-home craft.

You’ll Need:

Choose your favorite pattern from Roylco’s R15295 Rainbow Paper Pack.

Draw a spiral at the back of the paper.

You can also glue two pieces of rainbow paper together to create a double-sided sprital.


Use scissors to cut from the end of the outline toward the center to make a spiral.


Take two pieces of metallic paper from Roylco’s R15409 Economy Metallic Paper Pack.

I choose dark green paper to make the pot, and the gold colored paper for the golden coins. Draw the shape of a pot at the back of the green paper, and cut it out. Make the coins by cutting out some circle shapes from the gold paper. Then glue the golden coins on to the green pot.

After you finish making a pot of gold, you can glue it to the end of the rainbow.  Once complete, hang from ceilings, on bulletin boards or anywhere that could use some extra color.


You are the pot of gold at the end of my rainbow!

Bundle Savings

Get all the Roylco items used
in this project and save 15%!

$19.19 USD
bundled price
Add Bundle
to Cart

Skyscraper Building Cards

skyscraper building cards

Build ’em up and knock ’em down! Skyscraper Building Cards are a perfect addition to your building play center for kids who love to play architect and Godzilla all in one!

IMG_8370

We decided to test how our R60450 Skyscraper Building Cards could be used in a variety of different projects. One of these projects was designed to introduce students to city planning. This project enabled students to work together as a team to create little cities with the basic structural design of the Skyscraper Building Cards. It was up to students to plan where all the buildings went, how high they were built and what types of buildings they were making.

IMG_1813

We went to the Design Exchange Museum in Toronto for their March Break camp and set out the materials for the campers. The Skyscraper Building Cards were fairly easy to pick up: the blue cards are made to stand upright while the red scaffolding cards were placed flat on top of the blue cards.

IMG_8072

Once campers got the basic idea how to build with the cards, they decided to immediately start building a city. They made many little structures to fill up a large amount of space.

IMG_8078

We loved the way the campers decided to criss-cross the scaffolding cards. This added a bit of interest to their building designs.

IMG_8052

In the same group, one of the campers decided to build upwards instead of outwards. She stacked multiple little buildings together to make a base, then repeated the same design on the next level. This continued until she reached a reasonable height, which prompted the other campers to claim that the surrounding buildings were actually little “houses” and the big building represented the city center.

IMG_2459

Other campers got right into the fun. They constructed buildings with floors for people to work in. The people toys are our R75304 Super Topplers!

IMG_7993

The designs began to get more and more complex…

IMG_1964

This design, for instance, included a 3-level parking garage which was attached to the building by ramps and walkways.

IMG_2445

Finally, we took our structures to the next level by introducing our newest R59630 Sensory Tray! The Sensory Tray is a sand and water table all-in-one, featuring a vibrating mechanism to engage students’ senses even further. We placed a bit of sand at the bottom of the tray to give the structures some stability.

IMG_8386

But once the unit was turned on, it toppled the building right over! It was a great challenge and the campers were eager to rebuild their structures with more stability.

IMG_8363

We had great fun testing out new building designs and challenging ourselves with new ideas and materials!

Line-20

Like us on FacebookShare this post with your friends, or Subscribe to this blog today to receive original craft project updates every Monday, Wednesday and Thursday!

Welcome to the Light Cube!

2014-10-09-FeatureImage

We at Roylco are excited to launch our new series of posts about our brilliant Educational Light Cube! Check us out every Thursday for a brand new look at our sensory-engaging light box… and all the amazing things you can do with it. Let’s get introduced!

IMG_0123The R59601 Educational Light Cube is a sensory base that can be used for a variety of activities! Place different materials onto the Light Cube and turn the unit on. You will notice a bright, beautiful glow emitting from the Light Cube and illuminating the objects on the cube. This is a great way to engage children who would not normally respond to these materials in normal light conditions.

IMG_0247The cube has a water-resistant surface that can easily be cleaned with warm water and soap. This makes it a great base for water-based sensory activities and painting activities.

IMG_0385The Light Cube is portable, durable and a great addition to your classroom! Use it as furniture or to illuminate a low-light area, such as a reading fort.

IMG_0409Cycle through multiple light colors using the accompanying remote. There are 16 colors in total. You can make the colors strobe, flash, fade and smoothly transition between each one.

IMG_0463You can use the Light Cube to engage students in virtually any lesson plan using simple materials already in your classroom. Set up environments like this one, with animal figurines and gravel! Kids will love playing with the different sets.

IMG_0595Use the Light Cube to arrange math manipulatives on the surface. Students focus best when their attention is directed on one thing at a time, and the Light Cube does just that with its soft glow.

IMG_0632It engages students to experiment with different materials and view the effects of color-changing light!

IMG_0730

Practice writing skills!

IMG_8785Observe new concepts on the Light Cube, such as human or animal anatomy using our range of x-ray products!

IMG_9303Test out new sensory materials such as gel-stickers! These materials feel great on little fingers, and illuminate well on the Light Cube.

IMG_9355Stack ‘em up and knock ‘em down! Try out a range of building materials, such as clear plastic dollar store cups, to build your tallest colorful towers!

IMG_9484Keep your students engaged in light exploration with soft-glow lighting. Make a small fort for reading, playtime, math activities and more to amplify the effect of the Light Cube.

IMG_9508Explore what’s inside unique animal specimens!

IMG_9549Older students can join in the fun, too! Set up the Light Cube in a darkened area, and give your students tracing paper and pencils to work with. While using the Light Cube as a tracing light box, students can easily check their work and develop their own creative ideas.

IMG_9615Match up transparent sheets that are printed with various images. Here, we’ve showcased our shell x-rays.

IMG_9745Students will love watching colors leap right off the Light Cube. They can use the materials to build fantastic structures or simply observe the effects of light on color.

IMG_9813Turn on the strobing lights to get amazing responses like this one!

IMG_9915And this one! The Light Cube does it all… delight, entertain, educate and stimulate with its sleek design, bright, colorful lights and durable learning surface.

IMG_9931We’re sure you will delight in your very own Light Cube as well! Visit our Roylco Store for more details or contact your local toy/educator retail store to get your Light Cube today!

Line-20

Like us on FacebookShare this post with your friends, or Subscribe to this blog today to receive original craft project updates every Monday, Wednesday and Friday!

Craft Spotlight: Fingerpaint Flower

2014-04-14-FeatureImage

Big, bold and bright, Fingerpaint Flowers are the perfect art activity to paint out in the spring air! The best part about fingerpainting outside is that it adds another dimension of sensory development: not only are students using fingerpaints to stimulate finger movement, but the warmth of the sunlight will warm up the paint and the fingerpainting paper!

You don’t have to get the students to paint the entire flower. It can serve as a group activity! For younger students, paint sections of the flower petals. Some students may get a bit overwhelmed by the size of the fingerpainting canvas. Focus each student on painting one small space at a time, like one petal out of the whole flower. This will help students to narrow down their fingerpainting.

R75422

The R75422 Big! Huge! Fingerpaint Flowers can be painted then used as classroom decorations. Make a giant fingerpaint flower garden!

Once the paint on the Fingerpaint Flower is dry, paste other materials such as yarn, scrap paper, sequins, glitter glue and more to decorate! Add fun designs or patterns to the flower petals with markers or crayons.

To view more ideas in the instructional guide, click here!

Line-21

Thanks for viewing this post! Subscribe to this blog today to get updates on new craft products and craft ideas every Monday, Wednesday and Friday! Send us any comments, questions or suggestions through the contact form at the top of the page.

This Little Class of Mine uses our Color Diffusing Paper!

Used to make ocean backgrounds for these adorable squid characters, Color Diffusing Paper was combined with paint and bit of salt to create neat bubbly water effects!

This activity was part of a literacy/art class that studied a fun children’s book, I’m the Best Artist in the Ocean by Kevin Sherry. The squid on the front cover was used as the inspiration for this classroom’s art projects. Students also gained a lesson in biology as they learned a bit about ocean life and habitats of ocean creatures.

Check out some of the amazing art projects at this link!

The post, entitled “Best Artist in the Ocean: Giant Squid Painting” was published on September 27, 2010 at the Little Class of Mine blog. Visit more of this blog here!

Ms. Nellie Mae first showed her students a simple and challenging way to draw squid characters. The students painted their squid characters onto blue-color paper. While they waited for the paint to dry, the students prepared their backgrounds.

The R15212 Color Diffusing Paper was first placed on top of a sheet of white paper. This was a bonus trick that allowed students to make a copy of their artwork! Using liquid watercolors, the students painted their diffusion paper. The students then dropped pinches of salt onto the still-wet paint. This created a bubbly effect on the paint!

Crazy cool!

Thanks to Nellie Mae for sharing this post!

Images and original post © This Little Class of Mine

This post was not sponsored for a review. At LittleFingersBigArt, our mission is to present to our readers and viewers the newest and most creative craft ideas that fans of Roylco have made on their own. Our goal is to allow you and other educators and parents to reuse our products in fun ways so that children always get the best educational experience from them!

We’d love to see more ideas like this one! If you’ve got a brilliant craft idea or have made a version of one of our crafts that you would like to share with us, send an email to subscriber@roylco.ca with photos, descriptions or a link to your work. We will create a feature post and link back to you with full credit. We’d love to hear from you!

Craft Spotlight: Stand Up Letters

DSCF7019Our newest product addition: R49702 Stand Up Letters! Students can color in and decorate the letters, adding their own unique touch with collage materials, stickers, mosaics and more! The Stand Up Letters are perfect for helping students picture exactly how each letter looks like–since they stand out so well!

Stand Up Letters can be used for a variety of literacy projects! Click on the link to visit our full product webpage.

• Younger students can trace the inside of the Stand Up Letters to help build their fine motor skills and get them prepared for learning how to write the letters individually!

• Older students can spell their names with the letters.

• Draw on images that match the letter (i.e. Cat for the letter ‘C’ and so on).

• Use the letters to teach the differences between consonants and vowels!

• Students can also play a spelling game that’s a version of Boggle Letters! Choose 3-5 assorted consonants and vowels and encourage the students to spell out words with the provided letters.

View more ideas here in the PDF guide!

The Stand Up Letters are made from sturdy card to help reinforce the folded letter when it’s placed upright.

R49702

The video below shows how to set up and decorate the Stand Up Letters.

Line-20

Thanks for viewing this post! Subscribe to our blog to get notified about craft updates every Monday, Wednesday and Friday!   

Craft Spotlight: My Garden Stained Glass Frames

2014-03-31-FeatureImageBeautiful stained glass frames can be made by cutting out bits of 15257 Stained Glass Paper to fill in the gaps of the frame design. We got some great shots of the Art Campers hanging up the 52089 My Garden Stained Glass Frames in the garden!

_DSC0312

The My Garden Stained Glass Frames come in 8 designs. Your students can choose between a bee, spiderweb, dragonfly, butterfly and various flower designs! These Stained Glass Frames feature pre-punched holes, so you can hang your students’ finished frames from the ceiling in your classroom.

_DSC0309

First, trace the gaps of the stained glass frames onto a sheet of Stained Glass Paper. Cut a bit of a border around the outline. Spread some glue around the border and press onto the back of the stained glass frame.

_DSC0310


Be sure to change up the colors of the stained glass paper that you use. That way, the design will really stand out!

Line-16

Thanks for viewing this post! Subscribe today for updates every Monday, Wednesday and Friday on new product information, craft projects and guest post! Send us your comments or questions to subscriber@roylco.ca.