Craft Spotlight: Heart Mosaics

2014-01-27-FeatureImage

Available in a multitude of colors, sizes and designs, these Heart Mosaics will give your students’ projects a ‘lovely’ pop of personality! Watch a video at the cut to see the leafy tree art project we made with the Heart Mosaics!

Since Valentine’s Day is just around the corner, we’ve got several projects using the R15367 Heart Mosaics coming right up! Stay tuned for some more great ideas.

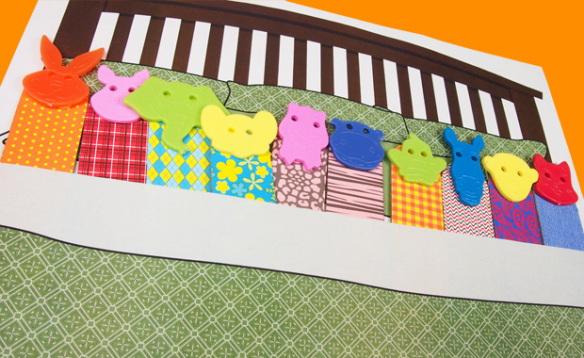
The package of Heart Mosaics contains over 2000 pieces to use. Glue down the Heart Mosaics as you would with regular mosaics. The Heart Mosaics guide is chockful of project ideas that will entertain your students. Assemble various sizes of Heart Mosaics together to make animals such as a rooster, seal, lion, peacock, bumblebee, fish, bird, dolphin, crab and more!

View the PDF guide HERE for more project ideas!

The best way to use the mosaics is to first design a project. Illustrate your basic artwork on a sheet of paper. Use the Heart Mosaics to fill the image in with color. You can also incorporate the shapes of the hearts into your illustration.

R15367

In the video below, you can make your own handprint tree using the Heart Mosaics as leaves!

Line-09

Thanks for viewing this project activity! We would love to hear from you! If you have photos of projects your students have made, send us an email to subscriber@roylco.ca.

Craft Spotlight: Floppy Foam Brushes

Feature-Image-FloppyFoamBrushesTry something new with your painting projects using our versatile and easy-to-use Floppy Foam Brushes! Dip the brushes into paint and dab onto your paint paper for neat effects. Floppy Foam Brushes aren’t only good tools for paint use… See what our Art Campers used them for below in the post!

_DSC0164Our Art Campers filled small plastic containers with white school glue and dipped in their Floppy Foam Brushes. Each Art Camper had a paper heart that was cut from colorful construction paper. _DSC0165The Art Campers then used the glue-dipped Floppy Foam Brushes to sprinkle the glue at random throughout the paper heart. Next, they poured multicolored glitter onto the paper heart and let the glue dry. _DSC0173The next step was to remove the excess glitter, which this Art Camper did by bending the sides of the heart and tilting it over a sheet of paper towel. Using a paper towel helped to eliminate mess by keeping the glitter in one particular spot. We simply funneled the remaining glitter into our glitter containers by curving in the sides of the paper towel and tilting it over the opening to help the glitter slide inside. IMG_2076What beautiful hearts! We left them to sun-dry which really showed off the gleam of the glitter and helped the hearts to dry that much quicker. Line-18Thanks for viewing this post! If you would like to showcase your own painting techniques or have interest in any of the products showcased in this post, please email us at subscriber@roylco.ca for more details! We’d love to hear from you!

Ten in the Bed!

2014-01-22-FeatureImageTurn a classic children’s song into a storytime activity with our Animal Buttons and a few craft materials! Your students will love the interactive quality of the game. Choose from a variety of different templates below to help you make your own Ten in a Bed!

Age: 3-5

Duration: 10 minutes

You’ll Need:

R2040 Animal Face Buttons™

R39101 Fabric Print Sticks

• Hot glue gun

• Bed Templates (see below)

• White printing paper

Line-11The Ten in a Bed song is ideal for learning to count numbers and exploring number management, patterning, and sequencing! Incorporate memorization with singing song lyrics, and develop fine motor skills with physical game interaction.

2014-01-22-Step01

For this activity, you will need to use a hot glue gun. Make sure you always use adult supervision while handling a hot glue gun. It would be ideal to first demonstrate to your students how to put together the craft, then station yourself at the “hot glue gun” area to make sure children don’t hurt themselves while using it.

TEN IN A BED TEMPLATES

Pick any one of the following bed designs to personalize your story-time Ten in a Bed activity! Click on the image or the title below to reach the PDF. Once you have accessed the PDF, simply print out the design to a color printer on regular 8.5 x 11″ printing paper. Use the paper design as a backing for your Ten in a Bed storytime activity.

Template blank

Ten in a Bed BLANK

Template 1

Ten in a Bed Template 1

Template 2

Ten in a Bed Template 2

Template 3Ten in a Bed Template 3

Template 4Ten in a Bed Template 4

Template 5Ten in a Bed Template 5

If you would like for each student to make their own Ten in a Bed activity, print out the blank template (at the top of the list). Students can color in the bed with crayons or markers, or decorate with stickers to personalize their craft.

2014-01-22-Step02

Cut the printed sheet out along the straight line in the center of the image. DO NOT CUT the bed into two pieces. The bed should separate only in the center like a pocket.

2014-01-22-Step03Now to make the ten animals! Select your Animal Face Button and hot glue it to the top of a Fabric Craft Stick.

2014-01-22-Step04Press and hold!

2014-01-22-Step05Repeat for all ten animals! You can mix and match the patterns on the Fabric Sticks with the color of the Animal Face Buttons.

2014-01-22-Step07Slide your ten animals through the pocket opening of the printed bed image.

Now to play the Ten in the Bed game! Below are some example lyrics that you can use while playing this great primary storytime activity:

There were [number] in a bed,

And the little one said,

“Roll over! Roll over!”

So they all rolled over

And one fell out!

Line-11

Thanks for hanging out with us today! We’d love to get some of your input on our projects. Send ideas or photos about your own projects to us at subscriber@roylco.ca for a chance to be featured in one of our upcoming posts! We’d love to hear from you!

Craft Spotlight: Animal Silhouettes

Feature-Image-AnimalSilhouettesMake your own garden safari with our Animal Silhouettes! Animal Silhouettes feature stylish animal designs, and special glossy and matte sides to allow students to experiment with their coloring using different materials. Check out more of our Art Camp photos below!

Students can learn how to draw various graphical patterns and designs on the intriguing black card and use multiple media such as gel pens, chalk, glitter glue, pastels and more!

View our pdf HERE for more ideas on Animal Silhouettes!

DSCF7201Each Animal Silhouette comes with a backing that you can pop off. Separate the interior shape from the outer shape.

DSCF7202Animal Silhouettes come in a range of designs–24 animals in a neat little pack! Choose between a monkey (pictured above), camel, kangaroo, lion, moose, penguin, horse, ostrich, bear, pig, alligator, hippo, rhinoceros, elephant, kudu, tiger, bull, wolf, snake, duck, rabbit, turtle, squirrel and hedgehog. With so many to choose from, your students will never get bored of their art work!

DSCF7206We set out pastels and chalk for the Art Campers to use. This young artist decided to experiment with different colors of chalk in vertical lines. She followed the vertical design of the kangaroo’s body to make her patterns.

IMG_2263Another camper decided to use the glitter glue in multiple colors. He mixed blue and green to color in the turtle’s shell and used red to define the turtle’s feet and tail. The random pattern of lines generated by the glitter glue helped to give the turtle an abstract, “drip-like” appearance.

IMG_2269Here’s a brief view of some of our art projects combined: The Floppy Foam Brushes were used to make the glitter hearts (stay tuned for an upcoming post on this project this Friday!), while our Animal Silhouettes were placed alongside in a sunny spot to dry.

IMG_2278Thanks for viewing our projects!

Line-21If you would like to share with us some of your project ideas, please email us at subscriber@roylco.ca! We’d love to feature your students’ projects in an upcoming post!

Craft Spotlight: Remembrance Day Poppies

Image of Roylco Poppy Wreath

Feature-Image-remempoppywreath

As November 11 is fast-approaching, we recognize the importance of remembering and the bravery of veteran heroes around the world on Remembrance Day. Show your classroom’s appreciation with a beautiful classroom wreath!

The R42005 Remembrance Day Wreath provides you with enough materials for every student to make at least 1 poppy. The kit features pre-cut red tissue paper poppies, and black centers that can be overlain to make the poppies. Tip: Use red marker to draw radiating lines out from the center of the tissue paper poppies. This will give the poppy a realistic appearance when assembled.

To further add dimension, soak the poppies with a light mist of water and drape over an upside-down cup to dry. The dried poppies will appear crinkled like real petals and take the shape of a flower.

Secure the tissue papers with the provided green chenille stem and attach die-cut green paper poppy leaves to complete the look. 

Combine all the poppies together to make this wreath a decorative tribute to those who have sacrificed so much. Talk about the deep history of Remembrance Day and research the significance of the poppy. You can read John McCrae’s famous poem, “In Flanders Fields” and encourage students to write their own poems on the significance of Remembrance Day. 

Watch the instructional video below to show you how to put together the wreath!

To construct the wreath, fold a card sheet in half and cut out a large half circle above the fold line. Cut out a smaller half circle from the fold line to make the center. Unfold the card sheet to reveal a circle with the center cut out.

Paste all the poppies around the wreath. You can make one large wreath or several smaller wreaths to decorate the classroom.

Line-20

Show us your Remembrance Day spirit by sending us photos of your class wreaths to subscriber@roylco.ca! We will feature the photos in one of our upcoming posts!