Posts Tagged ‘Language Arts’
Pop-Up Valentines Day Cards
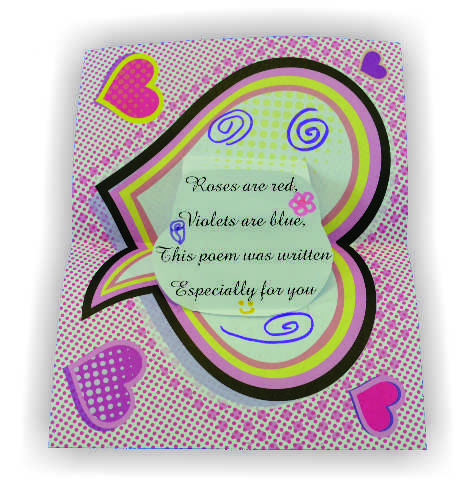
These hand-made cards make your feelings POP on Valentine’s day! Age: 5+ Duration: 15 minutes Learning Outcomes: Exercise fine motor skills. Encourage creativity. Integrate art, literacy, and holiday activities. Makes a perfect take-home craft. You’ll Need: R15412 Pop Culture Paper A short poem (typed or printed on white printer paper) Washable Markers Scissors Glue Stick Type a…
Read MoreElementary Animals: Fold A Mouse!
Welcome to our fifth and final origami animal project: the mouse!This project is definitely best-suited to third graders because the folds are a little more intricate than our previous projects. Age: 7+ Duration: 10 minutes Learning Outcomes: Practice reading and understanding step-by-step directions independently. Exercise fine motor skills. Develop patience. You’ll Need: R15219 Elementary Origami Animals Glue Stick…
Read MoreElementary Origami Animals for 2nd Grade
Welcome to our third set of Origami Animals! Today we will be focusing on two projects perfect for second graders: the Penguin and the Swan. Age: 5+ Duration: 5-8 minutes Learning Outcomes: Exercise fine motor skills. Practice following directions independently. You’ll Need: R15219 Elementary Origami Animals Washable Markers Glue Stick Googly Eyes With second graders, this activity…
Read MoreElementary Animals: Fold a Pig!
Welcome to our fourth origami animal project! Today we’ll be focusing on a project ideal for third graders: folding a pig! Age: 7+ Duration: 10 Minutes Learning Outcomes: Practice following step-by-step directions while exercising fine motor and spatial skills. You’ll Need: R15219 Elementary Origami Animals Pig Folding Instructions (POST INSTRUCTIONS) Glue Stick Googly Eyes If you structure…
Read MoreElementary Origami Animals for 1st Grade
Welcome to the second installment of our elementary origami series! Today, we’ll be focusing on two 1st grade projects: The fish and the fox! Age: 4+ Duration: 5 minutes Learning Outcomes: Practice following step-by-step directions. Exercise fine motor skills. You’ll Need: R15219 Elementary Origami Animals Washable Markers Googly Eyes Glue Stick We’ll start with the fish today. Under…
Read MoreElementary Origami Animals for Kindergarten

Origami is a fantastic way to introduce young learners to fine motor skills, spatial awareness, and creativity—all while having fun! In this post, we’ll walk you through two simple origami activities designed specifically for kindergarteners. These beginner-friendly projects require just a piece of paper and a little imagination, making them perfect for classroom or at-home…
Read MoreThrowback Thursday: Crafts for the Holiday Season
Celebrating the season doesn’t mean just focusing on Christmas. You can create inclusive crafts that all of your students will love to make. Here are some suggestions for fun art projects that are open ended enough to relate to Christmas, Diwali, Kwanzaa, New Years or just the first snowfall! Practice patterning and sequencing while creating…
Read MoreMath Mystery Mini Booklet
Can YOU solve this math mystery? Today we are demonstrating a fun activity that uses our technique for folded mini booklets, and will help get kids excited about math! Challenge each student to write their own math mystery, then mix them up and challenge their peers to solve the mysteries. Age: 5+ Duration: 15 minutes Learning Outcomes: Explore…
Read MoreMiniature Folded Booklet
This simple craft base is perfect for all kinds of classroom projects! Are students getting bored with writing? Has math lost it’s luster? Everything is more special when it is published! Reinvigorate students by teaching them how to create this little booklet and writing their own stories, favorite math facts, “All About Me” arts and…
Read MoreLight Learning: Uppercase Letters
Make literacy visual and tactile with these colorful, squishy letters! They are perfect for light table play! Appeal to the senses while learning the alphabet and spelling simple words! For students with fidgety fingers, these squishy letters make learning language tactile. The small disc inside each letter allows students to develop fine motor skills. Children…
Read More