Holiday Stringing Stars

finished craft.jpg

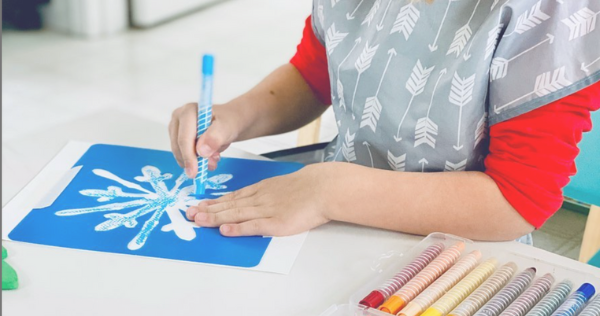
Create beautiful holiday ornaments with stringing stars and glitter chenille stems!

Age: 4+

Duration: 5-10 minutes (plus drying time)

Learning Outcomes: Practice pattern following. Exercise fine motor skills. Create a beautiful, take-home holiday craft.

You’ll Need:

Line-10

To begin this craft, each child will need a stringing star. We used yellow liquid watercolor in a Junior Paint Spritzer to color one side of the star. This step can be done by a teacher or parent beforehand, but if students are going to perform this step, we suggest covering a big section of floor in newspaper and laying the stars on the newspaper to spritz them. This can be fun for students, but be careful, it can get a little messy!

spritzing star.jpg

Once the stars have dried, it’s time to string them! For this craft, students will want to use two glittery chenille stems. Overlap the ends slightly and twist to secure them into one long strand before you start stringing.

pipe cleaner star.jpg

There are many different patterns students can use to string their stars with. Here are some of our favorites:

  • A,3,B,4,C,5,D,6,E,7,F,8,G,1,H,2
  • 1,3,4,6,7,1,2,4,5,7,8,2,3,5,6,8,H,A,B,C,D,E,F,G,H
  • A,D,H,E,B,G,C,F,B,E,A,F,C,H,D,G
  • A,E,H,D,G,C,F,B
  • 1,5,2,6,3,7,4,8
  • 1,2,3,4,5,6,7,8,4,8,3,7,2,6,1,5
  • A,6,F,3,B,7,G,4,C,8,H,5,D,1,E,2

Students can also experiment with their own patterns.

Once the whole class has finished their stars, you can either send the stars home as holiday gifts and ornaments, or you can hang the stars from your classroom ceiling to create an indoor star field!

We created a video to demonstrate the basic process for using stringing stars!

Bundle Savings

Get all the Roylco items used
in this project and save 15%!

$15.28 USD
bundled price
Add Bundle
to Cart

Line-19

Like us on FacebookShare this post with your friends, or Subscribe to this blog today to receive original craft project updates every week!

Throwback Thursday: Crafts for the Holiday Season

Feature-Image-2012XMASCelebrating the season doesn’t mean just focusing on Christmas. You can create inclusive crafts that all of your students will love to make. Here are some suggestions for fun art projects that are open ended enough to relate to Christmas, Diwali, Kwanzaa, New Years or just the first snowfall!

Practice patterning and sequencing while creating beautiful star ornaments! Roylco’s R16024 Stringing stars are a perfect craft base for holiday ornaments that students can give as gifts, hang in their homes, or use to decorate their classrooms! Check out the video we made to start creating strung stars in your classroom:


Integrate history, math and art as you put a holiday spin on Roylco’s R15665 Quilt Blocks! Each student can design their own quilt block, and add an image of a symbol of their favorite holiday tradition cut out of construction paper! Put all the blocks together to create a classroom quit that celebrates everyone’s holiday traditions!

15665 Quilt Square Mosaics_Pile.jpg

Decorate with color this season! Fold up beautiful ornaments with our special designs–use paint, crayons or markers to color in the shapes. Each of the R51081 3D Ornaments are die-cut into 3 folding designs. This means that when folded, the card ornament transforms into a beautiful arrangement that can be hung from the ceiling or as a part of a giant seasonal mobile. 51081-3D-Ornaments-art_4

snowflakes color diffusingIntegrate the science of weather while exploring the mathematical concept of symmetry. Start with Roylco’s R2437 Colour Diffusing Snowflake Kit. The kit comes with a beautifully illustrated poster of inspiring snowflakes along wtih a guide detailing the kinds of snowflakes that are formed at different temperatures. The guide provides easy-to-understand information about snowflake formation. Once your students know about snowflakes they can make their own! Start with a pre-cut sheet of colour diffusing paper. The clever design makes it easy to fold and cut wonderful snowflakes. Colour them in with watercolour paint or markers!

Untitled-2


Study the design of snowflakes in more detail with Roylco’s R58622 Super Snowflake Stencils. The twelve beautiful designs are perfect for making wrapping paper, window art and splatter painting.

snowflake stencilssnowflakestencils

For an outstanding window decoration, use Roylco’s R52085 Snowflake Stained Glass Frames. The metallic silver snowflakes are cut from high quality foil card. Flip them over and glue on tissue paper or Roylco’s R15257 Stained Glass Paper. Light will shine through the snowflakes and cast off wonderful colours!

snowflake stained glass snowflake glass frames

If stained glass art interests you and your students, explore the season with black construction paper. Children can start with a sheet and fold it in half and cut out shapes along the fold line. Alternatively, kids can poke their scissors into the paper and cut out shapes. For a Christmas theme, try creating a Little Town of Bethlehem townscape or make a beautiful star shining in the night sky! Flip the scene over and fill the gaps with coloured tissue paper or Roylco’s R15257 Stained Glass Paper.

stained glass winter stained glass winter stained glass winter

Explore holiday traditions with dioramas! Children can create dioramas on any subject. If they are interested in Christmas, they can create traditional or contemporary scenes. They can explore Christmas traditions in other cultures. Alternatively, they can make a diorama focusing on their own holiday traditions whether that’s taking a ski holiday, celebrating Kwanzaa, Hanukah or Ramadan. The scene can be anything the child is interested in. Provide some direction by putting out a mix of decorative elements such as craft buttons, coloured noodles, pompoms, fabric scraps, craft paper and modelling clay. Don’t forget to include magazines and catalogues along with scissors and glue. Children can flip through the pages and cut out pictures and glue them into their scenes. To make it easier to create wonderful dioramas, start with Roylco’s inexpensive R52094 Set the Scene Diorama Boxes.

diorama

Incorporate literacy into your festive activities. Create family heirlooms by writing the story of Christmas or any religious holiday onto a sacred scroll. Alternatively, children can make up and write down their own creative stories. These stories can make marvellous gifts. The author of ‘Twas the Night Before Christmas, Clement Clarke Moore, originally wrote his poem as a Christmas gift for his family. It’s become a tradition in many Christian families to reread the poem on Christmas Eve. Start with a sheet of Roylco’s R15406 Rolly Scrolly Paper and let children compose their own stories or practice their penmanship skills by rewriting a poem or the Biblical Story of Christmas. Roll up the scroll and send it home with the students.diorama

Decorate your classroom with a friendship paper chain! Traditionally paper chains are used to decorate homes and Christmas trees. Use them to celebrate your students. decorative paper chainsStart with good quality craft paper. Roylco’s R15203 Decorative Hues Paper is perfect. The sheets come in a huge range of colours. Cut off strips along the bottom of the paper. The paper is the perfect width (14 cm). Cut off strips that are 2-3 cm wide. Each child writes in his or her name on the paper strip. One student starts by looping their paper link together and taping it closed. He or she then hands the link over to the next child who threads his or her strip through the loop and tapes it closed. Go all the way around the room once or twice to create wonderfully long chains. Use them to decorate your classroom.


End your seasonal celebrations with Thank You Notes! Integrate writing skills with etiquette and art. Start out with a #10 envelope and Roylco’s R52056 Puzzle Me puzzles. Children write messages on the body of the puzzles and adds decorative details. They then break up the pieces and put them in an envelope to send off to a special someone!

puzzle me

It’s important to acknowledge and celebrate the season in the classroom, however, your celebrations don’t need to be limited to Christmas. Ask your students how they celebrate the season and explore everyone’s uniqueness through pictures, art and stories.

Line-20

Like us on FacebookShare this post with your friends, or Subscribe to this blog today to receive original craft project updates every week!

Christmas Tree Flourish Ornaments

Feature-Image-CurlDecorationsAdd a fancy touch to your Christmas tree or include it in your holiday classroom decorations. The glitter can be a bit messy to work with, but in this craft, your students won’t have to get their hands in it! Super simple and stunning–that’s what we like!

Age: 5+

Duration: 15-20 minutes

You’ll Need:

R15305 Renaissance Era Paper

• Glitter

• Scissors

• Glue

• Paper plates

• Ruler

Line-07

You can use any one of our decorative papers to customize your own flourish ornament. When you’re done making the ornaments, send us a picture of how they look like on your Christmas tree!

IMG_7925Paper plates will come in handy when adding glitter to your flourish ornament!

CurlDecoFoldCut-AnimationFirst, fold your paper lengthwise in half, then fold once again. Unfold your paper, to reveal three fold lines in total. Cut along the fold lines to separate the paper into four equal strips.

IMG_7933To make the curls on your flourish ornament, fold one strip of paper in half. Press the edge of a ruler to the underside (unprinted part) of one half of the paper strip. Stabilize the top of the paper with your thumb and pull the ruler with your thumb over the remaining length of the paper strip. This will curl the paper inwards.

Repeat for the opposite side of the paper strip.

IMG_7934Do the same for the remainder of the paper strips.

CurlDecoGluing-AnimationNext, glue the edges of your paper curls together. Join the edges together and fan the curls outwards from the center.

CurlDecoGlitter-AnimationFill the bottom of one paper plate with glue. Fill the bottom of a second paper plate with glitter. Dip one side of the flourish ornament in the glue. Lift, then dip the same side down into the glitter. Remove and set aside to dry.

IMG_7948Thread a length of string through the top of the flourish ornament and tie a knot at the opposite end. Now it’s ready to hang!

Line-07

Thanks for checking out our Christmas countdown posts for this week! Stay tuned next week for more crafty holiday projects! Email us your projects to subscriber@roylco.ca. Looking forward to hearing from you!