Hatch a Baby Dinosaur This Spring

Roylco baby dinosaur lesson plan

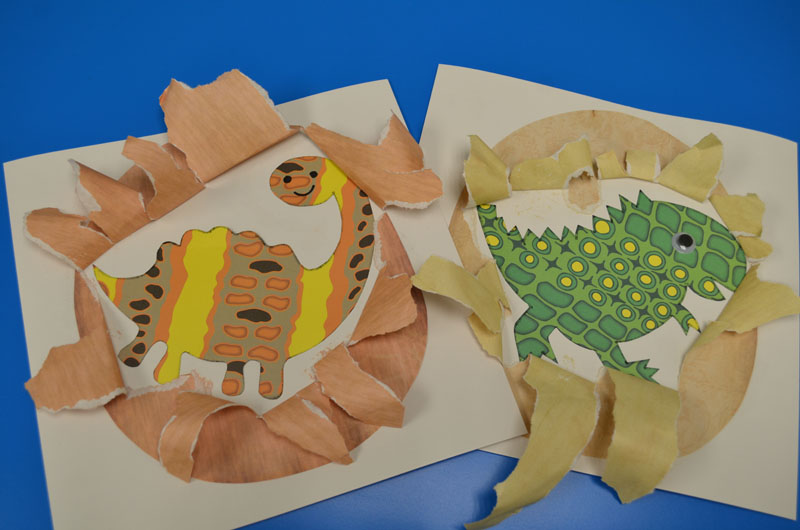
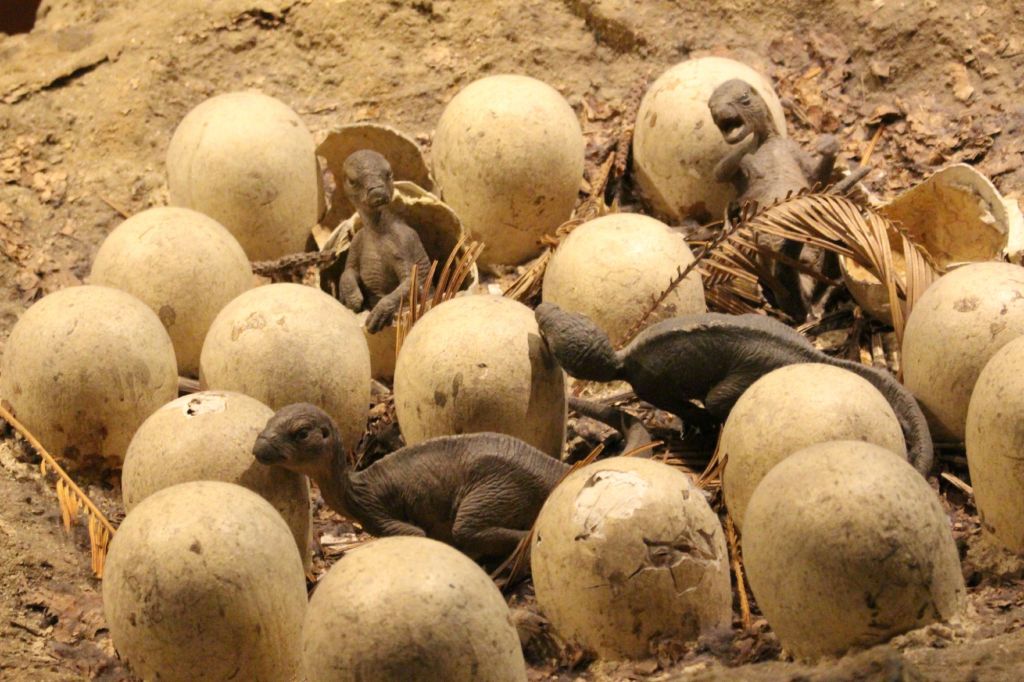
Most young children are fascinated by dinosaurs. They are curious about these mighty creatures that lived millions of years ago. Where did the dinosaur come from? Today we are going to introduce a hatching baby dinosaurs craft activity that children will love. This is a great class activity when you are teaching about dinosaurs.  You can also introduce it at the end of the dinosaur discovery tour at the museum.  Use this activity to talk about how a baby dinosaur grows inside the egg. Children will love to help the baby dinosaur hatch from the egg.

Age: 5+

Duration: 10 – 15 minutes

Learning Outcomes:  Learning evolutionary concepts. Practice drawing skills. Exercise Fine motor skills. Growing children’s interest in science.

You’ll Need:

Let the children choose one piece of paper with their favorite colors and patterns (R15311 Dinosaur Print Papers).

Encourage children to use a pencil to draw the baby dinosaurs at the back of the dinosaur print paper. After they draw the baby dinosaur, they can use the black marker to trace it.

Then cut out the baby dinosaur.

Glue the dinosaur on the white craft paper. You can glue the eye or draw the eye on the dinosaur.

Choose a piece of antique paper ( R15286 Antique Paperthat you like and lay it on top of the baby dinosaur. Use a pencil to draw an egg outline and cut it out.

Add glue to the outline of the brown egg and place it on the white craft paper over top of the baby dinosaur. Make a small cut in the middle the egg.

Ask the children to write their names on the white craft paper and exchange their crafts.

Here comes the exciting moment of this activity.

Invite children to help the dinosaur hatch from the egg by tearing open the paper (where you have made the small hole) to reveal the baby dinosaur inside the egg!

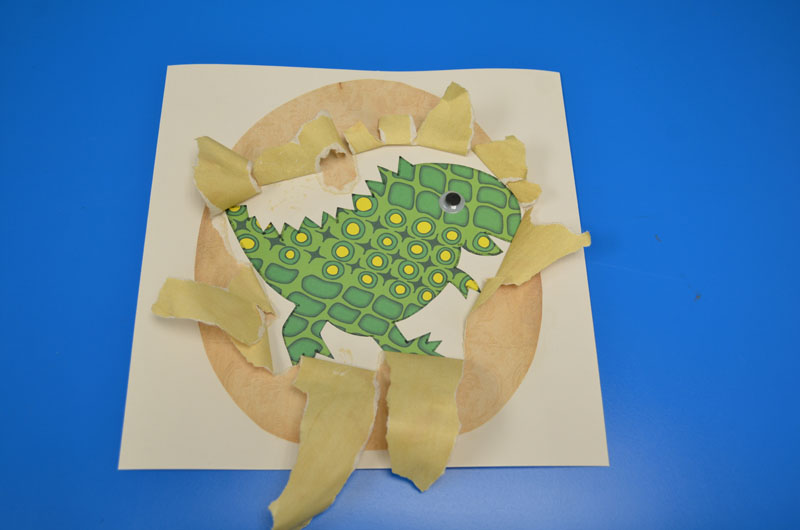
It’s a lot of fun for children to discover the different types of baby dinosaurs.

Please visit https://roylco.com/shop/r15311-dinosaur-print-papers/ for more information.

Bundle Savings

Get all the Roylco items used
in this project and save 15%!

$14.52 USD
bundled price
Add Bundle
to Cart

Sensory Collage Easter Egg Art Project

Are you looking for Easter egg ideas? The sensory collage Easter egg art project is great for your classroom activities. It introduces children to the important senses of the human body with Roylco’s Sensory Collage Kit. It’s also great for working on fine motor skills.

Age: 5+

Duration: 15 minutes

Learning Outcomes: Exercise fine motor skills. Practice sorting materials by color and texture. Learn about collage art. Develop sensory awareness.

You’ll Need: 

Pull out a wavy sheet from the R15413 Sensory Paper package, choose your favorite pastel color, and draw an outline of an egg. Encourage kids to slowly move their palms and fingertips over the paper to feel the small raised patterns. Some kids may want to follow the patterns on the paper to create their designs, while others may want to create their own designs. You can color the wavy lines on the paper and it will divide the egg into different sections. You can make these lines as bold as you like.

Next, plan and place the sensory art materials you like on your egg. The Sensory Collage Kit contains 20 different sensory art packs to use in creating unique illustrations.

Before gluing the sensory art materials onto the artwork, you can play with the colors and the different textures. Think about which sensory art materials would best represent your Easter egg artwork.

Encourage children to talk about the color and the texture they use on the artwork and discuss what they feel. Is the color a warm color or a cool color? Is the material rough, hard, scratchy, smooth or bubbly? After exploring the materials, children can start to glue the sensory materials onto the artwork.

The artwork is almost finished. Have the children cut out the egg and glue it on to the  cardstock. Here is our sensory collage Easter egg artwork. Write your name on the artwork and take it home for your Easter celebration!

For more information please visit https://roylcostore.com/products/sensory-collage-kit 


Bundle Savings

Get all the Roylco items used
in this project and save 15%!

$47.58 USD
bundled price
Add Bundle
to Cart


Color Diffusing Easter Egg Artwork

Make beautiful color diffusing Easter Egg Artwork by using Roylco’s R15213 Color Diffusing Paper™!

Age: 3+

Duration: 5 minutes for painting and assembling, couple of hour for drying.

Learning Objectives: Use fine motor skills to squeeze paint from pipettes onto paper. Learn about the process of diffusion with beautiful Color Diffusing™ technology.

You’ll Need:

• R15213 Color Diffusing Paper™

• R54470 Junior Heart Paint Pipettes

• Watercolor paint

• Paint tray

• A Cup of water

• Cardstock

Use white chalk to draw an outline of an egg on to Roylco’s R15213 Color Diffusing Paper™ . Then create some patterns to design your egg. I also wrote ” Happy Easter” in the middle of the egg. Encourage children to use their imagination to create their own designs.  

Next, place the paper in the paint tray. Wet the R15213 Color Diffusing Paper™, and use Roylco’s R54470 Junior Heart Paint Pipettes to drip liquid watercolor paint over top of the wet surface. Encourage children to experiment with different color palettes. It’s lots of fun for children to play with different colors and watch the colors flow and blend to create spectacular patterns and effects.. This is a great time for children to learn about color mixing, ask the children to discuss the effects of color mixing.

Let the artwork dry in the paint tray for couple of hours.  You can also use a blow dryer to dry the artwork. You can see the result is unexpected and beautiful.

The color diffusing Easter egg artwork is almost ready. Once the paint is dry, you can cut the egg out and glue it on to the cardstock.

For more information please visit https://roylcostore.com/products/color-diffusing-paper-9×12

Bundle Savings

Get all the Roylco items used
in this project and save 15%!

$15.62 USD
bundled price
Add Bundle
to Cart

Make Cross Weaving Mats for this Easter !

Let’s make cross weaving mats for this Easter! With this simple project, the art of weaving colorful strips of paper through a bright Cross Weaving Mat promotes hand-eye coordination!

Age: 4+

Duration: 8-10 minutes

Learning Outcomes: Explore cultural traditions and symbols. Practice folding and taping. Exercise Fine motor skills. Create a take-home craft.

You’ll Need:

Weave a colorful Cross!
• Begin by gently separating the weaving strips from the panel and loosening the die-cut slats of the cross. Allow four strips per cross.

• Start by weaving the vertical area of the cross. Insert a strip through the slats of the
mat and weave in and out. When you have finished the first strip, start the second but
alternate the “in and out” pattern each time. A wavy, checkerboard pattern will appear.

• Trim off the excess weaving strip lengths and use to complete the cross bar of the cross.Carefully glue or tape the ends down on the backside of the weaving mat. Notice the different color combination you have created on the reverse side.

Tape your finished cross to a window for inspirational window art or decorate a Bible
classroom doorway. Use several Cross Weaving Mats to decorate a bulletin board for Easter!

How to Make a Chinese Dragon Puppet

The Chinese New Year begins on February 16th this year, and to celebrate the Chinese New Year, we are going to show you how to make a Chinese Dragon Puppet. In the Chinese culture, the dragon symbolizes power and strength, and chases away evil spirits. It also brings good luck to people.  Make your own Chinese Dragon Puppet and welcome good fortune in the coming year!

Age: 5+

Duration: 15 minutes

Learning Outcomes: Exercise fine motor skills. Integrate art, and holiday activities. Makes a perfect take-home craft.

You’ll Need:

  1.  Open Roylco R15198 Creatures and Animals Value Pack and choose the paper you are going to work on. This pack includes diverse collection of nature themed craft papers.
  2. Draw the dragons head on the white craft cardstock. Note: We divide the dragons head into two parts. The upper and lower part of the head.
  3. Cut the two parts of the dragons head out. Trace them onto the craft paper, and cut them out.
  4. Glue the colorful pattern paper on the white craft paper dragon head. Take out one piece of  red paper from R15219 Elementary Origami Animals . Use the red paper to decorate the tongue of the dragon. Draw the dragon’s eyes and nose on the white craft paper, cut them out and glue them onto dragon’s face.

Let’s start to work on the dragon’s tail and body.

5.Draw the dragon’s tail on the white craft cardstock and the colorful craft paper.

6.Cut them out and glue them together. You will get a colorful dragon tail.

7.Let’s work on the dragon’s body. Take out two pieces of R15312 Sealife Print Papers.  You can also use other paper patterns from the R15198 Creatures and Animals Value Pack . Cut the paper in half, now you have four pieces of paper. Fold the strips of paper into an accordion pattern, and glue them together.

We have two ways to make the dragon puppet. You can glue the head, body and tail together and tape on the stick ( I used a straw from Roylco’s R6085 Straws & Connectors™) at the back of the head and tail. Please see the picture below. The dragon puppet is ready !

If you want to create a live action video with the dragon puppet. We have some more work to do.

8. Let’s take two green strips out of the Roylco R72020 Green Screen Live Action Video Kit. Prepare some thumbtacks and a hole punch.

9. Lay the dragon’s upper head on top of the lower head.  Find a point where both parts of the head join and punch a hole. Flip the dragon’s upper head to the back and tape on a green strip.

10. Take another green strip and punch a hole through it. Put a thumbtack through the hole and connect the upper head, lower head and the green strip together.

11. When you move the strip on the left, the dragon’s mouth is will open and shut.

You can use the same method to add the green strip to the tail. Then we can glue the head, body and tail together. When you move the green strips, the dragon comes alive! The head, the body and the tail are moving.

Voila! The dragon puppet is ready for your digital storytelling!

Please visit https://roylcostore.com/products/green-screen-live-action-video-kit

Bundle Savings

Get all the Roylco items used
in this project and save 15%!

$43.32 USD
bundled price
Add Bundle
to Cart

NAEYC 2015 – A Great Turnout!

naeyc 2015

This year, the creative folks at Roylco returned to the Annual NAEYC Conference, which was being held in sunny Orlando, Florida! Check out some of our favorite moments captured on our cameras!

Every year, the National Association for the Education of Young Children hosts a large space for companies who specialize in art education (like us!) to showcase their materials and talk one-on-one with the teachers. We had a prime location nearby the entrance to the hall, and welcomed hundreds of visitors!

naeyc2015

Our booth featured a fantastic array of our products, with 4 tables zig-zagging across the front. This allowed us to demo some of the products to our teacher friends while encouraging a flow of traffic through our booth.

naeyc 2015

We showed off some of our new products too! Look out for some of the following great products coming out next year at your local educational retailers:

R60705 Neon Straws and Connectors

R54490 Chromatography Kit

R48236 Junior Fun Faces Mix and Match Rubbing Plates

R59270 My Body in Action Cards

R49143 All About Me Book

naeyc 2015

We had great fun talking about our published ebooks as well (soon to be available on our website!), including The Art of LearningThe Art of EngineeringThe Human Body: Inside & OutLight Table Magic and Learn Math… Without Knowing It! Each e-book is a gigantic resource for teachers, featuring over 50 ideas for implementing art-based learning through various subjects. The focus is on FUN learning, meaning that we don’t provide any worksheets or practice lessons that students need to learn. Instead, we focus on building quality experiences within the classroom, using those experiences as a strong foundation, and strengthening those experiences with further tie-ins.

naeyc 2015

We love our teachers and strive to make the difference with all our products! Email us at info [at] roylco [dot] com for more information about our 2016 products and e-books!

Line-05

Like us on FacebookShare this post with your friends, or Subscribe to this blog today to receive original craft project updates every week!