Stained Glass Christmas Ornaments

Stained Glass Christmas Ornaments

31100 Stainglass Ornaments Collection

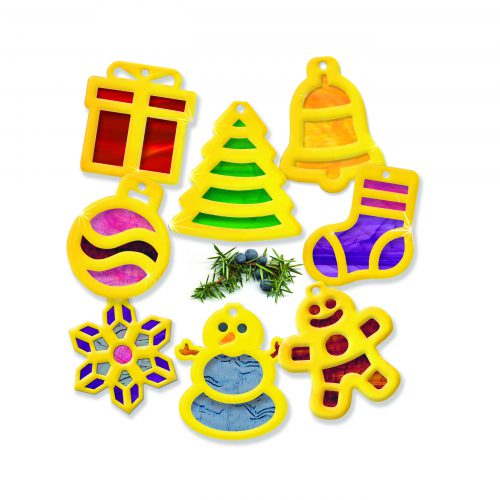
Need a fast and fabulous Christmas craft? These beautiful ornaments are the perfect project to spread holiday cheer!

Age: 4+

Duration: 10 minutes

Learning Outcomes: Explore the symbolism behind common Christmas emblems. Create beautiful take-home art that can be given as a gift. Exercise fine motor skills.

You’ll Need: 

Line-20

These ornaments are quick and simple to put together. Start by simply popping out the die-cut frames. Next, pop out the internal pieces, and set the frames aside.

Lay the internal pop-out on the stained glass paper and use a pencil to draw around the internal pop out. Make sure that you leave at least 1/4″ of space around the internal pop out so you have enough space to tape the stained glass paper into the frame. Cut out your stained glass pieces, and tape them to the inside (the white side) of the frames. Make sure to leave the small round hole at the top open!

Once your stained glass pieces are taped in place, fold the frame over and tape closed.

To finish off your stained glass ornament, cut a 6″ piece of yarn. Thread the yarn through the small round hole at the top of your ornament, and knot the loose ends into a circle. This will allow you to hang your ornament on your Christmas tree!

ornaments on tree.jpg

Have family members who don’t celebrate Christmas? Gift them the snowman or snowflake ornament and suggest they hang it in a window! Sunlight streams through the stained glass paper beautifully, and adds cheer to winter months.

ornaments on window.jpg

Line-21

Like us on FacebookShare this post with your friends, or Subscribe to this blog today to receive original craft project updates every week!

Holiday Stringing Stars

finished craft.jpg

Create beautiful holiday ornaments with stringing stars and glitter chenille stems!

Age: 4+

Duration: 5-10 minutes (plus drying time)

Learning Outcomes: Practice pattern following. Exercise fine motor skills. Create a beautiful, take-home holiday craft.

You’ll Need:

Line-10

To begin this craft, each child will need a stringing star. We used yellow liquid watercolor in a Junior Paint Spritzer to color one side of the star. This step can be done by a teacher or parent beforehand, but if students are going to perform this step, we suggest covering a big section of floor in newspaper and laying the stars on the newspaper to spritz them. This can be fun for students, but be careful, it can get a little messy!

spritzing star.jpg

Once the stars have dried, it’s time to string them! For this craft, students will want to use two glittery chenille stems. Overlap the ends slightly and twist to secure them into one long strand before you start stringing.

pipe cleaner star.jpg

There are many different patterns students can use to string their stars with. Here are some of our favorites:

  • A,3,B,4,C,5,D,6,E,7,F,8,G,1,H,2
  • 1,3,4,6,7,1,2,4,5,7,8,2,3,5,6,8,H,A,B,C,D,E,F,G,H
  • A,D,H,E,B,G,C,F,B,E,A,F,C,H,D,G
  • A,E,H,D,G,C,F,B
  • 1,5,2,6,3,7,4,8
  • 1,2,3,4,5,6,7,8,4,8,3,7,2,6,1,5
  • A,6,F,3,B,7,G,4,C,8,H,5,D,1,E,2

Students can also experiment with their own patterns.

Once the whole class has finished their stars, you can either send the stars home as holiday gifts and ornaments, or you can hang the stars from your classroom ceiling to create an indoor star field!

We created a video to demonstrate the basic process for using stringing stars!

Bundle Savings

Get all the Roylco items used
in this project and save 15%!

$15.28 USD
bundled price
Add Bundle
to Cart

Line-19

Like us on FacebookShare this post with your friends, or Subscribe to this blog today to receive original craft project updates every week!

Project Spotlight: 3D Ornaments

2014-12-15-FeatureImage

Decorate with color this season! Fold up beautiful ornaments with our special designs–use paint, crayons or markers to color in the shapes.

Each of the R51081 3D Ornaments are die-cut into 3 folding designs. This means that when folded, the card ornament transforms into a beautiful arrangement that can be hung from the ceiling or as a part of a giant seasonal mobile.

20141127_112219

This photo was taken in Simply Wonderful Toys in Guelph, Ontario. They decorated the ceiling using our 3D Ornaments! The ornaments were given to children to color and collage while they waited for parents to finish shopping.

51081-3D-Ornaments-art_4

Here’s a look at some of the ways you can decorate the ornaments. Use paint or markers to color in alternating sections of the ornament. Splatter paint blobs across the ornament to give your design a retro tie-dye effect. Experiment with different paint techniques to make your ornament stand out!

51081-3D-Ornaments-girl

All finished decorating! Pop out the ornament along the scored lines and fold each layer of the ornament towards opposite sides. Thread some string through the pre-punched hole at the top of the ornament and hang.

Line-08


Like us on FacebookShare this post with your friends, or Subscribe to this blog today to receive original craft project updates every Monday, Wednesday and Friday!

Little Fingers Big Art won’t be posting from now until the week of January 5th, 2015. Enjoy a safe and prosperous holiday! See you in the NEW YEAR! Check back for more incredible arts and crafts projects in your classroom. All the best, from all your friends at Roylco!

Project Spotlight: Paper Globes

2014-11-17-FeatureImage

Make beautiful paper globes with colorful paper designs, pre-cut and scored for easy assembly! Hang the globes up on a Christmas tree or decorate one of our mobile bases with the globes.

The Paper Globes feature 8 different color schemes. Each of the color schemes includes 1 solid color and 1 patterned circle. The patterns are all coordinated to work with the solid color circles. Mix and match to make your own combinations! See what works for you.

83459-Globe-2

Each circle is pre-cut with slots. Use the slots to easily slide the circles into each other. You can invert the sides to show through the opposite side of the paper circle you use. The best part about the Paper Globes is that they do not require gluing, so you can turn a craft session into a less-mess experience!

83459-Globes

Each pack of Paper Globes will make 16 globes in total. When you have created your globes, punch a hole through the top and tie a length of string or ribbon. With the holiday season approaching, it’s a good idea to consider decorating your tree with easy-to-make ornaments like these!

Alternatively, run a ribbon through the paper globes to make a decorative garland. Hang up the garland on a wall or decorate a ledge in your classroom!

Line-02

Like us on FacebookShare this post with your friends, or Subscribe to this blog today to receive original craft project updates every Monday, Wednesday and Friday!