Let’s Make a Mother’s Day Bouquet!

Roylco Mothers Day Bouquet 

Age: 6+

Duration: 1 hour, plus drying time.

Learning Outcomes:

We’re learning how to complete a project made of several different components, and how each of those unique parts is needed to create the final craft.

Here’s what you need:

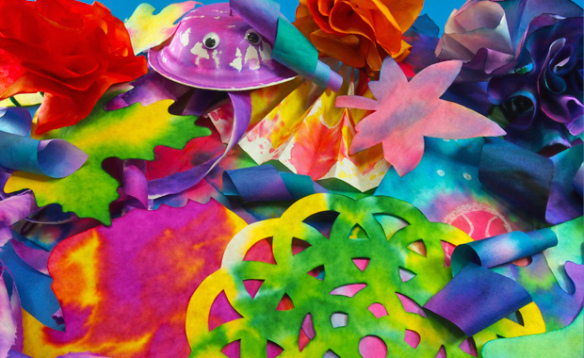
Color Diffusing Paper 9”x12” (R15213)

Fancy Stringing Rings (R2183)

Botanical Cuts (R15333)

Chenille Stems

Straws

Glue

Water

Paints (liquid watercolors & acrylics recommended)

Fine Mist Spray Bottles

Brush (foam or bristle)

Cotton Balls

Small Rock (optional)

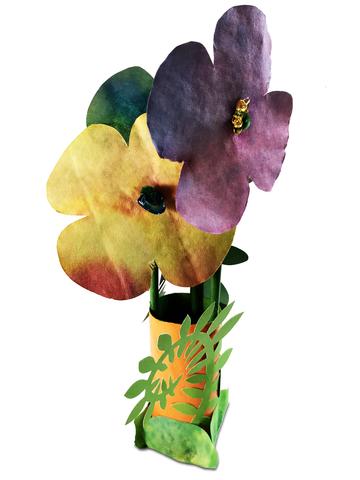
Mother’s Day is just around the corner, so now is a good time to get crafty. We’re going to make a bouquet of flowers to show Mom that we appreciate all that she does for us everyday. A garden bouquet looks best when you mix a few different things together, so we’ll do that one step at a time, following the instructions below.


Roylco Mothers Day Bouquet Craft Parts Display

   Roylco Sketch Art of Flower

Here’s how you do it:

Step 1:

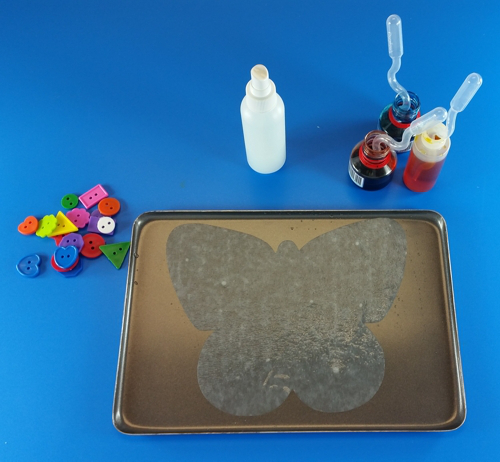
Prepare your work surface. If you don’t want to mess up your table, cover with some newsprint or butcher paper.


Step 2:

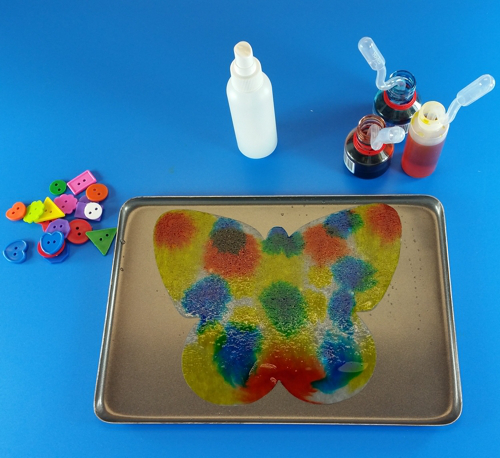
To begin, we need to paint our 9”x12” Color Diffusing Paper (R15213). This is what we’ll use to cut our flower shapes from. You’ll need 2–4 sheets. To get the most beautiful color blends, I recommend using liquid watercolor paint in a mister bottle. Spray the colors you like onto the sheet of diffusion paper. Then use another mister bottle to spray clean water over your colors.


Set aside to dry. Be careful where you put them, they can make a mess. To speed up the drying time, I like to hang them up for good air circulation. They should be dry enough to use in about 30 mins.


Step 3:

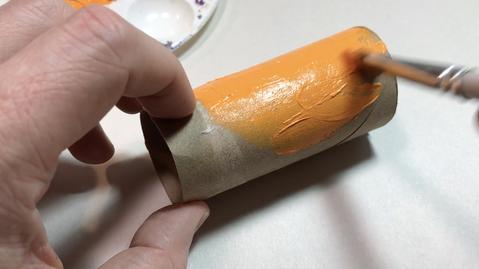
Okay, let’s find a cardboard tube. A toilet paper roll works great. Yeah, that’s right — we use those things! If you don’t have one handy (might want to take care of that), try a paper towel roll. For our bouquet, it will need to be about 3.75” long.


Now, we want to paint the tube. What’s your Mom’s favorite color?


Sounds like a good color to me. Go ahead and paint the tube. Acrylic paint is probably going to work best and dry fastest. Set the tube aside to dry.

 Roylco Mothers Day Bouquet Painting Tube


Consider this:

I thought it would be cool to paint the inside of the tube. I used a different color than the outside. You can use the same color, or not paint the inside. It’s up to you.


You’ll only need to paint one side. The bottom of the tube will be covered.
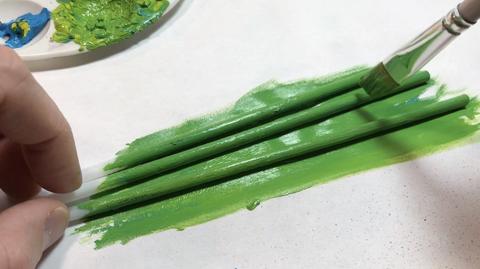
 

Step 4:

We’re going to need 3 straws to make our flower stems. I cut mine to lengths of 6.5”, 7” and 8”.


Paint the straws. The bottoms of our stems will not be visible from inside the tube, so you can hold one side and paint the other.


I painted mine green, but if you like red or purple flower stems, go for it. Set the straws aside to dry.

 Roylco Mother's Day Bouquet Painting Straws

Step 5:

I’m using some really neat Botanical Cuts (R15333) to add some garden flair to my bouquet. There are plenty of patterns to choose from in the pack. I chose 3 of them. If you’d like to add these in, now is a good time to decide on your patterns.


Step 6:

Now, let’s go back to our color diffusing paper. What we want to do is cut 4” round flower shapes from our beautifully painted paper. I like to look for the best patterns within the color and use them for outlining my flower shapes.

We’ll need to cut 4 shapes.

I’ve included a PDF template in case you would like to use it. Otherwise, create any flower shape you can imagine. Just remember, it will need to be about 4” round to work with all our other bouquet components.

 Mothers Day Bouquet-Flower Petal Template


Step 7:

We’re going to use one of our flower shapes for covering the bottom of the tube. Add some glue to one side in each of the petals. Then, place the tube in the center of the flower shape and fold the petals up. They should attach to the sides of the tube, closing up the bottom. I added 3 cotton balls to the bottom of my tube to keep the straws from poking through the bottom.


Step 8:

Speaking of the straws, let’s go ahead and add those in. Just add some glue to one side and place them in the tube. Press the straw against the tube to help the glue hold. Attach all 3 straws in this way.


Step 9:

Let’s make our 3 flowers next. Using a sharpened pencil, poke a hole through the center of your flower petals. Don’t make the hole too big. The pencil point should be enough.


Next, we need to use our 3 chenille stems. I cut mine to the same length — about 6”. On one side of the chenille stem, starting about an inch from the end, bend a right angle. Then make a “U” shape in the center of that bend (see the image).

Put one of the flower shapes onto a stem, moving it down to the bottom of the “U” shape.


To give my bouquet a jewel-like quality, I added a Fancy Stringing Ring (R2183) in front of the flower. Place it into the “U” shape as well, and then curl the end of the chenille stem around the ring to hold it in place.


Finish all 3 flowers.


Consider this:

These little flowers are so simple and beautiful, they kind of work on their own. If you want to do a quick craft, try just making the flowers, with the beads and the chenille stems. Tie them together with some ribbon, or a Fabric Strip (15655), and you’ll have a simple and sweet bouquet for Mom.


Step 10:

If you decided to go with the botanical cuts, this is where you’ll attach them. Use your creativity here. I chose 3 patterns and attached them with glue to the outside of the tube, from the bottom up. Pay attention to where your flower stems are. I think it’s neat to curl them botanical cuts around the straws a little.


Step 11:

Simply place the chenille flower stems inside each straw. Push them all the way down to the bend.


That’s it. You did it!

Your garden bouquet is ready to make your Mother’s day complete!

Consider this:

If your bouquet is a little wobbly, drop a rock in it. You may even want to fill the tube with colorful beads or small stones.

 Roylco Sketch Art of Kid 1

Celebrate Mardi Gras with Gorgeous Color Diffusing Masks

Mardi Gras is French for “Fat Tuesday”, reflecting the practice of the last night of eating rich, fatty foods before the ritual fasting of the Lenten season. It always falls the day before Ash Wednesday, the first day of Lent.   It is a time of great celebration where people throw parades and parties. Today we are going to teach you how to use Roylco R52081 Maridi Gras Color Diffusing Masks to make gorgeous masks. Let’s get ready for the parades and parties!

Age: 4+

Duration: 12 minutes

Learning Outcomes: Exercise fine motor skills. Integrate art,  and holiday activities. Makes a perfect take-home craft.

You’ll Need:

  1. Use liquid watercolor paint or water-based markers. The colors will mix and flow
    to produce interesting effects.
  2. To paint the paper, roughly cut out the images you will use for your mask. Note: you can mix and match components.
  3. It is important to plan your mask because there may be more than one mask image per sheet of color diffusing paper.
  4. Lay the pieces onto a paint tray or several sheets of newspaper to protect your work surface.
  5. Drip some liquid watercolor paint on and watch the colors flow. Tip: because the colors will mix, it is a good idea to work with only two or three colors—too many colors will result in brown masks!
  6. If you are using markers, color in the areas using as many different colored markers as you like. Once complete, spritz the sheet with a little water from a spray bottle, The water will help the marker to blend and “bleed” to produce a beautiful effect.
  7. Once completely dry, cut out the painted images. Add extra details with gel pen, markers or glitter glue before gluing onto the masks.

Ideas: To add even more interest to your mask, sprinkle a little salt over the mask before dripping on the paint. The salt will dissolve and add subtle star-burst highlights. You can add details with crayon before painting. The crayon will resist the paint and the detail will appear on the finished artwork.

Please visit https://roylco.com/shop/r52081-mardi-gras-color-diffusing-masks/ for more information.

Flashback Friday: Color Diffusing Crafts!

Feature-Image-colordiffpapercollage

We have had tons of requests for crafts using our lovely Color Diffusing Paper products! Check out an amazing selection of our fabric-like paper in a variety of different projects. The Color Diffusing Paper is perfect for exploring concepts like diffusion and color mixing! We have assembled 7 of our favorite blog posts and linked them here for you!

Color Diffusing Animal Shapes

Color Diffusing Paper Fan with Straws and Connectors

Color Diffusing Paper Jellyfish

Color Diffusing Paper Snowflakes

Color Diffusing 3D Wall Art

Lace Circles Bunting Garland

Wax-Resist Color Diffusing Art

We have also added a whole new craft: Solar Painting!

Solar painting is a wonderful, no-fail activity. All you need is water, color diffusing paper, water color paint and a bright, sunny day. We have tried this activity in both the summer and the winter and they work equally well as long as the winter day is dry.

Age: 4+

Duration: 10 minutes (plus drying time)

Learning Outcomes: Explore scientific concepts including evaporation and osmosis. Introduce students to the scientific process. Create beautiful take-home art.

You’ll Need:

Line-19

Coat a sheet of paper with water and drain off the excess. Place the wet paper into a tray
or on a cookie sheet. Next, drip liquid watercolor paint over top of the wet surface. I like to use primary colors, but experiment with color pallets. Place different objects on top of
the wet paint. Beads, buttons, small shells, acorns, or anything small and non-porous work well. Set the tray complete with the wet, painted sheet of paper with objects on top outside in the direct sunlight to dry. Note: To avoid spills, do the whole project outside.

The results are unexpected and beautiful and it’s a great way to celebrate a sunny day. There are three other important aspects to Sun Painting: First, it’s relatively cheap; you can create variations on this theme and really stretch your art budget by changing up the color palette or using different theme objects like our letter beads to make words, or objects from nature. Second, it’s a great way to introduce science to younger children. There are two important scientific processes going on when you create this art: evaporation and osmosis. Third, the students are creating beautiful, colorful art through a thoughtful design process. In other words, it’s a no-fail art activity because it focuses on process rather than the finished result—even though the finished result is spectacular.

Put the sheet into an art tray. Flood the surface with tap water and pour off any excess water.

step 1.jpg

Use paint pipettes like our R54460 Squiggle Pipettes or R54470 Junior Heart Paint Pipettes to sprinkle small amounts of liquid water color paint over the surface of the wet paper. You need to cover the entire surface with the paint and the pipettes do a great job.

step 2.jpg

Next, lay objects on top of the wet paint and put the whole tray outside in the bright sunlight. We like using our R2131 Bright Buttons and both R2184 Manuscript Letter Beads and R2186 Lower Case Letter Beads to add a literacy component to an art activity.
While you are waiting for the paper to dry in the sunlight, ask your students what they think is going to happen. Most kids will say that the paint will dry on the paper, but stay wet under the objects. They may also say that the paint under the objects will look darker than the paint on the rest of the paper. To be honest, this is exactly what we expected would happen the first time we tried this technique!

step 3.jpg

Instead, the paint on the paper dries, but when you remove the plastic objects, you see a
white “shadow” under them instead of a dark paint color. If it is a particularly hot summer day and the paper dries quickly, you’ll even get shadows around the taller objects like the letter beads. It’s almost photographic!

step 4

Here is what’s happening: The science behind this activity is all about the nature of water. Water wants to distribute itself evenly wherever it is. That’s why water flows across a sheet of paper. It doesn’t want to be higher in one area and lower in another. It wants to remain level, so it travels across a surface until it covers it evenly.

When the sun shines on the paper, the water in the paint starts to evaporate everywhere
except under the plastic/non-porous objects. The wetness under the objects wants to “level” out, so it migrates from under the objects and it pulls the pigment with it. Some younger children think this process is magic, but it’s not: It is science!

step 5.jpg

To take this process to the next level, try limiting yourself to one or two colors, and
experimenting with additives and how you set the piece to dry. For example, try sprinkling table salt, sand, glitter, or other tiny particles over the Color Diffusing Paper. See what the result is. Challenge students to tilt the sheet, so it drains as well as evaporates. This is a no-fail activity, so no matter what students try, they will walk away with a unique piece of art. With that safety net and reward system in place, challenge students to be creative about the materials they choose to experiment with. Display the beautiful results of student’s creative experimentation in the classroom!

Line-18

Like us on FacebookShare this post with your friends, or Subscribe to this blog today to receive original craft project updates every week!