Christmas Paper Chains

Feature-Image-ChristmasPaperChainsEveryone can add to this beautiful decorative chain! This post is a part of our special week series of Christmas/Winter crafts that you can use in the classroom. Stay tuned for more posts upcoming this week and the next!


Age: 5+

Duration: 15 minutes

You’ll Need:

15351 Cut & Fold Circles

• Scissors

• Glue

Line-05

This craft is very similar to yesterday’s craft: you’ll need to fold the paper and make several cuts with scissors. The final step requires you to glue all the pieces together to make a decorative paper chain.

IMG_7827
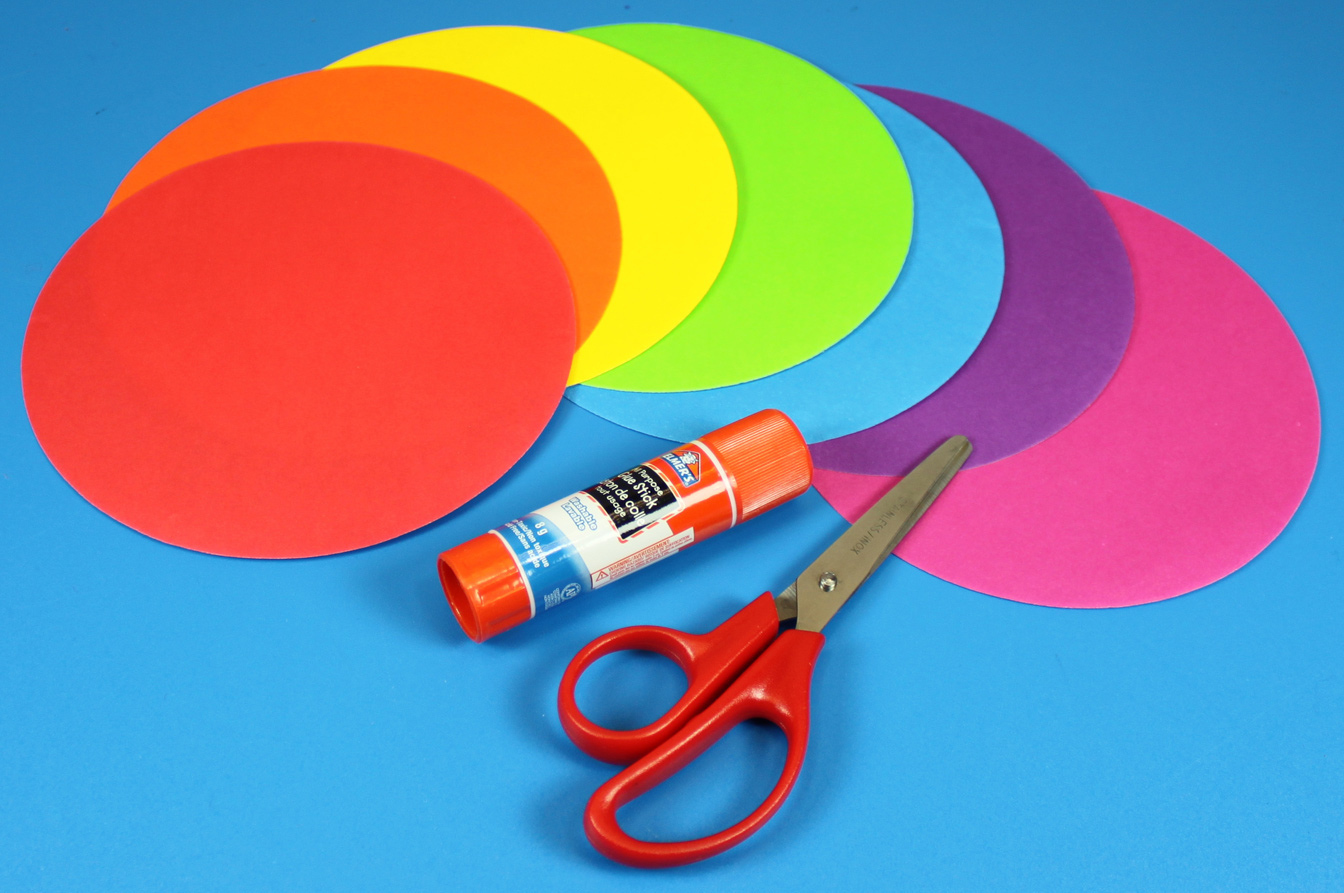
The Cut & Fold Circles pack comes in a variety of colors. Alternate colors or use all the colors of the rainbow!

FoldingCircleAnimationFold a Cut & Fold Circle in half 3 times.

IMG_7834

You should be left with a pie-slice shape. Cut three lines from the fold line. Cut up to just below the edge on the other side of the pie-slice.

IMG_7836Repeat the same from the opposite fold line. Cut these three lines in between the first three lines, so you make a zig-zag lightning shape with the lines. Remember not to cut all the way through the pie-slice!

IMG_7837Unfold the pie-slice back into a circle. This is what your line cuts should look like.

GluingCircleAnimationTo glue the circles together, first lay a circle with the colorful side facing down. Carefully dab the glue onto 4 points of the circle. Next, place a second circle, with the colorful side facing up on top of the first circle. Align the edges together so that the cuts exactly overlap each other. Put a bit of glue in the center of the colored circle and press the next circle (color side facing down) onto the previous circle.

Repeat these steps with all of the remaining circles.

IMG_7851

Wait for the glue to dry!

Feature-Image-ChristmasPaperChains

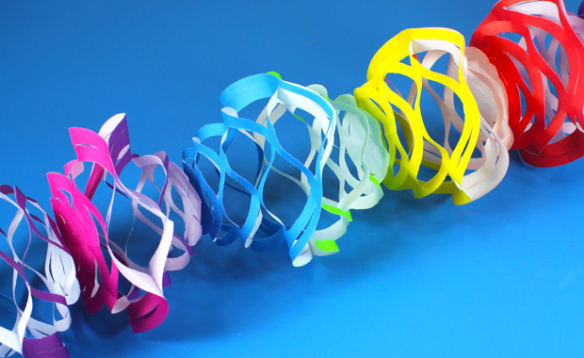
Grab both ends of the paper chain and gently spread apart.

Now you can hang up the paper chain wherever you like! Time to decorate your classroom for the winter holidays.

Line-05

Send us photos of your paper chains to subscriber@roylco.ca! We’d love to see your classroom decorations!

Special Feature this week:

We’ll be updating every day of this week and next week with fantastic holiday crafts you can use in your classroom!

Please note:

LittleFingersBigArt won’t be posting anything between December 18th, 2013 and January 6th, 2014! Have a wonderful winter vacation!

Tot School uses our Rubbing Plates!

FlowerPlateRubbings-5793-1Tot School made an assortment of rubbing plate prints using our R5804 Flowers Rubbing Plates! Check out Sweet Pea’s review on how well the prints turned out!


The post, called “Rubbing Plates” was published on July 23rd 2010 and can be viewed at this link.

Sweet Pea’s technique for using the rubbing plates is a great start for early learners with developing fine motor muscles. Using the non-dominant hand to hold the rubbing plate and paper in place, rub crayon across the surface of the paper with the dominant hand. This helps to reinforce muscle control and encourages patience and timing while making rubbing plate prints.

FlowerPlateRubbings-5798-1

And the flowers turned out lovely! Sweet Pea found that using block crayons helps to create an even image all throughout. If you are using regular crayons, be sure to use the side of the crayon rather than the point. The point will spread too much of the crayon over the paper and will blend the rubbing plate image in with the rest of the color.

Another important tip that Shannon wrote was that the images themselves could be used for botanical lessons: Use the provided identification sheet to connect the images to real existing flowers. Learn about flowers by name and match them to the rubbing plate images!

Thanks to Shannon for this post!

Images and original post © Tot School.

This post was not sponsored for a review. At LittleFingersBigArt, our mission is to present to our readers and viewers the newest and most creative craft ideas that fans of Roylco have made on their own. Our goal is to allow you and other educators and parents to reuse our products in fun ways so that children always get the best educational experience from them!

We’d love to see more ideas like this one! If you’ve got a brilliant craft idea or have made a version of one of our crafts that you would like to share with us, send an email to subscriber@roylco.ca with photos, descriptions or a link to your work. We will create a feature post and link back to you with full credit. We’d love to hear from you!


Color Diffusing Paper Game Pad

Feature-Image-diffusingpapergame

Combine all your favorite classic board games and take them with you wherever you go! Perfect for those long car-rides or for group playtime sessions in the classroom. 

Age: 6+

Duration: 20 minutes

You’ll Need:

• R15212 Color Diffusing Paper 12 x 18″ (30.5 x 46 cm)

• Assorted buttons: R2131 Bright Buttons or R2143 Really Big Buttons

• Paint

• Paint bowl

• Paint tray

• Hole punch

• Colorful ribbon

• Large wooden block (for stamping)

Line-13

This game pad is convenient to carry anywhere! I’ll show you how to attach a ribbon to the game pad so that it’s easy to roll up and secure.

OLYMPUS DIGITAL CAMERA

Lay out the paper on the tray. First, figure out which games you would like to include in the game board. If required, use a pencil to sketch out the game board before stamping out the various game spots.

OLYMPUS DIGITAL CAMERA

The game boards I chose were Tic-Tac-Toe and Checkers, which is pretty simple to stamp out. I used a small clear block to make the perfect-sized spaces for both game boards.

To stamp out the spaces, I used the white of the paper as half of the spaces and simply connected the spaces by the corners. Dip the block into the bowl of paint and stamp the spaces onto the paper.

OLYMPUS DIGITAL CAMERA

Leave the paint to dry. When dry, punch a hole on one end of the game board.

OLYMPUS DIGITAL CAMERA

Cut a length of ribbon and tie one end to the hole punched side.

OLYMPUS DIGITAL CAMERA

Now you can roll up the game pad and store it away for future use or take it with you on a long trip to play with friends!

OLYMPUS DIGITAL CAMERA

Use the buttons as game pieces! Play Tic-Tac-Toe by trying to get three of the same buttons in a row or use your game pieces to capture your opponents’ in Checkers!

Line-13

What kinds of game pads did your students make? Send us photos of some great game boards to subscriber@roylco.ca! We’d love to write a post about your students’ work!

Remembrance Day Wreath

Feature-Image-wreath

Use the poppies from our Remembrance Day Poppy kit to decorate your handmade Remembrance Day wreath! Everyone in your class can contribute to this activity using their hand-prints as leaves for the wreath!

Age: 5+

Duration: 30 minutes

You’ll Need:

• R42005 Remembrance Day Poppies

• Bristol paper

• Fingerpaint paper

• Green fingerpaint

• Glue

• Scissors

• Marker/pencil

Line-10

To begin your Remembrance Day wreath, you’ll need to first make the wreath base. The wreath base can be made by folding a large sheet of card in half. Use white or green Bristol paper to get a stiff backing.

OLYMPUS DIGITAL CAMERA

Cut a large half circle above the fold line. Cut a second smaller half circle in the center of the fold line. Unfold the cutout to reveal the wreath base.

OLYMPUS DIGITAL CAMERA

This next step will be fun for a lot of students. Give each student a sheet of fingerpaint paper and a bowl of green paint. Tip: Provide lots of sanitizing wipes and paper towels to keep workstations and clothes clean! Instruct the students to fingerpaint the entire sheet of paper so that none of the white shows beneath.

OLYMPUS DIGITAL CAMERA

Trace your hand-print onto the painted sheet. Students can trace and cut out several of their hand-prints.

OLYMPUS DIGITAL CAMERA

You will need about 8-10 pairs of hand-prints to fill the wreath.

OLYMPUS DIGITAL CAMERA

Rub a bit of glue onto the lower palm of each hand-print on the unpainted side. Paste each hand onto the wreath radiating outward from the circle. Note: You can add more fingerpainted hand-prints to the wreath to cover the white from the wreath base.

OLYMPUS DIGITAL CAMERA

Next, assemble the poppies! Each Remembrance Day Poppies kit comes with enough die-cut tissue flowers for each student to make 2 poppies. First, spritz the tissue paper poppy with water and drape it over an upside-down cup. This will help the poppy form a flower-like shape. Note: Repeat these steps for two more poppy shapes. Once the poppies are dry, you can layer them to give them a dimensional look.

OLYMPUS DIGITAL CAMERA

Once the poppy is dry, layer the two flower cutouts together and arrange so that the petals extend at various angles all around. Place the die-cut black circle in the center of the flower. Thread the green chenille stem through the hole in the center and twist the end to keep the layers intact.

OLYMPUS DIGITAL CAMERA

Attach the poppies to the fingerpainted hand-print wreath with tape.

OLYMPUS DIGITAL CAMERA

Ready to be displayed in your classroom!

Line-10

Show us your Remembrance Day spirit by sending us photos of your classroom projects to subscriber@roylco.ca! We’d love to hear from you!

Caution! Twins at Play! uses our Color Diffusing Paper Leaves!

IMG_0087

Kristen from Caution! Twins at Play! posted photos of her twins Graham and Parker painting our R2442 Color Diffusing Paper Leaves! They used liquid watercolor to color the leaves and painted onto clear plates to keep the table surface clean.  

This post, called “water color” was published on December 30, 2012. Kristen took many beautiful photos of her sons’ artworks. Check out the blog post for more images!

IMG_0076

Here you can see twins Graham and Parker having a blast as the liquid watercolor seeps throughout the leaf cutouts.

IMG_0091

It’s a good idea to make sure your work surfaces are covered before you start painting the leaves as the paint will inevitably seep through the bottom. Kristen mentioned that she would have liked to use this on her light panels but didn’t have the proper cover to protect it.

Look forward to our handy Light Table kits that we’re producing next year! We feature a variety of materials and resources that can assist with educational light table sessions.  

IMG_0094

Kristen is an advocate for using the light table for many educational subjects and she believes wholly in the value of presenting children with alternative learning ways. Light tables illuminate the objects that are placed on them and present a whole new perspective on objects’ appearances.

Thanks to Kristen for her post!

Images and original post © Caution! Twins at Play!.

This post was not sponsored for a review. At LittleFingersBigArt, our mission is to present to our readers and viewers the newest and most creative craft ideas that fans of Roylco have made on their own. Our goal is to allow you and other educators and parents to reuse our products in fun ways so that children always get the best educational experience from them!

We’d love to see more ideas like this one! If you’ve got a brilliant craft idea or have made a version of one of our crafts that you would like to share with us, send an email to subscriber@roylco.ca with photos, descriptions or a link to your work. We will create a feature post and link back to you with full credit. We’d love to hear from you!

Line-02

Craft Spotlight: Bunting Flags

Feature-Image-buntingflag

Welcome to our first Craft Spotlight post! These posts will be published every Monday to showcase our favorite craft projects developed and manufactured domestically by Roylco! This week’s feature craft is R22046 Bunting Flags! 

Bunting Flags are cut from heavier paper and are great for painting on! Use regular tempera paint for coloring the flags. Welcome back your class with a fun decoration or get the entire class to work on one together!

_DSC0242

We wrote the words “2013 Summer Art Camp” across our Bunting Flags during the Roylco Art Camp, and got some of our young crafters to paint all the letters of the alphabet.

IMG_00000566

Use the flags for making classroom decorations! Write one letter/number per Bunting Flag.

DSC05433

Some of our crafters even drew scenes and combined several colors together. This is a great way to explore new ways of displaying students’ artwork! All of your students’ art can be hung up along a single wall like a bunting flag line!

Line-10

Show us your students’ artwork! Hang up your students’ painted Bunting Flag artwork and send us a photo of what it looks like in your classroom. We will publish a post on your work and show the rest of the arts and crafts education world! Send us an email to subscriber@roylco.ca!

Judy’s Handmade Creations uses our Bright Buttons!

Judy from Judy’s Handmade Creations used our Bright Buttons to decorate lovely handmade cards! R2131 Bright Buttons are perfect for a variety of different projects, including scrapbooking and collage! The post, entitled “Summer Mini Album 2013!!” was posted on June 27, … Continue reading

Patt’sArt uses our Insect Rubbing Plates!

Patt from Patt’sArt uses our R5803 Insect Rubbing Plates to make beautiful textile prints. She rubs special fabric ink to bring the texture onto the textile piece. Check it out! Patt published her process in four posts. In each post, … Continue reading