Stained Glass Christmas Ornaments

Stained Glass Christmas Ornaments

31100 Stainglass Ornaments Collection

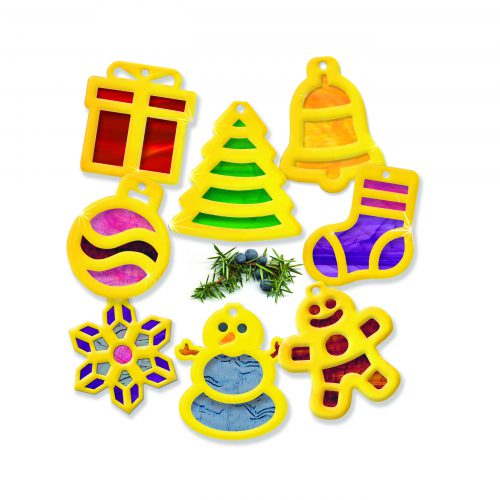
Need a fast and fabulous Christmas craft? These beautiful ornaments are the perfect project to spread holiday cheer!

Age: 4+

Duration: 10 minutes

Learning Outcomes: Explore the symbolism behind common Christmas emblems. Create beautiful take-home art that can be given as a gift. Exercise fine motor skills.

You’ll Need: 

Line-20

These ornaments are quick and simple to put together. Start by simply popping out the die-cut frames. Next, pop out the internal pieces, and set the frames aside.

Lay the internal pop-out on the stained glass paper and use a pencil to draw around the internal pop out. Make sure that you leave at least 1/4″ of space around the internal pop out so you have enough space to tape the stained glass paper into the frame. Cut out your stained glass pieces, and tape them to the inside (the white side) of the frames. Make sure to leave the small round hole at the top open!

Once your stained glass pieces are taped in place, fold the frame over and tape closed.

To finish off your stained glass ornament, cut a 6″ piece of yarn. Thread the yarn through the small round hole at the top of your ornament, and knot the loose ends into a circle. This will allow you to hang your ornament on your Christmas tree!

ornaments on tree.jpg

Have family members who don’t celebrate Christmas? Gift them the snowman or snowflake ornament and suggest they hang it in a window! Sunlight streams through the stained glass paper beautifully, and adds cheer to winter months.

ornaments on window.jpg

Line-21

Like us on FacebookShare this post with your friends, or Subscribe to this blog today to receive original craft project updates every week!

Christmas Paper Chains

Feature-Image-ChristmasPaperChainsEveryone can add to this beautiful decorative chain! This post is a part of our special week series of Christmas/Winter crafts that you can use in the classroom. Stay tuned for more posts upcoming this week and the next!


Age: 5+

Duration: 15 minutes

You’ll Need:

15351 Cut & Fold Circles

• Scissors

• Glue

Line-05

This craft is very similar to yesterday’s craft: you’ll need to fold the paper and make several cuts with scissors. The final step requires you to glue all the pieces together to make a decorative paper chain.

IMG_7827The Cut & Fold Circles pack comes in a variety of colors. Alternate colors or use all the colors of the rainbow!

FoldingCircleAnimationFold a Cut & Fold Circle in half 3 times.

IMG_7834

You should be left with a pie-slice shape. Cut three lines from the fold line. Cut up to just below the edge on the other side of the pie-slice.

IMG_7836Repeat the same from the opposite fold line. Cut these three lines in between the first three lines, so you make a zig-zag lightning shape with the lines. Remember not to cut all the way through the pie-slice!

IMG_7837Unfold the pie-slice back into a circle. This is what your line cuts should look like.

GluingCircleAnimationTo glue the circles together, first lay a circle with the colorful side facing down. Carefully dab the glue onto 4 points of the circle. Next, place a second circle, with the colorful side facing up on top of the first circle. Align the edges together so that the cuts exactly overlap each other. Put a bit of glue in the center of the colored circle and press the next circle (color side facing down) onto the previous circle.

Repeat these steps with all of the remaining circles.

IMG_7851

Wait for the glue to dry!

Feature-Image-ChristmasPaperChains

Grab both ends of the paper chain and gently spread apart.

Now you can hang up the paper chain wherever you like! Time to decorate your classroom for the winter holidays.

Line-05

Send us photos of your paper chains to subscriber@roylco.ca! We’d love to see your classroom decorations!

Special Feature this week:

We’ll be updating every day of this week and next week with fantastic holiday crafts you can use in your classroom!

Please note:

LittleFingersBigArt won’t be posting anything between December 18th, 2013 and January 6th, 2014! Have a wonderful winter vacation!