Thanksgiving Pumpkin Pie Craft

finished craft.jpg

This craft perfectly combines early geometry with Thanksgiving cheer!

In order for creativity to flourish, students need a solid understanding of the fundamentals. What underpins the fundamentals is vocabulary. A student has to be able to describe their world and what they see before they can change it and create new things. This activity is a great way to connect the visual aspect of shapes to the vocabulary that students will use for their entire academic careers. Fold a single circle first into 2D then 3D shapes, while getting as detailed as your students are ready for. In the classroom, it might be useful to copy the circle onto an overhead transparency or a sheet of clear Mylar so you can demonstrate for the whole class as you take them through this lesson.

What’s great about this activity is that is can be used for a wide range of ages and developmental levels. Very young students practice their fine motor skills while they fold, and build their vocabularies by identifying the basic shapes they are making. For older and more experienced students, this activity is a great way to practice geometric
vocabulary while learning technical aspects of shapes like faces, vertices and angles. Even better, at every level this is a no-fail activity, so while students are practicing vocabulary, they are succeeding at the basic folds. The small success bolsters confidence, and motivates students to take risks.

Age: 4+

Duration: 15 minutes

Learning Outcomes: Practice and reinforce geometry and vocabulary. Create a cute Thanksgiving craft. Exercise folding skills and following directions.

You’ll Need:

Line-22

The first step for this adorable holiday craft is to decorate your base. Place a color diffusing circle on an art tray or cookie sheet for each student, and have the pipette liquid watercolors onto the circle. Be sure to cover the entire surface! Students can use a pre-mixed orange, or they can experiment with pipetting yellow and red separately. Leave the circles to dry.


Once the circles are dry, it’s time to fold them up! We have created a special video to demonstrate the process:

Use this opportunity to talk to your students about circles. Circles are a regular shape, with a single face. Challenge students to think of where circles are in the world. They might suggest bicycle or car tires, pizzas or the moon and sun. Older students can talk about the mathematical properties of the circle, like the diameter (the distance between two opposite points), radius (the distance from the center to any single point on the curve) and the circumference (the distance around the outside of the circle). Challenge your students to find the area of their circle, using the formula A = r2. A stands for area. Area is the amount of flat space a shape takes up.

This activity is great for a few different reasons. First, it’s easy to do; as a no-fail activity it’s entertaining to students of all ages and it boosts confidence. Second, it’s an easy-to-scale activity. You can fold a circle with four year olds or fourteen year olds, and the conversations can reinforce basic shape names or basic geometry. Some of the shapes we fold are uncommon, so reinforcing them in this activity is important.

Once students have achieved their 3D Icosahedron, tape the bottom so the shape holds. Now you have the base shape for your slice of pumpkin pie!

step 4

To decorate your slice of pie, start by adding a crust! Cut out a triangle of brown construction paper that is approximately 4 1/2″ high (from center base to point) and 5″ wide at the base. Glue the triangle to the base and one edge of your color diffusing icosahedron. Use scissors with wavy blades to trim the base of the triangle so it looks like the crimped edge of a pie crust!


To top off your slice of pie, fluff up a cotton ball and glue it to the top. No pumpkin pie is complete without the whipped cream!

step 7.jpg

Line-17

Like us on FacebookShare this post with your friends, or Subscribe to this blog today to receive original craft project updates every week!


Tube Craft Turkey with Color Diffusing Feathers

Image of Turkey made from Tube Crafts

finished craft.jpg

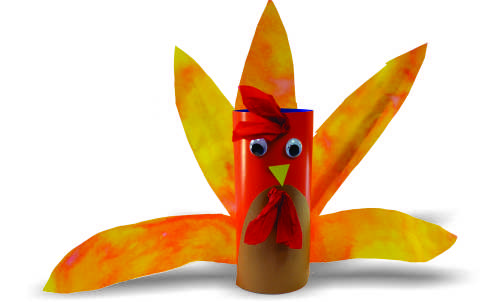
These adorable feathered friends make great centerpieces for any family dinner, and terrific classroom decorations!

Age: 4+

Duration: 15 minutes (plus drying time)

Learning Outcomes:

You’ll Need:

Line-01

We have found that the best way to structure this craft is to start by preparing the color diffusing sheet that will be your turkey’s feathers, and then having students create their turkey’s bodies while the liquid watercolor paint dries. So begin with a sheet of color diffusing paper on a tray and use paint pipettes to cover the whole sheet in liquid watercolor paint.

Set the sheets aside to dry while students create the bodies for their turkeys. Start with one of our card tube crafts flat on the table. Using construction paper, carefully cut out and glue down a belly for your turkey.

Now it’s time to give your turkey a face and some personality! Use a small triangle of yellow construction paper to make the beak. Glue googly eyes above the beak. Next, carefully crumple up a tissue circle to create your turkey’s wattle. Glue it underneath the beak. You can also crumple up a second tissue circle and give your turkey a jaunty set of red forehead feathers!

Once students are happy with the faces of their turkeys, carefully roll them up and insert the tabs into the slots. This will create a tube and allow your turkey to stand on its own!

By now your color diffusing sheets should be dry enough to work with. Carefully cut feather shapes out of the sheet.

Use 5-6 feathers per turkey to give each one a beautiful tail fan of feathers! Carefully glue them to the back of your turkey.

feathers 3.jpg

Line-17

Like us on Facebook, Share this post with your friends, or Subscribe to this blog today to receive original craft project updates every week!

Craft Spotlight: Project Leaves with a Thanksgiving Turkey project!

2014-09-22-FeatureImageIt’s never too early to start thinking about seasonal crafts for the classroom, no matter what time of year! Prepare for Thanksgiving with our true-to-life sized R51080 Project Leaves in a variety of colors and shapes. Use the Project Leaves to create the tail feathers and simple construction paper cutouts to make the turkey head and body. 

Project Leaves feature different colors on each side of the leaf shapes. You can use the shapes to talk about the changing seasons or adapt your fall science unit to include lessons about leaf identification.

R51080

Encourage students to engage with nature while appreciating the science behind it! Students can draw the veins within the leaf shapes to learn about leaf development. Trace out the shapes of the leaves onto sheets of paper, then cut them out and paste into a leaf collage!

Use leftover or traced Project Leaves to make a Thanksgiving turkey decoration! Learn more below.

Age: 4+

Duration: 10 minutes

Learning Objectives: Combine various leaf shapes together into a pleasing arrangement to make the turkey tail feathers. Use scissor skills to make a cut and paste project.

You’ll Need:

R51080 Project Leaves

• Gluestick

• Brown, orange and yellow construction paper

• Marker

• Scissors

Line-07

Celebrate Thanksgiving with a turkey decoration that all your students can take home!

P1010327Select 3-4 Project Leaves to make up the turkey’s tail feathers. Alternatively, you can trace the outline of the Project Leaves onto sheets of construction paper and cut them out. You’ll want to choose colors that work with the look of the craft.

P1010328Select the construction paper you will use to make the body. To save on construction paper, you can cut a sheet in half and divide between two students.

P1010330Fold the sheet in half lengthwise.

P1010331Draw a backwards B shape from the fold line. This will be the turkey’s body.

P1010332Cut along the drawn lines and unfold the resulting piece.

P1010333Next, pull out a light-sand colored sheet of construction paper.

P1010336Cut out a little turkey wattle and little turkey feet.

P1010337Finally, get a sheet of yellow construction paper. 

P1010338Cut out a turkey beak.

P1010340Paste the turkey beak, wattle and feet onto the turkey body.

P1010351Make your selection of Project Leaves for the turkey feathers.

P1010352Align two of the leaves together. You will need to angle them outwards.

P1010353Place the third leaf in the middle of the two leaves. This helps to round out the look.

P1010354Finish off with your decorative leaf shape. Place it right on top. Now you’ve easily layered the turkey back feathers!

P1010355Paste the turkey body on top of the leaf arrangement.

P1010356Paste the turkey features on top.

P1010357Finish off with eyes for your turkey. Draw them in with permanent marker or pen.

P1010358Now get ready for a big celebration! Paste the turkeys along a banner and hang up on a wall or arrange your turkeys in a Thanksgiving display!

Line-07

Like us on FacebookShare this post with your friends, or Subscribe to this blog today to receive original craft project updates every Monday, Wednesday and Friday!

Thanksgiving Hat

Feature-Image-featherhatcraft

Inspired by what our crafters at the Roylco Summer Art Camp made, here’s how to put together your unique Thanksgiving Hat! Use the R28421 Scissor Skills Paper for this craft. 

Age: 4+

Duration: 15-20 minutes

You’ll Need:

• R28421 Scissor Skills Paper

• R5870 Linear Rubbing Plates

• Sheet of paper, 8.5 x 11″ (20 x 28 cm)

• Crayons

• Scissors

• Tape

Line-06

Putting together the Thanksgiving Hat is super simple!

P9033137

For this activity, you can decorate the head band with any of our special rubbing plates!

P9033140

Fold a sheet of paper lengthwise in half. Unfold the paper and cut along the fold line to make two equal strips of paper. You’ll need both strips of paper for the entire headband.

P9033143

Place the headband on top of a rubbing plate. Use the side of a crayon to rub the pattern onto the headband.

P9033145

I used a different pattern for the top and bottom headband edges. Try it out with a different color too!

P9033146

Choose one of the three types of feathers to decorate your headband with. We’ve made an easy set of feathers for beginners with which to practice their scissor cutting skills. The second set is intermediate, with wavy lines. The third, and most challenging, set features jagged edges for students to cut. Choose the most appropriate set of feathers for students to cut.

P9033155

Attach the two headband pieces together with a piece of tape. Join the two headbands horizontally to extend the length of the entire headband.

P9033160

Keep the headband flipped over to the blank side. Line up all your cut feathers along the top edge of the headband and paste onto the paper. The feathers are double-sided so you won’t have to worry about which side you paste them onto!

P9033161

Join the edges of the headband together. Tip: First get students to adjust the headband for wearing. When they have found the right fit, tape the edges at that point.

P9033163

All ready for wearing! If you would like to add some dimension to your hat, curl out the ends of the feathers using a pencil.

CRAFT CHALLENGE:

What else did your students use to decorate their hats? You can use anything available in your craft supply closet or use scrap paper left over from other projects to cut out feathers. Once students have made their hats, sit your class down in a circle and talk about what each student is thankful for from the previous year.

Line-06

Send us your responses to subscriber@roylco.ca along with photos of your students’ hats! We’d love to hear from you!