Four Seasons Sponge Painting Craft

Image of Four Seasons Artwork for Blog

finished craft.jpg

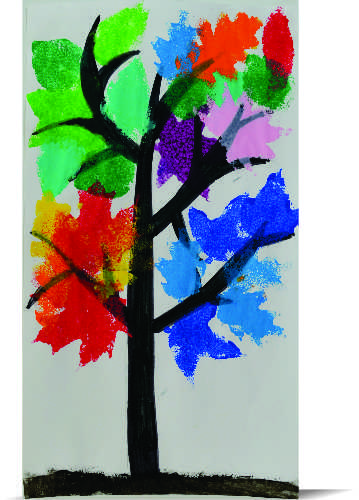
Put all four seasons on one very special tree! This is an adorable piece of take-home art that explores seasonal changes.

Winter, spring, summer, fall! Each season brings changes to the world around us, and one of the best ways to see these changes is to look at the trees and plants outside. Using tempera paint and Roylco’s R55004 Super Value Leaves Sponges, your students can create an artistic representation of the changes foliage experiences over the year!

55004 Leaves Sponges.jpg

The sponges are cut from a thick blue sponge with bubbles in the material to add texture to your prints. Dip the sponge into a bowl of thick tempera paint or fingerpaint! Make sure you keep the sponge flat down against the paint so that it completely covers the bottom surface of the sponge. Bristol paper, poster board or fingerpaint paper are great mediums for stamping the various shapes as they will absorb the paint without warping too much. Encourage your students to stamp repeatedly on the same sheet of paper.

Leaves are actually an organ! You have a heart, brain, liver and lungs, but trees have leaves. Leaves help plants to eat and breathe by performing photosynthesis, a process that converts carbon dioxide, water and sunlight into food for the plant. This also helps US to breathe, because when plants make their own food, they produce oxygen. One important component of photosynthesis is chlorophyll. Chlorophyll is what gives leaves their green color. When the chlorophyll in a plant breaks down, the leaf changes color! That’s why in the fall, leaves turn yellow, orange and red before falling off the tree completely.

Don’t worry about trees being hungry in the winter! Once their leaves fall off and winter comes, trees enter what is called a dormant phase. To put it simply, trees go to sleep in the winter. Usually trees lose all their leaves before it starts to snow, but sometimes it gets cold enough at night to form hoarfrost. This is the delicate covering of ice crystals you sometimes see on leaves in the fall. In northern climates, especially in places like Alaska, winter comes so fast that the leaves are frozen to the tree! This beautiful image is what we wanted to represent with the blue winter leaves.

When things start to warm up in the spring, trees wake up and grow new leaves to start the whole process over again!

Line-07

Like us on FacebookShare this post with your friends, or Subscribe to this blog today to receive original craft project updates every week!

Day of the Dead Color-Diffusing Calavera

Day of the Dead Color-Diffusing Calavera Artwork

finished craft.jpg

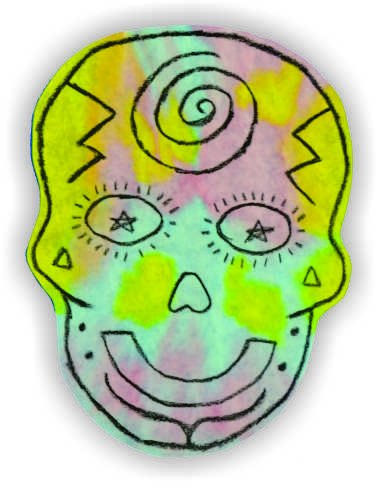
Bonus Post! Get ready to party for Dia de los Muertos with these color diffusing paper Calaveras!

Dia De Los Muertos, or Day of the Dead, is November 2nd. This Mexican holiday is celebrated throughout Mexico and in the United States, and it focuses on remembering  and celebrating friends and family members who have passed away. Traditions include building private altars called ofrendas, honoring those who have passed using calaverasaztec marigolds, and the favorite foods and beverages of the departed, and visiting graves with these as gifts.

You can celebrate the Day of the Dead in your classroom by creating bright color-diffusing paper versions of the traditional Calavera! A calavera is a representation of a human skull. The most well-known version of this are decorated spun-sugar skulls. These skulls are either given as gifts to children, or as gifts laid at the graves of those who have died. When calaveras are given as gifts to the deceased, the name of the deceased is typically written on the skull’s forehead.

Our calaveras are just as artistic as spun-sugar skulls, if somewhat less edible!

Age: 4+

Duration: 15 minutes (plus drying time)

Learning Outcomes: Explore Mexican culture and celebrate the lives of family members who are no longer with students. Exercise fine motor skills by tracing and drawing. Explore color mixing and liquid diffusion!

You’ll need:

Line-21

Start by downloading and printing out the Calavera template.

step 1.jpg

Cut out the shape of the skull, the eyes, nose and mouth.

step 2

Lay the template on a sheet of color diffusing paper and trace the skull outline, eyes, nose and mouth with crayon. Make sure your crayon lines are very heavy, they will need to be heavy to resist the liquid watercolor paint we will add later.

Now it’s time to add some decorations to your calavera! Swirly lines, flowers, and geometric shapes are all great ways to decorate your calavera. If your calavera will be an offering, carefully write the person’s name on the skull’s forehead.

step 5

Next, lay your sheet of color diffusing paper on a tray, and using pipettes, carefully cover the sheet in liquid watercolor paint. Allow the paint to dry.

Once your calavera is dry, trim off the excess paper. Mount your calavera on construction paper or colored card stock for a professional-looking finish!

You have lots of options for crayon colors when designing your clavavera. Our example uses just black crayon, but using just white crayon creates a beautiful calavera too. Using all the colors in your crayon box is also a great option:

the end

Suspend these bright calaveras from your classroom ceiling with string! Alternatively, string them together like paper lanterns to create a calavera garland.

Bundle Savings

Get all the Roylco items used
in this project and save 15%!

$15.62 USD
bundled price
Add Bundle
to Cart

Line-02

Like us on FacebookShare this post with your friends, or Subscribe to this blog today to receive original craft project updates every week!

Tube Craft Turkey with Color Diffusing Feathers

Image of Turkey made from Tube Crafts

finished craft.jpg

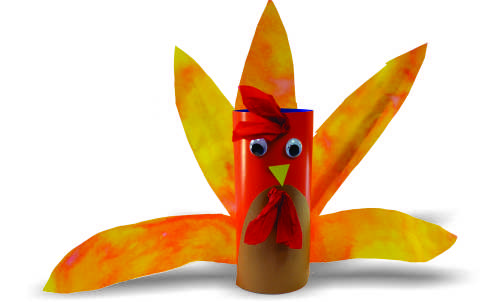
These adorable feathered friends make great centerpieces for any family dinner, and terrific classroom decorations!

Age: 4+

Duration: 15 minutes (plus drying time)

Learning Outcomes:

You’ll Need:

Line-01

We have found that the best way to structure this craft is to start by preparing the color diffusing sheet that will be your turkey’s feathers, and then having students create their turkey’s bodies while the liquid watercolor paint dries. So begin with a sheet of color diffusing paper on a tray and use paint pipettes to cover the whole sheet in liquid watercolor paint.

Set the sheets aside to dry while students create the bodies for their turkeys. Start with one of our card tube crafts flat on the table. Using construction paper, carefully cut out and glue down a belly for your turkey.

Now it’s time to give your turkey a face and some personality! Use a small triangle of yellow construction paper to make the beak. Glue googly eyes above the beak. Next, carefully crumple up a tissue circle to create your turkey’s wattle. Glue it underneath the beak. You can also crumple up a second tissue circle and give your turkey a jaunty set of red forehead feathers!

Once students are happy with the faces of their turkeys, carefully roll them up and insert the tabs into the slots. This will create a tube and allow your turkey to stand on its own!

By now your color diffusing sheets should be dry enough to work with. Carefully cut feather shapes out of the sheet.

Use 5-6 feathers per turkey to give each one a beautiful tail fan of feathers! Carefully glue them to the back of your turkey.

feathers 3.jpg

Line-17

Like us on Facebook, Share this post with your friends, or Subscribe to this blog today to receive original craft project updates every week!

Nature Mobile Maker

Image of close up of Nature Mobile

nature mobile craft

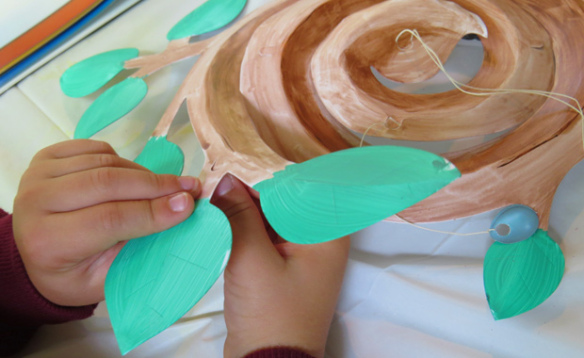
Make a lovely mobile decoration for spring! Our R51302 Nature Mobile Maker is a great base for making your mobile. Add on found objects such as leaves, feathers or flowers!

Age: 3+

Duration: 15-20 minutes plus drying times

Learning Objectives: Explore the natural world through decorating the mobile with natural found objects. Experiment with gravity and weight through kinetic studies. Observe the movements and flow of air and how this affects the balance of weight on the mobile.

nature mobile craft

You’ll Need:

R51302 Nature Mobile Maker

R15290 Nature Paper (or found objects, such as leaves, twigs, feathers, flowers, etc…)

• Scissors

• String

• Markers or paint

• Hole punch

Line-08

nature mobile craft

First pop the blank Nature Mobile Maker out from its paper backing. Separate all the elements and then place the mobile on a protected flat surface. Use paint or markers to color in the branches brown and to color in the leaves green.

nature mobile craft

Be sure to color on both sides of the mobile! This will make sure that from anywhere the mobile is viewed, it looks complete.

nature mobile craft

It was a bit of a rainy day when we made our mobiles, so we weren’t able to go exploring for found objects in nature. As a substitute, we used our R15290 Nature Paper! Pop out several of the elements from the paper backing. You’ll need no more than 6-10 elements per mobile. Mix large objects with smaller ones for a diverse appearance. Hole punch through the tops of each element you’ve chosen, then tie on a bit of string to hang from the mobile.

nature mobile craft

Our mobile is designed with ingenious little flip-up tabs that can be raised and pressed down over the length of string to secure it in place. This makes attachment way more easier than messing around with tape or tying the pieces on with difficulty.

nature mobile craft

Our camper friends took their finished mobiles out to the garden to hang them up among the bushes.

nature mobile craft

Even though the sun cleared up and we were able to resume our nature walk, we still had a great time making all our paper mobiles!

nature mobile craft

The mobiles seemed to blend right in with our amazing forest background!

Line-17

Like us on FacebookShare this post with your friends, or Subscribe to this blog today to receive original craft project updates every Monday, Wednesday and Thursday!

Craft Spotlight: Remembrance Day Poppies

Image of Roylco Poppy Wreath

Feature-Image-remempoppywreath

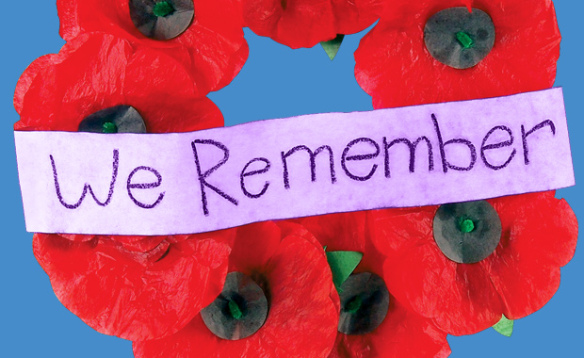
As November 11 is fast-approaching, we recognize the importance of remembering and the bravery of veteran heroes around the world on Remembrance Day. Show your classroom’s appreciation with a beautiful classroom wreath!

The R42005 Remembrance Day Wreath provides you with enough materials for every student to make at least 1 poppy. The kit features pre-cut red tissue paper poppies, and black centers that can be overlain to make the poppies. Tip: Use red marker to draw radiating lines out from the center of the tissue paper poppies. This will give the poppy a realistic appearance when assembled.

To further add dimension, soak the poppies with a light mist of water and drape over an upside-down cup to dry. The dried poppies will appear crinkled like real petals and take the shape of a flower.

Secure the tissue papers with the provided green chenille stem and attach die-cut green paper poppy leaves to complete the look. 

Combine all the poppies together to make this wreath a decorative tribute to those who have sacrificed so much. Talk about the deep history of Remembrance Day and research the significance of the poppy. You can read John McCrae’s famous poem, “In Flanders Fields” and encourage students to write their own poems on the significance of Remembrance Day. 

Watch the instructional video below to show you how to put together the wreath!

To construct the wreath, fold a card sheet in half and cut out a large half circle above the fold line. Cut out a smaller half circle from the fold line to make the center. Unfold the card sheet to reveal a circle with the center cut out.

Paste all the poppies around the wreath. You can make one large wreath or several smaller wreaths to decorate the classroom.

Line-20

Show us your Remembrance Day spirit by sending us photos of your class wreaths to subscriber@roylco.ca! We will feature the photos in one of our upcoming posts!

Crafty Leaves Wreath

Image of Roylco Crafty Leaves Wreath

Feature-Image-craftyleaveswreath

Just in time for fall! Send students home with gorgeous wreaths for decoration, made from our R15334 Crafty Leaves and a wreath template! A great way to start off the school year. Read more for our weekly craft challenge (send us photos of your projects)! 

Age: 5+

Duration: 10 minutes

You’ll Need:

• R15334 Crafty Leaves

• Wreath Template

• Scissors

• Glue

• Pencil

This is a pretty simple craft and can be done in less time than recess! Wreaths are great to make for decoration, or as a gift.

P8123064

Print out your template onto 8½ x 11″ (21.5 x 28) paper and cut around bold lines. Cut across the dotted line as well.

P8123070

Fold an 8.5 x 11″ sheet of card paper. Place your template along the fold line. Trace the outline of the template (along the bold lines) onto the card paper and cut out.

P8123072 

Unfold the card paper to reveal your wreath base!

P8123073

Next, pop out the leaves from the backing. Pick out leaves that you feel will arrange nicely on the wreath.

P8123076

Curl up the ends of the leaves using the blunt edge of a pair of scissors.

OLYMPUS DIGITAL CAMERA

Looking like realistic leaves now!

P8123078

Arrange the leaves onto the wreath template and glue them down. Tip: Pop out the acorns and chestnuts and place at three or four points around the wreath.

P8123080

Ready to hang!

CRAFT CHALLENGE:

Go outside and find some natural objects to add to the wreath: acorns or acorn caps, feathers or twigs! Use a hot glue gun to adhere the found objects to the wreath.

Line-04Show us your wreath ideas! Send photos of your work to subscriber@roylco.ca for publication in our next post. We’d love to hear from you!