Four Seasons Sponge Painting Craft

Image of Four Seasons Artwork for Blog

finished craft.jpg

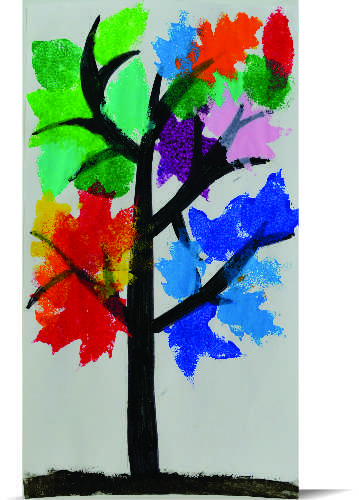
Put all four seasons on one very special tree! This is an adorable piece of take-home art that explores seasonal changes.

Winter, spring, summer, fall! Each season brings changes to the world around us, and one of the best ways to see these changes is to look at the trees and plants outside. Using tempera paint and Roylco’s R55004 Super Value Leaves Sponges, your students can create an artistic representation of the changes foliage experiences over the year!

55004 Leaves Sponges.jpg

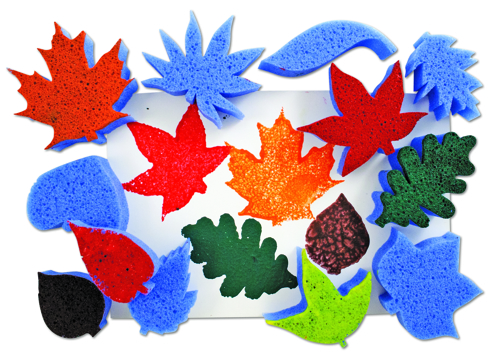
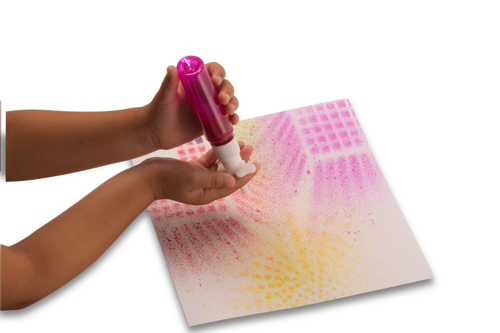
The sponges are cut from a thick blue sponge with bubbles in the material to add texture to your prints. Dip the sponge into a bowl of thick tempera paint or fingerpaint! Make sure you keep the sponge flat down against the paint so that it completely covers the bottom surface of the sponge. Bristol paper, poster board or fingerpaint paper are great mediums for stamping the various shapes as they will absorb the paint without warping too much. Encourage your students to stamp repeatedly on the same sheet of paper.

Leaves are actually an organ! You have a heart, brain, liver and lungs, but trees have leaves. Leaves help plants to eat and breathe by performing photosynthesis, a process that converts carbon dioxide, water and sunlight into food for the plant. This also helps US to breathe, because when plants make their own food, they produce oxygen. One important component of photosynthesis is chlorophyll. Chlorophyll is what gives leaves their green color. When the chlorophyll in a plant breaks down, the leaf changes color! That’s why in the fall, leaves turn yellow, orange and red before falling off the tree completely.

Don’t worry about trees being hungry in the winter! Once their leaves fall off and winter comes, trees enter what is called a dormant phase. To put it simply, trees go to sleep in the winter. Usually trees lose all their leaves before it starts to snow, but sometimes it gets cold enough at night to form hoarfrost. This is the delicate covering of ice crystals you sometimes see on leaves in the fall. In northern climates, especially in places like Alaska, winter comes so fast that the leaves are frozen to the tree! This beautiful image is what we wanted to represent with the blue winter leaves.

When things start to warm up in the spring, trees wake up and grow new leaves to start the whole process over again!

Line-07

Like us on FacebookShare this post with your friends, or Subscribe to this blog today to receive original craft project updates every week!

Junior Paint Spritzers

54466 Junior Paint Spritzer Hands 2.jpg

These spritzers are the perfect new tool for art classrooms! 

Create beautiful works of art with these adorable, elephant-headed paint sprayers!

54466 Jr Paint Spritzer-Head

Fill the sprayer bottle with liquid watercolor paint, point the elephant’s head down and squeeze the elephant ear-pump to spritz out a fine mist of color onto craft paper. Make yourself a rainbow of paint sprayers by putting different colors in each of the five sprayers. Dilute the paint with water or add liquid soap to make stains easier to clean.

Graffiti isn’t something we want to teach students how to do, but the painting techniques
employed by street artists like Banksy have many applications. Freehand and stencil spray painting techniques can be successfully adapted for a classroom environment. In addition to teaching an art technique, this is a great opportunity to talk to children about stealing like an artist.

Children might know the phrase “good artists copy, great artists steal.” This quote has been attributed to T. S. Eliot, Pablo Picasso and Steve Jobs. No matter who said it, stealing like an artist doesn’t mean copying someone exactly and presenting the results as your own work—that is plagiarism! Stealing like an artist means using a technique you admire from an artist and innovating that technique to create a unique final product.

54466 Junior Paint Spritzer_Bottle2

Ideas

  • Try putting masking tape on paper in random patterns, spray paint on the paper and then removing the masking tape to reveal beautiful artwork.
  • Choose a base color and spray it on a sheet of paper. Place small objects like buttons, blocks, or small cups and containers on the paper over top of the base layer of paint. Spray more layers of paint in different colors over your paper. When you remove the objects, you will have a gorgeous layered painting.
  • Spray a layer of paint down. Lightly crumple a sheet of news paper and quickly press it down and remove it to create exciting textures in the paint.
  • Use the elephant spritzer to create a background for your painting, and allow it to dry completely. Then use a different medium (crayons or colored pencils) to create the foreground of your painting.
  • Create a gorgeous paint texture by laying a piece of mesh or a sheet of Roylco’s R1504 Paper Mesh over top of a sheet of paper and pray paint over top. Remove the mesh to reveal the texture.
  • Make a rubbing with a crayon. Use the elephant sprayer to add color and pizzazz to the rubbing. The wax in the crayon resists the paint and will show through.

Line-15

Like us on FacebookShare this post with your friends, or Subscribe to this blog today to receive original craft project updates every week


Craft Spotlight: Big Huge Dinosaurs!

2014-05-12-FeatureImage

To give your Big! Huge! Dinosaur a unique appearance, use balloon painting! This cool technique keeps little fingers clean while generating a fun painting experience.

R75424 Big! Huge! Dinosaurs are perfect for large scale fingerpainting projects. The sheet itself reaches roughly 3 feet in length, but you don’t need a whole lot of paint to cover it up! Fingerpaints spread evenly across the special paper material, especially when children are eager to fill in all the blank parts of the canvas.

DSCF7082


Designing the dinosaur’s skin is the best part. What colors will you choose? And what kinds of patterns will you organize the colors in? To help simplify this process, we asked our little artists to use balloons!

_DSC0166Dip the balloon in paint.

_DSC0168And stamp all over the dinosaur canvas!

DSCF7067Our campers loved being able to make their own impressions with the balloons!

_DSC0170Some of the balloons were used just like paintbrushes. The paint was spread evenly across the surface of the dinosaur.

DSCF7071

Why were balloons important to use? Well, the rubber of the balloon expands and contracts when it’s applied against another surface.

_DSC0177

This helped to create a splotchy, ripply effect on the dinosaur paper, making it look like the dinosaur’s skin!

DSCF7072

Although some students may feel overwhelmed by the largeness of the dinosaur canvas, the dinosaurs are perfect for group painting activities. Combine groups of students together to develop fine motor skills while creating a work of art!

R75424

We have great project ideas available at the PDF guide, which you can access here!

Line-09

Thanks for viewing this post! Like us and subscribe to our blog today for updates every Monday, Wednesday and Friday! Send a line through our contact form and link with us today to get you started on your own crafting journey.