Spotlight On: Stand-Up People

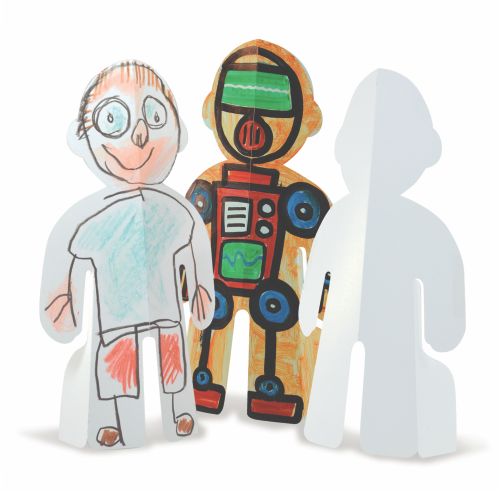
Create cute, miniature people who can stand on their own two feet!

These sturdy card stock figures are terrific for a multitude of different art projects and as components in presentations for other subjects. Use paint, marker, crayon, pencil crayon and collage materials to decorate your stand-up person. The large size (7 1/4 x 11 1/2″) is perfect for bringing out the fine detail in your artwork.

Use these art bases for “All About Me” art! Glue a photograph to the face of a figure, and decorate the body to resemble your favorite outfit. Finish by writing your name on your stand-up person so your classmates will always recognize you!

A great beginning of school activity is pairing students off and challenging them to introduce their partner to the class! Have students interview each other, and create a portrait of their partner to present to the class along with personal facts like age, favorite food, and favorite color!

Are written book reports starting to become a grind? Add a new dimension to them by challenging students to create a portrait of their favorite character in their book. The portrait can serve as a visual aid to help keep other students engaged.

Bring social studies to life with historical figures! Consider assigning each table (or group) a theme, and each student will create a portrait of a different historical figure. If students have a math theme, they might create figures of Ada Lovelace and Pythagoras. A science theme could include Einstein and Marie Curie.

To watch a video a Stand-Up Person come to life, click here: https://www.youtube.com/watch?v=37LTfRUm2UU


Paper Plate Pouch

finished craft.jpg

This versatile craft has infinite applications in the classroom! Use as a fun and practical first week craft. 

Do students need something to keep personal items in at their tables? These pouches are perfect for manipulatives, writing utensils, small book and notebooks and bookmarks! Hang them onver the back of chairs, tape to the edge of desks, or use tabletop purse hangers to keep them close to students.

Age: 5+

Duration: 15 minutes (plus drying time)

Learning Outcomes: Create a craft that carries! Exercise fine motor skills and promote self-organization.

You’ll Need:

step 1Line-22

Start by cutting ONE of your paper plates in half. Because each student only needs 1 1/2 paper plates, this is a good activity for buddies to do. They can split a paper plate between them.

step 2


Next, use a hole punch to make holes in the rim of the half paper plate, approximate 1″ apart. Use the hole punch to make corresponding holes in one half of the whole paper plate too. These will be used to stitch the two paper plates together.

step 4

Once your holes are punched, it’s time to decorate! We chose to paint our paper plates to resemble a sky and a green field, but you can choose any theme you like!

step 6

Once the paint is dry, use a plastic lacing needle and some fun yarn to stitch the half paper plate to the whole paper plate. This is an excellent opportunity to talk about fractions!

step 7

Next, pop out some of our colorful Botanical Cuts to decorate your grassy field with. You can add dimension to these flowers and leaves by gently folding or curling them or add details with markers. We also added some cotton balls to the blue “sky.”

The last step is to add you handle. Using your hole punch, cut two holes near the top of your whole paper plate. Then string some ribbon through and secure it with knots.

This is a great project to use at multiple times in the classroom! Some other ideas include:

  • Use this as a first week of school project! Challenge students to decorate their pouches with their favorite things or a self portrait. Then the pouches can be used to store personal items, or they can be hung together on a classroom wall and used as a place to return assignments.
  • Need Valentine’s Day mailboxes? These pouches are the perfect craft base to decorate with hearts and names and use to deliver classroom Valentines!
  • Will there be secret Santa’s in your classroom this Christmas? Students can use these pouches to deliver small gifts to each other, or to friends and family outside of the classroom.

Line-17

Like us on FacebookShare this post with your friends, or Subscribe to this blog today to receive original craft project updates every week!


R10210 Action Shapes

R10210-B

Lights! Camera! Action! These moving people shapes are wonderful resources to use for art projects, and amateur stop-motion videos. Action Shapes are made from sturdy card so that they will hold their shape while you position the characters’ arms and legs. A super-simple design for the pivoting joints helps make the characters easy to assemble and easy to move, too!

R10210-C

Color in and draw details on the character to make self-portraits or develop a unique character. Students may find that having a blank project in front of them seems a little daunting. There are so many ways to decorate the project, but which way is the best way? The Action Shape is made of sturdy card, so you can trace the shape on paper and plan your project.

10210-Illustration-02

The Action Shapes characters feature 9 parts: the head, neck and torso, two upper arms, two forearms, two thighs and two lower legs. All of the paired parts connect to each other using pivot points. These pivot points are formed by special fins on certain pieces that go through pivot holes in corresponding pieces. In order to make decorating the Action Shapes easier, assemble the pieces together after you finished coloring them.

Note: Keep track of all your pieces! There are two larger thigh pieces that can easily be confused with the upper arm pieces. If needed, write the location of each piece on the back. You can even specify “left” or “right” depending on how you wish to organize them.

To trace, lay the main body piece of the character onto a sheet of drawing paper. Hold the character steady with one hand while using the other hand to trace around the outline of the character. Use the traced outline as a guide for experimenting with different “looks” for your character. Illustrate different clothes on the character with a pencil; add in a happy face or a surprised face; or, try on different hairstyles. Then, color it in! If you need to re-trace your Action Shapes design, use another sheet of paper and draw a different appearance. Find out which look is best for your character. Once you have chosen your favorite “look,” use the illustration as a reference to draw on the details.

First, use pencil to lightly draw in the details on your Action Shapes character. Use crayons or pencil crayons to add color. The Action Shapes characters are designed on special blank card that accentuate crayon and pencil crayon colors. Tip: Some students find it easier to outline the different parts of the character with a crayon before coloring in the entire area. Use this technique to guide students towards coloring the whole surface area of the Action Shapes before moving on.

10210-Illustration-03

Assemble your Action Shape by locating all the “fins” at each of the joints. The fins are designed to slip through special pivot holes in select pieces that go on top. Bend the fins up from the backing and fold in towards the middle. Do not tear or remove the fins.

10210-Illustration-03B

Next, pop out the pivot hole. Place the piece with the fins underneath the piece with the pivot hole. Pinch the fins together and slide through the notches on either side of the pivot hole. Once the fins are through, fan them out flat over the pivot hole.

Animation

Now you can rotate the pieces! This will create movement with your Action Shape character. Look out for our next blog post that will show you how to create your very own stop-motion animation video!

Curriculum Connections

  • Encourage self-awareness through “All About Me” crafts
  • Build moviemaking vocabulary
  • Create storyboards and scripts
  • Develop fine motor skills
  • Integrate digital learning with multimedia art
  • Generate understanding about character poses
  • Exercise gross motor skills through fun posing activities
  • Discover the early history of film and stop-motion animation
  • Brainstorm activities for characters to perform
  • Encourage critical thinking
  • List action verbs for literacy

Line-09

Like us on FacebookShare this post with your friends, or Subscribe to this blog today to receive original craft project updates every week!

Tube Crafts Pencil Holders

tube crafts desk organizer

Make beautiful holders for your writing and painting tools using colorful card paper!

Age: 5+

Duration: 10 minutes

You’ll Need:

R39301 Tube Crafts

 R22052 Double Color Sheets

• Tape

• Scissors

 Line-09

tube crafts desk organizer

The R39301 Tube Crafts will be used to make the tubes for the holders.

tube crafts desk organizer

Select one flat sheet of the Tube Crafts and cut it all the way across using the midpoint notch as a guide.

tube crafts desk organizer

After you have cut across the sheet, you should have two separate templates to make smaller tubes.

tube crafts desk organizer

Roll up several of the tubes in various sizes.

tube crafts desk organizer

Next, cut little slits into the bottom edge of each tube. Space the slits at about ½” apart.

tube crafts desk organizer

Press the tabs outwards to make the tubes stand more securely. Tape them down onto a flat sheet of Double Color Card paper.

tube crafts desk organizer

And voila! A great way to keep all your desk tools in one neat little area. We suggest using 3 tubes at a time because they provide stability for holding various objects. Use the tubes to store your favorite colors of markers, pencil crayons, Goo Spreaders, paintbrushes, pipettes and more!

Line-10

Like us on FacebookShare this post with your friends, or Subscribe to this blog today to receive original craft project updates every Monday, Wednesday and Thursday!

Craft Spotlight: Big Huge Dinosaurs!

2014-05-12-FeatureImage

To give your Big! Huge! Dinosaur a unique appearance, use balloon painting! This cool technique keeps little fingers clean while generating a fun painting experience.

R75424 Big! Huge! Dinosaurs are perfect for large scale fingerpainting projects. The sheet itself reaches roughly 3 feet in length, but you don’t need a whole lot of paint to cover it up! Fingerpaints spread evenly across the special paper material, especially when children are eager to fill in all the blank parts of the canvas.

DSCF7082


Designing the dinosaur’s skin is the best part. What colors will you choose? And what kinds of patterns will you organize the colors in? To help simplify this process, we asked our little artists to use balloons!

_DSC0166Dip the balloon in paint.

_DSC0168And stamp all over the dinosaur canvas!

DSCF7067Our campers loved being able to make their own impressions with the balloons!

_DSC0170Some of the balloons were used just like paintbrushes. The paint was spread evenly across the surface of the dinosaur.

DSCF7071

Why were balloons important to use? Well, the rubber of the balloon expands and contracts when it’s applied against another surface.

_DSC0177

This helped to create a splotchy, ripply effect on the dinosaur paper, making it look like the dinosaur’s skin!

DSCF7072

Although some students may feel overwhelmed by the largeness of the dinosaur canvas, the dinosaurs are perfect for group painting activities. Combine groups of students together to develop fine motor skills while creating a work of art!

R75424

We have great project ideas available at the PDF guide, which you can access here!

Line-09

Thanks for viewing this post! Like us and subscribe to our blog today for updates every Monday, Wednesday and Friday! Send a line through our contact form and link with us today to get you started on your own crafting journey.  

Personalized Art Totes!

2014-03-05-FeatureImage

Store your art materials in personalized art totes! Make one for yourself (the ever-patient and longstanding art teacher) or invite your students to make one for you. The project is pretty simple and quick so students will love the opportunity to make more!

Age: 3+

Duration: 5-10 minutes

You’ll Need:

• Assorted rubbing plates: R5841 Optical Illusion Rubbing Plates / R5871 Organics Rubbing Plates / R5870 Linear Rubbing Plates / R5804 Flower Rubbing Plates

• Assorted stencils: R5615 Nature Stencils / R58621 Number Stencils / R58620 Fine Motor Skills Stencils / R5621 Rangoli Mega Stencils / R5618 Big Alphabet and Picture Stencils / R5522 Child’s First Stencil Set

• Crayons

• Dollar store / cloth totes

Line-09

In this project, I’ll show you how to combine stencils and rubbing plates together to make authentic-looking prints. You can separate this combination into two activities, depending on their difficulty level: Younger children can use only stencils and crayons. Color the inside of the traced shape. Older children can use specific colors for certain parts of a rubbing plate pattern.

P2044058

Here, I decided to make a leaf print on my art tote. To do this, I’ve selected a leaf stencil and chosen a rubbing plate pattern to match. In addition, I’ve picked two crayon shades of the color green.

P2044060

First, trace the leaf shape onto the middle of one side of the tote. Make the outline dark enough so the edges are visible on all sides.

P2044062The rubbing plate fits so nicely into the tote bag, it was like it was meant to be!

P2044064The cloth will be a lot tougher than regular paper. Be sure to use the point of the crayon to bring the pattern out. Rub the pattern all around the inside of the stencil outline.

P2044066

Repeat the same technique for the opposite side! Here, I’ve simply used a rubbing plate print and rubbed directly onto the tote, without need of a stencil. Younger students can try this technique, since it’s a basic way to decorate the art totes.

The next technique is a little tricky, however. Encourage older students to try this method out:

P2044068

Slip an Illusion rubbing plate or something similar inside the tote. Pick out several vibrant crayon colors.

P2044069

Rub certain sections of the art tote with one color, then switch to another color when you reach a different section of the rubbing pattern. Against the black tote, the neon colors just pop right out!

P2044070

Here’s a rubbing plate print from one of our Organics Rubbing Plates.

Use your art totes to store your art materials (such as the rubbing plates, loose crayons, markers, scrap paper and so on)!

Line-09

Thanks for viewing our post! Subscribe to our blog for updates every Monday, Wednesday and Friday with new craft ideas! If you’ve made any projects using the materials in this post or would like to showcase your own ideas, send us an email to subscriber@roylco.ca!

Craft Spotlight: Masterpiece Fingerpaint Frames

Feature-Image-mpfingerpaintframes

Make a work of art out of every fingerpainting session! Simply slip students’ fingerpaint artwork underneath any one of our R75421 Masterpiece Fingerpainting Frames

Each of the Masterpiece Fingerpainting Frame packages comes with special fingerpaint paper that slips perfectly into each of the frames. Use regular fingerpaint on the paper.

IMG_7486

To enhance students’ sensory awareness, we asked the art campers to close their eyes as they fingerpainted. Many of the campers loved the freedom they experienced with fingerpainting. Instead of painting a specific image, students could simply blend colors together and take delight in getting ‘messy’ without much clean-up needed.

IMG_7484

To make their fingerpainted backgrounds even more intriguing, we dripped a blob of one paint color onto one side of the paper, then took another color and repeated the same for the opposite side.

IMG_7488

This art camper blended similar colors together: Red and orange. To make her painting more distinguishable, she decided to create patterns in the paint with her fingers.

IMG_7483

The frames are die-cut into 6 beautiful designs. Choose from a gecko, butterfly, fish, frog, turtle or bird. The colors your students choose in their fingerpainting artwork will show through the stylized designs. Pop out the die-cut pieces from the rest of the frame. 

To slip the fingerpainted background into the Masterpiece Fingerpaint Frames, locate the tabs on the sides of the frame. Lift the tabs up and slip the edge of the fingerpaint paper in. Secure the paper on all four sides of the frame.

_DSC0259

Try out a variety of different fingerpainted backgrounds! Change up the background to give your masterpiece a new look.

R75421

Line-09

Thanks for stopping by! If you have any comments or suggestions, or you would like us to publish a post on your work, drop us a line at subscriber@roylco.ca!

United Art & Education uses our Color Diffusing Circles!

colordiffusingpapercircles

United Art & Education uses our R24908 Color Diffusing Circles to make rose-window style stained glass images! 

The process is very simple and can be applied to most other Color Diffusing Circle projects. First, the R24908 Color Diffusing Circles were folded in half twice. A pencil was used to sketch in a rose-window like design on the portioned part. Later, the artist applied watercolor markers to add color and definition to the sketch. 

The final step used a paintbrush to dab water onto the colored parts. This distributes the color through all the underlying layers.

When the paint is dry, unfold the entire Color Diffusing Circle to reveal the complete art underneath!

Check out the full step by step process and final artwork in the video below! Be sure to leave them a positive comment!

Line-14

Thanks for dropping by! If you have a Roylco project you would like to share with us, please email the details to subscriber@roylco.ca. We would love to hear from you!

Valentine’s Day Tree

2014-01-29-FeatureImageCreate your own Valentine’s Day artwork with Heart Mosaics! Use a tracing of your hand to form the tree trunk and branches, then fill in the gaps with Heart Mosaic leaves. Follow the complete tutorial below!

Age: 4+

Duration: 10-15 minutes

You’ll Need:

R15367 Heart Mosaics

R15233 Skin Tone Craft Paper

• Scissors

• Glue

• Pencil

Line-12

This is a fun and simple craft to make with basic materials. You could even adapt the project artwork and use it to create the front cover of a large-sized Valentine’s Day card!

2014-01-29-Step01You can use any color of Skintone Paper to make your handprint tree. For this project, I used a specific color of Heart Mosaic leaves to fill in the tree gaps, but your students can use whichever colors they like best.

2014-01-29-Step02Turn the Skintone Paper vertically facing you and place your hand in the center of the page. Trace the outline of your hand with a pencil.

2014-01-29-Step03Cut out the traced outline. This will form the base of the tree (the tree trunk and branches).

2014-01-29-Tree-AnimationNext, paste your handprint tree onto a sheet of white paper. Align the bottom edge of the handprint with the bottom edge of the paper.

You can start laying out the Heart Mosaic leaves around the “branches” of the handprint. Angle the direction of the Heart Mosaics outwards from the center handprint.

2014-01-29-Step04Once you have worked out the colors of your Heart Mosaic leaves, or where you want to place them on the page, start pasting them down.

Overlap various sizes of Heart Mosaics to get a fuller look for your tree.

Line-12

Thanks for checking out this project post! If you’d like to share some of your projects with us, send your photos to subscriber@roylco.ca and we’ll write up a post for our viewers!