Tube Craft Flower

Tube Craft Flowers

tube crafts flowers

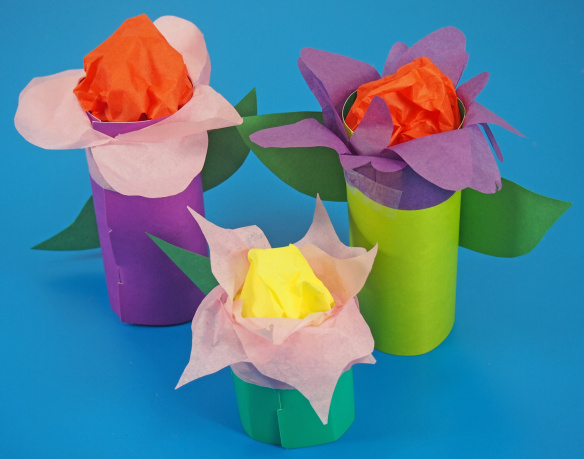
Using simple materials such as tube rolls and tissue paper, you can make the most intriguing flower decorations for your spring display! Try it with our R39301 Tube Crafts!

Age: 5+

Duration: 5-10 minutes

Learning Objectives: Use scissor skills to create beautiful flower decorations. Develop fine motor skills through rolling and securing the tubes. Create a lovely decorative addition to your spring/summer art display.

tube crafts flowers

You’ll Need:

R39301 Tube Crafts

• Scissors

• Tissue paper

• Tape

• Construction paper

• Pencil

Line-18

tube crafts flowers

Choose one of the flat Tube Crafts. The tubes have colors on both sides so you can roll it according to the side you want.

tube crafts flowers

Gently roll the card into a tube shape and secure with the specially designed notches and tabs. This tube will form the base of the flower.

tube crafts flowers

Next, cut a long strip of tissue paper from your sheet. If you have smaller lengths of tissue, you can simply tape them together. The strip should be about 3 x 16″ wide.

tube crafts flowers

Accordion fold the strip of paper until it is all neatly tucked into a square.

tube crafts flowers

Cut the unfolded edge into a half circle shape, making sure to keep the side folds intact.

tube crafts flowers

Unfold the chain to reveal a petal-like design.

tube crafts flowers

Gather up the tissue paper that you will use to form the center of the flower.

tube crafts flowers

Scrunch all four corners together in the center and secure with a piece of tape.

tube crafts flowers

Tape one edge of the petal chain onto the top of your Tube Craft and roll it all the way around the tube edge.

tube crafts flowers

Once the tube is completely rolled with the tissue paper, fold the petals outward.

tube crafts flowers

Stuff the center of the flower inside the tube and secure with tape.

tube crafts flowers

Cut a strip of paper from the construction paper sheet.

tube crafts flowers

Fold the strip of construction paper in half and cut from the fold line to make a leaf shape. Unfold the sheet of construction paper.

tube crafts flowers

Tape the leaf shape to the back of the tube to finalize the flower.

tube crafts flowers

With these techniques, you can make a full garden of flowers!

Line-22

Like us on FacebookShare this post with your friends, or Subscribe to this blog today to receive original craft project updates every Monday, Wednesday and Thursday!

Tube Crafts Pencil Holders

tube crafts desk organizer

Make beautiful holders for your writing and painting tools using colorful card paper!

Age: 5+

Duration: 10 minutes

You’ll Need:

R39301 Tube Crafts

 R22052 Double Color Sheets

• Tape

• Scissors

 Line-09

tube crafts desk organizer

The R39301 Tube Crafts will be used to make the tubes for the holders.

tube crafts desk organizer

Select one flat sheet of the Tube Crafts and cut it all the way across using the midpoint notch as a guide.

tube crafts desk organizer

After you have cut across the sheet, you should have two separate templates to make smaller tubes.

tube crafts desk organizer

Roll up several of the tubes in various sizes.

tube crafts desk organizer

Next, cut little slits into the bottom edge of each tube. Space the slits at about ½” apart.

tube crafts desk organizer

Press the tabs outwards to make the tubes stand more securely. Tape them down onto a flat sheet of Double Color Card paper.

tube crafts desk organizer

And voila! A great way to keep all your desk tools in one neat little area. We suggest using 3 tubes at a time because they provide stability for holding various objects. Use the tubes to store your favorite colors of markers, pencil crayons, Goo Spreaders, paintbrushes, pipettes and more!

Line-10

Like us on FacebookShare this post with your friends, or Subscribe to this blog today to receive original craft project updates every Monday, Wednesday and Thursday!

Tube Crafts: Sunny the Snake

tube snake paper roll Sssssssss! Here’s a great project you can adapt for larger groups of students–make an awesome tube snake. This is one of the many projects we’ve got lined up this year for Tube Crafts! Age: 4+

Duration: 15-20 minutes

Learning Objectives: Use fine motor skills to roll up colorful tubes. Great group activity! Multiple groups can contribute to building the snake.

tube snake paper roll

You’ll Need:

R39301 Tube Crafts

• Hole punch

• Permanent marker

• Ribbon

• Scissors

Line-10 tube snake paper roll

A full classpack of Tube Crafts is great for a variety of different projects. The flat sheets are printed with a color on each side. One one edge, the Tube Craft sheet features two tabs that fit into the slots on the other edge.

tube snake paper roll

Roll the flat sheet into a tube and push the tabs into the slots.

tube snake paper roll

You can see how I’ve left the bottom tab out so you can see where it fits into the slot. To make it easier to work with, you can try to press one side of the tab into the slot, then press the opposite side in.

tube snake paper roll

Once you have made a tube, punch two holes across from each other on either end. This will allow you to connect the different tubes together.

tube snake paper roll

Cut two lengths of yarn.

tube snake paper roll

Thread a length of yarn through each of the holes in the tube.

tube snake paper roll

Thread the ends of the yarn to adjoining tubes. Secure the tubes together with a knot at each end.

tube snake paper roll

To make the tail for the snake, make a tube.

tube snake paper roll

At one end of the tube, start out by cutting a V-shape.

tube snake paper roll

Continue cutting out along the side of the tube until you reach the opposite side.

tube snake paper roll

Hole punch the opposite sides of the tube.

tube snake paper roll

Start with another flat sheet from the Tube Crafts kit.

tube snake paper roll

Another great feature of our Tube Crafts is that we’ve added a notch halfway through the edge of the sheet. This allows you to cut the tube in half before assembling. This way you can make smaller tubes! In this next step, we will use the smaller tube to make the snake’s head.

tube snake paper roll

Cut straight across the flat sheet using the notches as a guide.

tube snake paper roll

Roll up and secure the tube with the tab and slot.

tube snake paper roll

Cut the same V-shaped notch out of the small tube, just as you did for the snake’s tail.

tube snake paper roll

Once you are finished making the head, use permanent marker to add details such as the eyes and nostril to the snake’s head. You can’t forget about the tongue! To make the tongue, tape on a length of pink ribbon! Drag the edge of a pair of scissors across the ribbon to curl it into a spiral. Alternatively, use a strip of felt and cut out a V from the bottom to make it a forked tongue.

tube snake paper roll

Here’s a look at what the finished snakes look like. You can give one snake project to each group of students in your classroom or encourage everyone to contribute to one giant snake project!

Line-18

Like us on FacebookShare this post with your friends, or Subscribe to this blog today to receive original craft project updates every Monday, Wednesday and Thursday!