Tube Craft Flower

Tube Craft Flowers

tube crafts flowers

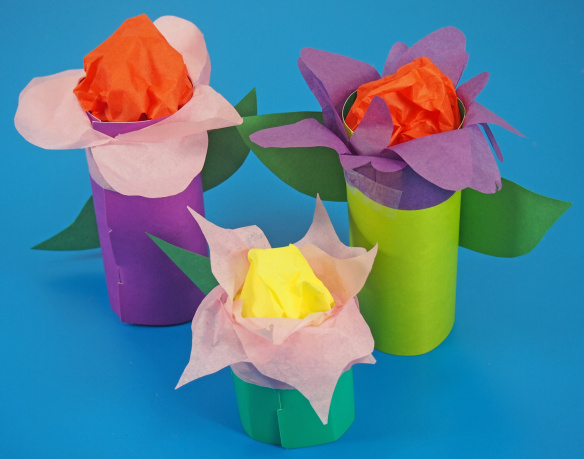
Using simple materials such as tube rolls and tissue paper, you can make the most intriguing flower decorations for your spring display! Try it with our R39301 Tube Crafts!

Age: 5+

Duration: 5-10 minutes

Learning Objectives: Use scissor skills to create beautiful flower decorations. Develop fine motor skills through rolling and securing the tubes. Create a lovely decorative addition to your spring/summer art display.

tube crafts flowers

You’ll Need:

R39301 Tube Crafts

• Scissors

• Tissue paper

• Tape

• Construction paper

• Pencil

Line-18

tube crafts flowers

Choose one of the flat Tube Crafts. The tubes have colors on both sides so you can roll it according to the side you want.

tube crafts flowers

Gently roll the card into a tube shape and secure with the specially designed notches and tabs. This tube will form the base of the flower.

tube crafts flowers

Next, cut a long strip of tissue paper from your sheet. If you have smaller lengths of tissue, you can simply tape them together. The strip should be about 3 x 16″ wide.

tube crafts flowers

Accordion fold the strip of paper until it is all neatly tucked into a square.

tube crafts flowers

Cut the unfolded edge into a half circle shape, making sure to keep the side folds intact.

tube crafts flowers

Unfold the chain to reveal a petal-like design.

tube crafts flowers

Gather up the tissue paper that you will use to form the center of the flower.

tube crafts flowers

Scrunch all four corners together in the center and secure with a piece of tape.

tube crafts flowers

Tape one edge of the petal chain onto the top of your Tube Craft and roll it all the way around the tube edge.

tube crafts flowers

Once the tube is completely rolled with the tissue paper, fold the petals outward.

tube crafts flowers

Stuff the center of the flower inside the tube and secure with tape.

tube crafts flowers

Cut a strip of paper from the construction paper sheet.

tube crafts flowers

Fold the strip of construction paper in half and cut from the fold line to make a leaf shape. Unfold the sheet of construction paper.

tube crafts flowers

Tape the leaf shape to the back of the tube to finalize the flower.

tube crafts flowers

With these techniques, you can make a full garden of flowers!

Line-22

Like us on FacebookShare this post with your friends, or Subscribe to this blog today to receive original craft project updates every Monday, Wednesday and Thursday!

3D Craft Circle Flower

3D flower finisged craft.jpg

These beautiful flowers will flutter in the breeze!

Age: 3+

Duration: 7-10 Minutes

Learning Outcomes: Exercise fine motor skills. Explore early paper sculpting. Create beautiful take-home artwork.

You’ll Need:

Line-14

  1. Choose six of your favorite craft circles and fold them in half. The colored side should be on the outside.
  2. Arrange the half circles in a full circle on your sheet of paper.
  3. Using a glue stick, apply glue to ONE HALF of the folded circles.
  4. Glue the folded circles to the sheet of paper in a circle configuration. You want the top halves to be loose and fluttery, so make sure you don’t overlap the circles.
  5. Add a stem and leaves with a washable marker.

The results are beautiful artwork that is perfectly fridge-worthy!

Ideas

  • Tape our tissue circles to the inside of your folded circles to add a pop of color!
  • Add an emotional component to the activity. Challenge students to draw six different emotions on the white side of the craft circles before you fold and glue them. Your flower will show a range of different feelings!

Line-03

Like us on FacebookShare this post with your friends, or Subscribe to this blog today to receive original craft project updates every week!

Spotlight on… Fold Up Paper Flower Bouquet!

2015-03-16-FeatureImage

Make a beautiful bouquet for upcoming spring celebrations using our R86450 Fold Up Paper Flower Bouquet!

The Paper Flower Bouquet features an assortment of beautifully printed flowers, die-cut and scored to appear realistic! Each kit comes with 80 flowers, 80 chenille stems, a pack of stickers and a cardstock vase to display your flower arrangement for all to see!

83450-Fold-Up-Bouquets-package-L

The kit makes a great gift for crafty young kids! Make bouquets for loved ones or use the flowers to decorate a wall board in your classroom for a spring display.

To make the flowers in each bouquet, pop them first out of their paper backing. Take a chenille stem and slide the tip into the center hole of the flower. Curve the tip to secure the stem to the flower.

To add details such as leaves, locate the hole at one end of the leaf. Press the chenille stem through the leaf and pull it halfway up the length of the stem. Repeat this process until you have a full arrangement of flowers. We incorporated the flowers we made into a crown for Mother’s Day to celebrate all the great things that moms do for us!

You can use the vase provided, or make your own decorative vase for the flowers. Check out the link for more details… Makes a great gift too!

Line-14

Like us on FacebookShare this post with your friends, or Subscribe to this blog today to receive original craft project updates every Monday, Wednesday and Thursday!

Craft Spotlight: Wild Flower Paper Bits

2014-09-28-FeatureImage

Try out our Wild Flower Paper Bits and decorate scenes, book covers, picture frames and more this season!

Our R15657 Wild Flower Paper Bits come with an assortment of flower shapes, petals, flower centers in a range of colors and patterns.

Pop out the various flower bits from the backing and paste down wherever needed. The whimsical designs and bright colors make the paper bits perfect for decorating skulls for Day of the Dead, which takes place on October 31st in Mexico.

Try out some of our project ideas using the DIY YouTube videos below! Check out Cathy’s brief review of our Wild Flower Paper Bits and the variety of projects you can make with the flower cutouts.

In the following video, we show you how to put together your own picture frames with markers, glue and a few of the Wild Flower Paper Bits.

Line-15

Like us on FacebookShare this post with your friends, or Subscribe to this blog today to receive original craft project updates every Monday, Wednesday and Friday!

Craft Spotlight: Flower Forms

2014-07-27-FeatureImage

Flower Forms are plastic flower bases with slots for threading through your own petal designs! Make your own chain of flowers or use to decorate hair bands or bracelets! 

Flower Forms come in a variety of colors to match various different types of petals. They are sturdy enough to hold the shape of the flower form, but flexible enough to allow tiny fingers to manipulate and place petals through.

R2453

You can use either decorative papers, printed flower images, Color Diffusing Paper or tissue paper to form your petals. To decorate Color Diffusing Paper, drop some liquid watercolor onto the sheet. Watch the color expand across the sheet, then drop another color to see how they blend to create new colors! Leave the Color Diffusing Paper to dry overnight. You can use the colored sheet to cut out large peanut-shaped petals, or simply cut out from decorative paper.

Accordion fold the paper shape across so that it is thin enough to fit into the Flower Form slots. Slide one end of the folded shape into one slot, and thread out through the slot on the opposite end of the Flower Form.

To view detailed information on how to put together your Flower Form, watch the video below!

Line-13

Thanks for checking out this post! Like us on FacebookShare this post with your friends, or Subscribe to this blog today to receive original craft project updates every Monday, Wednesday and Friday!

Mother’s Day Crowns

2014-05-07-FeatureImage

Make Mom a queen for the day with these embellished R22025 Color In Crowns! Add details with collage materials and a few of our own fun craft products, such as R24560 Bouquet Paper and R15657 Wild Flower Paper Bits!

Age: 4+

Duration: 15 minutes

You’ll Need:

 • R22025 Color In Crowns

R24560 Bouquet Paper

R15657 Wild Flower Paper Bits

R5870 Linear Rubbing Plates

• Pipe cleaners

• Scissors

• Crayons

• Glue

• Sequins / Dollar store rhinestones

• Tape

• Pencil

• Ruler

• Strip of paper from 11 x 17″ sheet (28 x 43 cm)

Line-10

Mom will love to feel lavished with this beautiful, handmade crown. Choose mom’s favorite colors and combine printed paper flowers. Although you can embellish the crown with real flowers, you can use our life-like Bouquet Paper to add on flower combinations that will never wilt!

P1018830

The crowns come in a variety of different styles, so you don’t have to be limited by one type. In addition, each of the crowns features die-cut holes that can be popped out from the interior of the crown. These can be used to attach the bouquet flowers. I’ll show you more in the steps below!

P1018836

First we will rub a pattern onto the Color-In Crown. Flip the crown so that the non-glossy side faces down onto the rubbing plate pattern.

P1018838

Place the crown onto the rubbing plate. Rub the side of a crayon to help distribute the pattern evenly across the crown. Choose a color that will allow the pattern to really pop out! Darker colors work best, but here, I’ve used orange and it still managed to turn out nicely.

P1018840

All finished. How does that swirl pattern look?

P1018848

Next, we will create the flowers to decorate your Mother’s Day Crown. First, cut a length of pipe cleaner into quarters. These will be used as stems to hold the Bouquet Paper pieces together.

P1018852Pop out the pieces from the paper backing. The graphics are double-sided with different colors so you can easily alternate the design of your flowers.

P1018854

Grab a bunch of different petal colors, shapes and sizes. The Bouquet Paper includes leaf and center graphics.

P1018856

I’ll show you how to layer the various kinds of flowers I will make for the crown. First, choose a daisy-like flower with a red center and its twin with a yellow center.

P1018857

Each Bouquet Paper graphic features small nicks in the paper to help you thread pipe cleaner through. Thread one of the small pipe cleaner lengths through the yellow center.

P1018858

Continue to thread the pipe cleaner through the next flower until it sits perfectly on top of the first. Fan out the petals so that they alternate between dark orange and soft yellow. To secure, press the top of the pipe cleaner on its side like a hook.

P1018861For the next type of flower, choose a daisy-like flower with a yellow center, another similar flower with a reddish-orange center and a long thin flower with light pink petals. Thread the pipe cleaner through the reddish-orange flower first.

P1018862Next, thread the yellow centered flower behind the first.

P1018863Finish with the thin pink flower behind the first two. Press the top of the pipe cleaner down to hold the arrangement in place.

P1018870

You can make further variations of these flowers using other combinations.

P1018872

Choose the double-petal graphics in four different colors. I popped out an additional center for the final flower design.

P1018873

First, thread the pipe cleaner through the flower center. Bend the end of it to secure.

P1018877

Layer the rest of the petals behind the flower center. Fan them all out equally so you can clearly see the various colors.

P1018879

You can add dimension to the flowers to make them look even more realistic! These particular petals feature a score line along their length. Pinch the sides of the petal together to bend them inwards.

P1018885

What a neat lifelike effect!

P1018895

Now it’s time to decorate your crown!

P1018896Pop out the interior cutouts. These will be helpful for stringing through the flower designs.

P1018897

Thread the pipe cleaner stem of one flower through the popped-out opening.

P1018899

Flip the crown over to the opposite side. You will see where the rest of the stem is poking through. Tape it down to the back of the crown with tape.

P1018903

Thread the rest of the flowers through and tape down.

P1018904

Ta-DA! Already looking fashionable!

P1018906

Now for some details. I pasted large rhinestones in different colors on the tips of the crown arches.

P1018908

To give our crown a bit more flair, I’ve popped out various flowers from the Wild Flower Paper Bits sheets. There are over 1000 different flower pieces to choose from, so mixing and matching the various patterns is so much fun!

P1018910

Paste on the flower bits to cover up some empty spots.

P1018912

Instead of popping out the provided flower centers for the Wild Flower Paper Bits, I decided to press in some rhinestones for the centers. So flashy!

P1018926

Next, we will need to make the headband for the crown. Cut a strip of paper from the 11 x 17″ sheet. The strip will need to be about 1 1/2″ wide and 17″ long. Color in the paper strip headband with the same color of crayon you used to make the print.

P1018929

Tape the sides of the headband to the sides of the crown.

P1018932

Now would be a good time to measure the headband and see if needs to be cut at any shorter.

P1018934

Double up on tape to secure the band.

P1018943

And voila!! Ready for Mom to wear!

P1018947

Mom will be so excited! You can make crowns to celebrate any time of the year, or just to feel like royalty for one day!

Line-10

Thanks for viewing this post! Like and subscribe to us today for more craft projects and product updates every Monday, Wednesday and Friday!