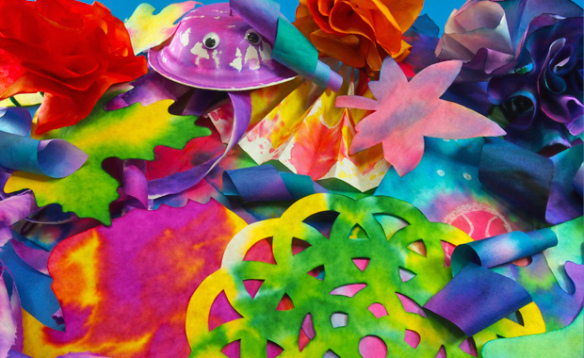
We have had tons of requests for crafts using our lovely Color Diffusing Paper products! Check out an amazing selection of our fabric-like paper in a variety of different projects. The Color Diffusing Paper is perfect for exploring concepts like diffusion and color mixing! We have assembled 7 of our favorite blog posts and linked them here for you!
Color Diffusing Paper Fan with Straws and Connectors
Color Diffusing Paper Jellyfish
Color Diffusing Paper Snowflakes
Wax-Resist Color Diffusing Art
We have also added a whole new craft: Solar Painting!
Solar painting is a wonderful, no-fail activity. All you need is water, color diffusing paper, water color paint and a bright, sunny day. We have tried this activity in both the summer and the winter and they work equally well as long as the winter day is dry.
Age: 4+
Duration: 10 minutes (plus drying time)
Learning Outcomes: Explore scientific concepts including evaporation and osmosis. Introduce students to the scientific process. Create beautiful take-home art.
You’ll Need:
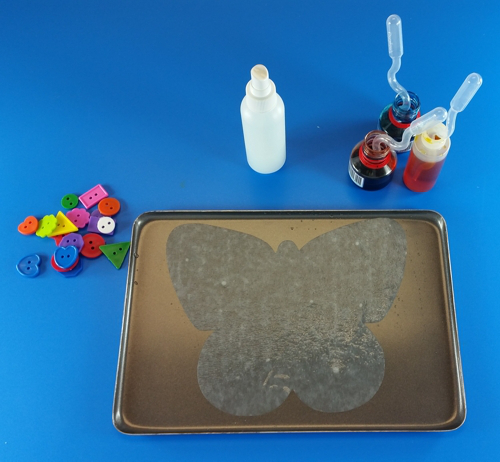
- R2445 Color Diffusing Butterflies
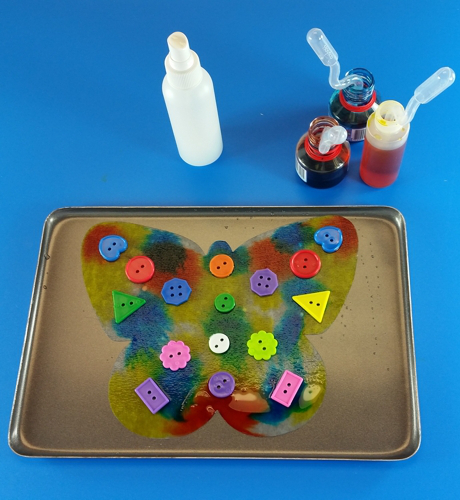
- R2131 Bright Buttons
- R2184 Manuscript Letter Beads
- R2186 Lowercase Letter Beads
- R54460 Squiggle Pipettes
- Liquid Watercolor Paint
- Art tray or cookie sheet
- Water
- Sunlight

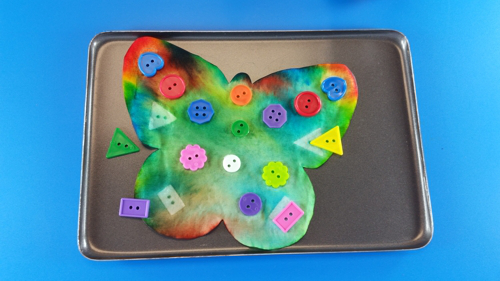
Coat a sheet of paper with water and drain off the excess. Place the wet paper into a tray
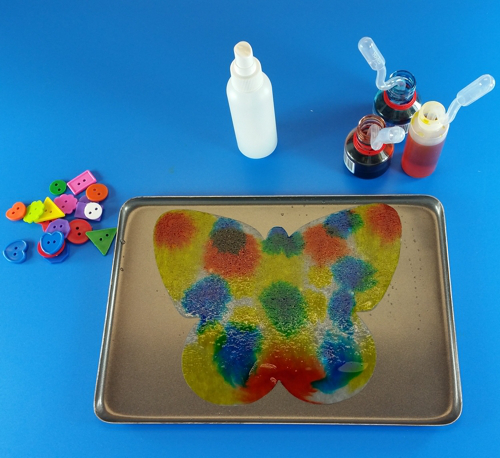
or on a cookie sheet. Next, drip liquid watercolor paint over top of the wet surface. I like to use primary colors, but experiment with color pallets. Place different objects on top of
the wet paint. Beads, buttons, small shells, acorns, or anything small and non-porous work well. Set the tray complete with the wet, painted sheet of paper with objects on top outside in the direct sunlight to dry. Note: To avoid spills, do the whole project outside.
The results are unexpected and beautiful and it’s a great way to celebrate a sunny day. There are three other important aspects to Sun Painting: First, it’s relatively cheap; you can create variations on this theme and really stretch your art budget by changing up the color palette or using different theme objects like our letter beads to make words, or objects from nature. Second, it’s a great way to introduce science to younger children. There are two important scientific processes going on when you create this art: evaporation and osmosis. Third, the students are creating beautiful, colorful art through a thoughtful design process. In other words, it’s a no-fail art activity because it focuses on process rather than the finished result—even though the finished result is spectacular.
Put the sheet into an art tray. Flood the surface with tap water and pour off any excess water.
Use paint pipettes like our R54460 Squiggle Pipettes or R54470 Junior Heart Paint Pipettes to sprinkle small amounts of liquid water color paint over the surface of the wet paper. You need to cover the entire surface with the paint and the pipettes do a great job.
Next, lay objects on top of the wet paint and put the whole tray outside in the bright sunlight. We like using our R2131 Bright Buttons and both R2184 Manuscript Letter Beads and R2186 Lower Case Letter Beads to add a literacy component to an art activity.
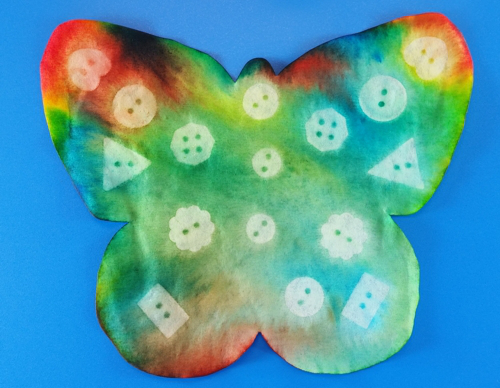
While you are waiting for the paper to dry in the sunlight, ask your students what they think is going to happen. Most kids will say that the paint will dry on the paper, but stay wet under the objects. They may also say that the paint under the objects will look darker than the paint on the rest of the paper. To be honest, this is exactly what we expected would happen the first time we tried this technique!
Instead, the paint on the paper dries, but when you remove the plastic objects, you see a
white “shadow” under them instead of a dark paint color. If it is a particularly hot summer day and the paper dries quickly, you’ll even get shadows around the taller objects like the letter beads. It’s almost photographic!
Here is what’s happening: The science behind this activity is all about the nature of water. Water wants to distribute itself evenly wherever it is. That’s why water flows across a sheet of paper. It doesn’t want to be higher in one area and lower in another. It wants to remain level, so it travels across a surface until it covers it evenly.
When the sun shines on the paper, the water in the paint starts to evaporate everywhere
except under the plastic/non-porous objects. The wetness under the objects wants to “level” out, so it migrates from under the objects and it pulls the pigment with it. Some younger children think this process is magic, but it’s not: It is science!
To take this process to the next level, try limiting yourself to one or two colors, and
experimenting with additives and how you set the piece to dry. For example, try sprinkling table salt, sand, glitter, or other tiny particles over the Color Diffusing Paper. See what the result is. Challenge students to tilt the sheet, so it drains as well as evaporates. This is a no-fail activity, so no matter what students try, they will walk away with a unique piece of art. With that safety net and reward system in place, challenge students to be creative about the materials they choose to experiment with. Display the beautiful results of student’s creative experimentation in the classroom!

Like us on Facebook, Share this post with your friends, or Subscribe to this blog today to receive original craft project updates every week!

![]()