
Age: 4+
Duration: 30 minutes (or more, if you’re really having fun)
Learning Outcomes: A mandala is a spiritual symbol that represents the universe. So, this craft will give us an opportunity to start a conversation about the people who create these symbols. Also, we’re going to focus on the mathematical component of these intricate designs using fractions.
Here’s what you need:
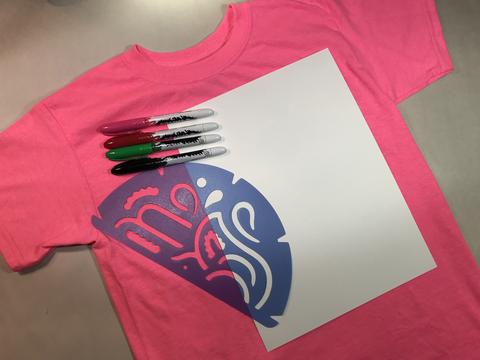
Mandala Fraction Stencils (R58626)
T-shirt (follow washing instructions)
Fabric Paint or Fabric Markers (follow washing instructions)
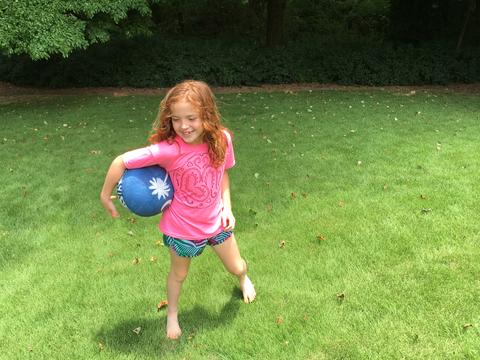
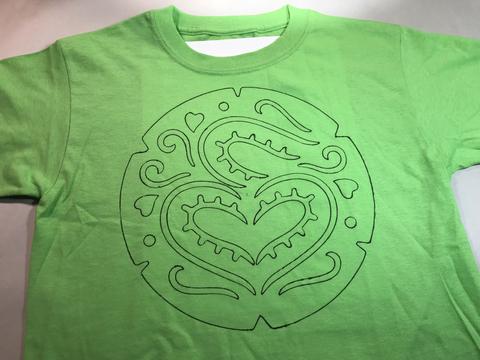
What could be better this summer than to go out on all your adventures wearing a t-shirt designed by your very own crafty fingers? We’re going to make a cool, SMART design that you’ll be proud to wear when you play outside or travel abroad!
These mandala designs are inspired by the ancient Asian traditions of Hinduism, Buddhism and Jainism. Devoted worshipers created mandalas as a visual representation of the universe, as well as an aid for meditation.
The intricate, circular designs make this ancient art form ideal for splitting into parts. This is how we’re going to be able to use the patterns to help us sharpen our understanding of mathematical fractions.
Once you’ve finished your pattern, make it your own! It’s up to you to embellish and complete your design in any way that makes you happy. For inspiration, search online for mandala images. Or, better yet, take a trip to your local library to search for books about mandalas and the people who create them. You’ll discover fascinating representations of the universe that just might inspire your own creations.

Step 1: Choose your pattern
Because mandalas can be extremely detailed and beautifully ornate, we have broken our designs into fractions. Each stencil is a like a slice of a pie: 1/2, 1/3, 1/4, 1/5, 1/6, 1/8, 1/10. Pick one stencil, and use it to create the outline of your design. For the 1/2 stencil, 2 parts make the whole. For the 1/10 stencil, 10 parts make the whole. The product guide will be helpful to understand the best way to use the stencils.
Step 2: Trace the pattern on your shirt
It might be a good idea to practice tracing your stencil on a sheet of paper first.
Before you begin, make sure you know how the pattern will fit on your shirt. The best way to do this is to mark the center with something that will wash out, like a very small pencil mark. Where you place the design is totally up to you, but you’ll want to know that it’s going to end up where you intended.
Here’s a tip for you: Depending on your art medium (markers or paint), you may want to place a sheet of cardboard or some other scrap material inside your shirt as you work. This will help to prevent the colors from bleeding through to the back of your t-shirt. If you do happen to get colors on the back accidentally, you could always draw another mandala on the backside.
Now that your placement is all set, it’s time to start tracing your design with your fabric markers or fabric paint. And, hey, don’t worry about making mistakes. It’s totally fine if you get out of line! In fact, you might find that an unexpected mark is just the thing your design needs to make it more unique.
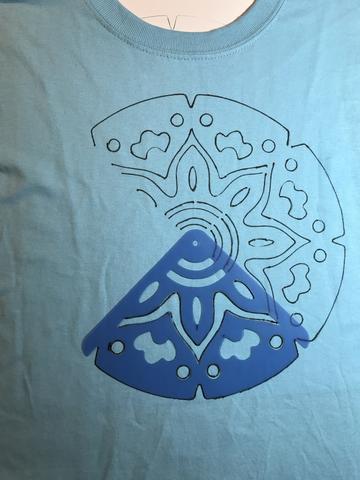
Step 3: Complete your image
This is the fun part. Doodles allowed! Make it unique. Have fun. Take your time. Refer to your library books for inspiration. Enjoy it!
Step 4: Wear it!
Guaranteed — you’ll be the only one on the block with this cool t-shirt, made by you!
Consider This:
What was the most interesting thing that you learned about the culture of the people who created the mandala art form?
What are some other objects from around your house that could be broken into fractions?
Do you think the creators of the mandala art from used an understanding of mathematics to inspire their work?
How might you apply mathematical principals to help visualize your interpretation of your home, your neighborhood, your city, your world, your universe?