Tessellations Mosaics

Print

Inspired by Pattern Blocks, we’ve created 6 shapes that can be used to make wonderful tessellation patterns. Shapes are: equilateral triangle, rhombus, trapezoid, hexagon, square and small rhombus. Each shape is carefully crafted to match the sides and angles of the other shapes allowing your students to use the shapes to create seamless tessellations or to design animals, people, vehicles, structures and patterns!

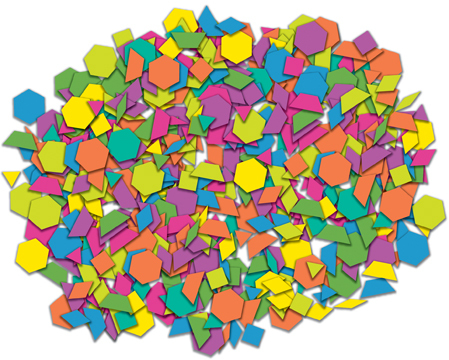
Unlike Pattern Blocks, which have specific colors for specific shapes, our tessellations mosaics come in a range of 12 bright, glossy, double-sided colors. Your students can make patterns with similar colors or challenge themselves by creating patterns in different colors. Get students acquainted with the different shapes and talk about their characteristics by giving each group a bowlful of the Tessellations Mosaics. Ask students to sort the mosaics only according to color. They must choose one color and find all the shapes in that color. Note: Make sure to point out that the mosaics are double-sided!
Once all the shapes are found, ask students to describe each shape to you.

Print

What do the shapes look like? For instance, some children may say the trapezoid reminds them of a roof. Once your students get a chance to share their opinions on the shapes, discuss the characteristics of the shapes. We’ve included a short description of each of
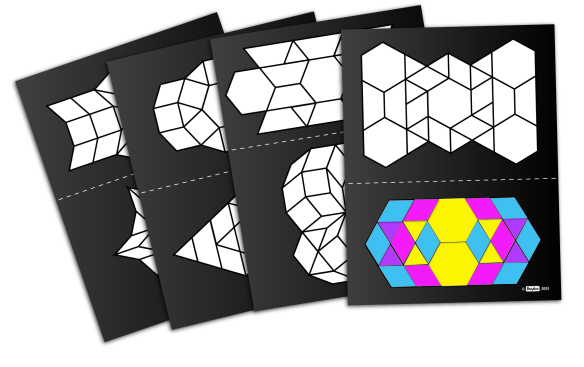
the shapes later on in this guide. Now comes the fun part—putting the Tessellations Mosaics together! Pull out the provided pattern sheets and photocopy each set. Keep the
original sheets safe for future use. There are 2 patterns on each sheet. Print as many sheets as required for your class. You can provide the entire sheet with both patterns to students or cut the sheets and hand out one pattern each.

Fill in the puzzles with the shapes shown in the outlines. Before students fill in their patterns with the mosaics, encourage them to experiment with colors. For their first pattern, students can make the shapes match all in one color. Once they get comfortable with arranging the Tessellations Mosaics onto the pattern sheet, they
can switch out different colors for the same shapes. For instance, instead of filling a pattern sheet with Tessellations Mosaics all in red, students can switch out some of the red shapes for the same shapes in blue.

15664 Tessellations Mosaics girl web

Make new patterns with these color arrangements! After all the students have arranged and glued down their mosaics, compare the patterns to see how different color combinations change how the patterns look. These patterns are intended to teach students how to put the mosaics together. They are meant as a guide to understand how the edges and angles of the shapes can be matched. Some of the patterns can be replicated to make regular tessellations. These patterns can be tiled together to make even larger and more impressive patterns. Ask children to cut their patterns and arrange one big tessellation on a bulletin board.

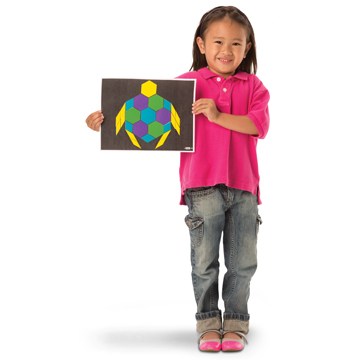
To add more value to your Tessellations Mosaics pack, go online to download our amazing patterns featuring kaleidoscope-like designs and fun animals! Click on the ‘Artwork’ link to access the resources in printable PDFs. You can access the artwork directly here. Fill in the designs with the Tessellations Mosaics! Draw thematic backgrounds, such as an ocean, the plains or a jungle onto the animal puzzle cards!

Line-11

Like us on FacebookShare this post with your friends, or Subscribe to this blog today to receive original craft project updates every week!

Action Shapes Animation

OLYMPUS DIGITAL CAMERA

Now’s the time to bring your vision to life! In order to shoot your animation, you will either need a camera or a tablet with animation software. In this activity, we will be using the stills from our camera to make an animated flipbook!

Age: 6+

Duration: 20-30 minutes

Learning Objectives: Create an animated flipbook using simple materials. Use fine motor skills in “flipping” the book to create a visual animated clip.

You’ll Need:

Line-07

OLYMPUS DIGITAL CAMERA

Children can decorate and color in a large-size sheet of paper to use as a backdrop for your Action Shapes characters. Use poster or Bristol board for this. Place your backdrop on a flat surface such as a desk or easel.

OLYMPUS DIGITAL CAMERA

As I’ve demonstrated before in our Action Shapes post, there are several pieces that join together to create the swiveling motion of the character.

OLYMPUS DIGITAL CAMERA

Each limb has a pair of fins and a hole for sliding the fins through.

OLYMPUS DIGITAL CAMERA

Here’s what the junction looks like when combined. Flatten out the fins to secure.

OLYMPUS DIGITAL CAMERA

Now you’re ready to assemble your full action shape!

OLYMPUS DIGITAL CAMERA

Color in your Action Shape character with pencil crayons or markers! Create custom props out of scrap card paper that you can use in your animation. for this character, we’ve added a ponytail to the side of the Action Shape’s head and decorated a soccer ball to use as a prop in our film. Check out our process below!

OLYMPUS DIGITAL CAMERA

You will need a tripod to properly hold your camera. These can be easily adjusted for height and angle, so you can set it at one point and simply press the shutter button to take as many photos as needed. This will help keep the frames consistent. Note: Be careful you don’t trip over the tripod legs! If you are using a tablet, place the backdrop on a desk and use modular wire shelves to prop the tablet directly on top of the artwork, like it will be grabbing a bird’s eye view. Modular shelves can be found at your nearest department store in the organization aisle. Adjust so that the viewfinder is able to clearly see through the wire mesh.

Use your storyboard as a reference to set up the Action Shapes character. What is your Action Shape’s first pose? Once you have set up the Action Shapes character, take a shot! Go back to your Action Shapes character and slightly move one or two limbs. Take another shot. As you go back and forth between adjusting your character and taking a photo with your camera, you will need to keep in mind that each shot shows one part of an entire action. You need to make all the shots “flow” together so that the starting point of an action smoothly reaches the end.

There are several free-to-use software (called ‘freeware’) online that can string these images together for you into an animation. Simply upload your photos and select them all to get combined into the animation. Most of these software programs will require that your photos be in JPEG format. The final animation will be converted into a GIF, which is a file type that strings multiple pictures together to make a mini video!

OLYMPUS DIGITAL CAMERA

Alternatively, you can “flip” your animation into a flipbook! Select all the images in your folder and select them to print wallet-size onto regular 8.5 x 11” (21.5 x 28 cm) paper.

OLYMPUS DIGITAL CAMERA

Cut out all the small pictures and stack them in the appropriate order. Staple them all together on the side opposite where you will flip through them.

OLYMPUS DIGITAL CAMERA

When finished, hold the stapled side in one hand while flipping consecutively through the pages. As you flip through the pictures, they will string together like a frames in a movie!

Animation

Happy filming!

Line-07

Like us on FacebookShare this post with your friends, or Subscribe to this blog today to receive original craft project updates every week!

R10210 Action Shapes

R10210-B

Lights! Camera! Action! These moving people shapes are wonderful resources to use for art projects, and amateur stop-motion videos. Action Shapes are made from sturdy card so that they will hold their shape while you position the characters’ arms and legs. A super-simple design for the pivoting joints helps make the characters easy to assemble and easy to move, too!

R10210-C

Color in and draw details on the character to make self-portraits or develop a unique character. Students may find that having a blank project in front of them seems a little daunting. There are so many ways to decorate the project, but which way is the best way? The Action Shape is made of sturdy card, so you can trace the shape on paper and plan your project.

10210-Illustration-02

The Action Shapes characters feature 9 parts: the head, neck and torso, two upper arms, two forearms, two thighs and two lower legs. All of the paired parts connect to each other using pivot points. These pivot points are formed by special fins on certain pieces that go through pivot holes in corresponding pieces. In order to make decorating the Action Shapes easier, assemble the pieces together after you finished coloring them.

Note: Keep track of all your pieces! There are two larger thigh pieces that can easily be confused with the upper arm pieces. If needed, write the location of each piece on the back. You can even specify “left” or “right” depending on how you wish to organize them.

To trace, lay the main body piece of the character onto a sheet of drawing paper. Hold the character steady with one hand while using the other hand to trace around the outline of the character. Use the traced outline as a guide for experimenting with different “looks” for your character. Illustrate different clothes on the character with a pencil; add in a happy face or a surprised face; or, try on different hairstyles. Then, color it in! If you need to re-trace your Action Shapes design, use another sheet of paper and draw a different appearance. Find out which look is best for your character. Once you have chosen your favorite “look,” use the illustration as a reference to draw on the details.

First, use pencil to lightly draw in the details on your Action Shapes character. Use crayons or pencil crayons to add color. The Action Shapes characters are designed on special blank card that accentuate crayon and pencil crayon colors. Tip: Some students find it easier to outline the different parts of the character with a crayon before coloring in the entire area. Use this technique to guide students towards coloring the whole surface area of the Action Shapes before moving on.

10210-Illustration-03

Assemble your Action Shape by locating all the “fins” at each of the joints. The fins are designed to slip through special pivot holes in select pieces that go on top. Bend the fins up from the backing and fold in towards the middle. Do not tear or remove the fins.

10210-Illustration-03B

Next, pop out the pivot hole. Place the piece with the fins underneath the piece with the pivot hole. Pinch the fins together and slide through the notches on either side of the pivot hole. Once the fins are through, fan them out flat over the pivot hole.

Animation

Now you can rotate the pieces! This will create movement with your Action Shape character. Look out for our next blog post that will show you how to create your very own stop-motion animation video!

Curriculum Connections

  • Encourage self-awareness through “All About Me” crafts
  • Build moviemaking vocabulary
  • Create storyboards and scripts
  • Develop fine motor skills
  • Integrate digital learning with multimedia art
  • Generate understanding about character poses
  • Exercise gross motor skills through fun posing activities
  • Discover the early history of film and stop-motion animation
  • Brainstorm activities for characters to perform
  • Encourage critical thinking
  • List action verbs for literacy

Line-09

Like us on FacebookShare this post with your friends, or Subscribe to this blog today to receive original craft project updates every week!

Welcome Back to the New Year!

top ten list feature image

Now that we’ve rung in the New Year, we are excited to share our ideas with you over the next little while. Stay tuned for blog posts in a range of subjects, using tools that you already have in your classroom!

We hope that you’ve enjoyed a year of posts from Little Fingers Big Art. Here’s a recap of 10 of our favorite posts:

1.IMG_0139

Use jelly on the Light Cube for a great sensory activity!

2.2015-02-25-FeatureImage

Make lucky four leaf clovers for St. Patrick’s Day, coming up in March!

3.

P1016562

Combine letters in a Word Mobile to generate literacy creativity in students!

4.

Image-04

Guest post from Rebecca Milling about the wonderful creations made with our Straws and Connectors at St. Jerome’s Children’s Home in Nakuru, Kenya.

5.

P1016903

Check out this neat step-by-step tutorial on how to make 3D wall art!

6.

IMG_0811

Use our Tube Crafts to make a birdfeeder… or critterfeeder!

7.

P1016967

Make beautiful tissue paper birds–a great fine motor skills activity!

8.

Animation

Check out our awesome Action Shapes People! Customizable action figures that your students can use for stop-motion animation projects!

9.

Collage-a-Saurus-FeatureImage

Imagine what dinosaurs really looked like with our Collage-A-Saurus and Dinosaur Paper Sheets!

10.

OLYMPUS DIGITAL CAMERA

Turn old doodle paper into wrapping paper for someone’s birthday or for Christmas time!

These are our top ten for the year! Share your favorite post online with your friends.

Leave us a comment to let us know what kinds of posts you would like to see more of!

Line-09

Like us on FacebookShare this post with your friends, or Subscribe to this blog today to receive original craft project updates every week!

Repurposed Brown Paper Art (Christmas Edition)

IMG_7757

We always hear about great ways to get kids thinking creatively, while doing some sort of double duty. By this, I mean putting down brown packing paper onto tables to protect the surfaces, while giving kids the ability to draw or doodle to their hearts’ content! Well… what do you do with that paper after it’s all done? Read on for more, but a word of advice: DON’T throw it away!!

Age: 3+

Duration: 15 minutes

Learning Objectives: Create artistic talent, generate creative thinking skills. Repurpose old art in a new and fun way.

You’ll Need:

  • Brown Wrapping Paper
  • Markers/pencil crayons/crayons/pens
  • Tape
  • Scissors
  • Ribbon

Line-03

Click to view slideshow.

Over the years, we’ve worked with children at various art camps and picked up a few pointers along the way. One of our good educator friends gave us this hint: cover up workspaces with brown wrapping paper. Get the students to doodle when they are bored or need some creative stimulation. It’s always good to have a canvas available at all times!

But what do you do with it when it’s all filled up?

P1010379

Remove the brown drawing paper off the table and cut the best artwork out into large rectangles (about a meter or yard wide, depending on how big the previous workspace was).

OLYMPUS DIGITAL CAMERA

Flip the rectangle sheet over. Place a boxed item such as a new toy or a small keepsake into the center of the wrapping paper.

OLYMPUS DIGITAL CAMERA

Fold in the long sides. Cut off any of the excess and tape the two edges in place. Fold down the sides as you would for wrapping a gift and cut off any other excess. Tape the sides closed.

OLYMPUS DIGITAL CAMERA

This is what you’ll be left with after you flip it right side up.

OLYMPUS DIGITAL CAMERA

To give your wrapped present extra special flair, add on a gold ribbon or bow. Tie it in the center and curl the ribbon with scissors.

OLYMPUS DIGITAL CAMERA

A great way to spread Christmas or birthday cheer any time of year!

Line-14

Like us on FacebookShare this post with your friends, or Subscribe to this blog today to receive original craft project updates every week!

Getting Creative with our 60170 Constructa Clips Creative Animal Set!

DSCF8281

A few years ago, we spent the day at the Design Exchange Museum in Toronto putting together a few activities with the kids. One of those activities was our R60170 Constructa Clips Safari Animals set, also known as our Creative Animal Set! Check out what the campers made!

DSCF8288

Campers popped out the pieces of the Safari Animals kit, then started assembling them with the provided Constructa Clips. This is a great little kit for kids who love to tinker with their creations.

DSCF8313

They were working away like Santa’s elves to make the coolest little toys!

DSCF8299

We’ve included full-color instructions to help you put together the unique toys. Experiment a little and see what kinds of combinations your students come up with…

DSCF8314

Like this one! Go wild with your designs and have hours of fun this holiday season with a kit that’s bound to be a hit in your classroom.

Line-09

Like us on FacebookShare this post with your friends, or Subscribe to this blog today to receive original craft project updates every week!

NAEYC 2015 – A Great Turnout!

naeyc 2015

This year, the creative folks at Roylco returned to the Annual NAEYC Conference, which was being held in sunny Orlando, Florida! Check out some of our favorite moments captured on our cameras!

Every year, the National Association for the Education of Young Children hosts a large space for companies who specialize in art education (like us!) to showcase their materials and talk one-on-one with the teachers. We had a prime location nearby the entrance to the hall, and welcomed hundreds of visitors!

naeyc2015

Our booth featured a fantastic array of our products, with 4 tables zig-zagging across the front. This allowed us to demo some of the products to our teacher friends while encouraging a flow of traffic through our booth.

naeyc 2015

We showed off some of our new products too! Look out for some of the following great products coming out next year at your local educational retailers:

R60705 Neon Straws and Connectors

R54490 Chromatography Kit

R48236 Junior Fun Faces Mix and Match Rubbing Plates

R59270 My Body in Action Cards

R49143 All About Me Book

naeyc 2015

We had great fun talking about our published ebooks as well (soon to be available on our website!), including The Art of LearningThe Art of EngineeringThe Human Body: Inside & OutLight Table Magic and Learn Math… Without Knowing It! Each e-book is a gigantic resource for teachers, featuring over 50 ideas for implementing art-based learning through various subjects. The focus is on FUN learning, meaning that we don’t provide any worksheets or practice lessons that students need to learn. Instead, we focus on building quality experiences within the classroom, using those experiences as a strong foundation, and strengthening those experiences with further tie-ins.

naeyc 2015

We love our teachers and strive to make the difference with all our products! Email us at info [at] roylco [dot] com for more information about our 2016 products and e-books!

Line-05

Like us on FacebookShare this post with your friends, or Subscribe to this blog today to receive original craft project updates every week!

Thank You Art Campers!

kids art camp roylco

Thank you to all our wonderful art campers who participated in our 2014 Art Camp! We had a blast!

ThankYouPhoto-02

Although it was unusually cold for the middle of summer, we did lots of activities that kept us up on our feet and moving about. The kids not only took part, they engaged fully with each other and made the best of friends!

ThankYouPhoto-05

We had some silly moments…

ThankYouPhoto-06

…some sneaky moments…

ThankYouPhoto-04

…and some out-of-the-box moments!

ThankYouPhoto-03

All of these moments brought about a willingness to explore with new materials and develop artistic ability using fine and gross motor skills!

We’ve put together a gallery of faces featuring our lovely campers. Thanks again for all the great memories and we hope to see you soon!

ThankYouAllKids

Line-16

Like us on FacebookShare this post with your friends, or Subscribe to this blog today to receive original craft project updates every Monday, Wednesday and Thursday!

Newspaper Builders Pyramid

newspaper builders pyramid

We had the fantastic opportunity to visit THEMUSEUM in Kitchener, Ontario and build a pyramid with our R60550 Newspaper Builders! This worked out well for us since the museum was hosting their exhibit of ancient Egypt!

newspaper builders pyramid

The R60550 Newspaper Builders kit features 36 connectors and 200 rod tubes. The rod tubes are secured inside a sheet of newspaper at either end. Use tape to adhere the tubes to the inside of the roll. Roll up the newspaper, secure with tape, and you are ready to start building! We painted our newspaper sheets before we rolled them up.

newspaper builders pyramid

The connectors fit snugly into the tubes, and feature prongs that point in 30° angles. You can make multiple triangle shapes and combine them into a unique sculpture. These girls put together the top of our proposed structure: a pyramid!

newspaper builders pyramid

We first started with the base. Constructing the base is the most important part because it sets up how the rest of the sculpture will look.

newspaper builders pyramid

We split the campers into separate groups. This not only helped us complete the sculpture faster but also taught kids the experience of working on different parts that are pieced together to make a whole sculpture.

newspaper builders pyramid

We helped the campers connect the various parts together.

newspaper builders pyramid

And then we held it up while the finishing touches were added!

newspaper builders pyramid

It was a great experience for everyone!

newspaper builders pyramid

All standing and secure! The kids loved to crawl inside the structure, as it seemed like a little ‘house’!

Line-22

Like us on FacebookShare this post with your friends, or Subscribe to this blog today to receive original craft project updates every Monday, Wednesday and Thursday!