Willard City Elementary Artists use our Tessellations Animal Templates!

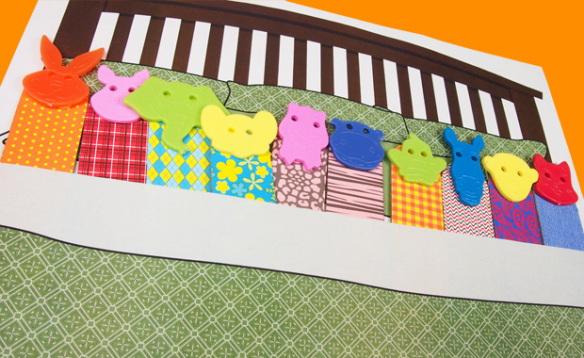
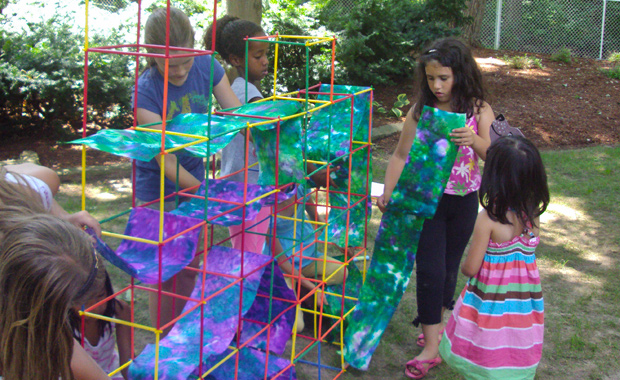
The Artman posted his students’ math/art projects that used our Animal Template Tessellations! Tessellations are a great way to build coordination and patterning skills! See more about Artman’s process below.

Artman posted many photos of his students using our Animal Template Tessellations. A variety of designs from the pack were used. These included the elephant, lizard, fish, butterfly, dog, turtle and spider. The pack includes so much more, however! See the full display of designs at the full web guide HERE.

This project was posted by Artman at his WordPress blog Artmanews on April 30, 2012, entitled “Tessellations -part 1.” Visit the full post on his students’ tessellation art the link!

After the tessellations were traced onto paper, the students incorporated a lesson in color theory to complete their project. They chose complementary colors, which are two colors on the color wheel that are directly opposite each other. This student chose blue and orange as his complementary colors.

Instead of merely coloring in the tessellation in one flat color, the interior details were filled in with the complementary color to help distinguish the patterns from each other.

Lovely work!

Thanks to the Artmanews for this post!

Images and original post © Artmanews

This post was not sponsored for a review. At LittleFingersBigArt, our mission is to present to our readers and viewers the newest and most creative craft ideas that fans of Roylco have made on their own. Our goal is to allow you and other educators and parents to reuse our products in fun ways so that children always get the best educational experience from them!

We’d love to see more ideas like this one! If you’ve got a brilliant craft idea or have made a version of one of our crafts that you would like to share with us, send an email to subscriber@roylco.ca with photos, descriptions or a link to your work. We will create a feature post and link back to you with full credit. We’d love to hear from you!

Line-01

Ten in the Bed!

2014-01-22-FeatureImageTurn a classic children’s song into a storytime activity with our Animal Buttons and a few craft materials! Your students will love the interactive quality of the game. Choose from a variety of different templates below to help you make your own Ten in a Bed!

Age: 3-5

Duration: 10 minutes

You’ll Need:

R2040 Animal Face Buttons™

R39101 Fabric Print Sticks

• Hot glue gun

• Bed Templates (see below)

• White printing paper

Line-11The Ten in a Bed song is ideal for learning to count numbers and exploring number management, patterning, and sequencing! Incorporate memorization with singing song lyrics, and develop fine motor skills with physical game interaction.

2014-01-22-Step01

For this activity, you will need to use a hot glue gun. Make sure you always use adult supervision while handling a hot glue gun. It would be ideal to first demonstrate to your students how to put together the craft, then station yourself at the “hot glue gun” area to make sure children don’t hurt themselves while using it.

TEN IN A BED TEMPLATES

Pick any one of the following bed designs to personalize your story-time Ten in a Bed activity! Click on the image or the title below to reach the PDF. Once you have accessed the PDF, simply print out the design to a color printer on regular 8.5 x 11″ printing paper. Use the paper design as a backing for your Ten in a Bed storytime activity.

Template blank

Ten in a Bed BLANK

Template 1

Ten in a Bed Template 1

Template 2

Ten in a Bed Template 2

Template 3Ten in a Bed Template 3

Template 4Ten in a Bed Template 4

Template 5Ten in a Bed Template 5

If you would like for each student to make their own Ten in a Bed activity, print out the blank template (at the top of the list). Students can color in the bed with crayons or markers, or decorate with stickers to personalize their craft.

2014-01-22-Step02

Cut the printed sheet out along the straight line in the center of the image. DO NOT CUT the bed into two pieces. The bed should separate only in the center like a pocket.

2014-01-22-Step03Now to make the ten animals! Select your Animal Face Button and hot glue it to the top of a Fabric Craft Stick.

2014-01-22-Step04Press and hold!

2014-01-22-Step05Repeat for all ten animals! You can mix and match the patterns on the Fabric Sticks with the color of the Animal Face Buttons.

2014-01-22-Step07Slide your ten animals through the pocket opening of the printed bed image.

Now to play the Ten in the Bed game! Below are some example lyrics that you can use while playing this great primary storytime activity:

There were [number] in a bed,

And the little one said,

“Roll over! Roll over!”

So they all rolled over

And one fell out!

Line-11

Thanks for hanging out with us today! We’d love to get some of your input on our projects. Send ideas or photos about your own projects to us at subscriber@roylco.ca for a chance to be featured in one of our upcoming posts! We’d love to hear from you!

Craft Spotlight: Straws and Connectors

Feature-Image-strawsconnectors

Looking for a last-minute kids’ Christmas gift? Stimulate your children’s cognitive abilities with this perfect building kit. In this post, we’ll show you some ideas to make from Straws and Connectors!

The Straws and Connectors come in 4 intriguing packages:

 R60901 Straws and Connectors™ Creative Building Set (390 Straws, 315 Connectors)

 R60990 Straws and Connectors™ Structure Pack (100 Straws, 84 Connectors, 1 Big Blue Veil)

 R6085 Straws and Connectors® (230/pkg)

 R6090 Straws and Connectors® (705/pkg)

You can even order replacement straws (R6084 Replacement Straws) to replenish your classroom supply!

IMG_7634

Straws and Connectors come in a brilliant array of colors, so you can use them for sorting projects! Ask children to sort by color and by type–such as separating Straws from Connectors.

You can even introduce angles with the Straws and Connectors! Even though it seems like a tough subject to teach, using actual concrete objects helps to reinforce certain concepts in children’s minds, especially if they can manipulate the object into different possibilities. Attach one of the Straws to a Connector and describe the Connector as the vertex of an angle. Attach another Straw to the opposite side of the Connector to make a 180 degree angle.

IMG_7628

Next, align two Straws with the Connector at a 90 degree angle. Once you have made a 90 degree angle, demonstrate how to make a 45 degree angle by placing another Straw directly in the middle of the L.

IMG_7655

These concepts will help children grasp how to make simple shapes with combinations of Straws and Connectors. Make squares, rectangles and triangles! You can even make circular objects!

IMG_7662

Here, our Art Campers worked together to make their very own sculpture with bends and curves!

_DSC0594

In another group, the Art Campers constructed a rectangular structure from the Straws and Connectors. They used dried painted Color Diffusing Paper that they had made previously with pipettes and watercolor paint to decorate the interior and exterior of the sculpture.

_DSC0591

They consulted with each other how they would cover their sculpture with the Color Diffusing art and worked out a system of ‘waving’ the art through the Straws.

[youtube http://www.youtube.com/watch?v=Ow04SYfL5_E]

Watch the video above to see just why YOU need a box of these versatile construction materials!

Line-10Thanks for sticking around! We love to hear your feedback. If you’ve ever used Straws and Connectors and have photos of your structures, send us your pictures to get published in an upcoming post. Send to subscriber@roylco.ca!

Feely Bag Find-It Letters

Feature-Image-eyespygame

Can you find all the letters of the alphabet? Check out our tutorial below for an easy-to-make game students will love playing with during rainy days! This project uses our R2184 Manuscript Letter Beads which help students feel for the shape of each letter as they search for them! 

Age: 4-7

Duration: 15 minutes

You’ll Need:

• R2184 Manuscript Letter Beads

• R2114 Colored Rice

• Ziploc® bag

• Tuck tape or duct tape

Line-12

The objective of the Feely Bag Find-It game is to locate and find all the letters or numbers placed into the bag using touch. Students can “feel” and look for various kinds of letters or numbers, for example, letters that are vowels, consonants, uppercase or lowercase. These different rules help students reinforce different linguistic concepts while playing with the Feely Find It Bags!

OLYMPUS DIGITAL CAMERA

This is a pretty easy project that most young students can help out with. You can make multiple kinds of Feely Bags–for uppercase and lowercase letters, numbers or even miniature action figures! Note: Be careful when handling Colored Rice as it can spill everywhere if not properly siphoned into the bags. Use a measuring cup or spoon to transfer the Colored Rice from its container to the Feely Bag.

OLYMPUS DIGITAL CAMERA

First seal up all three sides of the Ziploc® bag with colorful or decorative duct tape. This helps to ensure that the Colored Rice won’t seep out in case there is a rip in any of the edges.

OLYMPUS DIGITAL CAMERA

Fill the Ziploc® bag with the Colored Rice.

OLYMPUS DIGITAL CAMERA

Next, place in the Manuscript Letter Beads or Math Beads.

OLYMPUS DIGITAL CAMERA

Close the opening in the Ziploc® bag and seal with another strip of duct tape. Note: Gently press out all of the air from the bag through the opening before closing it up.

OLYMPUS DIGITAL CAMERA

Shake the bag to mix all the contents together and hide all the visible beads in the mass of Colored Rice.

Give students a time frame to find all their beads or have students sit in a circle and pass the Feelie Find-It Bag around so that each student can locate one assigned letter or number bead.

Line-12

Tell us how today’s project went by sending us an email to subscriber@roylco.ca! Send us photos of your students’ work and we will write up a feature post highlighting your classroom crafting adventures!