Father’s Day Picture Frame

Father's Day Picture Frame BP

fathers day picture photo frame

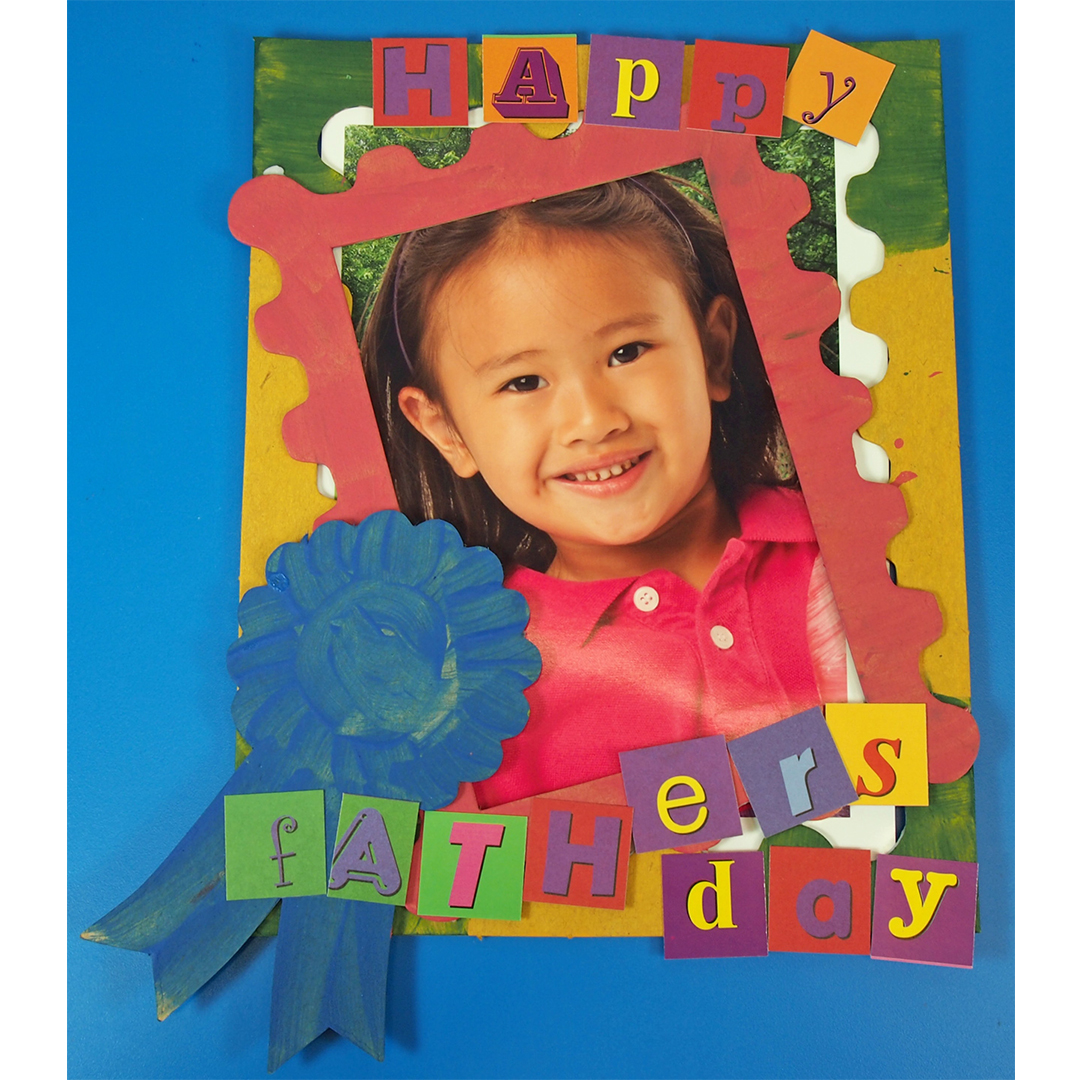
Frame wonderful memories for Father’s Day!

Age: 5+

Duration: 15-20 minutes plus drying times

Learning Objectives: Create beautiful painted frames for Father’s Day. Make a gorgeous take-home craft. Practice literacy skills while spelling out words with letter mosaics. Arrange and overlay various picture frame elements to get an interesting design.

fathers day picture photo frame

You’ll Need:

R52109 Chipboard Picture Frames

R15632 Alphabet Pasting Pieces

• Paint

• White school glue

• Paintbrushes

• Photograph (measured to frame size)

• Paint tray

Line-13

fathers day picture photo frame

Our chipboard frames are specially designed to “nest” into each other, giving you way more value for less! Simply break apart the frames at the score lines. These frames are intended to overlap together to create an interesting design. As an added bonus, the center of each frame contains a third image that can be popped out and glued to the corner of the frames. This project uses the frames with the winner’s ribbon, but you can adapt this activity to any design in the Chipboard Frames pack.

fathers day picture photo frame

For this activity, I use regular school-grade tempera paint and mixed all the colors used with a bit of white paint for greater intensity and to prevent the 100% recycled material from absorbing all the paint. Use broad, even brushstrokes to fill the frames with color.

fathers day picture photo frame

While waiting for the paint to dry, grab a pile of R15632 Alphabet Pasting Pieces and sort through them to find the letters that spell the words, “Happy Father’s Day” or a similar phrase. You can explore different types of lettering styles with the interesting colors and designs!

fathers day picture photo frame

Once the frames are dry, layer the largest in the back and the smallest pieces towards the front. Use the additional element to decorate a corner of the overall frame. Paste all the pieces together with white glue.

fathers day picture photo frame

Layer the Alphabet Pasting Pieces phrase onto the frame. Use white school glue to paste the pieces.

fathers day picture photo frame

Here’s a look at a simpler design created with the Alphabet Pasting Pieces and the frame.

fathers day picture photo frame

Print out a photo of yourself and paste to the back of the frame! This makes a great take-home craft for all your students and just in time for Father’s Day!

Line-13

Like us on FacebookShare this post with your friends, or Subscribe to this blog today to receive original craft project updates every Monday, Wednesday and Thursday!

Accordion Critters

accordion critter folding puppet

Round up your favorite animal friends for a puppet show! The Accordion Critters are intended to focus students on folding accordion-style to exercise their fine motor skills.

The super-cute animal designs are enough to make a fuss about! That’s why we’ve made 12 different designs–a whole lot of animals for your students to choose from.

accordion critter folding puppet

Apart from learning about the different animals, kids can create their unique animal legs by either braiding, folding or curling the strips provided in the pack. Mix and match the different colors too!

accordion critter folding puppet

Our art campers designed some of their own Accordion Critters using the provided paper lengths! This camper is folding the strips back and forth to create that accordion look.

accordion critter folding puppet

She unfolded the strips to see how the legs would look like.

accordion critter folding puppet

She attached the legs on with a bit of tape. Other animals such as the frog or snake can use the paper strips as tongues.

accordion critter folding puppet

Almost finished! Now all we need to do is add on some string to hang the Accordion Critter for a puppet show!

accordion critter folding puppet

Here’s how one of our campers turned her critter into a puppet!

accordion critter folding puppet

Unfortunatley, our puppet show got blown over by the wind, but we did manage to hang the critters from the bushes in our garden.

accordion critter folding puppet

So cute!

You can extend the puppet activities to include some of the projects below!

• Make your own personal puppet theatre and characters for individual student demonstrations!

• Simplify your puppet projects with a teacher finger-puppet glove you can use for storytime!

Line-17

Like us on FacebookShare this post with your friends, or Subscribe to this blog today to receive original craft project updates every Monday, Wednesday and Thursday!

Fluffy Clouds Sky Mobile

sky mobile craft

Introducing our up-in-the Sky Mobile! It’s the newest addition to our product lineup and features some of the coolest details to make your mobiles soar!

Age: 4+

Duration: 15-20 minutes

Learning Objectives: Use fine motor skills to carefully place the cotton balls onto the cloud mobile base. Talk about the different types of objects or animals that fly in the air and observe the movements of the mobile.

You’ll Need:

R51303 Sky Mobile

• Cotton balls

• Blue paint

• Markers / pencil crayons / crayons

• String

Line-15

sky mobile craft

The Sky Mobile pack comes with an assortment of thematic shapes. There are about 30 designs that fit into 5 different themes–bugs, flying vehicles, weather, fantasy creatures, space and birds. These shapes attach to the cloud mobile base.

sky mobile craft

We will first decorate the cloud mobile base. Fill a bowl with blue paint. Dip the end of a cotton ball into the blue paint and press it onto the cloud.

sky mobile craft

Fill the entire cloud mobile base with cotton balls to give the cloud a fluffy appearance.

sky mobile craft

While you are waiting for the cloud mobile base to dry, color in the shapes that you will attach to the mobile base. You can mix and match the pieces together to add more interest to your designs! Ask students to talk about the various pieces they pick out. What if the pieces form some kind of story?

sky mobile craft

You can color the shapes in different ways, with crayons…

sky mobile craft

…markers, or pencil crayons!

sky mobile craft

It’s great fun to exchange the different shapes with your classmates! Mix and match to make the the most unique mobile design.

sky mobile craft

To attach the shapes to the clouds, you will need to cut out a length of string. Each shape has a special tab that can be folded out. Slide the end of the string over the tab, then push to secure it.

sky mobile craft

It’s our ingenious no-tie design that allows you to put the mobile together without glue or any mess!

sky mobile craft

Once the shapes have been attached to the length of string, the opposite end of the string can be tabbed down to the inside swirls of the cloud mobile base.

sky mobile craft

When the mobile base is lifted up, the weight of the shapes will pull the inner spirals out.

sky mobile craft

This mobile soars sky-high!

Line-14

Like us on FacebookShare this post with your friends, or Subscribe to this blog today to receive original craft project updates every Monday, Wednesday and Thursday!

Flag Designer

2015-06-15-FeatureImage

Create your own beautiful flags or duplicate your country’s flag with our Flag Designer kit

Use the blank card flags to initiate discussion about country flags and their symbolism. Talk about your own country’s flag and what the colors or images on the flag represent. You can even broaden the discussion to include the country flags for students of different nationalities.

You can make the project more interesting if you encourage children to design their own flags for a favorite team, make-believe country or for a special club.

Provide your students with scrap paper on which to first design their flags. Use crayons, markers or pencil crayons to color in your flags.

Pin up the finished flags for a classroom display!

Here are some other great project ideas you can incorporate in your unit study about flags:

• Make a flag windsock using a super-cool color resist technique!

• Hang your flags together with a Paper Hand Wreath to celebrate diversity in the classroom!

Line-20

Like us on FacebookShare this post with your friends, or Subscribe to this blog today to receive original craft project updates every Monday, Wednesday and Thursday!

Butterfly Ornaments Bracelets

butterfly ornaments bracelets

Turn beautiful Butterfly Ornaments into wonderful bracelets! 

Age: 4+

Duration: 15-20 minutes plus drying times

Learning Objectives: Use a unique material to create a color resist effect. Learn to diffuse colors with special paper. Create swirly designs, shapes and interesting patterns on the wings. Use fine motor skills to squeeze wing designs into bug bodies and curl antennae.

You’ll Need:

R83260 Butterfly Ornaments Kit

R54460 Squiggle Pipettes

• Clear glue

• Plastic bowls

• Watercolor paint

• Paint tray

• Pipe cleaner

Line-08

butterfly ornaments bracelets

The Butterfly Ornaments Kit features pre-cut butterfly wings made out of Color Diffusing Paper. It’s a good idea to put the wings onto a paint tray as you drip-drop the color resist glue.

butterfly ornaments bracelets

Pour some clear glue into a plastic bowl. Squeeze the bulb of a Squiggle Pipette to expel all the air from it, then drop the tip into the clear glue and release. This will draw in some of the clear glue into the pipette chamber.

butterfly ornaments bracelets

Press the pipette bulb to squeeze out the glue onto the Color Diffusing Paper butterfly wing. You can draw shapes such as stars or circles, or make patterns like polka dots!

butterfly ornaments bracelets

This art camper decided to make polka dots out of the clear glue. Leave the glue to dry overnight.

butterfly ornaments bracelets

Once the clear glue has completely dried, use the Squiggle Pipettes to drop watercolor paint on top. As you can see in the above image, all the areas where the clear glue had dried will repel the paint.

butterfly ornaments bracelets

Once the wings are dry, you can accordion fold the wings and squeeze them into the slot of a bug body. The bug bodies are included in the kit.

butterfly ornaments bracelets

You can insert a pipe cleaner through the head and wrap the length around your wrist. This will make a bracelet!

butterfly ornaments bracelets

Alternatively, you can string the colorful wax-dipped antennae through the holes in the head of the bug body.

butterfly ornaments bracelets

Our art campers placed their butterfly ornaments onto the greenery in the area. As the watercolor dries, it leaves a beautiful color on the wings!

Line-08

Like us on FacebookShare this post with your friends, or Subscribe to this blog today to receive original craft project updates every Monday, Wednesday and Thursday!

Spotlight on… Squiggle Pipettes

squiggle pipette painting watercolors

We recently revamped our pipette line with a few new designs! One of the new designs is our fabulous Squiggle Pipettes. Learn more below!

squiggle pipette painting watercolors

Squiggle Pipettes feature an interesting squiggle design that helps to distribute paint evenly onto paper. Learn more about this product here! Pipettes are not only a great tool to use for painting, but can be incorporated into fine motor exercises–the motion of squeezing the bulb helps to get kids working out their pincer grip! If you are planning to paint with the pipettes, use watercolor paints.

To use your pipettes, first squeeze the bulb to press out all the air. Dip the nozzle into a container of watercolor and release the bulb to suction the paint into the pipette. Squeeze the bulb again to release the paint over your sheet of paper.

[youtube https://www.youtube.com/watch?v=QmCBhIL4COc]

You can use the Squiggle Pipettes to color your art! Here are some ideas you can try for yourself! Click on the links to be taken to the full tutorials.

 • Make your own giant weaving mat using only Color Diffusing Paper, paint and Squiggle Pipettes! Cut the dried colored paper into strips and weave them in and out of each other to make a beautiful woven mat.

Learn our secret for color-resist painting! We use Squiggle Pipettes to add color to the flag designs.

Color your own clothes! A paper vest, that is. Find more about how to design your own vest at the link.

• Form your art into beautiful images of animals using basic shapes! Squiggle Pipettes are used to make the painted images.

Line-16

Like us on FacebookShare this post with your friends, or Subscribe to this blog today to receive original craft project updates every Monday, Wednesday and Thursday!

3D Flower Wall Art

wall art diy color diffusing flowers

Make a beautiful wall art canvas with 3D flowers using our R2440 Color Diffusing Paper Flowers!

Age: 4+

Duration: 15-20 minutes

Learning Objectives: Children get to take home their own projects to hang up on their bedroom walls at home. Use different colors to produce interesting combinations. Paint easily with fun and engaging Color Diffusing Paper! Create a wash of color on a canvas and talk about essential keywords such as balance, subject and background.

wall art diy color diffusing flowers

You’ll Need:

R2440 Color Diffusing Paper Flowers

R2131 Bright Buttons

R54460 Squiggle Pipettes

• Canvas

• Watercolor paint

• Paint tray

• Spray bottle of water

• Small plastic cups

• Paintbrush

• Glue

Line-21

P1016864

Pour a small amount of watercolor into each cup. Set up your workstation so that the flowers are on the paint tray.

P1016867

Squeeze the bulb of the Squiggle Pipette to expel all the air inside, then dip the nozzle into the paint and release the bulb. This will draw the paint into the main chamber of the pipette. Carefully raise the pipette on top of the paper and squeeze the bulb to release the paint. Use different colors to make interesting effects!

P1016872

Spray the concentrated watercolor spots with a bit of water to help diffuse the paint throughout the flower.

P1016876

To give your Color Diffusing Flower some dimension, drape it on top of an overturned cup. Leave it to dry for 30 minutes under direct light.

P1016882

While the Color Diffusing Paper Flowers are drying, prepare your canvas for painting! You can use watercolor on the canvas as this will give it a nice diffused look. Pour the concentrated watercolor into little cups so as not to use too much, although a little will go a long way!

P1016888

I created a gradient wash from one corner of the canvas to the opposite corner. First I started with the darkest color I had–red–and blended it into an orange once it hit the yellow on the opposite side. Even though there isn’t much red remaining, it is still a lovely transition! Although your students can paint their canvases different colors, it’s a good idea to keep the colors minimal. Remember, the canvas will form the background to your 3D art, so it needs to let the flowers stand out!

P1016897

Now get your flowers ready to attach to the canvas!

P1016899

Dab a bit of glue onto the back of each flower center and press the flower onto the canvas. Hold the flower down for about 20 seconds to make sure that the glue starts working to secure it to the canvas.

P1016903

Glue a button to the center of each flower. Use contrasting colors to really make the 3D art pop!

Line-18

Like us on FacebookShare this post with your friends, or Subscribe to this blog today to receive original craft project updates every Monday, Wednesday and Thursday!

Spotlight on… Pocket Portfolio!

pocket portfolio artist coloring

Need something to do on those long road trips? Or just feeling very artistic? Try our R82051 Pocket Portfolio, ready set with all the materials you need to make a sketchbook of unique illustrations!

The R82051 Pocket Portfolio is a great kit to bring out even for rainy school days when everyone’s stuck inside! The kit features over 100 printed coloring pages with beautiful illustrations, including everything from a person’s portrait to an ice cream sundae, teddy bear, lady bug and more! The range of coloring pages makes the kit a great repeat project to do whenever you need something to fill in the time for your students.

The kit also includes 8 crayons that you can add to your stash of existing crayons! You can keep the entire kit inside of the package as a handy place to stash all your artwork and materials.

We’ve included an assortment of rubbing plate patterns that you can use to decorate the foreground or background of each scene. Simply place the rubbing plate underneath the sheet of paper. Use the blunt side of a crayon and rub back and forth. The imprint of the rubbing plate underneath will show through the paper to appear as if you’ve colored the sheet in an interesting pattern. Use the rubbing plates to make patterned details on leaves, petals, clothes and more!

Here’s an alternative way to have fun with your coloring kit: Paste on materials to decorate the coloring pages such as colorful mosaics or other fun embellishments!

When you have finished coloring in all the pages in the kit, you can further use your rubbing plates to make cool craft projects!

• Rub designs onto clear protective sheets to make suncatchers

• Use the patterned rubbing plates to make textures for fun spring crowns

• Explore planetary surfaces with our fun paper solar system!

Line-20

Like us on FacebookShare this post with your friends, or Subscribe to this blog today to receive original craft project updates every Monday, Wednesday and Thursday!

Nature Mobile Maker

Image of close up of Nature Mobile

nature mobile craft

Make a lovely mobile decoration for spring! Our R51302 Nature Mobile Maker is a great base for making your mobile. Add on found objects such as leaves, feathers or flowers!

Age: 3+

Duration: 15-20 minutes plus drying times

Learning Objectives: Explore the natural world through decorating the mobile with natural found objects. Experiment with gravity and weight through kinetic studies. Observe the movements and flow of air and how this affects the balance of weight on the mobile.

nature mobile craft

You’ll Need:

R51302 Nature Mobile Maker

R15290 Nature Paper (or found objects, such as leaves, twigs, feathers, flowers, etc…)

• Scissors

• String

• Markers or paint

• Hole punch

Line-08

nature mobile craft

First pop the blank Nature Mobile Maker out from its paper backing. Separate all the elements and then place the mobile on a protected flat surface. Use paint or markers to color in the branches brown and to color in the leaves green.

nature mobile craft

Be sure to color on both sides of the mobile! This will make sure that from anywhere the mobile is viewed, it looks complete.

nature mobile craft

It was a bit of a rainy day when we made our mobiles, so we weren’t able to go exploring for found objects in nature. As a substitute, we used our R15290 Nature Paper! Pop out several of the elements from the paper backing. You’ll need no more than 6-10 elements per mobile. Mix large objects with smaller ones for a diverse appearance. Hole punch through the tops of each element you’ve chosen, then tie on a bit of string to hang from the mobile.

nature mobile craft

Our mobile is designed with ingenious little flip-up tabs that can be raised and pressed down over the length of string to secure it in place. This makes attachment way more easier than messing around with tape or tying the pieces on with difficulty.

nature mobile craft

Our camper friends took their finished mobiles out to the garden to hang them up among the bushes.

nature mobile craft

Even though the sun cleared up and we were able to resume our nature walk, we still had a great time making all our paper mobiles!

nature mobile craft

The mobiles seemed to blend right in with our amazing forest background!

Line-17

Like us on FacebookShare this post with your friends, or Subscribe to this blog today to receive original craft project updates every Monday, Wednesday and Thursday!