Light Cube: Shell X-Rays

2015-04-30-FeatureImage

Observe transparencies of x-rays to see cool images! Our R5913 Shell X-Rays & Picture Cards work great with the Educational Light Cube. 

IMG_9609

The Shell X-Rays and Picture Cards give you two cards per shell. One is an x-ray to see the inner details of each shell while the other is a picture card to show the shell in reality. This kit presents great value as it does not solely have to be used with a light table… although it works well with our Light Cube!

IMG_9612

John placed the cards onto the table to see how the insides of the shells look like.

IMG_9613

It was a nice exercise to compare and contrast the picture cards with their matching x-rays. We asked John to find the matching pairs, which was a good exercise in making connections with visual cues.

IMG_9614

Does that one fit? John used the guide provided with the picture cards to learn more about the type of shell in each card.

IMG_9622

There are 36 cards and x-rays in total and a detailed guide with information about each of the shells. It’s a great resource for enriching your science lessons!

Line-02

Like us on FacebookShare this post with your friends, or Subscribe to this blog today to receive original craft project updates every Monday, Wednesday and Thursday!

Light Cube: Floating Density Experiment

light cube floating objects

Explore the densities of various objects using bubbly soda water and a few clear glasses on the Light Cube!

light cube floating objects

Pour a bit of club soda into a clear glass. In the second glass, pour some water. The carbonated fizz or bubbles in the soda will start to lift and dance around inside of the glass. Ask students to consider why the carbon rises up and out of the glass.

light cube floating objects

We asked our friend Malak to observe the bubbly fizz and the glass of water and try and guess what will happen if she dropped a toothpick into each glass. She guessed that the toothpick would sink in the glass with water, and rise in the glass with soda.

light cube floating objects

As you can see, the toothpick floats midway up the glass of water. Interesting! Why is this so? Malak asked if this had something to do with the wood of the toothpick… perhaps it floats like a log in water? We moved on to test her hypothesis of whether or not the toothpick would float in the glass with soda.

light cube floating objects

This time we dropped the toothpick into the glass of soda and observed that it proceeded to float just like the toothpick in water.

light cube floating objects

We tried the hypothesizing and experimenting again with other found items such as buttons, beads and erasers.

light cube floating objects

Ooh! Now we have a surprise. We guessed that the Fancy Stringing Ring we dropped into the glass with water would float. It floated when we dropped it into the glass with soda. But why did it sink to the bottom? These are great questions to be asking your students as you develop new theories on why some items float why others do not.

Line-20

Like us on FacebookShare this post with your friends, or Subscribe to this blog today to receive original craft project updates every Monday, Wednesday and Thursday!

Changing Seasons Diorama

diorama changing seasons

To explore the beauty of nature and the changing of the seasons, we put together a beautiful diorama with a split down the middle to show the transition from winter to spring! 

Age: 5+

Duration: 20-30 minutes

Learning Objectives: Talk about seasonal transitions, the names of the different seasons, why seasons occur and how each is connected through changes in the earth’s atmosphere and physical landscape. Use references and brainstorming sessions to discover what kinds of ecology systems can be represented in both spring and winter. Illustrate scenes, draw props and characters and cut out resulting drawings with scissors. Combine multiple media to form a complete scene.   

seasons diorama

You’ll Need: 

R52094 Set the Scene! Diorama Box

• Card paper

• Scissors

• Markers

• Tape

Line-19

seasons diorama

Each of the dioramas are flat-packed for easy assembly. Lift the piece up to reveal its box-like shape.

seasons diorama

Press the inside die-cut part of the diorama. This piece is attached to the diorama by the bottom. This part will form the stage for the interior of the diorama.

seasons diorama

There is a score line at the top that can be folded in. This will help the stage to sit evenly inside the diorama. When you are finished designing and illustrating the interior of the diorama, tape the edges of the stage to the inside of the diorama to secure.

seasons diorama

There are flaps on either side of the diorama that can be folded in to secure the upright shape of the diorama. Tape the sides down together.

seasons diorama

Tape the sides down to secure the shape of the diorama.

seasons diorama

This is the final look of the diorama without any illustrations.

seasons diorama

Lift out the inside stage and illustrate your foreground. To turn the diorama into an exploration of seasons, I’ve divided the diorama stage with an imaginary line. Start illustrating the details for the spring season on one side. I’ve drawn stalks of grass onto the foreground and will color around them with a lighter green to represent a field or meadow.

seasons diorama

This is what the final illustration looks like! You can draw a background onto a sheet of paper, cut it out and paste it onto the back or draw directly onto the back of the diorama.

seasons diorama

Pop out the skylight tab. This will allow you to hang items from the roof or to let some light into the interior of the diorama.

seasons diorama

Now we’ll move on to make the card characters and objects for the inside of the diorama.

seasons diorama

Using a pencil to sketch out the drawing and markers to fill it in, I’ve made a little bumblebee character!

seasons diorama

Cut a small white border around your drawn character. Punch a hole through the top if it will be suspended from the ceiling of the diorama. Tie on a length of string to the hole and tape to the inside of the diorama.

seasons diorama

To form the bottom objects, draw the illustrations onto leftover card pieces. Leave a bit of space at the bottom as you cut each shape out. Fold the bottom part inwards; this will be the tab to glue the object down onto the diorama.

seasons diorama

Add a few more details to fill in the space! We’ve got a white bunny, a boulder and a flying chickadee in the winter side, while a bumblebee hovers above a flower and a tree on the spring side. You can have a preliminary discussion with your students to figure out what kinds of elements could go into the diorama on either side of the imaginary seasonal line.

Line-13

Like us on FacebookShare this post with your friends, or Subscribe to this blog today to receive original craft project updates every Monday, Wednesday and Thursday!

Gizmo Paper Robots

Gizmo paper robots

Celebrate National Robotics Week with robots made from R60160 Constructa Clips, recyclable materials, R15298 Gizmo Paper and a lot of creativity!

Age: 5+

Duration: 10-15 minutes

Learning Objectives: Use recyclable materials as a new medium for forming art projects. Form a 3D model out of basic cut 2D shapes. Develop fine motor skills through use of Constructa Clips. Learn names of geometric shapes such as triangular prism, cylinder or rectangular prism. Position Gizmo Paper in appropriate spots throughout.

P1016597

You’ll Need:

R15298 Gizmo Paper

R60160 Constructa Clips

• Scissors

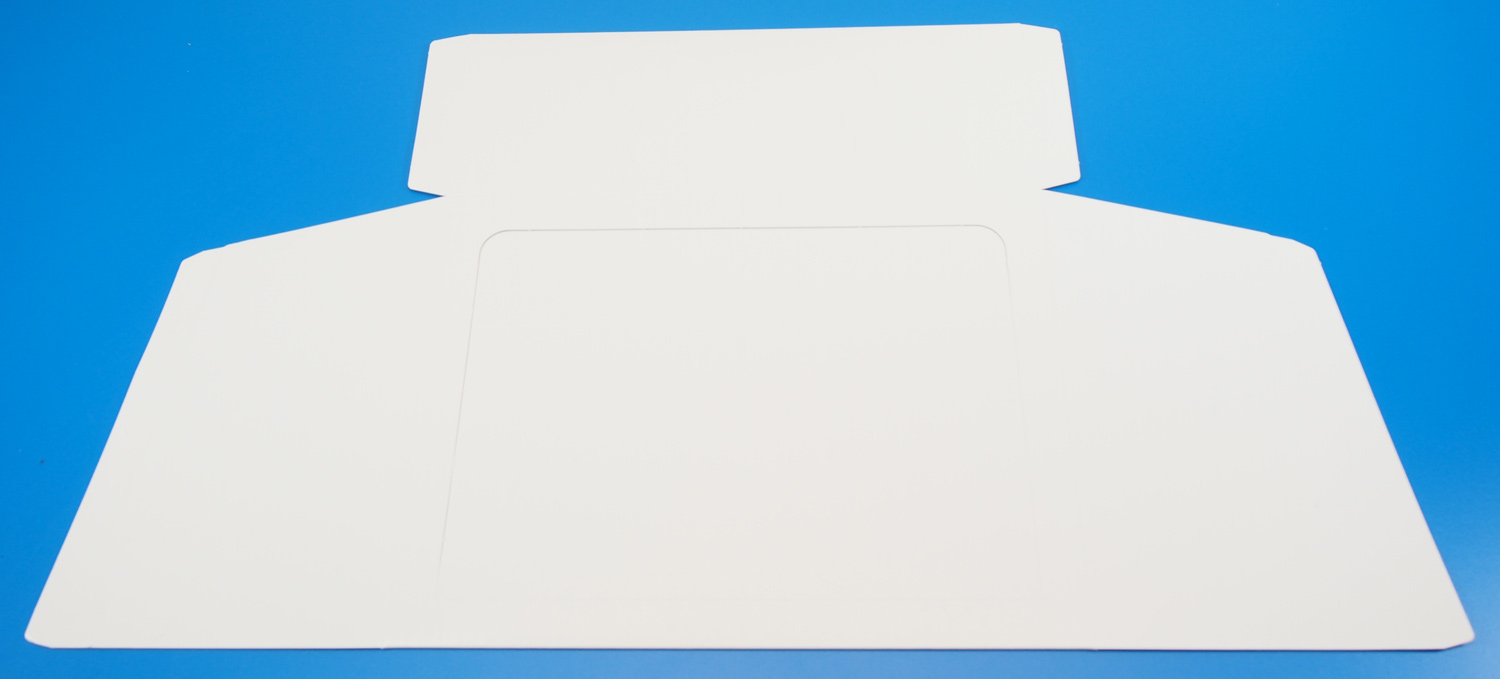
• Boxboard (cereal boxes, frozen food boxes, etc)

• Glue

Line-01

P1016600

Prepare your set of materials using recyclable boxboard. Make sure to let your students know a couple of weeks before this project that they should bring to the classroom any recyclable boxes they may get at home. You can make virtually any shape or form of robot imaginable with a few basic tools.

For the first part of the activity, provide all the materials to your students and ask them to choose two or three boxes to make their robot out of. Students can cut the box down into individual shapes or incorporate the main shapes into their designs.

Give your students sheets of paper to sketch out their robots. Encourage them to pay attention to the different sizes and shapes of the boxes they chose. How can they incorporate the boxes into their robot designs?

For inspiration, use the following tips!

P1016602

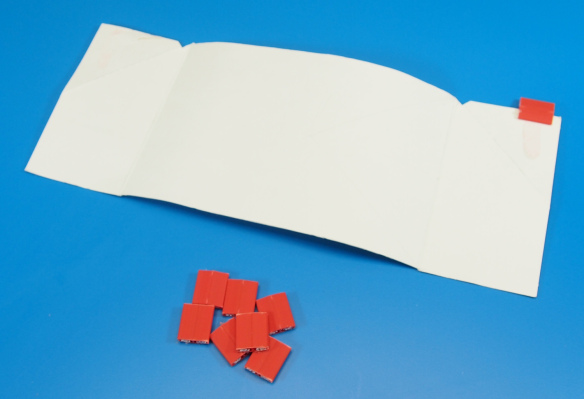
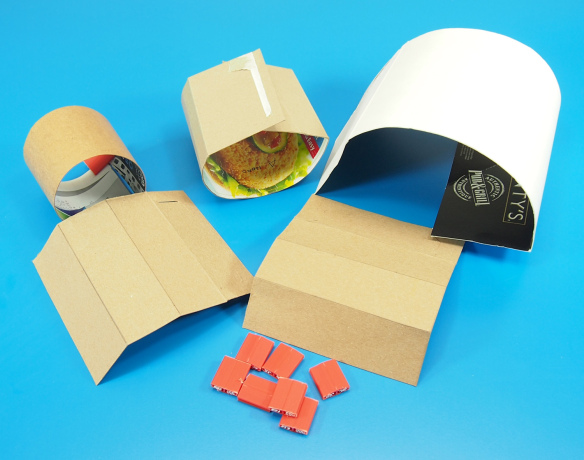
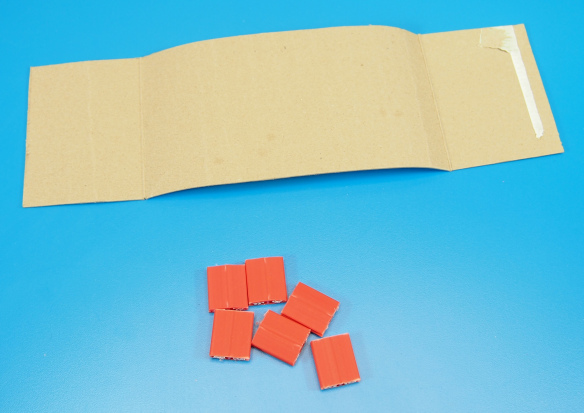
We’ll start off by making the body. I cut a big box along one edge so that it separated into one long rectangle.

P1016604

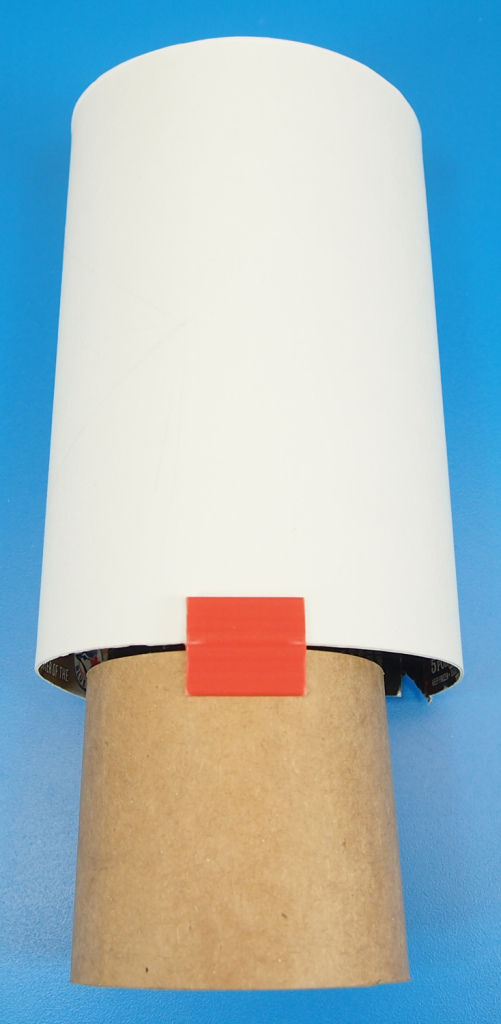
Roll the body into a cylinder and secure with a one-way Constructa Clip.

P1016607

Repeat the same process for the robot’s legs. Use a smaller box so that it fits underneath the body like an exhaust pipe.

P1016609

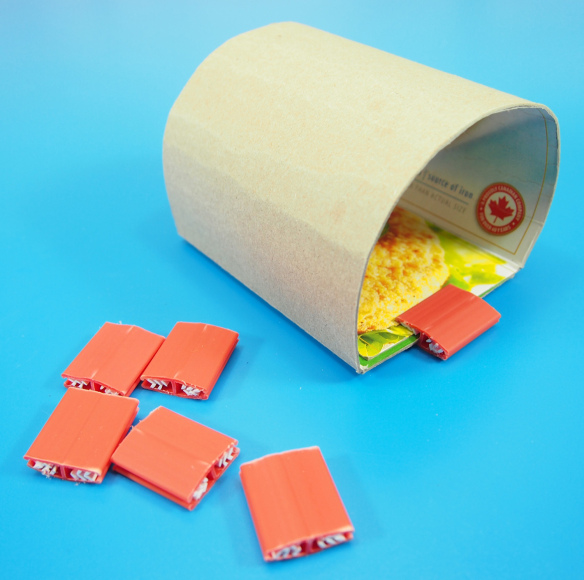
Secure the exhaust pipe cylinder with another Constructa Clip. Make a second box similar to the size of the exhaust pipe cylinder to make the robot’s head.

P1016612

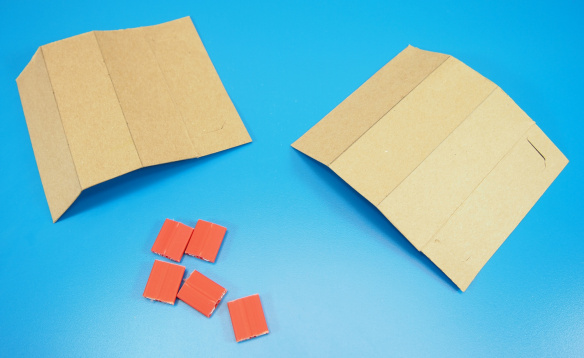
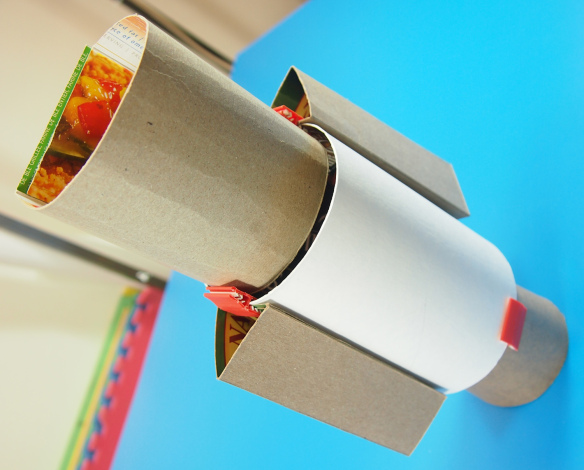
To make the arms, cut out two smaller rectangles and fold them into four sections.

P1016614

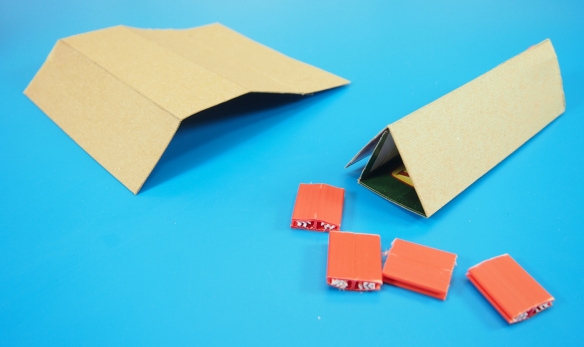
Fold each section into a triangular prism and overlap the final section to secure it. Slide a Constructa Clip onto the top edge to finish each arm.

P1016619

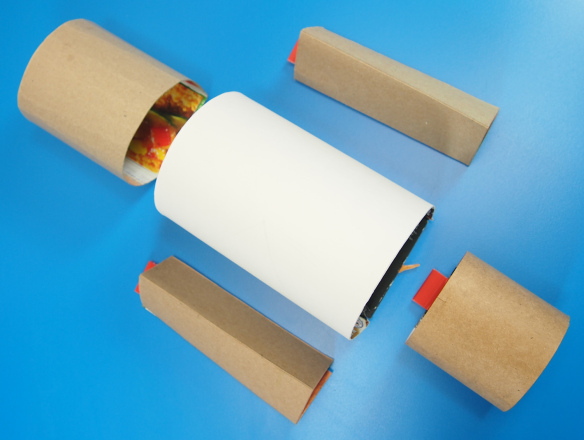
Align all the pieces together to see where they go.

P1016621

Use the opposite side of the Constructa Clip to connect each piece to their appropriate locations.

P1016624

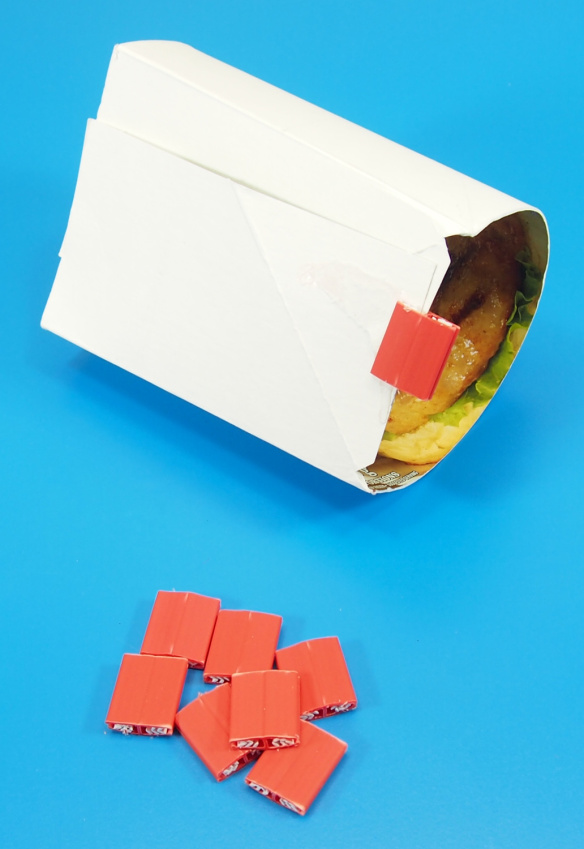
Here’s a look at the robot all assembled without any decorations. Now it’s time to add some character to your robot!

P1016625

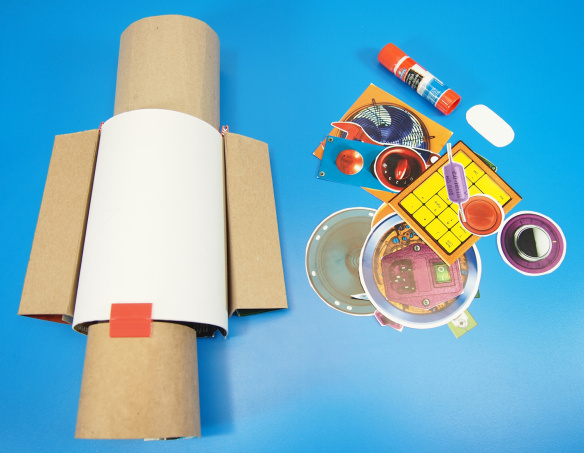
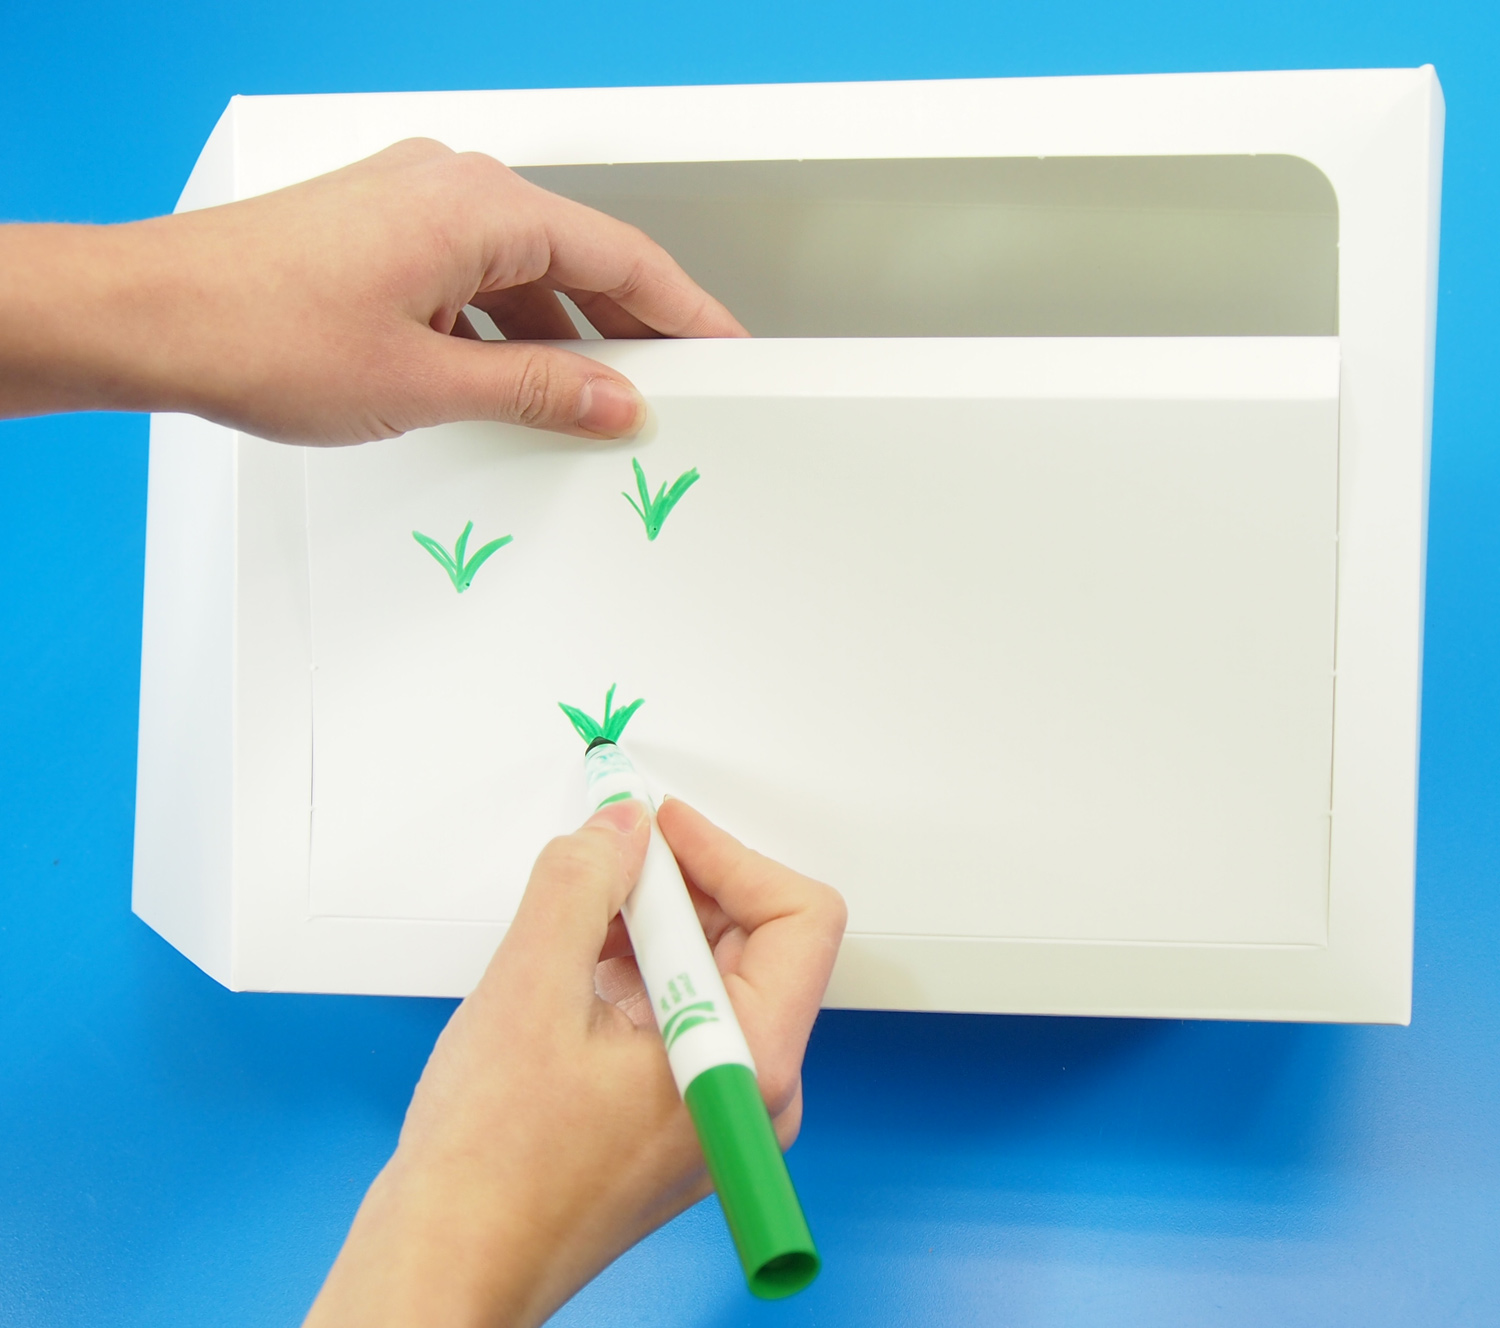
Cut out each of the Gizmo Paper pieces that you wish to add to your Gizmo Paper robot. Each of the pieces are similar to basic shapes such as circles, squares and cylinders, so students can exercise their knowledge of geometric shapes while exercising their scissor skills!

P1016631

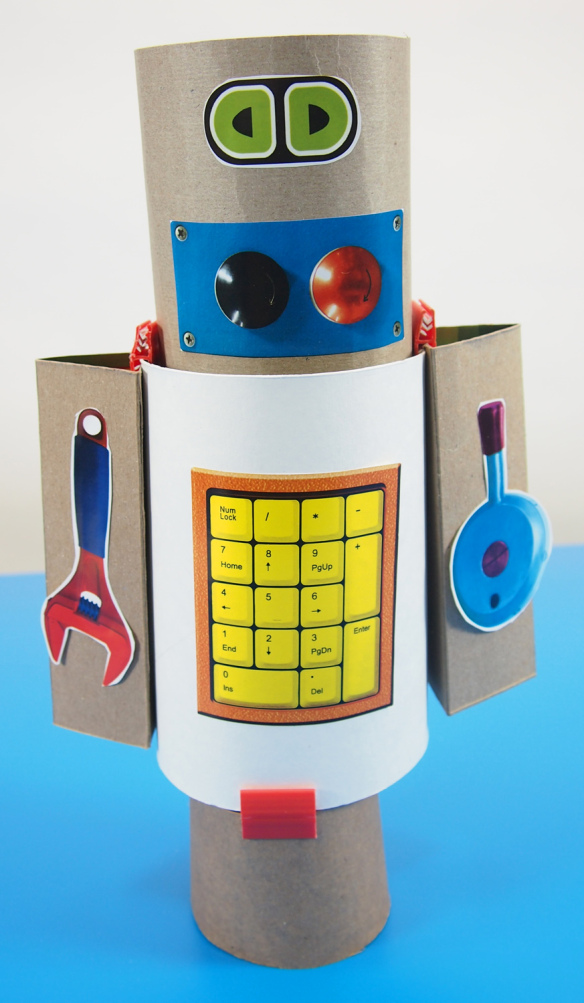
Here’s the finished look of our robot! Now what do all those buttons do?

P1016636

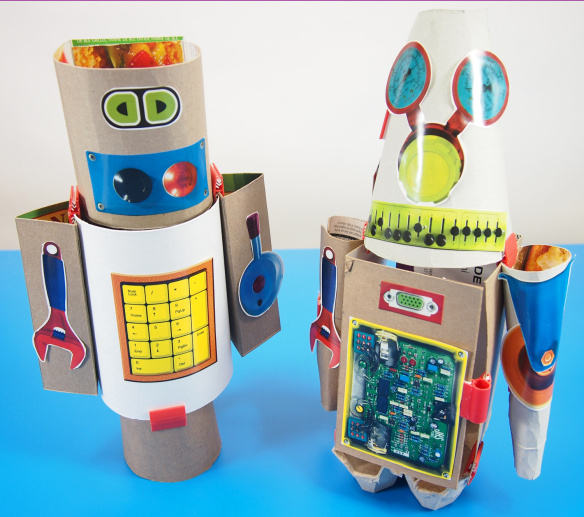
There are plenty of different combinations of robots you can make using a bit of recyclable card or boxboard materials, Gizmo Paper and Constructa Clips!

Send us some of your ingenious robot projects! Ask your students what are the functions of each button on their robot?

Line-14

Like us on FacebookShare this post with your friends, or Subscribe to this blog today to receive original craft project updates every Monday, Wednesday and Thursday!

Light Cube: Why are x-rays so cool?

2015-03-12-FeatureImage

Our R5910 Animal X-Rays give your students a whole new way to observe the details of animal skeletons… especially when placed on the Light Cube! Turn your Light Cube corner into a vet clinic!

IMG_9515

The R5910 Animal X-Rays are a great way to introduce students to learning about animal anatomy and how it is similar and/or different than human anatomy. We first asked our friend Jasmine to remove the provided image cards from the x-rays to see what types of animals we would be exploring. See everything from a snake to a rabbit, or a fish to a bird in this x-ray set!

IMG_9508

Children are naturally drawn to exploring x-rays because they offer a whole new way to look at animal bodies. Seeing the framework for bones that make up the legs, for instance, helps children to compare to their own bodies and make references to what is similar, and what is different.

IMG_9514

On the Light Cube, x-rays are even better seen. The Light Cube illuminates all the details in the white parts of the x-rays, showing off arrangements of miniature bones and how they all connect together.

IMG_9504

Ask students to compare and contrast the x-rays to their image counterparts. Where do all the parts go and how can you orient the skeleton to fit within the outline of the animal shape? Compare the bone structure to other animals in the Animal X-Ray pack. How do the legs look like? How are the heads shaped differently or similarly to each other?

IMG_9512

To make viewing the x-rays less intimidating for younger children, turn the Light Cube station into a veterinary office! Purchase a kid-friendly pair of stethoscopes and/or some plush animal toys that correspond with the x-rays provided. Ask students to diagnose how the animals are feeling using the stethoscopes and x-rays as veterinarian tools.

How cool is that?!

Tell us what kinds of activities you do with x-ray cards! What kinds of teaching methods do you employ and how do you incorporate fun into your learning activities?

Line-18

Like us on FacebookShare this post with your friends, or Subscribe to this blog today to receive original craft project updates every Monday, Wednesday and Thursday!

Light Cube Jelly Play

2015-01-15-FeatureImage

Kids love experimenting with new and weird materials. No wonder, then, that we had the perfect opportunity to play with giant gelatine blocks over the Light Cube–the kids were so intrigued! Using feathers to decorate the gelatine was an added fine motor activity that you can incorporate in your own gelatine block play! We detail more about this process below.

IMG_0102

Gelatine blocks are great because they are transparent, meaning that they are clear enough to be seen through. Some gel blocks can be thicker depending on how you mix up the quantities (we will discuss more about how to make your own gel block below!) This is a great opportunity for teachers to talk about the differences between opaque (not see-through), translucent (somewhat see-through) and transparent (see-through) objects!

IMG_0104

The gel block has great texture and movement too! On the Light Cube, it looks even better because it glows with the light underneath.

IMG_0112

We asked the campers to “decorate” the gel block with fancy additions such as pipe cleaners and feathers. We used shimmering, glittery pipe cleaners to help bounce the light around even more.

IMG_0115

Both campers were really excited to see that the gel block acted like a stand for the feathers and pipe cleaners. It was soft enough to press the materials through but also firm enough to keep the materials in their spots without letting them tip over!

IMG_0118

Since we had the Light Cube set to a white glow, it made the colors of the feathers pop out! Look at the contrast between the yellow and the blue. These are complementary colors, meaning that they are placed directly across one another on the color wheel. Another cool lesson for students: learning about color groups!

IMG_0124

Once we got started, it was hard to stop! Fabian here decided to curl one of the pipe cleaners into a spiral shape and jut it into the gel block for fun.

IMG_0138

To make your gelatine block just like ours you will need the following:

• Knox® Gelatine (find a box of packets at any baking supplies or supermarket near you!)

• Heat-safe bowl or large mold, depending on your preference

• Hot or boiling water

• Cold water

• Measuring cup

• Baby oil

• Whisk

First, measure the cup capacity of the mold you are using. Simply use a measuring cup to keep track of how much water you use to fill the mold. Once you have a definite number, divide it in half. One half of the water cup capacity will need to be boiled while the rest will need to cool in the fridge. You can pour out half of the water into a kettle or sauce pan and heat it up until boiling. For every cup of water used to fill the mold, you will need to use 1 package of the Knox® Gelatine powder. While you are waiting for the water to boil, spread some baby oil onto the mold. This will help loosen the gelatine out of the mold when it is set. Pour the hot/boiled water into the mold and mix in with the gelatine powder using the whisk. When the gelatine is fully mixed into the water and there are no remaining clumps, pour in the remaining half of the water that was cooling in the fridge. Stir the mixture with the whisk. Place the gelatine mold into the fridge to set for 3 hours or leave overnight.

In the morning, pop out the gelatine mold. You can use a long spatula to ease the block out of the mold. Flip the mold over to set it on top of a tray. Place the tray onto the Light Cube and turn on the white glow to get started on your own neat sensory-fine motor play activity!

IMG_0139

We love the campers’ priceless reactions to the activity–they spent more time on it than we’d planned!

Line-07

Like us on FacebookShare this post with your friends, or Subscribe to this blog today to receive original craft project updates every Monday, Wednesday and Thursday!

Light Cube: Glowing Art by Twins At Play!

IMG_5045

Kristen from Twins at Play is featured in another great post about the Educational Light Cube. In this edition, she gets her twins to play with neon tempera paints and black lights on the Light Cube!

To see the full post, please view HERE!
Kristen says:
“My twins had such a blast with this activity!
We used:
 
neon tempera paint, 
and printer paper
IMG_5046
 
With the Educational Light Cube remote control, we turned the light cube to on one of it’s blue hues.  We switched around between blues and purples. We also turned on a few black lights. I put one of the Educational Light Cube trays from the accessory pack on to the light cube, then squirted some neon tempera paint right on to the tray. After that, I gave my twin boys paint scrapers and let them make designs, then they pressed printer paper on to the paint, gently pushed down and gently lifted the paper. They ended up with very pretty Art prints!
IMG_5058
We did this before bed, there was very little clean up.
This can be done in daylight with regular colored tempera paint too!”
Thanks to Kristen @ Twins at Play for putting together this awesome post!
Images and Text © Kristen from Twins at Play blog

To see more about our R59601 Educational Light Cube, visit here!

Line-16

Like us on FacebookShare this post with your friends, or Subscribe to this blog today to receive original craft project updates every Monday, Wednesday and Friday!

Educational Light Cube: Sorting Manipulatives

2014-11-27-FeatureImage

Getting students to sort manipulatives is a double-duty task. While they sort and differentiate between the objects in front of them, students get to exercise their fine motor skills, too!


On the R59601 Educational Light Cube, sorting gets so much more fun to do! Turn on the fading function of the Light Cube to gradually cycle through colors. This produces a calming effect on students, getting them to slow down and focus on their task.

IMG_9559

Our first step was to find a snack platter at the dollar store. Use the snack platter to encourage proficiency in identifying like and unlike objects. Gather a variety of different types of manipulatives. We suggest using items such as buttons (R2131 Bright Buttons), letters or numbers beads (R2185 Math Beads and R2184 Manuscript Letter Beads), mosaics (R15367 Heart Mosaics) and more! Place all the manipulatives in the center of the snack platter.

IMG_9561

Ask students to sort through all the different manipulatives and pick out similar ones. Place similar items in one of the snack platter dividers. Repeat for all other items in the snack platter.

IMG_9562

If you cycle through the colors more rapidly on the Light Cube, it challenges students to notice the differences between objects that are transparent versus those that are opaque.

IMG_9566

It’s a great exercise that students will love to try!

More curriculum-based activities on the Light Cube:

Use readily-available materials for counting and sorting

• Build stacking abilities with dollar store party cups

• Find out just how sturdy the Light Cube is!

Share your stories about the Light Cube! What activities do your students use the Light Cube for?

Line-20

Like us on FacebookShare this post with your friends, or Subscribe to this blog today to receive original craft project updates every Monday, Wednesday and Friday!

Light Cube: Math Straws

2014-11-20-FeatureImageExplore mathematics on the Light Cube using simple items you can find at your local department store or dollar store! The Light Cube will focus students’ attention as they manipulate the materials to build skills in early numeracy!

IMG_0559In this edition of Light Cube lessons, we’ve decided to focus on counting and sorting. To do this, you will need a package of clear colorful straws, some transparent numbered stickers and 10 clear plastic drinking cups.

IMG_0565First, we tacked down our stickers to the Light Cube. The stickers we found are numbered 1-10 so you can explore counting in different quantities, or for advanced learning, develop skills in skip-counting. We’ve decided to skip-count by the number 2. This is a great starting point for discussing the differences between odd and even numbers.

You can additionally create your own stickers by using clear scotch tape and writing numbers on the tape with permanent marker. Paste down the tape onto the Light Cube. Tip: If you own a Light Cube tray, you can use write the numbers directly onto the tray with dry-erase markers.

Ask your students to pick out the same number of straws as the numbers indicated on the Light Cube. Place the straws you’ve picked out directly onto the Light Cube underneath each number.

IMG_0580

Once we had explored the basics of skip-counting, we moved onto bigger numbers. You can mix the digits to make these larger numbers. To contain the larger number of straws, use the clear cups.

IMG_0593To reinforce your students’ counting skills, mix up a random amount of straws into each cup and ask the student to correct to the proper amount. They must either add or subtract the straws.

To take students’ learning one step further, ask them to imagine that each straw has a certain value, such as 2. Therefore, each straw represents the number 2. If you have labeled a cup as the number 6, students will have to place 3 straws inside the cup to reach the right amount.

The glow of the Light Cube is a great base for exploring abstract mathematical concepts as students are focused on the materials they work with.

Line-04

Like us on FacebookShare this post with your friends, or Subscribe to this blog today to receive original craft project updates every Monday, Wednesday and Friday!