3D Features Mask

finished craft.jpg

This cheerful mask incorporates paper sculpting to create vivid 3D facial features! Use as part of a costume or as colorful wall art!

Age: 5+

Duration: 30 minutes (plus drying time)

Learning Outcomes: Practice sculpting with paper. Explore new art techniques. Exercise fine motor skills. Talk about what masks represent for various world cultures.

You’ll Need:

  • R52010 African masks
  • R2172 Tissue Circles
  • Sculpting paper (we used white printer paper, but you can experiment with newsprint or construction paper)
  • White glue (mixed with equal parts water)
  • Tape
  • Paintbrush

Line-20

  1. To start this project, mix equal parts white glue and water in a small dish.
  2. Tape the V’s at the top and bottom of the mask together. This will make a convex mask, and prevent the tissue “skin” from tearing. If you use this technique on a flat mask, the glue and tissue will crack when you transform the mask to 3 dimensions.
  3. Challenge kids to crumple, bend and twist paper in order to sculpt their mask’s facial features. Tape each facial feature securely in place.
  4. Using your paint brush, spread your glue and water mix over your mask. Carefully lay tissues circles on the mask, and laminate them in place with more of your glue and water mixture. The tissue will absorb the moisture and mold itself to the contours of the facial features. If necessary, tear the tissue circles into different shapes to cover smaller areas.
  5. Allow the glue to dry thoroughly!
  6. Trim off any excess tissue paper.
  7. Use chenille stems to secure your mask to your head, or to hang it on the wall!

Bundle Savings

Get all the Roylco items used
in this project and save 15%!

$17.41 USD
bundled price
Add Bundle
to Cart

Line-07

Like us on FacebookShare this post with your friends, or Subscribe to this blog today to receive original craft project updates every week!

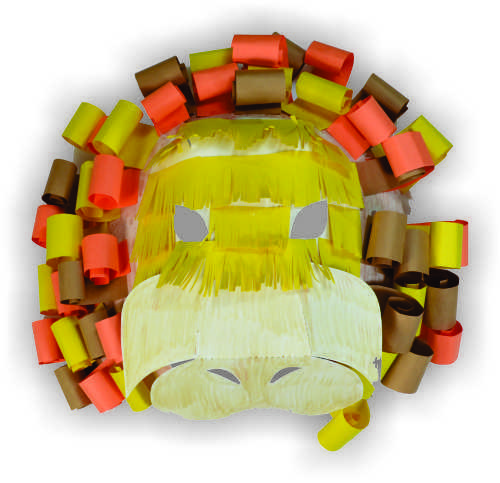
Paper Sculpted Lion Mask

finished craft.jpg

These easy paper sculpting techniques create a beautiful 3D effect on any basic mask! 

Age: 5+

Duration: 20 Minutes

Learning Outcomes: Practice precision scissor skills! Explore the tensile strength and elasticity of paper. Learn how different textures create different looks!

You’ll Need:

Line-12

  1. Select your mask. We chose a lion mask for this project. Then we colored in the mane and snout with crayons while the mask was flat.
  2. Fold, crease, overlap and tape your mask so it is 3D! It is much easier to fold your mask up BEFORE you add the paper elements than trying to fold it up after.
  3. Cut strips out of your construction paper to form the lion’s mane. Strips that are approximately 4″ long worked best for the mane.
  4. Once all your strips are cut, gently roll each strip up, then let it relax.
  5. Tape your mane curls to the mask. We taped them in three rows, starting with the outermost row and working inward.
  6. Next, cut strips for the facial fur. We started with long strips and measured each strip against the section of mask we wanted to cover. Once each strip was the correct length, we cut the strip into a fringe and taped it down. Start from the lowest point that you want the fur fringe to cover and work upwards in layers.
  7. Use chenille stems and the pre-punched holes to secure the mask to your head! These masks are perfect finishing touches for Halloween costumes!

Line-06

Like us on FacebookShare this post with your friends, or Subscribe to this blog today to receive original craft project updates every week!