 This quick and easy cultural craft is also useful both inside and outside the classroom!
This kid-friendly take on a traditional craft is a beautiful take-home piece, but if they stay in the classroom, they’re great for holding pens, pencils, manipulatives and other small personal items.
Age: 4+
Duration: 5 minutes (including printing time)
Learning Outcomes: Explore the tensile strength of paper and it’s similarities to birch bark. Learn about using natural materials to create art that is both beautiful and practical. Exercise fine motor skills by cutting and taping.
You’ll Need:
- Birch Bark Basket template (contains two styles)
- R15415 Indigenous Crafts Paper
- Scissors
- Tape

Birch trees are found all over North America and Eurasia and before the widespread use of pottery and ceramic containers, birch bark and wood were the most flexible materials available. The wood and bark of this tree were used by a variety of cultures. Native American and First Nations birch bark baskets might be one of the better-known uses for birch bark, but native peoples in North America also use birch bark for canoes, wigwams and tinder.
Asian countries (including Siberia, Ancient China and Ancient Assyria), Scandinavia and Finland used birch bark to make storage containers, roof coverings and waterproof coverings for bows. In Russia and India, birch bark was used to record manuscripts before the availability of parchment, vellum or paper. Some of the oldest known Buddhist texts were written on Birch Bark.
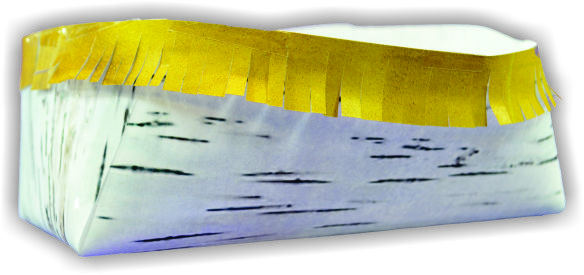
Our paper version of this ancient craft is quick and simple. Start by downloading the Birch Bark Basket template. The template contains two different style of basket. Print out the templates on a sheet of craft paper. It may take some experimenting to see which way you need to put the craft paper into the printer so the lines print on the white side. We used the birch bark design for our basket, but you can choose your favorite paper! These templates would also work well with our R15294 Terrific Tree Craft Paper.
Once you have printed out the templates, cut along the solid lines. To construct your basket, simply overlap the edges of the template and tape closed. We have created a video to demonstrate the construction:
Once your basket is ready, you can add embellishments. We used the leather design paper to create a fringe for our basket, but you can leave it plain too.

Like us on Facebook, Share this post with your friends, or Subscribe to this blog today to receive original craft project updates every week!