Age: 6+
Duration: 1 hour (plus drying time)
Learning Outcomes:
We’re going to get creative. We’re going to work on our dexterity. We’re going to learn about mixed media art. We’re going to study nature and focus on ocean life.
Here’s what you need:
Color Diffusing Paper 9×12 (R15213)
Ocean art silhouettes (PDF available for download)
Liquid Watercolor and Misting Bottles
Construction or Bristol Paper
Scissors, or craft knife
Glue
Well, the earth has tilted toward the sun once again, which can only mean one thing. Summer!
This is the perfect time to take our creativity to the salty beaches. You know what the great thing is about having our BIG imaginations? We can explore beautiful blue oceans from the art table!
With this craft, we want to create different pieces of art using different mediums (medium sometimes means, “middle”, but it can also mean a material used for making art), and we want to bring those different pieces together in one picture. In the art world, this is called “mixed media”. To follow along with these steps, we’re going to be using our Crafty Strips and our Color Diffusing Paper. This is going to give us a lot of color and a lot of texture, in not a lot of time!
If you really want a big adventure, put on some flip flops and take an excursion to your local library. Look for books about ocean animals, beaches, saltwater plant life, colorful crustaceans or coral reefs. There’s so much to explore! Think about ocean colors and textures. How might you apply these sensory elements to your ocean life art? Once you’ve gathered up your supplies and reference materials, head on back to the art table. It’s time to dive in!

Here’s how you do it:
Step 1: Create an ocean background
Let’s begin by creating our background. It’s good to start with this step because the art will take a little time to dry. We’re going to use our Color Diffusing Paper and liquid watercolors. First, grab a couple of paper towels and lay them on your your art table. Place the Diffusing paper on top of that. Now, using your liquid watercolors in a misting bottle, spray the diffusing paper with colors that remind you of ocean water. Think about how the colors of ocean water can seem to change, depending on the light, the depth, the composition of the sand. Sometimes the water is bright blue. Sometimes it appears pink, or yellow or green. Way down deep in the ocean, the water is solid black and fish glow in the dark.
To create beautiful blended effects, spray the paper with clean water on top of your colors.
Once you have the colors you like, set aside the paper to dry. If you can find a good place to hang the paper, it will probably dry faster.
Step 2: Create ocean life silhouettes
Now is the time to decide which ocean life image you’re going to create. You have a LOT to choose from. The oceans of our world are full of life — sharks, jellyfish, crabs, seahorses. The list goes on. But, if you get stumped, don’t worry. We have some images to help get you started. Just click on the link to download the Roylco-Ocean Life Silhouettes.
Once you have your image, let’s move on to our Crafty Strips. We’re going to use these colorful strips of paper to create silhouettes of our ocean life images.
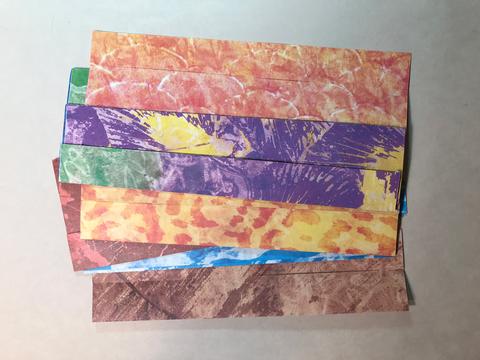
To create the shapes, first, cover a sheet of construction paper, or Bristol paper, with your Crafty Strips. There are lots of colors and patterns to choose from. Pick the ones you like the best. Then spread some glue on one side and lay them down right next to each other, until you’ve covered the surface. Make sure your image is going to fit on your sheet of Crafty Strips.

Once the glue is dry, lay your ocean life silhouette image on top of your Crafty Strips base.

It might be a good idea to attach the image to the base with a little tape to keep it from moving around. Now you’ll want to use some scissors to cut out the outline of your shape. Make sure an adult is with you as you cut. Because your shape might have lots of curves or waves, or claws, or fins, this will be a good chance to exercise those fingers. Just remember to take your time. This isn’t a race. (For more precision cutting, adults may choose to use a craft knife. Not recommended for the kids.)
And that’s it. Now you should have a fun looking ocean life cut-out shape.
(Image: BP-Ocean-Life-Crafty-Cut-Outs.jpg)
Step 3: Mix the media
Once your diffusing paper background is dry, you’re ready to combine your art. Now is a good time to think about how you want to display your image. If you’d like to frame it, you’ll need to make sure to cut the diffusing paper base to fit your frame.
(Image: BP-Ocean-Life-Ocean-Base.jpg)
You could use all sorts of stuff for a frame. You could purchase one, or you could make one from straws, or seashells, or sand sprinkled over popsicle sticks covered with glue. Whatever works best for your image.
When your ocean background is sized to your liking, it’s time to attach your ocean life cut-out. Simply glue it into place and you’re ready. For a special effect, consider attaching small squares of cardboard or foam core with glue to the back of your ocean life cut-out. This will create a neat shadow effect behind your cut-out and will add to the layers of color and texture you have.
(Image: BP-Ocean-Life-Shadow-Effect.jpg)
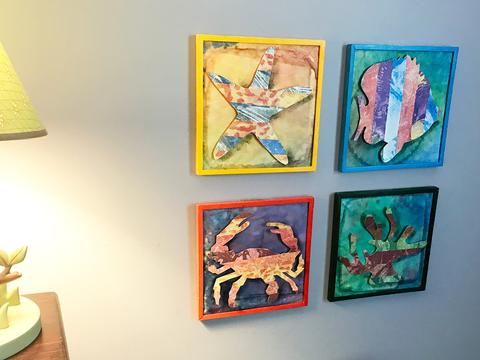
Step 4: Hang it up
You did it! Now hang your beautiful artwork in your bedroom to admire all summer long!
(Image: BP-Ocean-Life-Finished-Art.jpg)
Consider This:
When you went to the library to search for books, did you find a new favorite story?
How did the photos and artwork from the references you looked through inspire the art that you created?
What is one fact you learned about the ocean that you didn’t know before your research?
(Insert Blog Sketch Art Graphic)