Education & Inspiration
If you want to give some pizzazz to your winter-themed artwork, check out our Super Snowflake Stencils! We’ve created an assortment of beautiful snowflake designs that your students can use again and again!The Super Snowflake Stencils are jumbo-size, perfect for small hands to use, manipulate and trace! Our video below shows you several different techniques…
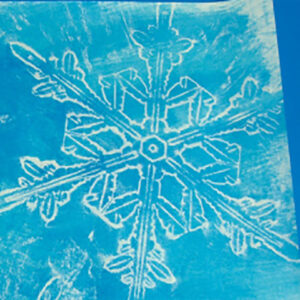
Learn the technique for making beautiful wax resist art–give your students something to work on as they return to their school routine after the holidays, and help them create an art piece that they can be proud of! Age: 3+ Duration: 15 minutes You’ll Need: • R58622 Super Snowflake Stencils • Paper towel • White…
WELCOME BACK TO 2014! We are ecstatic to begin the New Year with a plethora of craft ideas, guest posts and so much more! To start off, I’ve decided to post on our Sensory Collage Kit–filled with a variety of colorful materials to add brilliance, texture and fun to your students’ collage projects! The Sensory…
Looking for a last-minute kids’ Christmas gift? Stimulate your children’s cognitive abilities with this perfect building kit. In this post, we’ll show you some ideas to make from Straws and Connectors! The Straws and Connectors come in 4 intriguing packages: • R60901 Straws and Connectors™ Creative Building Set (390 Straws, 315 Connectors) • R60990 Straws and Connectors™ Structure Pack…
Our R59260 First Look Light Table Kit gives you all the materials you need to explore light and color changing properties and add a new dimension to learning in virtually all educational subjects! Two Big Two Little posted up their experiences using our kit on their very own homemade light table! This post was made…
Add a fancy touch to your Christmas tree or include it in your holiday classroom decorations. The glitter can be a bit messy to work with, but in this craft, your students won’t have to get their hands in it! Super simple and stunning–that’s what we like! Age: 5+ Duration: 15-20 minutes You’ll Need: • R15305…
Everyone can add to this beautiful decorative chain! This post is a part of our special week series of Christmas/Winter crafts that you can use in the classroom. Stay tuned for more posts upcoming this week and the next! Age: 5+ Duration: 15 minutes You’ll Need: • 15351 Cut & Fold Circles • Scissors • Glue…
A whimsical star design hung in your classroom is sure to turn heads! Use our R15350 Cut & Fold Squares for brilliant color. Age: 6+ Duration: 20-30 minutes You’ll Need: • R15350 Cut & Fold Squares • Tape • Scissors • Hole punch The great thing about this craft is that it looks complicated, but is actually super-easy to…
The winter season is fast approaching but you can do your decorating now! Our easy-to-use Color Diffusing Snowflakes give children the opportunity to explore their painting skills while experimenting with a few neat effects! The Color Diffusing Snowflakes are cut into a variety of different snowflake shapes. Since every student will color their snowflakes differently,…
Tot School made an assortment of rubbing plate prints using our R5804 Flowers Rubbing Plates! Check out Sweet Pea’s review on how well the prints turned out! The post, called “Rubbing Plates” was published on July 23rd 2010 and can be viewed at this link. Sweet Pea’s technique for using the rubbing plates is a great…