Education & Inspiration

The holiday season is the perfect time to spark creativity, bring families together, and fill classrooms with festive cheer. Whether you’re an art teacher planning December activities or a parent looking for magical at-home crafts, Roylco has everything you need to make Christmas crafting simple, joyful, and mess-friendly. Here are five easy, kid-approved Christmas crafts…

Dioramas bring learning to life. Students build real, three-dimensional scenes. They research, design, and create something they can actually be proud of. A strong diorama project works across subjects – science, history, ELA, and social studies all fit the format well. Below, find seven diorama box ideas for school projects. Each one includes Roylco paper…

Every child dreams of launching their own colorful creation into the sky — watching wings flutter as the wind carries them. Roylco’s Bird Kite makes that dream possible: a delightful DIY kite for kids that blends art, science, and outdoor play. Whether at home, in the classroom, or in the backyard, this make your own…

Every child’s imagination lights up at the idea of wearing a mask and taking on a heroic identity. With Roylco’s Super Hero Masks, kids don’t just wear a mask — they make their own superhero mask, design their story, and step into a world of empowerment. These aren’t just ready-made props — they’re blank canvases…

When life gets overwhelming, a soft snuggle can make all the difference. Theo the Therapy Dog and Chloé the Comfort Cat are Roylco’s weighted, sensory-friendly stuffed animals designed to provide the same sense of safety and calm as a beloved pet — but with added therapeutic benefits. Whether used in classrooms, therapy settings, or at…

Each year, millions of butterflies embark on an incredible journey, traveling thousands of miles to find warmer climates. This natural phenomenon, known as butterfly migration, is a perfect opportunity to teach kids about the wonders of nature through hands-on activities and creative exploration. What is Butterfly Migration? Butterfly migration is the seasonal movement of butterflies,…

Looking for fresh, creative craft ideas for your elementary students? We’ve gathered inspiration straight from art educators and influencers who are using Roylco products in fun, innovative ways. These hands-on projects are perfect for the classroom, after-school programs, or at-home crafting — and they’re designed to keep kids engaged while sparking creativity. Here are our…
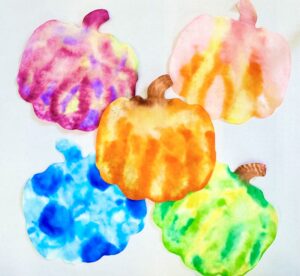
Fall is in the air! 🍂 As the leaves change color and pumpkins pop up on porches, it’s the perfect time to bring a touch of seasonal creativity into the classroom or at home. Roylco’s Color Diffusing Pumpkins make it simple, fun, and mess-free to create beautiful autumn art projects that kids of all ages…

Art educators know that creativity flourishes when students are given the freedom to make choices. That’s the foundation of TAB (Teaching for Artistic Behavior) — a nationally recognized approach to art education where “the child is the artist, and the classroom is the child’s studio.” In a TAB classroom, students explore their own artistic interests…
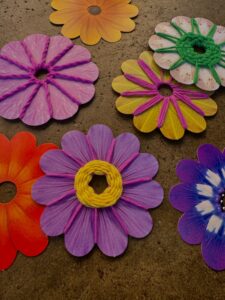
Weaving is one of the oldest and most rewarding forms of crafting—an art that blends texture, rhythm, and patience into something truly beautiful. Whether you’re introducing it to preschoolers with simple mats or challenging older students with basket-making and textile patterns, weaving crafts are a powerful way to develop motor skills, creativity, and concentration. At…