Colored Rice Stencil Shapes

2014-02-26-FeatureImage

Earlier this week, we posted a Craft Spotlight post on Colored Rice. Today we’ll show you how to use Colored Rice with our various stencil shapes to make decorative shapes for your classroom wall!

Age: 4+

Duration: 15-20 minutes

You’ll Need:

R2114 Colored Rice

R5522 Child’s First Stencil Set

• Construction paper / Card paper

• White glue

• Scissors

• Plastic bowls

• Paintbrush

• Paint tray

Line-10

This activity encourages students to work through a multi-step process. The first step encourages children to use their fine motor skills while tracing the image in the stencil. The second is carefully layering glue onto the image. The third is dropping a little bit of rice at a time onto the image, being careful to hold the rice between joined fingers. Not only do you end up with a great result but students gain some fine motor experience as well!

2014-02-26-Step01

It’s a good idea to keep all the work inside a paint tray to eliminate problems that may happen from potential spills or mess.

2014-02-26-Step02

Choose your favorite stencil shape and place onto the card paper. Cover the inside of the stencil entirely with glue. Spread the glue using an old paint brush so you get an even layer.

2014-02-26-Step03

Next, remove the stencil. Grab a pinch of Colored Rice and spread all over the card paper. Make sure you layer on as much as possible!

2014-02-26-Step04

You have to ensure that the entire image is covered. The more Colored Rice you drop onto the image, the better chance you have of the rice adhering straight to the glue.

2014-02-26-Step05

Wait for the glue to dry completely! Lift up the edge of the card paper and shake off the excess rice.

2014-02-26-Step06

How brilliant is that! The Colored Rice has a wonderful multi-color blend that makes any shape stand out. The final step is to cut the shape out.

2014-02-26-Step07

Cut around the rice shape to give it a small white border. Apply a bit of tape or sticky tack to the back of the shape and post it up on a classroom wall!

2014-02-26-Step08

Combine several different shapes together!

Line-10

Thanks for stopping by! If you’ve made a craft similar to this or would like to send us your ideas, drop us a line at subscriber@roylco.ca! We’d love to hear from you.

Craft Spotlight: Colored Rice

2014-02-24-FeatureImage

R2114 Colored Rice doesn’t work just as a collage material. It produces artwork that can be used in sensory activities! Non-toxic and easy to use. Check out more below!

A basic way to use Colored Rice is to first draw a basic image onto construction paper. Construction paper holds up best against glue, which is what we will use to stick the rice on. When you’ve drawn out your simple shape onto the paper, prepare your glue.

First, make sure your workstation is completely covered in a plastic sheet or newspaper. This will be important for later on. We suggest using something to catch the excess rice in, such as our plastic paint trays! Drop the glue into a plastic bowl and use an old brush to spread it across all the interior parts of the shape.

R2114

Once you have completely spread a layer of glue onto the shape you’ve drawn, sprinkle a large amount of Colored Rice all over the construction paper sheet. Let the rice sit onto the sheet until the glue is completely dry.

When the glue is dry, gently lift up one edge of the paper and allow the excess rice to shake off. The rest will stick to the parts of the image that were covered in glue.

To see more about this process, watch the video below!

Your students’ projects can be used as sensory images! Ask students to choose one simple shape each to make (such as stars, flowers, squares, circles, etc). Cut out small squares (about 4 x 4″) from construction paper and distribute one square to each student. Students can draw their chosen shape onto their square, cover the shape with glue and apply the rice to make the sensory images. Shake off the excess when the glue is dry.

Gather children into groups. One student in each group will be the leader. The leader will collect everyone’s sensory images and tell everyone to close their eyes. While no one is looking, the leader randomly distributes one sensory image to each student. Students must keep their eyes closed and feel over the rice texture to guess what shape it is!

Line-08

Thanks for dropping by! Explore our site to see more crafts like this. If you were inspired to make something from this craft, send us photos of your work to subscriber@roylco.ca and we will publish a special post! We’d love to hear from you!

Crayon Shaving Stained Glass Paper

Feature-Image-crayonglass

Last year, one of our most popular crafts used a technique with shaved crayon bits to make authentic-looking stained glass images. Try it out for yourself! The stained glass effect can be applied to any of our black-frame designs. 

Age: 5+ (Adult Supervision Required)

Duration: 20-30 minutes

You’ll Need:

• R52087 Tropical Fish Stained Glass Frames R52070 Stained Glass Frames /R52074 Junior Stained Glass Frames / R52093 Stained Glass Lantern

• Unlabeled crayon sticks

• Pencil sharpener

• Black marker

• Wax paper

• Paper towel

• Iron (CAUTION: Use adult supervision!)

• Scissors

• Glue

Line-15

Stack the sheets of wax paper and staple them together if they aren’t already attached. Place several sheets of the paper towel on top of and below the wax paper sheets to minimize mess. Lift the top sheet up and crease along the spine to hold it in place above the second sheet of wax paper. This second sheet of wax paper will be your workspace.

_B072118

Place the wax paper on an iron-safe surface, preferrably a craft table.

Use the pencil sharpener to sharpen the ends of the crayon. Hold the pencil sharpener and the crayon stick above the workspace so that the shavings fall onto the wax paper. Keep sharpening the crayon ends until you have just about covered the workspace area. Tip: Use different colors to make the best crayon shavings mix. In the next step after this one, I found that using fluorescent-colored crayons produced the best results. The colors were so bright and beautiful. If you never had a real use for fluorescent crayons (as the colors don’t show up so well on regular paper), save them instead for this project!

_B072122

Once you have just about covered the sheet of wax paper, replace the first sheet of wax paper over top to cover. Make sure that the top and bottom of the wax paper sandwich is covered with paper towel. This is crucial for this next step. CAUTION: Using an iron requires adult supervision. Make sure you do not use any hot appliances without proper protection (oven mitts, for instance!).

_B072128

Set the iron between the LOW and MEDIUM settings. Place the iron on top of the paper towel. Gradually push the iron across the paper towel in a zig-zagging motion. This will help to heat up the crayon wax to a liquid. While you push the iron across the sheet of paper, the crayon colors will converge and blend to create a wonderful stained glass look.

_B072134

When you have run the iron several times over the sheet of paper, remove the iron and have a look between the layers of wax paper to see how the crayon melt is forming. If it looks like it needs a little more work, fold the wax paper down and cover with the paper towel, then run over it with the iron.

_B072135

Place the stained glass design onto the crayon wax paper and adjust so that all the gaps are mostly covered by the color underneath. Use a black marker to trace around the outside edge of the stained glass design. This is a step that students will enjoy trying out for themselves as they can get to see how their finished art piece will look like.

_B072140

When you have finished tracing, cut out the crayon wax melt from the resulting outline. Hint: Make sure you keep track of what side of the stained glass design goes on top of the crayon wax melt. Use tape to secure the edges of the crayon wax melt and the stained glass design together.

_B072147

Flip the design over to make sure none of the wax paper shows outside of the edges. Trim any excess off with your scissors or reapply and tape the wax melt onto the stained glass design.

_B072148

Experiment with different colors and our other stained glass designs (the product numbers are available above in the materials list). The colors really are gorgeous! Hang the stained glass designs against a window to catch the light. When sunlight shines through the wax, the color will bounce off and reflect into the room. Enjoy the view. Talk to your students about the properties of light and color while creating the stained glass designs.

_B072156

If you have a large window in your classroom, make an entire theme of stained glass designs to hang up! The view looks great both inside and out!

Line-15

Thanks for stopping by! Give us your input or send us photos of your own projects to subscriber@roylco.ca. We’d love to hear from you!

Craft Spotlight: Masquerade Glasses

Feature-Image-masqueradeglassesBring out your inner drama buff! R52023 Masquerade Glasses are a great way to encourage students to express their performance skills while exploring decorative art techniques.There are several different types of Masquerade Glasses to choose from. For example, some of the glasses are well-rounded, others are cat-like frames, and yet other frames are shaped like stars, hearts or flowers.  You’ll notice the various types in our Art Camp photos. The Art Campers loved to try on the different styles first and see which ones suited them best.

IMG_2192Some of our Art Campers decided to start decorating right away with collage materials and other nifty craft bits we could find. It would be a good idea to encourage students to first color in their Masquerade Glasses before proceeding to decorate them.

IMG_2182

We used materials from the R75419 Sensory Collage Kit to provide our Art Campers with inspiration to decorate their dramatic glasses.

IMG_2185Some larger pieces helped to add color to the glasses! We attached all of the collage pieces onto the glasses with white glue.

R52023

You can color in the Masquerade Glasses with crayons, markers or paint. Cut out fun little shapes from construction paper or add on beautiful details with colorful pasta pieces or buttons.

To see more inspirational ideas, visit our PDF guide HERE!

Line-17

Thanks for stopping by! Give us some of your feedback on projects you’ve made. Send us photos and your thoughts to subscriber@roylco.ca! We’d love to hear from you!

Craft Spotlight: Color-In Chinese Lanterns

2014-02-10-FeatureImageWe combined two of our products into one project with the Chinese Lantern craft posted on Wednesday. Learn more about this colorful craft using our video and description below!

The Color-In Lanterns can be used with our rubbing plates to decorate the various pieces. Simply slide any of our available patterned rubbing plates underneath the lantern pieces. Rub the side of a crayon onto the top of the lantern piece and watch as the patterns pop through! Combining colors together is half the fun with this project. While rubbing the pattern onto the lantern pieces with one crayon color, switch into a different color to create new effects!

The interior lantern tube can be embellished with stickers or other rubbing plate designs.

Hang your students’ lanterns together on a length of string. Tie the string across a classroom wall.

To see some of these ideas in action, view the video below!

Line-17Thanks for stopping by! We’d love to hear your input or receive photos of your work! Drop us a line at subscriber@roylco.ca.

Valentine’s Day Pop Up Cards

2014-02-05-FeatureImageGive your Valentine’s Day wishes a personal touch with R22052 Double Color Card Sheets! We’ll show you how to make your card pop out in a meaningful way!

Age: 5+

Duration: 10-15 minutes

You’ll Need:

R22052 Double Color Card Sheets

• White paper 8.5 x 11″

• Staple

• Pencil

• Pencil Crayon

• Scissors

Line-14

2014-02-05-Step01Assemble all the materials you’ll need. Start choosing colors for the hands, flowers, flower stems and flower petal centers.

2014-02-05-Step02Trace the outline of your hand onto the matte side of a Double Color Card.

2014-02-05-Step03Now, cut it out!

2014-02-05-Step04Select the colors for the flower stems and leaves.

2014-02-05-Step05Cut out basic stem and leaf shapes. Make as many as you wish! There’s no need to make the leaves or stems perfect; as long as you can cut long thin, tapered rectangles, and elongated teardrop shapes, you’ll have what you need to decorate the Valentine’s flowers.

2014-02-05-Step07Next, choose your flower colors! Once you’ve made your decision, randomly cut up the Double Color Card sheets into big or small square sections.

2014-02-05-Step08

Give the random square sizes to students so they can make different sizes of flowers. Let them draw the petals of the flowers any way they like! Cut out the flowers once they are all drawn. I recommend making about 3-5 flowers per bouquet.

2014-02-05-Step09Find the spot between each flower petal. Cut a straight line into the flower, stopping about ½” to 1″ away from the center.

2014-02-05-Step10

These cuts will be important for making the flower “pop!” Fold the petals up from the center of the flower. Pull some petals in front of others to make the flower look a bit dimensional.

2014-02-05-Step11

Glue a small circle into the center of each flower.

2014-02-05-Step12Here are some other flower ideas! You can see how the flowers are all made into different sizes. I decided to make the petals on the yellow flower different from the rest. Your students can experiment in the same way. Use scrapbook scissors to make a variety of decorative fringes on the edges of the flower petals.

2014-02-05-Flower-Animation

Glue each flower to the top of each flower stem. About halfway down the stem, glue on the petals.

2014-02-05-Step13

Loosely bunch the flower stems together. Spread a few of the flowers apart while keeping their stems together to make the combination look like a real bouquet. Once you are satisfied with the position of the flowers, staple the centers together.

2014-02-05-Step14

Place the stems between the forefinger and thumb of your handprint cutout.

2014-02-05-Step15Next, carefully bend or curve the four upright fingers over the flower stems. Dab glue to the underside of the fingertips. Press the fingertips onto the flower stems.

2014-02-05-Step16

Spread a bit of glue onto your white paper card. Paste the hand cutout onto the card.

2014-02-05-Step17

Finally, write in your personal message to your special someone!

Line-14

If you made a related project, send photos of what you or your students made to subscriber@roylco.ca! We’d love to hear from you!

Craft Spotlight: Bouquet Paper

Feature-Image-bouquetpaperNo need to pick flowers! Make your own decorative bouquets with our realistic R24560 Bouquet Paper! The ingenious flower designs allow students to overlap the different flower images to make their own three-dimensional flowers!

IMG_00000396Sheets of Bouquet Paper line one of the art tables at our Summer Art Camp. Each of the flower images can be popped out from the backing and combined with other flower images. To see more information on our R24560 Bouquet Paper click the following link!

IMG_00000423

Simply overlap the flower designs. Each flower image is marked with a center hole to allow students to thread a pipe cleaner through and secure the flowers together. The pipe cleaner acts like the flower’s stem! Make sure the flowers all align at the center hole before you secure them with the pipe cleaner.

IMG_2353You can add leaves to the flowers as well. The hole for the pipe cleaner is located at the base of each leaf. Adjust the position of the leaves along the pipe cleaner ‘flower stem.’

IMG_00000432Each of the Bouquet Flower petals and leaves can be carefully folded along the center to add a realistic touch to your designs. Here, one of the Art Campers adjusts her flower bouquet!

IMG_2364The flowers were placed inside of clean and empty water bottles. The inside of the bottles were decorated with our 15203 Decorative Hues Paper located HERE. Students selected their favorite paper design, rolled it up into a tight tube and slipped it through the top of the bottle. Now it looks like a vase!

IMG_2369Perfect for adding a happy touch to your crafting table tops!

Line-11Thanks for stopping by! If you have used this craft in the past, send us photos of your work to subscriber@roylco.ca and we will feature them in an upcoming post!

Craft Spotlight: Animal Silhouettes

Feature-Image-AnimalSilhouettesMake your own garden safari with our Animal Silhouettes! Animal Silhouettes feature stylish animal designs, and special glossy and matte sides to allow students to experiment with their coloring using different materials. Check out more of our Art Camp photos below!

Students can learn how to draw various graphical patterns and designs on the intriguing black card and use multiple media such as gel pens, chalk, glitter glue, pastels and more!

View our pdf HERE for more ideas on Animal Silhouettes!

DSCF7201Each Animal Silhouette comes with a backing that you can pop off. Separate the interior shape from the outer shape.

DSCF7202Animal Silhouettes come in a range of designs–24 animals in a neat little pack! Choose between a monkey (pictured above), camel, kangaroo, lion, moose, penguin, horse, ostrich, bear, pig, alligator, hippo, rhinoceros, elephant, kudu, tiger, bull, wolf, snake, duck, rabbit, turtle, squirrel and hedgehog. With so many to choose from, your students will never get bored of their art work!

DSCF7206We set out pastels and chalk for the Art Campers to use. This young artist decided to experiment with different colors of chalk in vertical lines. She followed the vertical design of the kangaroo’s body to make her patterns.

IMG_2263Another camper decided to use the glitter glue in multiple colors. He mixed blue and green to color in the turtle’s shell and used red to define the turtle’s feet and tail. The random pattern of lines generated by the glitter glue helped to give the turtle an abstract, “drip-like” appearance.

IMG_2269Here’s a brief view of some of our art projects combined: The Floppy Foam Brushes were used to make the glitter hearts (stay tuned for an upcoming post on this project this Friday!), while our Animal Silhouettes were placed alongside in a sunny spot to dry.

IMG_2278Thanks for viewing our projects!

Line-21If you would like to share with us some of your project ideas, please email us at subscriber@roylco.ca! We’d love to feature your students’ projects in an upcoming post!

Snowflake Wax Resist Art

Roylco Snowflake Wax Resist Art

Feature-Image-rubplatesnowflakes
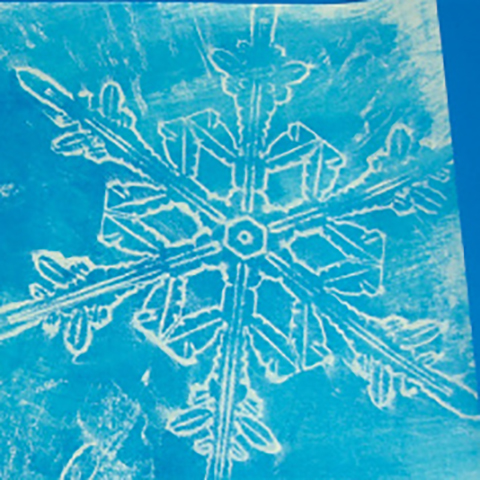
Learn the technique for making beautiful wax resist art–give your students something to work on as they return to their school routine after the holidays, and help them create an art piece that they can be proud of!

Age: 3+

Duration: 15 minutes

You’ll Need:

R58622 Super Snowflake Stencils

• Paper towel

• White crayon

• Blue watercolor paint

• White paper (8.5 x 11″)

• Paint tray

Line-20

We’ve done it! Days of experimentation, combining a multitude of products and materials, testing this paint versus that crayon…. and here we are! Use our Snowflake Rubbing Plates to make simple but beautiful wax resist art. Decorate your classroom during the winter months with your students’ projects!

2013-12-12-snowflakerubplates01The paint tray is essential for keeping work-spaces clean while spreading paint onto the paper.

2013-12-12-snowflakerubplates02Place one of the Snowflake Rubbing Plates underneath the white paper. Tip: Tape the edges of the Snowflake Rubbing Plate to the paint tray to keep it from moving about. This will be important for the next step.

2013-12-12-snowflakerubplates03Rub the white crayon across the surface of the paper. Make sure the rubbing plate stays in one spot while you rub the page with the crayon.2013-12-12-snowflakerubplates06

Tear one sheet of paper towel and fold it into a square. Dip a corner of the square into the blue watercolor paint. Next, dab the dipped corner onto the white crayon rubbing. Spread the paint outwards from the center. You will start to notice the crayon rubbing “pop” out from the paint color.

2013-12-12-snowflakerubplates08

Make additional crayon rubbings at various angles on the white paper. Use different Snowflake Rubbing Plates or vary the position of the snowflakes.

Line-20

Thanks for stopping by! If you liked this craft and would like to share your version with us, send us an email to subscriber@roylco.ca with photos! We’d love to hear from you!