Stained Glass Christmas Ornaments

Stained Glass Christmas Ornaments

31100 Stainglass Ornaments Collection

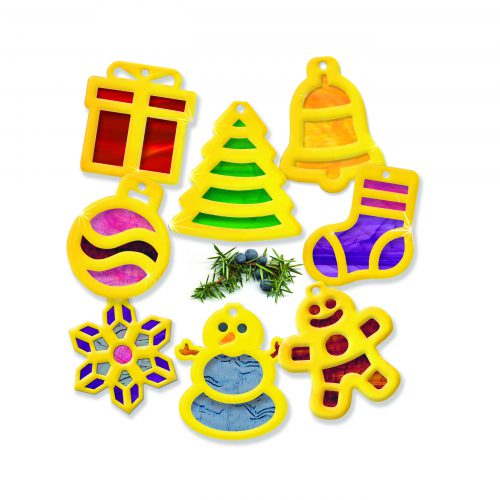
Need a fast and fabulous Christmas craft? These beautiful ornaments are the perfect project to spread holiday cheer!

Age: 4+

Duration: 10 minutes

Learning Outcomes: Explore the symbolism behind common Christmas emblems. Create beautiful take-home art that can be given as a gift. Exercise fine motor skills.

You’ll Need: 

Line-20

These ornaments are quick and simple to put together. Start by simply popping out the die-cut frames. Next, pop out the internal pieces, and set the frames aside.

Lay the internal pop-out on the stained glass paper and use a pencil to draw around the internal pop out. Make sure that you leave at least 1/4″ of space around the internal pop out so you have enough space to tape the stained glass paper into the frame. Cut out your stained glass pieces, and tape them to the inside (the white side) of the frames. Make sure to leave the small round hole at the top open!

Once your stained glass pieces are taped in place, fold the frame over and tape closed.

To finish off your stained glass ornament, cut a 6″ piece of yarn. Thread the yarn through the small round hole at the top of your ornament, and knot the loose ends into a circle. This will allow you to hang your ornament on your Christmas tree!

ornaments on tree.jpg

Have family members who don’t celebrate Christmas? Gift them the snowman or snowflake ornament and suggest they hang it in a window! Sunlight streams through the stained glass paper beautifully, and adds cheer to winter months.

ornaments on window.jpg

Line-21

Like us on FacebookShare this post with your friends, or Subscribe to this blog today to receive original craft project updates every week!

Sponge Paint Christmas Tree

Roylco Sponge Paint Christmas Tree

finished craft.jpg

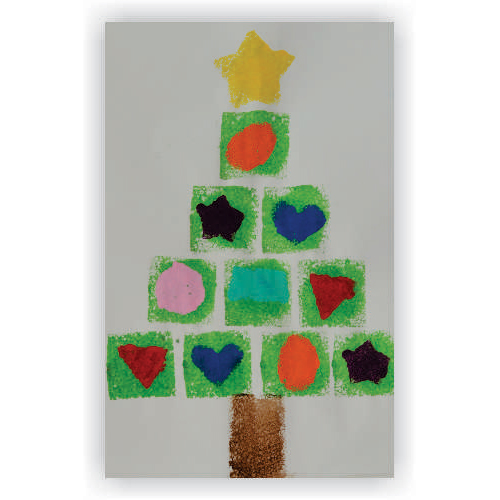
Integrate early geometry and holiday spirit with this adorable craft!

Sponge painting is a tactile and fun activity! By combining our R55009 Shape Sponges with tempera paint and some old-fashioned Christmas Spirit, we have come up with a great way to integrate early geometry and holiday art!

Age: 3+

Duration: 15-20 minutes (plus drying time)

Learning Outcomes:

You’ll Need:

Line-01

The sponges are cut from a thick blue sponge with bubbles in the material to add texture to your prints. Dip the sponge into a bowl of thick tempera paint or fingerpaint! Make sure you keep the sponge flat down against the paint so that it completely covers the bottom surface of the sponge. Bristol paper, poster board or fingerpaint paper are great mediums for stamping the various shapes as they will absorb the paint without warping too much. Encourage your students to stamp repeatedly on the same sheet of paper.

55009 Shape Sponges web.jpg

For this activity, make sure you take the time to talk about shapes with your students. Ask them to name each shape, and describe its attributes. For example, a square has four sides, one face and four angles, while a triangle only has three sides and three angles! We used the square and rectangle sponges to paint the tree itself, and then let the paint dry for a few minutes before adding the shape ornaments!

Let kids experiment with some of these ideas and their own creativity:

  • Squares work to make the shape of your tree, but what other shapes can you use? Try the circle, oval, or even the triangle sponge to craft the body of your tree
  • Add backgrounds to your picture! Make the tree a small part of a bigger mural by painting a scene on a large sheet of butcher paper. Make the activity a whole-class art project.
  • Add presents below the tree! Use sponges to stamp the images of presents underneath the tree, and consider gluing real yarn or narrow ribbon to the presents after the paint has dried.

Line-12

Like us on FacebookShare this post with your friends, or Subscribe to this blog today to receive original craft project updates every week!

Christmas Twist Stars

Feature-Image-CutFoldStarA whimsical star design hung in your classroom is sure to turn heads! Use our R15350 Cut & Fold Squares for brilliant color.

Age: 6+

Duration: 20-30 minutes

You’ll Need:

• R15350 Cut & Fold Squares

• Tape

• Scissors

• Hole punch

Line-07The great thing about this craft is that it looks complicated, but is actually super-easy to make! All you require is square-cut paper, a simple folding technique and a few snips with scissors. I’ll walk you through the process step-by-step, but I’ve also made a few detailed animations to help you through each step.

IMG_7854Choose your selection of colors. A rainbow-colored star will stand out just as nicely as a red and green arrangement!

StarFoldCutAnimationThe Christmas Star is divided into several parts. Each part can be made simply with one Cut & Fold Square and a few cuts with scissors. First fold your square into a triangle.

From the fold line, close to the edge of the triangle, cut 1 long line towards the point of the triangle. Do not cut all the way across the triangle, but stop about 1/2″ below the edge. Make another cut just beside the first. Stop the cut about 1/2″ below the first cut. Make a third cut beside the second cut. Stop the cut about 1/2″ below the second cut. Mirror the same cuts on the other side of the triangle.

StarFoldTapeAnimationUnfold the triangle back into a square. Turn the square so that it makes a diamond shape. You’ll notice that the cuts make little triangle strips on either side of the diamond shape. Start with the uncolored side facing up. Join the corners of the center together. Use tape to secure.

Next, flip the shape over and join the next two corners together with tape. Flip the shape over again to the uncolored side and join the next two corners. Continue flipping the shape over and joining the next set of corners until you get something like a spiral, which you can see in the last image in the animation.

StarFoldAttachAnimation

In order to make a Christmas Twist Star, you will need 6 of the colorful spirals. Alternate the colors of the spirals (such as red, green, red, green, etc) or make one of each color available in the Cut & Fold Squares pack.

To join the spirals, glue the sides together. You should have all 6 spirals glued side by side in a row. Wait for the glue to dry before bending the whole line of spirals into a circle. Glue the sides of the last two spirals together. The spirals will all angle out from the center to look like a large star!

IMG_7877Punch a hole through the top of one of the spiral points.

IMG_7880Tie a length of string from the hole to hang the star!

IMG_7876Line-07

Show us your beautiful Christmas Twist Stars! Send us photos of your students’ work to subscriber@roylco.ca. Wishing you a wonderful winter vacation!

Special Feature this week:

We’ll be updating every day of this week and next week with fantastic holiday crafts you can use in your classroom!

Please note:

LittleFingersBigArt won’t be posting anything between December 18th, 2013 and January 6th, 2014! Have a wonderful winter vacation!