Stained Glass Christmas Ornaments

Stained Glass Christmas Ornaments

31100 Stainglass Ornaments Collection

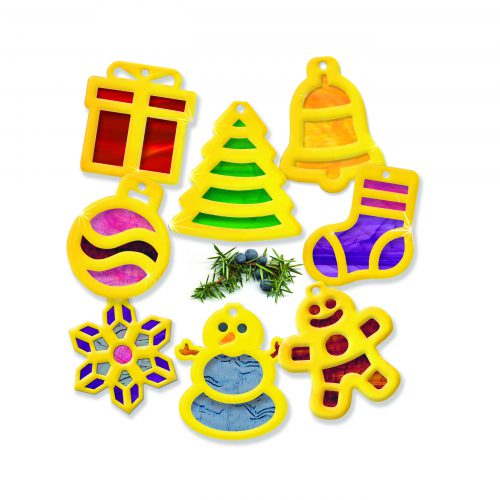
Need a fast and fabulous Christmas craft? These beautiful ornaments are the perfect project to spread holiday cheer!

Age: 4+

Duration: 10 minutes

Learning Outcomes: Explore the symbolism behind common Christmas emblems. Create beautiful take-home art that can be given as a gift. Exercise fine motor skills.

You’ll Need: 

Line-20

These ornaments are quick and simple to put together. Start by simply popping out the die-cut frames. Next, pop out the internal pieces, and set the frames aside.

Lay the internal pop-out on the stained glass paper and use a pencil to draw around the internal pop out. Make sure that you leave at least 1/4″ of space around the internal pop out so you have enough space to tape the stained glass paper into the frame. Cut out your stained glass pieces, and tape them to the inside (the white side) of the frames. Make sure to leave the small round hole at the top open!

Once your stained glass pieces are taped in place, fold the frame over and tape closed.

To finish off your stained glass ornament, cut a 6″ piece of yarn. Thread the yarn through the small round hole at the top of your ornament, and knot the loose ends into a circle. This will allow you to hang your ornament on your Christmas tree!

ornaments on tree.jpg

Have family members who don’t celebrate Christmas? Gift them the snowman or snowflake ornament and suggest they hang it in a window! Sunlight streams through the stained glass paper beautifully, and adds cheer to winter months.

ornaments on window.jpg

Line-21

Like us on FacebookShare this post with your friends, or Subscribe to this blog today to receive original craft project updates every week!

Sponge Paint Christmas Tree

Roylco Sponge Paint Christmas Tree

finished craft.jpg

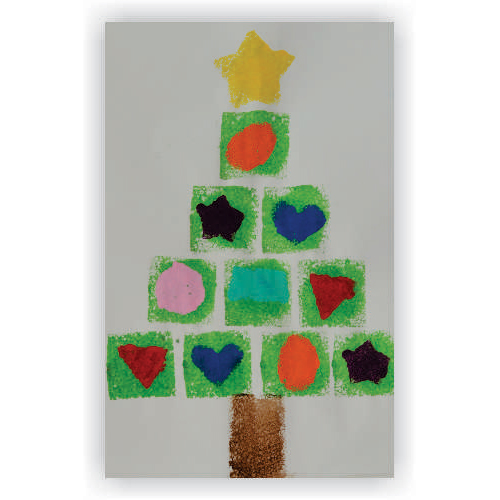
Integrate early geometry and holiday spirit with this adorable craft!

Sponge painting is a tactile and fun activity! By combining our R55009 Shape Sponges with tempera paint and some old-fashioned Christmas Spirit, we have come up with a great way to integrate early geometry and holiday art!

Age: 3+

Duration: 15-20 minutes (plus drying time)

Learning Outcomes:

You’ll Need:

Line-01

The sponges are cut from a thick blue sponge with bubbles in the material to add texture to your prints. Dip the sponge into a bowl of thick tempera paint or fingerpaint! Make sure you keep the sponge flat down against the paint so that it completely covers the bottom surface of the sponge. Bristol paper, poster board or fingerpaint paper are great mediums for stamping the various shapes as they will absorb the paint without warping too much. Encourage your students to stamp repeatedly on the same sheet of paper.

55009 Shape Sponges web.jpg

For this activity, make sure you take the time to talk about shapes with your students. Ask them to name each shape, and describe its attributes. For example, a square has four sides, one face and four angles, while a triangle only has three sides and three angles! We used the square and rectangle sponges to paint the tree itself, and then let the paint dry for a few minutes before adding the shape ornaments!

Let kids experiment with some of these ideas and their own creativity:

  • Squares work to make the shape of your tree, but what other shapes can you use? Try the circle, oval, or even the triangle sponge to craft the body of your tree
  • Add backgrounds to your picture! Make the tree a small part of a bigger mural by painting a scene on a large sheet of butcher paper. Make the activity a whole-class art project.
  • Add presents below the tree! Use sponges to stamp the images of presents underneath the tree, and consider gluing real yarn or narrow ribbon to the presents after the paint has dried.

Line-12

Like us on FacebookShare this post with your friends, or Subscribe to this blog today to receive original craft project updates every week!

Snowflake Wax Resist Art

Roylco Snowflake Wax Resist Art

Feature-Image-rubplatesnowflakes
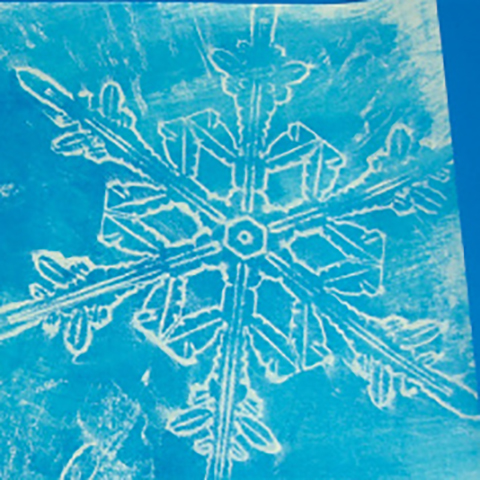
Learn the technique for making beautiful wax resist art–give your students something to work on as they return to their school routine after the holidays, and help them create an art piece that they can be proud of!

Age: 3+

Duration: 15 minutes

You’ll Need:

R58622 Super Snowflake Stencils

• Paper towel

• White crayon

• Blue watercolor paint

• White paper (8.5 x 11″)

• Paint tray

Line-20

We’ve done it! Days of experimentation, combining a multitude of products and materials, testing this paint versus that crayon…. and here we are! Use our Snowflake Rubbing Plates to make simple but beautiful wax resist art. Decorate your classroom during the winter months with your students’ projects!

2013-12-12-snowflakerubplates01The paint tray is essential for keeping work-spaces clean while spreading paint onto the paper.

2013-12-12-snowflakerubplates02Place one of the Snowflake Rubbing Plates underneath the white paper. Tip: Tape the edges of the Snowflake Rubbing Plate to the paint tray to keep it from moving about. This will be important for the next step.

2013-12-12-snowflakerubplates03Rub the white crayon across the surface of the paper. Make sure the rubbing plate stays in one spot while you rub the page with the crayon.2013-12-12-snowflakerubplates06

Tear one sheet of paper towel and fold it into a square. Dip a corner of the square into the blue watercolor paint. Next, dab the dipped corner onto the white crayon rubbing. Spread the paint outwards from the center. You will start to notice the crayon rubbing “pop” out from the paint color.

2013-12-12-snowflakerubplates08

Make additional crayon rubbings at various angles on the white paper. Use different Snowflake Rubbing Plates or vary the position of the snowflakes.

Line-20

Thanks for stopping by! If you liked this craft and would like to share your version with us, send us an email to subscriber@roylco.ca with photos! We’d love to hear from you!